Pages

Thursday, October 31, 2013

Mummies, Another Tiny World Teacup Pincushion and Frixion pen refills

Boo! It is Halloween today! If you are looking for a scary treat for kids pop on over to Pots and Pins for her "mummy dogs" recipe! I think veggie dogs would be a great meatless alternative!


Last night I finished another Tiny World Make-Do Pincushion. The basic pattern is available from Mimi Kirchner. Mimi is wonderfully inventive and she has all kinds of interesting delights for the eyes. I really like her tattooed men! They are a great way to use toile type prints! If you haven't visited her site I encourage you to do so! It will put a smile on your face. But I digress. My latest Tiny World Make-Do Pincushion is called Rosedawn Cottage. The teacup is from Johnson Bros. in England and the name of the line is Rosedawn!


This is the little cottage in the cup sitting on Hexagon and Blue Star.

Rosedawn Cottage

I like my trees with trunks!

Rosedawn Cottage Close-up

Do you use Frixion pens made by Pilot? I do and I really like them but what I don't like is throwing out the whole new pen when it runs out of ink. It is so wasteful because the clicker pen casing is perfectly good. The solution is to buy refills! I bought mine from Grand & Toy/Office Depot and they are fairly reasonably priced. A set of two pens will cost about $5.50 which works out to $2.75 each. The refills are $1.60 so that is much better!


Enough procrastinating. It is time to put the borders on Hexagon and Blue Star so until I post again, happy sewing!

Wednesday, October 30, 2013

Caught in the act...twice and progress on Hexagon and Blue Star quilt

So the rotten cat was caught in the act having a nap on Lazy Punk! We've had words and he is in his own bed.


I've never made him a quilt so maybe if he had his own he wouldn't be so interested in my quilts. I'll give it some thought. Maybe a quilt made of Puss in the Corner blocks!

Yesterday was a busy day so there was no sewing but I've had a productive morning (hence the lateness of this post) and I managed to get all of the rows of hexagons sewn together so Hexagon and Blue Star is close to being assembled. I've place the border fabrics next to the quilt top to get a feel for how it will look. I think I will be happy with this one!


I decided to take it out into the backyard to photograph and who did I catch in the act? The six young raccoons. As soon as they saw me it was time for the big skedaddle and up the wisteria they went. This little guy was having a difficult time getting his chubby little caboose off the ground and on the vine!


You can see the one kit at the bottom of the vine and another at the top. There were four others but they were already up the vine and on top of the arbor!


I looked to my right and there was mummsie rooting around looking for something delicious to snack on!


She could hear me but couldn't see me so I was able to get a few pictures. They are very cute, fluffy critter but they have sharp teeth so I kept my distance.


 I quickly tacked up Hexagon and Blue Star and took this picture to share with you.


The leaves are dropping like crazy but the Saskatoon bush is hanging on to the last few leaves. They are such a beautiful colour so I took a quick picture of them too!


All the while the young raccoons were on top of the arbor watching me so I took one more quick picture and decided to pack up my quilt and go in so that they could get on with their business.


So until I see you again, happy sewing!

Tuesday, October 29, 2013

When the mouse is away the cat will play (on the new quilt)!

Hi everyone - it's me Forest Gumby! Karen has gone out for the day so I've got the place to myself. She finally washed Lazy Punk and threw it in the dryer. It is so soft and cozy. She folded it up and put it on the back of a chair....my chair. With a little poking and prodding I was able to try it out! I wish we could keep it!


So where is Karen? She has gone to pick up her big Rowenta iron from the repair shop.


Earlier this month Karen told you that the trigger broke. She called and Rowenta agreed to fix it even though it was a few days beyond the warranty period. The man at the repair shop told her that there is a design flaw in the trigger. It has a little plastic pin that tends to break. Karen was worried that this would be an ongoing problem so she wrote to Rowenta and asked what they proposed to do if the trigger goes again. Rowenta's customer service wrote back that they stand behind their products and that they will repair it if the trigger breaks again. Karen was very happy about that!

Time for a snack and a cat nap....maybe on Lazy Punk! So until Karen blogs again, have yourself a lovely day!

Monday, October 28, 2013

More thread art

I am a huge fan of challenges because they force one to work with "challenging" fabrics. My Guild held a fabric challenge in 2009. The kit included three fat quarters from Northcott, a black ground with huge blue and mauve hydrangeas, a blue/mauve Stonehenge print and a black and white patchwork. The rules permitted the addition of six fabrics. The theme for the challenge was "Earth's Blessings" and were asked to provide the inspiration for our piece and an artist's statement.

On my own I would never have purchased any of these fabrics because I didn't like the prints and they weren't in my preferred colours. In addition I had difficulty with the them "blessings". All of this made for a true challenge. The piece I entered is titled "Renewal" and it measures 19" x 17".

Renewal, 2009   19" x 17"

My artist's statement read "Forest fires are destructive events that damage huge swaths of land but the genetic material that makes up our planet is indomitable and after a fire the forest immediately begins to renew itself. My piece "Renewal" depicts the event of a forest fire, the ensuing enrichment of the soil and the regrowth of plant life. As an atheist I had difficulty with the religious connotation of the theme "Earth's Blessings" and opted instead to interpret blessings to mean a fortunate state of affairs. In my opinion the Earth's ability to renew itself is indeed a fortunate state of affairs".

Each of the six fabrics I added were selected for a specific reason.

Swatches of six fabrics added to challenge fabrics

I started off with a large piece of slate coloured Northcott Stonehenge fabric as the base (the fabric on the left). I chopped up the hydrangeas and the blue/mauve Stonehenge challenge fabrics and layered them on my base. I also added bits of the black and white patchwork challenge fabric. They formed the sky. To this I added little patches of teal silk  (fourth from the left) and bits of two drapery sheers. One had a gold sheen to it (third from the left) and a second drapery sheer that had squares embroidered on it (second from the left).

Close-up of sky
 
The Northcott fabrics were cool colours and I needed warm colours for the fire. My last two additional fabrics were Elaine Quehl's hand-dyed fabrics, an orange/red/yellow cotton and a red/burgundy velveteen. They are the two swatches on the right in the picture of the swatches. I used them to make the fire. I added lots of red and orange threads, plus a little blue, to make the forest fire flames.


I used a long strip of the black and white patchwork challenge print across the centre of the quilt to separate the earth from the sky. I layered bits of this fabric with the drapery sheers to create the earth. The drapery sheer with the embroidered squares is terrific for filing in with different threads to create depth.
 
 
For a little interest I quilted a fossil fish in the earth!


From the hydrangea fabric I cut out the green leaves and placed them so that they appeared to be growing from the earth. I fussy cut some of the black and white patchwork fabrics and used them as flowers in the new growth.


I used my Sakura pens to shade different parts of the piece including the flower below. I started out with a piece of the black and white patchwork. I layered a piece of drapery sheer over it and quilted. Once the quilting was completed I shaded the flower with a Sakura Pigma pen to give it the rosy colour.


 Notice the quilted roots in the enriched soil.
 

I didn't like the challenge fabrics and wanted to change or disguise them as much as possible. I accomplished this with non-traditional fabrics, lots of different threads and Sakura Pigma pens. While it is not my favourite quilt, I learned a great deal about machine quilting, experimenting with threads adding non-traditional fabrics to good effect.

Until I post again, happy experimenting!

Sunday, October 27, 2013

Fun with thread and scraps

When I was a beginner machine quilter I was very nervous. A quilt is a big project to tackle when you have little or no skills, aren't familiar with how your machine sounds and feels when doing free motion and you don't know what kinds of effects you will get with different threads. And sorting out tension is just one more issue to contend with! Creating a small piece of thread art is a great way to overcome these obstacles. I guarantee that they will help you get comfortable with your machine!

About five years ago the members of my Guild were asked to make small pieces of quilt art that could fit in a shadow box. The plan was to auction these pieces and the funds would go to charity. The shadow boxes were from IKEA and they measured 10" square. Once could make a piece that was that size and it would fill the frame. However there is also a matt in the shadow box and the opening measured 5" square so that was a second option. Time was getting short and I hadn't made anything. I decided I would try doing a little piece of thread art that would fit inside the matt. I was nervous and hadn't much in the way of free motion quilting so my first stitches were a little uneven and the circles looked like deflating balloons! They looked very much like the white stitches in the picture below.


I gained a little confidence and turned the deflating balloons into leaves and flowers. Still not beautiful but they were very small so the imperfections were of no great concern. You can see some of the vines and flowers winding across the top of the picture shown below. I then tried little vines with offshoots and circles at the ends of the offshoots. You can see some of them on the right side.


A square spiral filled a large open space and the offshoots with circles made it even more interesting. I tried any kind of thread I could get my hands on....quilting cotton, variegated polyester, metallic, silk and invisible threads.


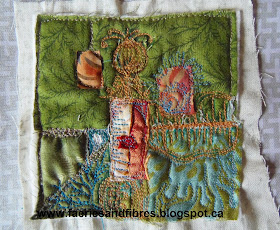
So what does the finished piece look like? It measures roughly 6" square. Here it is!


Here is another example of my experimentation with threads and scraps.


When framed these little pieces look complex. People look at them and are amazed at the detail! And all the time I was playing around trying to get comfortable with threads, tension, shapes, moving my fabric and getting to know the sound and feel of my machine when free motion quilting.

If you are wondering how I made these pieces it is really quite simple. I cut a piece of scrap batting. If you want to give it a go just know that in all likelihood you will have to trim down the finished piece so start with a piece of batting that is a little larger. I place the batting on top of a piece of backing fabric that is slightly larger that the backing. Finally I layering scraps of fabric on the batting until I am happy with the arrangement. There are two options available at this point: use a little glue to tack the scraps in place OR lay a piece of fine tulle netting over the entire surface. When I use tulle I like to pin the outside edge with straight pins until everything is stabilized. Here are three examples of pieces in progress.


I start off by quilting over the raw edges of the pieces of fabric and then just start filling in the spaces. When there are no more spaces, I'm done! This pieces measures 3" and it has lots of areas left where I can have fun experiment with threads!


When I sit down to quilt I like to warm up on these little thread art pieces. I've used all sorts of fabrics including drapery sheers, silks, cottons and polyester lining. If I use tulle I've even tossed leftover thread down before the tulle goes over the piece. Creates a very interesting effect!

So if you are nervous about getting started machine quilting why not give little thread art pieces a try. There's no right or wrong way to do it and you can experiment in all sorts of ways with all sorts of materials. If the piece doesn't work out, no great loss. But if it does turn out, put it in a frame and give it a wacky name like "Amoeba Quiche" and amaze everyone with your talent and originality!

Until I post again, happy thread painting!

Saturday, October 26, 2013

Festival purchases and Hexagon and Blue Star quilt

Yesterday I went to the Creativ Festival with The Girl. There were hundreds of booths selling all sorts of interesting things. This year there were many vendors with wool and since The Girl is a knitter she was in heaven! She is partial to yarn made with alpaca and so bought herself some skeins in rich colours. She also bought a little box of mini skeins of variegated wool which is used to make honeycombs. They are stuffed with a little fibrefill and then stitched together to make "The Beekeepers Quilt"!


These colours of these little mini skeins are delicious.


I was almost tempted to buy some yarn for myself but I resisted the urge. Instead I bought myself six fat quarters from Log Cabin Yardage. I think all of these fabrics have possibilities!

 
I also visited a rug hooking booth where I was able to purchase some fat quarters of wool in drab earthy colours. Won't these be great for the ground of my tiny world pincushions?


The third purchase was six fat quarters for Mom. These fabrics are from South Africa and they are printed from old copper plates. Historically the fabric was heavily starch to protect it during shipping. The manufacturer continues this tradition so that they fabrics are stiff as a board. A gentle wash removes all of the starch leaving a soft quality cotton. I think these fabrics will be great for her African themed quilts!


Today I'll start sewing the Hexagon and Blue Star blocks into rows. Time permitting I'll work on stitching the rows together. I think this quilt will come together nicely and quickly. It is a miserable, rainy day today so this cheery quilt is the perfect project!


I want to thank Kath of Railway Cottage for providing me with a link to another really lovely blog. If it is rainy and dreary where you are and you need some pretty pictures to brighten your day and inspire click your way over to Super-Goof. Don't let the name fool you - it is a very nice blog and I guarantee that you will be charmed and delighted with what you see! Ingrid has a wonderful colour sense and she had given me loads of ideas for new quilts!

Until I post again, keep dry and happy sewing!

Friday, October 25, 2013

A busy day quilting, cutting, sewing and pressing

It was a busy day and I got lots done. I've quilted my Mom's African themed quilt. Now it goes back to her for binding with a facing and embellishing with beads. There's lots of movement in this one. I left some of the spaces in the sky unquilted to create some depth. This is also the case with the huts and the trees. They are all very dimensional!


I'll be sure to take pictures of her quilt when it is completed.

I've been working on the Hexagon and Blue Star quilt blocks. The pattern is in the book Feathering the Next. It is loaded with wonderful pictures of luscious quilts but the patterns are short on instructions. For me this isn't a problem but for an inexperienced quilter it could present a challenge so if you are considering purchasing this book and you are a beginner you may need some assistance from a more experiences sewer. That isn't to say that the pattern is complicated but simply that the instructions are very brief. For example I like patterns that provide pressing instructions but there are none in this book.

I've been sewing and pressing the blocks and they are almost all done. Here are a couple of pictures of some of the blocks up on the wall.


This design is a great way to showcase large prints and busy patterns. I am very happy with how it is looking!


I am pressing the seam allowances open so that they will be less bulky. A triangle is sewn to the upper left of a hexagon and the lower right. You can see a pink hexagon at the bottom of the picture and it has the blue triangles attached. The hexagon is now a large diamond and these large diamonds will be sewn into rows. It is all straight line sewing with no set in seams!

I wanted to stitch some blocks together to make sure that everything will come together nicely once all of the diamonds are made, pressed and lightly starched. I selected two hexagons with the triangles attached and seam allowances pressed open. The little dog ears were not trimmed because they will be important landmarks when I sew the blocks together.


I placed the blocks with their right sides together. In this picture you can see the dog ears.


I lined up the dog ears and pinned through the seam allowance just below the dog ears and then I place a pin on either side of the seam.


I stitched the blocks together and then pressed the seam allowances open. This is how the blocks look from the wrong side.


And here they are from the right side. Using the dog ears as land marks, lining them up and pinning well resulted in a perfect intersection!


To prove it is perfect here is a close-up! As an added bonus there isn't any bulk at that intersection which means the quilting will be MUCH easier when I get to it!
 

Tomorrow is another busy day so I don't know how much sewing I'll get done but I'm having great fun with the Hexagon and Blue Star quilt so I'll be itching to get at it again!

Until I post again, happy sewing!