Pages

Thursday, November 28, 2013

Show and Tell and Oak Leaves and Plumes in Love Entwined

Quilting Gallery's Show and Tell theme this week is stars. If you've never submitted a quilt I encourage you to do so. You will find the instructions on how to do it here. Now tell me who doesn't have a star quilt? I have oodles of them so the question was which one should I submit? I decided on A Pound of Stars!

A Pound of Stars

It was made very early in my quilting life. I was living in a small town with no access to fabric shops. I bought a pound of scraps by mail order from the US. I combined them with cotton sheeting to make this quilt. The quilt was English paper pieced because it was the only way I could figure out how to cut and piece this quilt!


Work continues on Love Entwined! I've completed one of the oak leaf and plume arrangements and the second one is getting there!


I think the little orange circles inside the oak leaves are the perfect touch and now they don't look so naked. I might just make more orange circles and save them because I'm sure I'll find other spots where I can use them to embellish the quilt!


It's a short post today. Until I post again, happy sewing!

Wednesday, November 27, 2013

And the winner is.......

It snowed last night - how pretty!
 
First off a big thank you to Michele at Quilting Gallery for organizing the Giving Thanks Blog Hop Party with Give-Aways. It was great fun discovering new blogs! There's always something fun and interesting happening at Quilting Gallery including the weekly Show and Tell. This week's theme is star quilts. I'm sure you have a star quilt so why not enter it? It is a great way to show off your lovely work, discover new blogs and meeting new people! And you could win prizes too! Tomorrow I'll tell you what quilt I'm showing this weekend!

Another big thank you goes to Mimi Kirchner. Mimi very generously donated one of her Tiny World Make-Do Pincushion patterns for my give-away. This is a terrific pattern, well written and well illustrated. You will be surprised how easy it is to make a Tiny World Make-Do Pincushion. But I warn you, they are addictive and I'll bet you won't be able to make just one!

Finally thank everyone who visited my blog and left a comment on the November 23rd post. Everyone with an email address was entered my give-away for the. Those who  follow me by Bloglovin received an additional entry. Your kind comments are very much appreciated! And now the moment you've been waiting for! The winner of the pattern is Allierae! Allie wrote "So adorable - I love those little pincushions". She is going to have so much fun with this pattern.


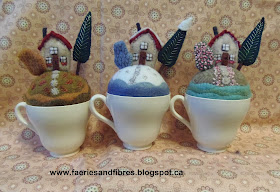
Here is my latest Tiny World Make-Do Pincushion creation. Although it is winter outside, it is Spring inside. This is the third in my series of the Four Seasons. Each season is set it a little white Wedgewood teacup!


I used variegated pink thread for the cherry blossoms and the little flowers bordering the path.


So now I've completed Autumn, Winter and Spring. All that's left is summer and it is already underway.


Until I post again, happy sewing!

Tuesday, November 26, 2013

Last day to enter, oodles of tiny circles and Stars in the Loft

Today is the last day to enter the draw for a copy of Mimi Kirchner's Tiny World Make-Do Pincushion. It is a great pattern and I've been having loads of fun making pincushions like this one! To enter go here and just leave a comment! For an extra chance to win follow me on Bloglovin!


So here is where I'm at with Love Entwined. The plumes are almost all stitched down.


I spent a couple of hours cutting and making oodles of tiny circles....48 of them!


They will be appliquéd to the red plumes. Here you can see the circles positioned on the plumes. I'm thinking the gold looks a little drab and lacking.


How about if I put another little circle in the centre of each gold oak leaf? I think that looks a little better but what do you think?


Once that is done I've got sixteen fussy little hearts to stitch down. I'm considering back basting appliqué rather than freezer paper or needle turn.

Finally Hancock's of Paducah is having a show and tell where you can vote for your favourite quilt. I've entered Stars in the Loft. If you would like to vote for it or just see all of the lovely quilts go here.  You don't need a Facebook account to see the quilts or to vote. To view the quilts click on the "Vote" button. There are quilts with hundreds of votes and mine is nowhere near that number and that's okay. I just wanted to find a way to share my quilt with more people.


If you would like to read a bit more about the story of Stars in the Loft you can read it herehere and here! It took me years to find out who made the quilt. In fact the quilt had been finished for many years before I found the original. I also found other versions of the quilt!


That's it for today. It is time to sew down some little circles I think! Until I post again, happy sewing!

Monday, November 25, 2013

Get to know your patchwork foot

Flora and Fauna, Parts of the Garden close-up

I recently took a workshop and mentioned to my neighbour a precise way of starting/stopping 1/4" from the edge without marking the patch. I was surprised to find out that many weren't aware of what their 1/4" patchwork foot could do for them! I wrote about this before but thought that this would be a good time to repeat what I figured out about my foot.

This is the 1/4" patchwork foot off my Janome. If you look closely you will see some little markers along the edge. Believe it or not these markings serve a purpose!


This shot is taken from the above the foot and I've place three pins so you can see the markers more clearly.


The blue pin indicates where the sewing machine needle will pierce the fabric. The needle will be 1/4" away from the right edge of the fabric.  If you want to start sewing 1/4" in from the top edge of your fabric, line up the marker at the white pin with the top edge of the patch and your needle will pierce the fabric 1/4" in from the top. If you want to stop 1/4" before the bottom edge of your fabric, when the marker at the orange pin is lined up with the bottom edge of the fabric your needle will be 1/4" in from the edge!  I think you'll agree that these are very helpful little features!

Work continues on my Love Entwined quilt albeit slowly! I'm now on to Part 3. I've stitched down the gold oak leaves (well that's what they look like to me). Between the oak leaves are "plumes" with six tiny circles appliquéd on each. I had thought I would use a taupe fabric but decided it was too drab so I've decided to go with red. I think this is a better option. I'll stitch them down and then I'll have to make and appliqué 48 little orange circles. You can see two of the orange circles on the bottom right plume. They are rough cut just to give me an idea as to how the orange would look and I am happy with it!


Well that's it for today. It is too cold to go outside to take pictures so I'll leave you with a picture of some mushrooms from my quilt Flora and Fauna, Parts of the Garden!


Until I blog again, how about we warm up with a hot pot of mushroom and onion soup and a crust of bread. Then we can settle down and sew to our heart's content! Bliss!

Sunday, November 24, 2013

Winter has arrived, tip for working with your ironing board and a trip down memory lane

Winter has arrived, inside and outside! Yesterday we had snow and it stayed on the ground!  The poor little sparrows look cold...and hungry! I interrupted breakfast. The moment my back was turned they were back in the feeder chowing down!


And inside it's winter too! I finished the second season in my series of Tiny World Make-Do Pincushions. The pincushions are based on Mimi Kirchner's pattern. I have a draw running until end of day November 26 so if you would like a chance to win a pdf copy of the pattern just go here and leave a comment! For an extra chance follow me on Bloglovin!

I'm making each pincushion identical - same house, same tree and same bush so you can see the changes in the seasons! The pincushions sit in four tiny white Wedgewood cups that I found at the thrift shop. And here is Winter!


I have some tiny antique clear beads that have a little sparkle but they are at Mom's place. If I remember to bring them home I just might add some beads to the ground to make the snow sparkle.


Two seasons down and two to go. Hurry up Spring!

 
Today I plan on working on the appliqué pieces for my Love Entwined quilt. I like to have my ironing surface at a right angle to my work table so that the work area is an L shape with the ironing surface to my right. Did you know that you don't have to raise your ironing board to waist height? You can raise it so that it can be used sitting down. Unfortunately my sewing room is very small and I don't have the space for a full size ironing board beside my work table. But I do have space for an old child's ironing board.


I found this little gem, complete with a wooden iron, at a garage sale a few years back. I think I paid $5 . It is the perfect size for my work room and the work surface is large enough for working on small pieces. I use a travel iron or my little Clover iron. Here it is sitting on Love Entwined.


One of the things I would like to do when I have a few moments is set up a page for a Cast of Characters to showcase my dolls! Here you see a few of them reading a Beatrix Potter story.


If you are new to my blog you may have missed my three part story about Zebra Girls and the rotten cat from two doors down, Teetoo. It is a real cliff hanger! If you are interested you can read Part 1 here, Part 2 here and the Grand Finale here! The story was a little add on to the topic of the day so if you are just interested in the story scroll down each post! Hope the story puts a smile on your face!

Until I post again, keep warm and keep sewing and don't forget to enter my draw for the Mimi Kirchner pattern!

Saturday, November 23, 2013

A new tiny world teacup pincushion and a New Tutorial: Hop to it!

I recently purchased four tiny Wedgewood cups at the local thrift shop and I though they would be perfect for more tiny world make-do pincushions. But what comes in fours? The seasons of course!


Here is the first season, Autumn!


I embroidered leaves on the ground with some lovely variegated floss.


The other three seasons are in the works. If you would like to win a free copy of the Mimi Kirchner Make-Do Tiny World Pincushion pattern so you can make your own scroll down to the bottom of this post to find out how to enter.

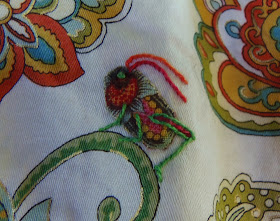
It is nice to hide surprises in quilts. My Mom will hide a coin in the quilt sandwich (the year on the coin is the year the quilt was made). I like hiding things like initials or grasshoppers! They are a little surprise for the recipient of the quilt. And my favourite surprise is a grasshopper like this little fellow or a cricket!
 

I made quilts for two children and told them I hid a grasshopper in each quilt. They had loads of fun searching for their grasshoppers! Do you remember my Lazy Girl quilt top? I thought it would benefit from a hidden grasshopper so today I'll demonstrate how I make them!


I love this fabric because it is loaded with all sorts of interesting flowers and leaves that can easily be converted into "bugs" - a veritable metamorphosis!


I cut out the portion of the fabric I want to use for he body making sure to leave a seam allowance of roughly 1/8" all around.


I pin the body where it will be stitched being sure the tip the back end down a little. I often for a colour that is similar to the grasshopper so it is camouflaged!


I needle-turn appliqué the body in place. I'll use two strands of two colours of floss to embroider the legs and antennae. I like red and green but you can use whatever colours tickle your fancy!


First step is to use two strands of red floss to stitch a line for the thigh.


Next I use two strands of green floss to stitch all around the red line to make a nice chubby thigh!

For the last part of the hind leg I stitch the shin and a little foot pointing backwards. I weave my floss through the stitches on the wrong side and bring my needle up through the fabric just a little ahead of the thigh.


I stitch the next little leg and then weave my floss through the stitches on the wrong side and bring my needle up near the front where I will stitch the third and final leg.

 
Once the leg is stitched I weave my floss through the stitches on the wrong side and bring my needle up through the head just below the edge.
 

I stitch the antenna and then weave my floss through the stitches on the wrong side and bring my needle up just a little in front of the first antenna right at the edge of the applique.
 
 I stitch the last antenna and I am done!
 
 
You can always use your Sakura Pigma pens to add details such as an eye or shading or you could add a little bead for an eye!
 
Here are some examples of the grasshoppers that I've added to quilts and other projects.
 
There was a little knick in the backing fabric of my quilt Centre Ice so I covered it up with a grasshopper. So little hidden appliqués can be used to cover mistakes! Read about how my Mom used killer bees to camouflage some problems.
 
 
This one was hidden in Orange Crush. If you visit my Patterns by Karen H tab you will find a free pattern for this quilt.
 
 
This critter is hiding in a tote bag. I used variegated thread for the antennae!
 
 
 This one is hiding in my Lazy Punk quilt.
 
 
And one last grasshopper with and inchworm and a bee and from my quilt Flora and Fauna, Parts of the Garden. Want to make a bee? Read all about it here!
 
 
And now here's the info about my give-away! You could win a Tiny World Make-Do Pincushion pattern from Mimi Kirchner. Mimi posted pictures of her newest teacup pincushions on her blog. To enter the draw for the pattern go my November 21 post and leave a comment!  I will reply to each comment so if you don't hear back from me it is likely because you are a no reply/anonymous blogger so you'll need to provide an email address in your comment in a format such as name(at)emailhost(dot)com. The winner will be announced on November 27th!
 
For now I want to get back to my Love Entwined quilt so until I post again, happy sewing!


Thursday, November 21, 2013

It's give-away time and a new tiny world make-do pincushion

Close-up of mushrooms and grasshopper in Flora and Fauna, Parts of the Garden

It is day one of Quilting Gallery's Blog Hop Party With Give-Aways and I am a participating blogger. This means I have a lovely give-away that you could win (more about it in a little bit). If you got to my blog via Quilting Gallery you already know about this event. If you are here because you follow my blog just click on the Blog Hop Party With Give-Aways button on the right side bar and you will be taken to a list of all participating blogs (the list will be up in the late afternoon on November 21). Every participating blog will have its own a give-away. What fun and it is a great opportunity to discover new blogs and maybe win a prize!

My blog is less than a year old and I hope you have enjoyed what I've done so far. Have you had a chance to read my booklets on English paper piecing? If not check them out under the tab English Paper Piecing and Hexagon Fun. They are free and loaded with helpful tips! You can learn how to make lovely blocks like this!

Stars in the Loft close-up

Make a few more and you could have a quilt like my Stars in the Loft! I've entered in in Hancock's of Paducah's Quilt Contest. You can see all of the gorgeous entries here and vote for your favourites!

Stars in the Loft

I hope you'll take a tour of my Gallery where you'll find pictures of some of the quilts I've completed.
Stars in the Loft centre medallion

Learn how to make little bees to embellish your quilts! There's a honey of a demo under Tutorials and Tips. During the Blog Hop Party week I'll be showing you how to make a grasshopper!


I also have a Tiny World Pincushion Gallery. The basic pattern was designed by Mimi Kirchner. Her instructions are clear and very well illustrated. Once you learn the basics you can let your imagination run wild. I've made so many tiny worlds and there are more in the works. Here is a picture of my most recent creation. I found a lovely little milk glass bowl in the local thrift shop.


And here's a close-up. These little gems aren't just pretty little tchotchkes....they are working pincushions!

Mimi is wonderfully creative. She has a blog and an Etsy shop where you an buy her whimsical creations and her patterns. Check out her muscle men on her blog - they are guaranteed to put a smile on your face!

Now for the give-away! Mimi has donated a Tiny World Make-Do Pincushion Pattern for my give-away. The pattern is a pdf format and it will be emailed by Mimi to the lucky winner. To enter the give-away just leave a comment below. No-reply/anonymous blogger comments won't be entered in the draw unless a email address is provided in the comment. For an extra chance to win follow me on Bloglovin (if you are already a follower with an email address you are already entered). The winner will be announced in my November 27 blog post. Good luck!

NOTE: Those of you who are Google+ users appear to be showing up as "no-reply" so I have no way to contact you if you win the draw so please make sure your email address is included in the comment!  Thanks!

I've got lots to share with you over the next several days so I hope you'll drop by for a visit and see what's new! Until I post again, happy sewing!