Pages

Monday, December 30, 2013

My 2014 QAL Quilt has a name


Bonjour! My 2014 Quilt Along quilt has a name and it is (INSERT DRUM ROLL PLEASE!!!).............

Soupçon

Soupçon is a French word that means "a little bit" and it is the perfect name because my quilt has just a little bit of many of the things I love to do! If there's a technique that you've never tried I hope you'll consider giving it a go. And if what I've done isn't to your liking by all means do your own thing! I'll launch the first installment of Soupçon on January 3rd so mark your calendars! Subsequent installments will be released every two weeks! I'm going to keep the final quilt a secret that will slowly be revealed with each pattern installment!

Kathysnest32 asked what size of hexagons will be used. I try to reply be email to every comment but when the comment comes from a no-reply blogger I can't send an email. So in answer to Kathysnest32's question the hexagons that will be used are 1" but you don't need to go out and buy them! If you check under my tab English Paper Piecing &Hexagon Fun you will find hexagon templates in three sizes. Just print off one sheet of 1" hexagons but don't cut them out just yet! And if they don't print of at exactly 1" on your printer it won't be a problem! There will also be an opportunity to use 1/2" hexagons in a later installment of the pattern but they will be optional and I will provide you with some simple but effective alternatives! What will they be? You'll just have to wait to find out!

Over the past few weeks I've been teasing you with what I’m doing and if it was confusing that’s because I've made two Soupçon quilts! The first is a scrappy version made with robin’s egg blues, rusts and browns. The second is a simplified version made entirely with shades of red such as rose, brick, fire engine, orange-red and lipstick red! You can make your Soupçon quilt entirely scrappy or you can work with a specific colour scheme. Alternatively you might want to go with pastels or batiks or 1930's prints or homespuns. You don’t have to decide right away; you can make your colour decisions as each installment is released. Whatever you do have fun! I'll be setting up a FLICKR group so you can post photos of your progress. I'll provide the link once I launch the first installment of Soupçon.

I was very pleased to find out that my hardcover needle books were mentioned on a DMC blog! I was very flattered to say the least! Much of the credit goes do The Studiolo which is where I found the free pattern for the needle book. The embellishment with variegated DMC floss and felt was my addition! 


I'm going to take a couple of days off (at least that's my plan) so I would like to take this opportunity to say thank you to all you lovely people who have taken the time to read my blog and comment! I've had a blast sharing with you what I do and how I do it. I've enjoyed our email exchanges and appreciate the friendships that have developed over the past nine months! My head is filled with lots of ideas for 2014 and I can't wait to get started! One thing that is for sure......there will be hexagons!


I wish you and yours a very Happy New Year and until I post again....happy sewing!

Karen H

Sunday, December 29, 2013

Tutorial: Paperless English Paper Piecing

Paperless English paper piecing? What the heck is that? Well grab a cuppa, settle back and I'll tell you all about it!

Yesterday I was playing around in my sewing room doing nothing in particular. I decided to fussy cut some shapes for English paper piecing. My plan was to create a motif that would be appliquéd to a background. To start I created a window template in a modified hexagon shape. I wrote about the modified hexagon on December 11, 2013. This template represents the finished size of the shape.


I sorted through some fabric and decided that this one had lots of curly queues which are a great option for fussy cutting and I wanted to do something red so this fabric ticked all boxes! 


I placed the window template on my fabric and moved it around until I liked what I saw.  I made some registration marks on the window template to identify landmarks in the print so that I would be able to line the template up on my fabric for the next motif. I decided to use my Frixion pen to trace inside the window template but you could use whatever fabric safe non permanent marker you choose.


I then moved my window template to the next motif, lined up the registration marks with the landmarks on the fabric and traced inside the window motif. I repeated this until I had  traced six modified hexagons. I was careful to make sure there was enough fabric between each motif for the seam allowances.

Next I cut out the motifs with scissors adding at least a 1/4" seam allowance all around. It didn't have to be precise. You can see the line I drew and the seam allowances. I clipped the point at the bottom of the shape so that it was blunt.

To baste the modified hexagons I started by folding down the tip at the point and I gave it a good finger press. I pinch it nice and firm so that there is a good crease.

HELPFUL TIP: When you finger press give a good pinch. Release and move your fingers over a little and pinch again. Do not slide your fingers because this can distort the fabric along the bias edges.


I didn't use an iron because it would make my pen marks disappear. In addition if I had used an iron it would make a hard crease and there would have been no wiggle room when it came time to stitch the patches together (I love having a little wiggle room).

I next folded over the right side on the line and gave it a good finger press.


The left side is then folder over on the line and again it gets a good finger press.


I start basting from the right hand side just down from the point. I take my needle down through the fabric and bring it up through the folds at the point. I find that if I do it this way the thread on the back keeps the fold nice and flat.


I baste the left side that was finger pressed but stop short of the next side which I will fold and finger press. I baste that side again stopping short of the next corner so I can fold it on the line and finger press.


I continue in this manner folding and basting, until the entire piece is basted.


I repeated these steps with the five remaining modified hexagons. Once they were basted I tried out two arrangements before stitching. I like this modified hexagon (technically I suppose it is a pentagon since it has only five sides).  This is the first arrangement. I like the open centre so that the background fabric shows through. I could always appliqué or embroider a little detail there to add some zip!

Arranged with the points facing out

This is the second arrangement.

Arranged with the points facing in

I liked the first arrangement best and so I stitched it together in the normal English paper piecing method. Now it is time for a press with a hot dry iron and voila! A paperless English paper pieced hexagon ready to be appliquéd to a background fabric!


Here is another one made using the same method, paperless English paper piecing!


This nice thing about this method is that there is no paper to remove so it can appliquéd to a background as is and once it is stitched down all that needs to be done is to remove the basting stitches!

Was that fun, fast and easy or what? Until I post again, happy paperless English paper piecing!

Karen H

p.s.  If you are a hexagon lover be sure to check out Angie's Hexie Friday Link-up party for more inspiration!

Saturday, December 28, 2013

Improv quilting


The sun is shining, yesterday's snow on the trees is melting and the ice on the trees looks like flowers made of diamonds! But today it has warmed up and the ice is disappearing.

Yesterday my Mom watched her first ever Craftsy class, Improvisational Piecing, Modern Design with instructor Jacquie Gering. I had already watched the class and I enjoyed it so much that I asked for Jacquie's book for Christmas.


I've been itching to read the book but when the power went out last week all of the Christmas gifts were left behind. I finally got the book and had a quick look. So many exciting ideas and techniques. I really like learning new techniques that I can add to my skills set!

I have done a couple of improvisational, art quilts. My very first was Darlington in 2012. I made it in a workshop with Pat Pauley. I really should take a picture of the finished quilt. It was finished with a facing (first time I tried it) and I really liked the look. The workshop was very "free wheeling" in the design phase but the pattern drafting and construction was much more structured. Those Home Ec lessons came in handy. Darlington is a nuclear power plant and was reminded of it while making the quilt.

Darlington, 2012

I then discovered Rayna Gillman and Jean Wells. Their methods are definitely more improvisational and after reading books by both I dipped my toes in the improv quilting pool! This piece is called Jack and I made it to pay homage to Canadian artist Jack Bush.
Jack, 2012

The third piece is large and was definitely more challenging. I called it Green Beans Several Ways. All of the little green strips reminded me of green beans; they can be prepared in so many delicious ways! I really enjoyed making this one but it was more challenging figuring out how to assemble all of the little bits together.

Green Beans Several Ways, 2012

The construction of these quilts was certainly a great deal of fun but I think what I enjoyed most is the quilting. It is very loose and organic. Lines don't have to be perfect or straight. In fact I think that the waviness of the lines really adds depth and character to Jack.

I enjoy these tiny bits of improve piecing but I want bigger blocks so I can make a functional quilt and play around with some more organic quilting and that's where Jacquie Gering's class and book comes in. So my goal for 2014 is to try to make a more structured improv quilts with loose, organic quilting!

How about you? Do you have any quilting plans or goals? I hope one of them is to join in on my 2014 Quilt Along (QAL). I am hoping to set up a Flickr group (I think I've got it figured out) so that you can post pictures of your progress should you chose to join in on the fun! This is the fabric that was the jumping off point for my QAL quilt. If you are going to work along take a look through your stash for some large prints that you be your jumping off point!


I've also signed up for a Grow Your Blog hop on January 25, 2014 and I plan to have a give away. What will it be? You'll just have to mark the date on your calendar to find out what it is and enter to win!

Time to get back to the QAL pattern so until I post again, happy sewing!

Thursday, December 26, 2013

Ain't we got snow!


And ice (plenty of it) and still no electricity! Cold temperatures continue and everything is still covered in ice. Added to it is a fresh dumping of fluffy snow. As the temperature goes up a little the snow will get heavy and I'm sure more trees will come down so that could mean the power outage will continue!


I've been busy working on my 2014 Quilt Along. What could this  be? I do love hexagons so you know the project will include some hexagon ideas! They are 1/2" hexagons and although they are small they are easy to manage and the sew up quickly! I've had to use my seam ripper that my brother made for me for Christmas. You can also see one of the hardcover needle books I made. I have been putting it to good use! I made it from a free pattern from The Studiolo! I plan to make some more because they are fast, fun and oh so pretty!


It isn't just me working on hexagons during the power outage. Mom has been making a pile of her own! You can see her seam ripper is closed up - guess she is not as mistake prone as me! She doesn't know what she will do with all of these hexagons but it doesn't matter! It's nice to have busy hands and eventually she will have an idea and the hexagons will be ready to be used!


Another short post but with any luck the power will be back on soon and my sewing life will get back to normal. The sky just turned a bright blue so hopefully better days are on their way.


Until I post again, happy sewing!

Wednesday, December 25, 2013

Merry Crimbo, Happy Holidays and another sneak peak!

Papier mache Santas that I made almost 20 years ago

Happy holidays everyone! Life here is still not back to normal after the ice storm on Saturday night. My Mom is staying with us until her electricity is back on. We are having fun sewing, chatting and eating but I know she would rather be in her own home. Fingers crossed the power is back on by the weekend!

Today we had a lovely Christmas surprise. Mom and I were each given a seam ripper for Christmas. My brother made them for us!


You hold the gold tube at the end and pull. Out comes the seam ripper and you just slip the tube into the wooden handle.


He turned these on his lathe and used different burls. Look at the beautiful figuring and colouration on Mom's! The burl used for mine is very fine grain so it didn't photograph well but it is gorgeous and I love it!


Such a lovely, thoughtful gift that will be put to good use but hopefully not too much use. I mean after all, who wants to do a lot of reverse sewing? I would rather get it right the first time! I told my brother he should make seam rippers to sell; I'm sure that quilters would love them. I will cherish mine for sure!

Speaking of reverse sewing, I am working on my quilt along (QAL) quilt and pattern and have decided to do a little reverse sewing. Darn! At least I have the perfect new tool for that! The reverse sewing is just to make at adjustment to the size of a border so it isn't a catastrophe. Here is another of the fabrics I am using! It is great for fussy cutting. All I ever had was a fat quarter and I use it judiciously....sure wish I had more of it!


So this is what I've done with the fabric but it might be a little "dull"!


How about this? Any better? Maybe! Guess you'll just have to wait and see which version I go with and what I'm going to do with it!


Yesterday afternoon the sky was blue and the ice on the poor, beat-up willow looked like tinsel!


Today it is grey and big, fat fluffy flakes are falling. We have snow for Christmas! Now all we need is some electricity!

May all your days (and especially today) be merry and bright. Until I post again, happy sewing!

Monday, December 23, 2013

Sorry for the silence!

We've had a terrible ice storm and there were 250,000 homes without electricity. Our home was one of them. We had a very chilly couple of days but the power is on but there are still almost 200,000 without and my Mom is one of them. The authorities are saying it may be another couple of days before power is restored.

There was lots of damage to the trees. One month ago I took this picture of a willow tree that I look at from my kitchen window.


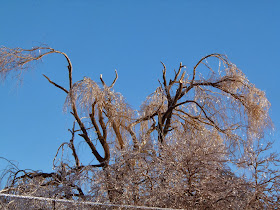
This is what it looked like this morning. In the lower left corner the birch tree is missing. Many in the neighbourhood are bent over but not broken so perhaps when the ice melts it will straighten up if it isn't broken.


Willows suffer terribly in this kind of storm. Look at the icicles on this redwood!


The icicles formed on the wisteria vine but the weight of the ice on the juniper made it bend so that the icicles on the wisteria appear to be growing sideways!


Here you can see the ice on the mugo pine needles


and the mountain ash berries!


All of this has meant no sewing or blogging for me! Hopefully things will improve in the next few days so that I can resume work on my projects.

If I'm not able to post before December 25th I wish you and yours all the best of the season. And as always, happy sewing!

Friday, December 20, 2013

Holiday treats for your sewing friends

I had lunch with some lovely quilting friends this week and look at what I got! These are lovely little Christmas ornaments that are perfect for a quilter! I've already got them hanging in my sewing room.


Red and green was a very common colour combination in antique quilts so these little gems are perfect for display all year long.


They come from a lovely little florist shop in Toronto, Canada. The name is Sweetpea's and she has all sorts of lovely little treats and gift items including Grinch Christmas trees. I didn't have my camera with me so I could take a picture but they are gorgeous little table centre pieces!

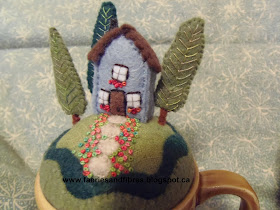
While I've been busy working on my 2014 QAL I also managed to finish two more Tiny World Make-Do Pincushions. The e-pattern comes from Mimi Kirchner.  If you need to make a last minute gift for a sewing friend these would be perfect. You'll have the pattern in your inbox in a matter of minutes and then the fun will begin!


Here I go again extolling the virtues of variegated floss....I only used two colours for this pincushion. I used a variegated green for the French knots in the garden path and a rosey pink/tangerine for the French knots in the path and the window boxes!

And lastly here are a few little crazy hearts that I made for the Christmas tree several years ago! They would make great small pincushions!


This hearts measure roughly 3" by 3".


 I cut a piece of scrap fabric that was roughly 4" square. I traced this pattern on the fabric and then foundation pieced in the order indicated. The next step was to embellish with embroidery stitches. The beading was NOT done at this point.


I then placed the right side of a 4" square of fabric that would be the back of the heart against the right side of the pieced heart. I machine stitched on the outside line of the heart leaving an opening for turning. I trimmed the excess fabric, clipped where necessary and turned the heart right side out. The heart was stuffed with fiberfill and the little opening was hand stitched closed. The final step was to bead the heart, make a tassel and voila....you're done!


Hope you enjoyed this little holiday treats! Until I post again, happy sewing!