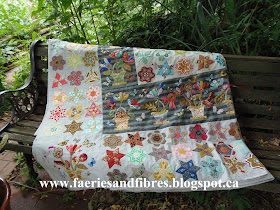
I've been working on my quilt "81" and now have the quilt top together. It is big! It measures 85" x 90". I had thought that once I got the pieces stitched together that I would be done but I've since decided to add one more border. The hexagons and stars in the outside border are just a little too close to the edge and I am concerned that this will make the quilting difficult. An extra border will take care of that problem.
The border in the original quilt is made up of appliqued diamonds and so it is back to
making more diamonds!
I'll cut out papers and fabric and baste them. Then I'll give them a good press with a little starch before removing the basting threads and papers. I'll use Roxanne Glue Baste-It to glue the diamonds to the border strips which will be made off the quilt. When the applique work is completed the borders will be stitched to the quilt.
All this got me thinking about my method for basting diamonds. I've seen them basted so that there are little "wings" sticking out at the two points and I tired that method in the past but I found the piecing was a little difficult. I baste mine so that there are no "wings" and I so I thought that today I would share with you how I do it! In the picture below my method is the diamond on the left. With my method appliqueing the diamonds to the border will be much easier because there are no "wings" to tuck in.
I start out as usual by cutting papers and fabric. The first step is to tack the paper to the fabric with a little fabric safe glue.
I place my thumb at the tip of the point of the diamond.
I fold down the top of the fabric right at the point of the diamond. I just hold it in place but if you prefer you can place a little dab of fabric glue on the paper to hold the fabric securely. If you decide to use glue do both points at this time to save time and use very little glue. You only want it to hold for the moment!
Fold the right side of the fabric over the paper and hold it at the tip. If it is more comfortable for you to fold the left side first that will work just as well.
Fold the other side of the fabric over the paper to make a nice sharp diamond tip and pinch the folds with your fingers. I bring my basting thread up from the right side of the fabric just below the edge of the fabric that was folded over and then I go down through the folds near the point. This will tack down the folds.
I bring my thread up on the side at about the mid point.
I fold over the fabric and take my needle down through the fold.
I bring my thread up on at the mid point of the side heading towards the second point.
Again I fold over the tip of the fabric as in the first step.
I fold the right side of the fabric over and hold it at the tip.
Fold the left side over and bring the needle down through the folds near the tip.
Continue stitching the remaining two sides as described in the previous steps, coming up at the mid point of the side and going down through the folds.
The basted diamond on the wrong side. I do not knot off my thread; instead I just take a few more smaller stitches and the thread will stay put!
The basted diamond from the right side.
And that's how I do it! You may prefer the other method which is a little less fiddly at the points but I find my finished product looks a little neater with my method and more importantly the diamonds stitch together much better.
Until I post again, happy sewing!


yes that's how I do mine too. I was glad you showed that old quilt which inspired you. I am coming round more and more to the idea of trying appliqué.
ReplyDeleteYour lazy girl quilt is lovely. What a fine job you did of piecing it, I think you were right with the tweaks you did.
If you can EPP then you can applique easily. The stitches are not as small as the EPP. Just try it!
DeleteThanks for the tute very clear
ReplyDeleteOmg, you've done it again, lol, this is going to help me so much. I hated those darn dog ears! Thanks Karen!!! ❤️
ReplyDeleteYour quilt is---------I can't think of any adjective, to fill in! I think I will go with breath taking!
ReplyDeleteThank you for sharing.
Froma
Thank you so much. I always struggle with the pointy bits and this way will be a big help. x
ReplyDeleteWhat a nice and clear tutorial! I do mine exactly this way.
ReplyDeleteA great 'how to' tute, thanks Karen : )
ReplyDeleteThat quilt is incredibly beautiful!
Thank goodness for this tutorial! I thought I was going to have to deal with those little wingies forever! You rock!
ReplyDeleteThank you! I've been doing something like this, and it's my guilty little secret. But I just can't deal with all those little ears hanging out.
ReplyDelete