Personally I like to leave the papers in as long as possible because they keep the quilt stable and fraying is minimized. However I reach a point where the piece starts getting heavy and difficult to manage so that's when I start removing them. I only remove a paper if it is completed surrounded by other hexagons. In the hexagon below it would be safe to remove the paper from the blue hexagon in the center hexagon and the six brown hexagons that surround it. I would leave the rest in place. HELPFUL TIP: The seam allowances on your hexagons will have nice crisp folds from the handling and sewing however I like to give the piece a press with a hot dry iron before I remove the papers. I find it just ensures that everything is flat and smooth!
This is particularly important when you use my foundation pieced English paper piecing (EPP) technique.
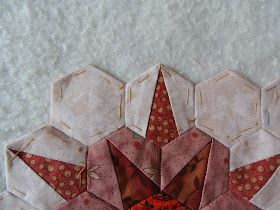
In the picture below you can see that the outside hexagons still have the basting thread and paper in place but the papers have been removed from the hexagons inside that edge.
This is the piece from the wrong side. When you foundation piece the hexagon it is important to shorten the stitch length because it will make removing the paper much easier. Once the basting thread is removed I lift the seam allowance and start removing the hexagon papers. I do this gently so as not to injure the seams.
You will recall that I use a little dab of glue to stick my paper to the first piece of fabric for foundation piecing. Sometimes it happens that I use too much glue and a bit of paper gets left behind on the fabric. In the following picture a little bit of paper is stuck to the fabric.
I let it sit for five to ten seconds and then scrape off the paper and glue with the tip of a pin or with my fingernail.
You are left with a nice clean hexagon!
If you have questions or comments I would love to hear from you!
Until I post again, happy sewing!
Karen H


Thanks for this tutorial. I'm piecing together my Martha Washington's Flower Garden blocks but leaving the papers in as long as I can. I was wondering how I'd get those papers out ... Thanks for the tips!
ReplyDeleteOh don't tell me about another hexagon project because I will want to make that too and there just aren't enough hours in the day for all of my projects!
Deletethanks I have this bookmarked with the other one. do you have a close up on how you sew the hexies together? thanks Barbara
ReplyDeleteHi Kathy - I do have close-up pictures but will have to look for the date so I can send you the link. I'll shoot a video now that I know how to do it and I'll publish it in the next couple of days!
ReplyDeleteSo brave to show the backs of your hexis....LOL!!! I too press mine before removing the paper and it makes such a difference!!
ReplyDeleteThanks karen for these new tips ! But Is it really important to stick the paper?
ReplyDeleteWow I feel Ooooold! Mothers secret weapon, I remember that! Unfortunately for me ;)
ReplyDeleteEvery single time I got out of the car mum or my nan would attack my face!
Thanks for bringing back great memories lol.
Your Heart Hexy is gorgeous xox