Showing posts with label Craftsy. Show all posts

Wednesday, February 3, 2016

Introducing Easier Than Pie & Beyond PLUS a giveaway!

I am so excited to introduce you to my five  Easier Than Pie & Beyond booklets each of which includes seven designs for English paper piecing. I developed my methods that combine English paper piecing, foundation piecing and made fabric in the late 1990s and have used them to make quilts that look complex but in fact are very easy to make! The rosettes can be combined in a variety of ways to create truly beautiful and unique quilts. If you can sew a simple whip stitch or a ladder stitch you can make these fabulous designs quickly and easily! I've assembled some of my designs into five booklets each of which includes 7 designs! The booklets are available in my Craftsy Store.


You may have noticed that I've used the same fabric for the centre hexagon in each rosette. I did that because I wanted to ensure that the blocks had a cohesive look and feel. The rosettes were made from all my leftover scraps and I didn't give much thought to how these rosettes would look when they were put together to make a quilt top but I knew that if I repeated the fabric in the middle of each rosette that they would look like they belonged together. I will share what I did with all these rosettes and how I did it in the days to come.

And now for the giveaway! Five lucky winners will each receive a pdf  copy of the Easier Than Pie & Beyond booklet of their choice! To enter simply leave a comment telling me which booklet(s) you would chose! That's it! It order to win I need to be able to contact you so if you are a no-reply blogger your name won't go in the draw. You'll know you are a no reply blogger because you will not receive an email from me confirming that you have been entered in the draw. To get around this leave a comment and send me a private email with your address (be sure to include your blogger name so I know who you are) and I’ll enter you in the draw. That way your personal information is kept private but you’ll still have a chance to win! The deadline to enter is Sunday, February 7 at 09:00 EST (9:00 a.m EST). Good luck and I hope you've enjoyed seeing my designs! If you just can't wait and want your own copies of the the patterns now they are available now in my Craftsty Store.
*** NOTE: THE GIVEAWAY HAS NOW ENDED. THE WINNERS
WERE ANNOUNCDED IN THIS POST ***

Karen H

Thursday, September 3, 2015

Growing the diamonds and Africa

Another round of hexagons has been added to the large diamonds that will flank the centre medallion of my hexagon quilt The Meadery. This time it was a round of creamy coloured dotted fabric.I think the next round will be a blue-grey to reflect the sea (an important part of Cornish life) and also the stone used to make Men-An-Tol.


I would normally have filled in the centre of the diamond but I've been unsure about what I wanted to put in the middle until now. You will recall the medallion I am using for the middle. I really liked the print but it just wasn't working with the honeycomb. The colour was wrong and there was just too much of the same thing so I remove the middle and replaced it with a piece of fabric with a bee skep.


I thought the middle of the medallion would work perfectly in the large diamond and as I've said many times before, if you repeat a fabric in the quilt it will give it a more cohesive look and feel.

I got a sheet of my hexagons and cut out the middle diamond shape. I put it on the medallion  fabric making sure that it was smooth and flat. I traced inside the diamond.

I cut out the shape leaving a generous seam allowance all the way around.


I line up the centre of the large diamond on the lines and applique it to the piece of fabric. This is the same method I used for my Brinton Hall blocks. Once the applique is done I can trim the excess fabric. I find that it is easier to do this reverse applique if there is extra fabric.

I've been helping my Mom put together her latest quilt. There will be pictures soon. This quilt has 17 appliqued blocks which she designed. She has a love for African themed quilts, children and grandmothers, all of which are reflected in this quilt. Today I thought I would share pictures of three of the blocks. The first is my Mom and her friend Quinnie when they were little girls living on homesteads.


The second is a grandmother and her grandchild. I really like how she fussy cut the fabric to make the chair.


The third is a little boy trying to feed an elephant. I'm not sure that would ever happen but it sure is a cute block!


I've been busy making a pattern for my Value Proposition quilt. Included are new simplified instructions for constructing and attaching the middle path. The pattern will really be almost a book because it will cover everything from fabric selection to basting, and sewing. When it is finished I'll put it up on Craftsy. The free patterns will still be available on my blog but for anyone who wants them all in one place they can purchase the pattern!

If you need a morning/afternoon/evening smile check out Selvage Blog's post about sewing machine thingys! It is sure to make you smile!

That's it for today. I've got more sewing to do so until I post again, happy sewing!
Karen H

Sunday, October 6, 2013

Rainy days, another tiny world and quilting the setting triangles

It is a dull rainy day - my favourite kind for quilting! The iridescent glass in the stained glass in the window glows on days like this. It looks like oil on water.


My Guild has a retreat planned for later this month and I was asked to make a tiny world make-do pincushion as a door prize. I finally got it finished last night. I love this little mug and house. Heck, I love each one I make! This is an old Japan mug that I found at the local thrift shop.


I used variegated floss for the pink posies along the path. They are little French knots. The path was made with a small strip of olive stretch velour and I used a variegated brown rayon thread to stitch over it and hold it in place. The green for the lawn was another find at Fabricland. It is a lightweight wool and acrylic blend that is the perfect grass colour and at $3/metre the price was right!


I hope that the person who wins this pincushion likes it as much as I do. If not I would be happy to welcome it back into my tiny world!

I've outlined all of the Lazy Punk appliqués so I will leave the blocks for the time being and move on to the setting triangles. That means it is decision time! How shall I quilt them? I would like something a little more modern because it is what the recipients of this quilt will like.

I took the Angela Walters Craftsy class Dot-to-Dot quilting. While I have a couple of books on the topic I do like to see "live" demonstrations of how it is done. Simply put rather than marking lines on your quilt top you mark dots and they are your targets, your start and stop points. They are what you aim for when quilting. For smaller spaces the dot system is fine but for larger spaces I think I will be more comfortable drawing my long lines. But who knows, with practice I will likely reach the point where all I'll need is dots but I'm not there yet!


I use my walking foot to stitch the straight lines. They aren't perfect but then who or what is (certainly not me)? I place my hands on either side of the area to be quilted and make sure that the quilt is smooth and flat. I relax, breathe and start stitching on the line. When I approach the  point where my hands can no long hold the fabric flat and smooth I stop making sure that the needle is in the down position. I do not move my hands until the machine has come to a complete stop and I remove my foot from the gas pedal. I reposition my hands once again making sure that the fabric is smooth and flat. I apply pressure to the fabric to make sure that it is held firmly in position so that when I start sewing it will not jump. I relax, breathe and apply even pressure to the gas pedal and start moving the fabric stitching on the blue line. Once all of the straight lines were stitched I filled in the spaces with no marking required.


And here is a close-up of the quilting. As I say, not perfect but I'm okay with it! And I guarantee you this: the last setting triangle I quilt will be much better than this one - that's what happens with practice!


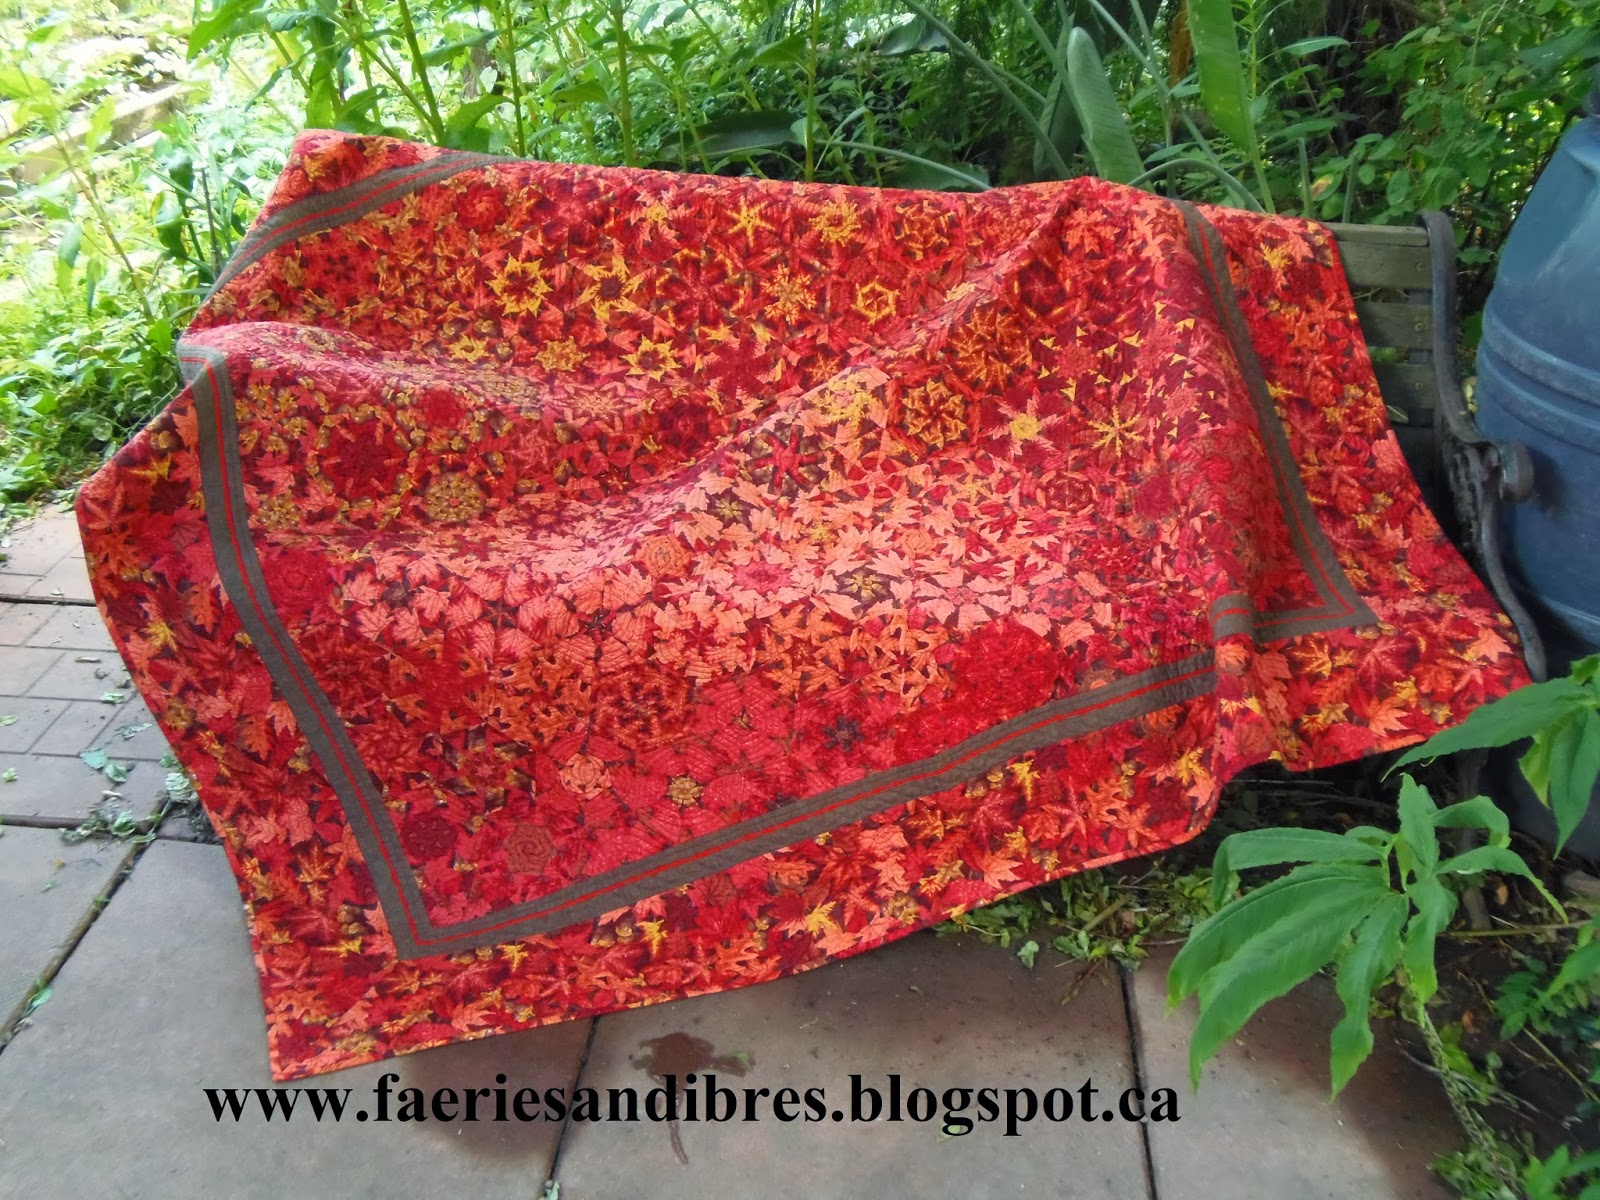
Yesterday Kath asked about the fabric I used to make Red Maple. Aside from the brown and red inner border the quilt was made with one fabric. It is in the outside border and then the blocks were constructed with the One Block Wonder method from the same fabric.


This is the fabric.

And this is the entire quilt.
 
Craftsy has launched its first ever blogger award. You can read about it here.  There are lots of different categories so be sure to nominate your favourite blogs!
 
Time to get back to Lazy Punk (or maybe a cuppa first) so until I post again, happy sewing! 

Saturday, September 7, 2013

Craftsy customer service, my field trip, show and tell and the tote bag

I've taken several Craftsy online workshops and have been really pleased with them (I usually wait until they are on sale and they do go on sale quite regularly). I recently purchased the Angela Walters Dot-to-Dot class. As always it was a good workshop but it was shorter than others I've taken and it could have used more content. Afterwards I read the student reviews and their opinions were very similar to mine. This morning I received an email from Craftsy saying that  they realized this course's content is "a bit less in-depth than (their) other quilting classes" so they invited me to take another workshop for free! I love it when a company listens to its customers and takes immediate action to address concerns. Way to go Craftsy - I am a very happy customer and look forward to taking more workshops in the future and to recommend the workshops to fellow quilters!

My field trip yesterday was fun. We went to Log Cabin Yardage. Nicole had previously only sold her fabrics online and at quilt shows but has recently opened a store front operation.

 
It is truly a fabric store...she sells only quilting fabric (no notions or patterns) and I kind of liked that! Her prices are excellent and she has a wonderful selection of modern fabrics.  She still sells her fabrics online and at quilt shows. Just look at this lovely assortment of fabrics that I'm adding to my stash!


And then there was this toile that I couldn't resist!


Take an up close look at the images! I love them! Wouldn't they be great fussy cut and surrounded by hexagons?


We need a better word than stash. Stash sounds like a small pile whereas my collection is more like a mountain. How about moustash - I've got a moustash of fabric but I could always use a little more fabric! How big is your moustash?

Hope you've had a chance to take a look at the Show and Tell quilts at Quilting Gallery! Take a look at "Some Folks Resting" by NinaMe of the Russian Federation. It is VERY interesting! The quilt I entered is called "A Challenging Year". Here are a few close-ups of the details.

The cherry tree in winter

The cherry tree in spring
 
The cherry tree in summer - yummo!

The cherry tree in autumn
 
And now it is time for me to get back to work on the tote bag for my swap partner.  I've appliqued some butterflies and need to add a grasshopper.
 
The side pockets with butterflies
 
Side panel with two butterflies

Side panel with one butterfly - grasshopper will go where the pin is placed
 
The front and side panel
 
Tomorrow I hope to show you some pictures of Mom's latest African themed quilts with the embellishments. Until I post again, happy sewing!

Friday, July 12, 2013

More Cherry Blossom Quilt decisions - I'm in the final stretch!

The quilting of Cherry Blossom continues and I'm in the final stretch. The blocks made up of five nine patches are all quilted now.

Nine patch block made of nine patches


I quilted plumes of feathers and I wanted each block to have plumes that radiated from the centre. I knew what I wanted an marked the spine of the feather as a curly queue on each of the blocks mane up of nine patches. I've drawn up a diagram of the quilting plan. Some of the curly queues started an the bottom edge of the block in the centre and some started in the corner of a block.


So the next step is to quilt the blocks made of one red nine patch block surrounded by half square triangles.

Nine patch block made of red nine patch surrounded by half square triangles

I decided to stitch in the ditch around the half square triangles and then stipple the area between the triangles and the outer edge of the block. I use my free motion foot for stitch in the ditch and stippling. As I was stippling I noticed that when my shoulders lifted there was tension and that tension translated into a lack of control which resulted in curves that are not as smooth. So if you feel your shoulders lifting, drop them and relax or look for a place to stop with the needle down and take a quick break. And if you haven't tried stitch in the ditch with your free motion foot I encourage you give it a go. Personally I get better results with that foot than with a walking foot. And here .


I haven't decided how I will quilt the white border around the nine patch or the nine patch itself but it will come to me!

I purchased Cindy Needham's Craftsy class Design It, Quilt It: Free-Form Techniques and one of the things she recommends is stitch in the ditch in every seam or as Cindy likes to say "every stinkin`seam"! This is boring and time consuming but it does produce great results and the quilting is much more enjoyable. I tried this technique out on half of my blocks; I stitched in the ditch in every seam, even the little nine patch seams and I used Superior Monopoly on top and Superior's The Bottom Line on The Bottom. Both are light weight threads which means I was able to backtrack on seams I had sewn in order to get to the next seam and there is no thread build-up. I have to say that it was much easier to quilt the nine patch blocks made of nine patches if they were entirely stitched in the ditch. A lesson previously learned now relearned! If you are looking to improve on your machine quilting I highly recommend Cindy's class. You can watch it as often as you want and you can replay sections as often as you want. Craftsy classes go on sale fairly regularly so keep your eyes open!

Hopefully Cherry Blossom will be finished in the next two to three days and then I'll work on the pattern for those who are interested. It has been a fun and easy quilt to make. It looks complicated but in fact it was very easy to make. I am so happy with the quilt and I'll have a few tips for you to help you make your own version! Tip number one is don't go buy any fabric - work with what you have and when you run out, add another fabric. I ran out of my white on white print so I added the off-white with black dots and it added some dimension and depth to the quilt! For those of you who have just started reading my blog here is a picture of Cherry Blossom unquilted.


Phew - lots of words! How about some garden pictures instead?

Yellow loosestrife close-up

Yellow loosestrife
 
Gooseneck loosestrife (should bloom soon)
 
Angel trumpets (they are huge and they are fragrant at night)

Bee at the balsam
 And finally, a fly! Now I know I've shown you plenty of bugs recently and that's because there are plenty of them and they are an important part of the garden since the pollinate the plants and they are hors d'oeuvres for other critters. I am showing you this picture of a fly because I think the colours are spectacular and that they would make a beautiful quilt. Look at the soft greens, emerald, golds, turquoise and rust. Fabulous! Inspiration is everywhere if you just look!


Until I post again, happy sewing!