Showing posts with label Gardens of a King. Show all posts

Sunday, November 8, 2015

Once again I ask you "What was she thinking?"

So it appears that there was interest in my quilt making journey and how I got to where I am today.  I am not in the least embarrassed to show you my older quilts. I'm proud of the fact that I was fearless and solved problems on my own. I made quilts that had I know how difficult they were, I would not have even attempted to make them! But ignorance is bliss and when faced with a problem I just used the skills and knowledge I had to figure out a solution. Actually sometimes I forgot to use that knowledge as is the case with today's quilt!

For me English paper piecing (EPP) was (and still is) the go to technique for creating complex designs without the need for precision cutting of fabric or marking of sewing lines on the patches. It is how I made the Wagon Wheels quilt I showed you the other day, I'm working away on requilting it and am enjoying the hand work. Polyester batting needles so nicely!


I also use this technique to make my Pound of Stars quilt.


More recently I used it to make Gardens of a King quilt top which is a pattern I tested for Missie of Traditional Primitives. You see, English paper piecing is not just for hexagons!


Honestly, if you want to do precision piecing of virtually any block, English paper piecing is the way to go. The quilt I am going to show you today was made around the same time as Pound of Stars and Wagon Wheels. What makes this one different is that it involved much more complex curved piecing and what I learned in making it was "use what you know". In this case I didn't use what I knew. I was accustomed to sewing clothes and I new about clipping curves (like when you are setting in the sleeves on a shirt) but it never occurred to me to clip the curves when I made this quilt. What quilt pattern is it? Well it was the pickle dish pattern and here is my version of the pattern.

Cranberry Glass Pickle Dish by Karen H

It isn't a large quilt but it has been used extensively over the years and it shows absolutely no signs of wear. For the most part it was stitched with the cheapest polyester thread I could find and I think that the two beige fabrics used where the rings connect might be polycotton! Here you can see both the polyester stitching and the beige fabrics.


One of the things I ask myself is what was I thinking when I used black - it was a nightmare to hand quilt on black. Because I didn't clip ANY of the curves  there were areas that just would not lay flat. So what did I do? Quilt the heck out of them of course! I wasn't entirely successful (actually I wasn't successful at all) but nonetheless I forged ahead and in the end the quilt did what it was supposed to do and that was get used! The second red triangle in from the right on the top curve is a leftover from the red border sashing in my Wagon Wheels quilt. The second red triangle in from the left on the top curve is a piece of the fabric I used on the backing of this quilt. I remember where and when I bought it. It was an older cotton fabric and only 36" wide. It was 100% cotton and I bought it because it was inexpensive!


I still hadn't figured out how to bind a quilt so I just trimmed the backing and batting (polyester of course) down and then turned under the edge of the quilt top (1/4" please) and the quilt backing and I whip stitched the two together. 


If I were to remake this quilt today would I make it the same way? The answer is yes and no. I would probably use EPP to make parts of the top and I would probably still use polyester thread (the quality today is excellent and it is inexpensive) but I would clip curves and make better choices in fabric colours (no more black thank you very much). 

Still, I like this quilt, warts and all. I learned a lot making it and it is yet another quilt that has been loved and used. Really, isn't that why we make quilts?


I don't plan on entering any of my quilts in a juried show because it just isn't my thing. I critique my own work and give myself a pat on the back when it is deserved. For me the most important elements of quilt making are taking pleasure in the process of making the quilt and knowing that the finished quilt gave someone warmth and comfort. My Cranberry Glass Pickle Dish ticks both boxes! 

Thank you for all the lovely comments on the last post. There were a few from No-Reply Bloggers so while I was unable to send you a person note (there is no email attached to your profile) I did read every comment.

Until I post again, happy sewing!
Karen H

Friday, July 31, 2015

REWIND: Back Basting Applique

Welcome back to REWIND! Every now and then I "rewind" and republish one of my older posts that you may have missed! Today I'm going to share a post from November 2014  in which I write about back basting applique.


I used this applique method to make fruit and flower blocks in the border in my Gardens of a King quilt designed by Missie Carpenter of Traditional Primitives. It is a great technique to add to your skills set so why not give it a try? You'll be surprised at how easy it is and the great results that you will achieve.

Gardens of a King by Karen H
Pattern by Missie Carpenter of Traditional Primitives

* * * * * * *

TUTORIAL: Back basting applique

I am not an expert when it comes to applique but I enjoy doing it and I think that sometimes just a little bit of applique can add so much to a quilt. There are lots of different ways of doing applique and each has its own place. One of the methods I like is back basting applique. There are small applique blocks in Gardens of a King quilt that lend themselves perfectly to back basting applique.
So what is back basting applique? Simply put you baste your applique fabric to the background but you baste it from the wrong side. Once it is basted you do needle turn applique that is surprisingly easy!

The first step is to draw the shape on the wrong side of your background fabric. I will use a fleur de lis shape. I place my design on a light box or tape it to a window. I place my fabric over the pattern  with the wrong facing side up and I trace the shape with a fabric safe marker that makes a fine line. I like to use a mechanical pencil or a Frixion pen.


Cut a piece of applique fabric that is large enough to cover the entire shape.


I place the the applique fabric on the right side of my background fabric and hold it up to the light to make sure that it is correctly positioned which means that the applique fabric extends beyond my drawing on all sides. Depending on the size of the applique I may place a few pins to hold it in place. I then take a needle and thread and run basting stitches on the lines.


I turn the fabric over and on the right side I draw on the lines of the basting thread with a fabric safe marking tool. I like to use my mechanical pencil or a Frixion pen. If you use a pencil be sure that you can see the line but you don't want it do dark that it will show after the applique is finished. A chalk pencil would work equally well. Use the marking tool you have in your tool box that you like and that works for you!


Trim the excess fabric leaving a narrow seam allowance. I like to leave somewhere between 1/8" and 1/4". If there are inner points or curves you will need to clip them to make it easy to turn the seam allowance. In fact I like to clip all the way around the shape. I find that it makes turning the seam allowance much easier. I do not clip right to the line; I stop a few threads short of the line because I can always clip more but I can't clip less!


Now it is time to applique. Remove a few basting stitches and tuck the seam allowance under on the drawn line with the tip of your needle. Stitch until you reach the point where you need to remove another couple of basting stitches. Continue in this manner until the applique is completed removing only a basting stitch or two at a time. I like to use Superior's The Bottom Line thread for my applique. A soft taupe colour seems to work on virtually all colours!


This is the fleur de lis from the front.


This is the fleur de lis from the wrong side. When I press the piece all of the Frixion pen marks will disappear!


This method works well for simple shapes like the fleur de lis but it is even better for more complex, layered designs and small pieces! As with any applique work you have to give thought to the order of sewing pieces. For example in the picture below I stitched cherries before the stems because the stems sit on top of the cherries. The leaves were stitched before the branches. I'll often write the order of sewing pieces on the wrong side of the fabric so I know what to do next. I marked all of the leaves and most of the cherries as "1" because there were stems and branches that had to go on top of them. I back basted all of the pieces marked "1" at the same time and then I appliqued them in place. At the bottom of the picture you can see there is a cherry that is on top of another so the top cherry was marked "2". I continue numbering all of the shapes in this way. The back basted piece in the picture is the last stem that I need to applique and then the piece will be finished.


HELPFUL TIP: One of the tools I keep in my sewing kit is an orange stick (just below the scissors in the picture). It is great for turning applique edges especially if there is an inner point or inner curve to be turned. The wood just grabs the fabric and tucks it neatly into place! And it does it the first time so if the seam allowance is narrow there is little or no fraying. A needle is slippery so if I have to poke the fabric a few times it might start to fray and that will make the applique more difficult!

An important consideration is if your pattern is oriented the way it should look when it's finished your will need to create a reverse image for tracing on the wrong side of the background fabric. If you just trace it onto the wrong side of your fabric the final applique will be a mirror image of the pattern. To eliminate this problem I trace my pattern on the wrong side of the pattern with a fine Sharpie marker and that is what I use to trace the design on the wrong side of my fabric. Problem solved! Another option is to use your printer to print a mirror image.

* * * * * * *
I adore the Gardens of a King pattern by Missie Carpenter of Traditional Primitives. In fact I like it so much that I am seriously considering making another. At first glance you wouldn't think so but it is English paper pieced just like my hexagon quilts! These blocks measure about 6" across and they were a great way to use up some really small scraps.


Look at this block with the tiny little hexagon in the middle! Love it! I used Missie's starch basting method to prepare all of the pieces.


When I made the Gardens of a King quilt I made it exactly as per the pattern because I was testing the pattern for Missie. I don't get any compensation for testing or promoting this pattern nor do I have a commercial interest in the pattern - Missie just asked me if I would be willing to test the pattern for her and I thought that it would be a fun thing to do. I enjoyed making Gardens of a King and am so proud of my quilt top that I can't resist sharing it with you!


Some of the applique blocks are challenging and if applique is not your thing you may think that this isn't a quilt you could make. My applique work is far from perfect and I had to work really carefully on this block; the purple flowers were very difficult because I used cotton fabrics but the pattern is based on wool applique which I understand is fast, fun and easy. When you are making a quilt from a pattern you can change it up to suit your skill level or design sense. I think that if you had a large pretty print you could just skip the applique and frame the fabric with the oval. How quick and pretty would that be? Very quick and pretty and it can be just as effective as the applique!


I would like the next Gardens quilt to have more a Canadian flavour to it! I'm already jotting down ideas about how I might do that. I also bought a fabric challenge kit so I may combine the challenge with this quilt pattern and come up with something similar but uniquely my own.

I know that some readers have purchased the Gardens of a King pattern and have had some questions. I'm always happy to answer/help and I know that Missie too is always available. What you may not know is that she has set up a help page on her blog and I encourage you to visit Missie's help page on her blog. She has developed some very unique approaches to piecing that you will find helpful and worth adding to your skill set. She is also working on a new quilt design that has fleurs-de-lis! It looks very interesting and I can't wait to see the finished quilt!

Well people, I've got stuff to do so I had better get on with the doing. Until I post again, happy sewing!
Karen H

Thursday, December 11, 2014

Gardens of a King - The Reveal

Those of you who have been following along know that Missie Carpenter of Traditional Primitives contacted me in the summer to ask if I would be willing to test a pattern that she was designing and drafting. I thought it would be an interesting challenge so I immediately agreed. Her design was inspired by the King George III Coverlet (maker unknown).  The original quilt is dated 1803-1805 and is made with many printed cottons. It resides at the Victoria & Albert Museum in England.


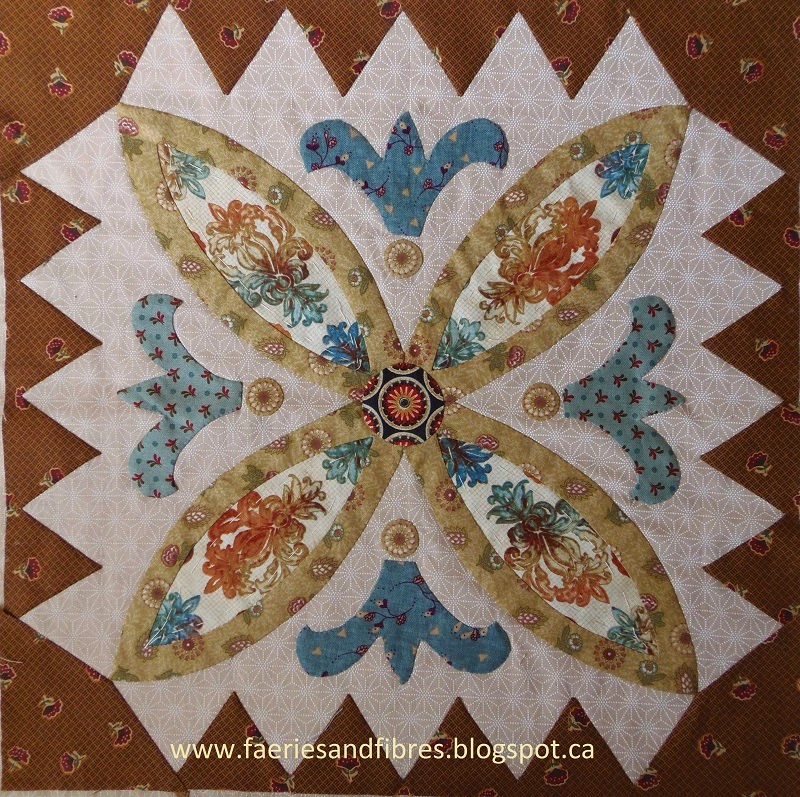
When we started Missie had drafted the pieced blocks and she had a rough idea about how the quilt would look but she hadn't designed the entire quilt. There were 16 pieced blocks and I was to make two of each. I think this is one of my favourite blocks - I love the colours! The print fabric used in the "eye" was a tiny scrap that I trimmed away from the backing fabric of a quilt I machine quilted for my Mom. In was in the can of scraps to go in the garbage. I fished it out and was able to fussy cut the four pieces!


Once the blocks were made they were reverse appliqued to background fabric. Missie planned to use a variety of light fabrics but I opted to use a single light fabric for all of the blocks. It is amazing what a difference the reverse applique made. The blocks looked so polished! A block like this


looked like this when framed with the background fabric.


The pieced blocks finish 6" across so that makes for some small pieces of fabric. English paper piecing was the method used to construct these blocks and instead of thread basting, I used Missie's English paper piecing method which uses freezer paper and starch. You can see her tutorial here.

Missie designed a simple applique design for the centre medallion. All of her applique work is done with wool but I decided to use cottons. The circle in the middle is not part of the pattern. I thought that my fabrics needed to be spiced up a bit so that was my first addition. Including little details like this is a great way to put your own stamp on a quilt while still maintaining the original design.


I still thought it needed a little more so I cut some circles from the gold fabric and appliqued them to the base of the fleur de lis. The background fabric in this block is the same fabric used throughout the quilt.

Here is the finished medallion.


If you look closely at the original quilt you will notice a pieced block with a face. It is one of the blocks that really caught my eye and I wanted to try it out so I drafted my own pattern (a dinner plate was my starting point) and I drew a face. I had thought about using it as my medallion but have set it aside and will find another way to use it!


The next task was stitching 12 fruit and flower blocks for the border. The applique technique I chose to use was back basting applique. You can see my tutorial here.  I love the cherries! Almost all of the fabrics used for the pieced blocks and the applique blocks were cut from leftover bits in boxes of tiny scraps!


Each of the 12 blocks was to be framed with crescents and I went with butterscotch and caramel colours because I think they add richness. And of course I added my own detail! Each of the blocks has an insect of some sort - there's a ladybug on the leaf in the cherries block.


When I cut the crescent shapes there were some scraps and I used them to make the periwinkle stars that are placed between the applique blocks in the border. I added the circle as my own person touch. It is a repeat of the fabric used in the middle of the centre medallion. Repeating fabrics in this way adds not only visual interest but it gives the quilt a cohesive feel.


The last blocks were four pieced corner blocks for the outer border. I so enjoyed making the faces that I decided to put one in a border block. I LOVE this sun face! Again Missie's plan was to use light background fabrics but I liked the effect of the green border in the original quilt so I pulled an old green print from my stash and I think it is the perfect complement!


If you have a sun you need a moon so I drafted a block for the opposite corner and added a moon face in the middle!

As I worked on the blocks I also worked on the shark tooth borders. Missie and I worked very hard on the math to get them just right! So everything was made and it was time to stitch it all together! That was the fast and easy part - just long straight seams with very few points to match! First I will share Missie's quilt top.

Gardens of a King by Missie Carpenter 2014

Now I am SOOOOOO excited to share with you my finished quilt top! It is the same quilt but it has a different look and feel.The green border fabric anchors my blocks and gives the quilt some weight. I also added my own personal touches like the circle appliques, butterfly and insect appliques and the sun face (upper left) and moon face (lower right).

Gardens of a King by Karen H 2014

Making this quilt was a great experience. It is definitely not a quilt for a beginner but it is a quilt that is manageable for those with experience hand sewing. If you are a fan of the Dear Jane or Nearly Insane quilts this one is for you!

Missie is posting tutorials on her blog to assist with the making of the quilt.  If you are interested in the pattern it is now available for purchase here. As a reminder I have no financial or other interest in Missie's pattern. I made the quilt and have blogged about the making because I thought it would be a fun and interesting experience!

Hope you've enjoyed following the making of Gardens of a King. If you are making the quilt I would love to hear from you. I reply to every comment so if you don't hear back from me it means you are a no reply blogger and I have no way to contact you unless you include your email address in the comment!

I'm linking up with the Needle and Thread Network where you will find interesting posts from great Canadian quilters!

Tomorrow is the final block in my Value Proposition Hexagon Quilt Along! Until then, happy sewing!
Karen H

Monday, December 8, 2014

The finish line is in sight and another Lozagon hexagon block!

I've had several comments and emails telling me that some of you have purchased the pattern for Gardens of a King from Traditional Primitives. I had a fun time testing the pattern for the designer, Missie Carpenter. I have no financial or other interest in the pattern - Missie asked me if I would be willing to test the pattern and I said yes because I thought it would be a fun thing to do and it was! If you decide to make this quilt I would love to hear from you. I reply to every comment so if you don't hear back from me it means you are a no reply blogger! And now for my progress report on the Gardens of a King quilt top!

All of the applique blocks for the border are finished and framed with butterscotch and caramel coloured fabrics. It won't be much longer until the quilt top is finished. It will measure 63" and I am so eager to get it done. Fingers crossed I'll be able to show it to you this week!

I embellished the hazelnut with an orange butterfly that looks very much like a monarch.


I embroidered a cross hatch design on the burdock and added a brown and cream butterfly. I've glue basted the block to the green border fabric so it is now ready to be stitched!


I've also pieced a fourth block for the corner in the green border border.


The first three blocks are stitched to the border so the next step is to stitch the stars in between the  blocks and at the ends. Unfortunately the two missing stars have not yet turned up and I've searched high and low so I made two more stars. I have no doubt the original two will be found after I've stitched down their replacements! I love the green fabric; it is a great backdrop for the appliques.


In my spare time I also completed another Lozagons block! This one is a little brighter than some of the others.


I know it looks like I don't sleep but I get my hexagon blocks by organizing my work so that I can just grab something and sew. I also work in stages. If I feel like cutting fabric I cut hexagons until I get bored. I have little zip lock bags and each bag contains the pieces for one block. I might cut an entire block at once or I may just cut one or two rounds.


I take a bag with me when I'm out so I have something to do. It is a great way to get the basting completed. All of the basted hexagons go right back in their bag! All of the pieces for the block stay together in the bag until the hexagons are sewn into rounds.

I stitch the hexagons into rounds starting with the first round of six hexagons. The second round has twelve, the third has eighteen and the fourth has 24. I stitch the hexagons together t make the round but I do not stitch it closed - I call it an open donut. In the picture below I positioned the rounds carefully so that they look closed but they aren't. The red circle in the fourth round shows the opening. For more pictures on this process you can go here. I like to work this way because I can use one long piece of thread to attach the round and it minimizes the number of sewing starts and stops!


Once I've stitched the rounds I tack them together with a needle and thread and toss the whole thing in a box. It reminds me of a bunch of noodles!


When I need some hand sewing I pull out one of the sets and start sewing. If I don't finish stitching the whole thing together at that sitting I just tack it together with a needle and thread and toss it back in the box!

I'm linking up with the Needle and Thread Network. Head on over to see what other Canadian bloggers are working on!

That's it for today - I've got some Gardening to do so until I post again, happy sewing!
Karen H

Thursday, December 4, 2014

Fruits and flowers

I'm zooming along with the Gardens of a King pattern testing. Three more applique blocks are finished and ready to be appliqued to the border fabric! I've cut out the fourth and final corner block for the border too!

The first applique block is a saffron crocus. I embroidered the roots and added a green butterfly.


The cherries block has a little ladybug on a leaf. 


The pears have little brown bits embroidered at the base of the fruit and a bee has been added.


There are a couple to go and then they can be appliqued to the border fabric. Then I have to make sixteen four pointed stars to applique between the framed fruit and flower applique blocks. All I can say is yahoo - the end is in sight! I've enjoyed testing the pattern for Missie but I'm really eager to finish a project or two and maybe start a project or two! If you want more information about the pattern it is available from Traditional Primitives.

Tomorrow I'll publish the patterns for the side setting blocks in the Value Proposition Hexagon Quilt Along and the following Friday will be the 18th and final block pattern. Time has just flown by and I'm starting to think about another quilt along for 2015. I've got a few ideas fermenting but would love to hear from you. Are you interested in another quilt along and if so what would you like to see - hexagons, piecing, applique, foundation piecing or a mish mash of techniques? I reply to every comment so if you don't hear back from me it means that you are a no reply blogger.

Time to run so until tomorrow, happy sewing!
Karen H