Monday, July 20, 2015

Quilts at the Creek - Pioneer Spirit

Hello people! I survived the weekend and had an absolute blast sharing my work with people who visited Quilts at the Creek at Black Creek Pioneer Village. It was a beastly hot and humid weekend but the sun was shining and the quilts were absolutely glorious!

My talks were in the Town Hall. It was a lovely old building. It was nice and cool inside when I first entered but you pack a bunch of excited quilt makers into the space and things heated up pretty quickly!


Hanging in front were two gorgeous quilts. Both were made as part of a mystery quilt challenge. The name of the challenge was Pioneer Spirit Mystery and the quilt was designed by Sherri Hisey of Border Creek Station. Thirty quilters made and showed their versions of this quilt at the show. If you want to make your own the full instructions are available free of charge here.


Here I am standing at the front with my quilt Chop's Pick hanging on the right side.


I don't have pictures of my trunk show but I do have pictures of the quit show. Look at the quilts moving in the breeze! And right up front is yet another Pioneer Spirit quilt.


There were so many quilts to see but today I thought I would share pictures of many of the Pioneer Spirit quilts. Although it is a single pattern there were options: the blocks could be straight set or set on point. Backgrounds could be squares of a single fabric or pieced squares of four fabrics. Corners could be finished in several ways. To give you an idea take a look at these fabulous quilts!

Here the blocks were straight set. The colours in this one were so pretty and soft.


This fresh blue and white Pioneer Spirit was made by a member of my Guild and her blocks are set on point. Most of the quilts were borderless but she added a nice dark border and corner blocks. What a summery quilt this is!


Love the greens - it reminds me of 7 Up bottles!


The next two quilts are full of juicy goodness. Clearly these quilt makers are not afraid of colour.


A very soft colour palette - this one has a wintery look and feel to it.


This reminds me of old Roman glass or sea glass. 


Love, love, love the drama of this one. It reminds me of my friend Babs' hexagon quilts Yellow Bird and Yellow Bird's Sister.

Another quilt made with muted caramel colours with the blocks set on point. There isn't a strong contrast between the colours so it give the quilt a very soft look. This would be a great quilt to snuggle under!


Another fresh and delicate quilt. This is one I can envision on an old cast iron bed with the frame painted a fresh, crisp white!
The little red nine patches really pop on this one. The photograph just doesn't do this quilt (or any of them) justice!


Here we see dark nine patches set with pastels and once again the star is the nine patch.


Drama, drama, drama! There is strong contrast and and a varied colour palette makes for a very interesting quilt.


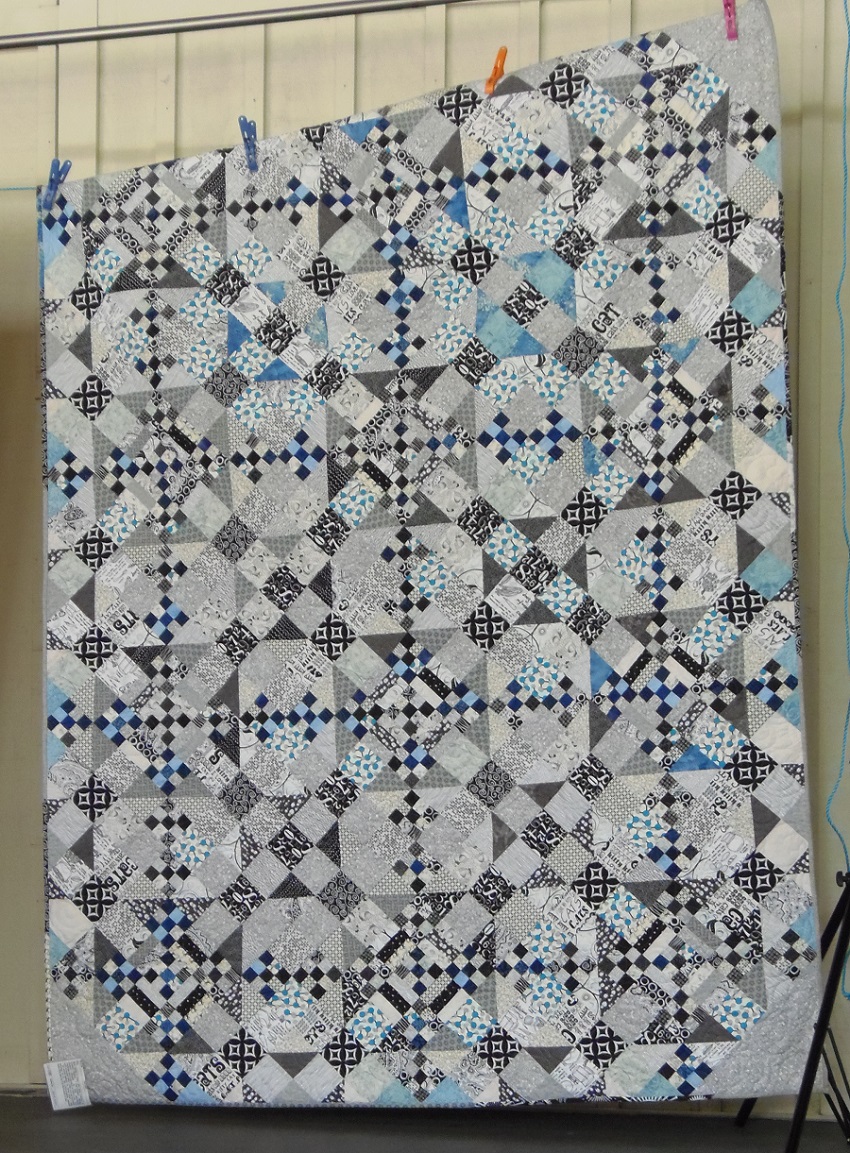
Again there is strong contrast but this time the maker chose to work with a limited colour palette and it created a very different quilt.


Another limited colour palette was used in this quilt. To my eye the nine patches appear to recede and this creates a totally different look.


Yellow, black, grey and white make for a honey of a quilt! Notice the corner treatment.


This one is loaded with grapey goodness. The makers fabric choices are so interesting. I see circles around most of the nine patches and that makes this quilt look very different from the others.


This is a another fresh summery quilt in cool greens.


This one really caught my eye. The combination of soft greens and caramels make for an all seasons quilt.

This would make a great quilt for a boy. The browns against the background are so fresh and crisp.


This is another quilt that was very attractive but just didn't photograph well.


This is another one where I can see circles surrounding the nine patches. A very interesting visual effect!


 Browns of similar value on a dark cream background give the quilt an entirely different feel.


Careful colour placement resulted in a quit that has a look that is all its own. The dark nine patches add drama.


There were more Pioneer Spirit quilts but unfortunately my pictures didn't turn out well. I'll have more show pictures to share with you in the coming days.


Until I post again keep cool and happy sewing!
Karen H

Friday, July 17, 2015

Sorting quilts

I've been busy pulling, sorting and refolding quilts for my trunk shows at Quilts at the Creek this weekend. It is a big job but as you can see I've got a "helper". Not much help if you ask me! Sorting quilts will just have to wait until he has finished his little nap.


The title of my talk is "English Paper Piecing and More". It is so hard to decide which quilts to take because they all have some feature that I think might be of interest to others. I will bring a few quilt tops one of which is Gardens of a King, a pattern I tested for Missie Carpenter of Traditional Primitives. The pattern is now available from her shop. You can see my quilt folded on top of the pile in the picture above.  The quilt was made using English paper piecing (EPP). I added my own personal touches such as the sun face in the upper left corner and a moon face in the lower right corner. It is a little detail that makes the quilt my own. I also added some butterflies and ladybugs in the floral applique b locks in the borders.

Gardens of a King by Karen H

I plan on taking Flora and Fauna, Parts of the Garden as part of the "more" portion of my talk. This quilt does not use EPP but it is one of my quilts that I love the most because of all of the little details. It was a challenge quilt. There were three fabrics that had to be used (all of which I detested and did my best to disguise) and I was able to add an additional six fabrics. I chose three greens, one brown, one blue and a very busy print on a butter colour background. I fussy cut last fabric to create all sorts of additional colours, plants and creatures. I also the wrong side of the blue fabric in the kit and that gave me two shades of the same fabric. You can't do this will all fabrics but in this case it worked!

Flora and Fauna, Parts of the Garden by Karen H

One of the reasons I like Flora and Fauna is because of all the little vignettes that I was able to create within the quilt. Here are a few examples.


I know this quilt appears as though it was difficult to make. I didn't have much of a plan for this quilt other than there would be a circle of blue in the middle for the sky. I would border it with a narrow bit of green for the grass and then a wide border of brown for the earth. The last border would be a pale green just because I like green! I used a fabric safe marker to draw the stems of the plants that would start at the green grass and reach up toward the sky. They were embroidered with two strands of floss. Once I had that framework completed I just started filling in the spaces with bits of this and that. I quilted tunnels for the ant colony in the brown border and then filled the tunnels with little brown ants. I worked on this quit top while sitting outside and as I saw bees, grasshoppers, butterflies, inchworms and other insects I would find a space where I could add them to the quilt. If I liked what I had done I would repeat it in other areas of the quilt! The more I added the more ideas I had. Before I knew it the whole thing was chock-a-block with creatures and plants. You don't have to make an entire quilt of detailed creations - you could just take one or two tiny details to a big quilt. Small details have big impact. That's what I did when I added bee details to the centre medallion of my quilt Mom's Flower Bed. The following pictures shows the centre medallion. On the blue-green batik hexagons that connect the green stars I added bees. The bee bodies were cut from yellow fabric. The stripes were added with my Sakura Pigma pens and then I appliqued the bodies to the hexagons. The wings were drawn on the fabric with my Sakura pens. Once this was done I cut my hexagons and continued English paper piecing in the usual way.


This is a close-up of the bees. Want to make your own bee? I did a little tutorial and you will find it here.


Bees not your thing? How about adding a grasshopper? I like to sneak a grasshopper into a quilt and tell the recipient it is there but not where it is. It is especially fun for children to search their quilt for the grasshopper! The tutorial is here.


I continue to work on my Green Parrot hexagon quilt but every time I put it on the floor to have a look this is what happens! There are plenty of places to wrestle but it seems that Green Parrot holds particular appeal for the boys, Jinx and Gump.


And when exhausted from wresting this is what happens. Jinx stretches out to have a nap on the quilt. Cute but not at all helpful!


I have managed to stitch the olive-brown border to the top section of Green Parrot. The final round will be a dusty pale green. I'm thinking I will fill in the "Vs" at the top with more pale green to finish the top edge but I'll make that decision when I get to that point.


There'll be little or no sewing for two days but it will be fun to share my quilts with others at Quilts at the Creek and I'm really looking forward to touring the outdoor show where 300 quilts will be on display. I'll try to take pictures and share them with you in an upcoming post. My talks will be at the Town Hall at 11:30 on Saturday and Sunday. If you are at the show and have time please pop in and say hello!

That's it for me until next week. Happy sewing!
Karen H

Wednesday, July 15, 2015

Needles

It is just a short post today because I am busy pulling quilts for my trunk shows this weekend at Quilts at the Creek in Toronto, Ontario. I'm also cutting up fabric for the final pale green round of hexagons for my Green Parrot quilt.

I thought I would talk to you able the needles that I use. I was speaking with my friend Babs who is hand quilting her hexagon quilt Yellow Bird's Sister.

Yellow Bird's Sister by Babs

The needles she was using to quilt were betweens and she mentioned that she was struggling with them. It was difficult to get even stitches and the small needles were uncomfortable in her hand. I told her that I use needles that work for me and those may not be the recommended needles for the task. She was shocked and told me that she thought you could only use betweens to quilt. Here is what I say: rules schmules! Rules are just guidelines, not laws and there is no chance of you going to jail or being fined for breaking a rule. What is important is that you get the best possible result and when quilting for me it means nice even stitches with a the needle that is comfortable for the fingers and finger joints. I don't believe that quilting stitches must be small but they should be as evenly spaced and as close to the same size as possible. Babs took my advice and tried some different needles. A Roxanne applique needle gave her the results she wanted and it was much easier on her fingers and hands. An added bonus was that the eye of the needle is a larger and therefore much easier to thread. This is a good thing for eyes that don't function the way they did many moons ago! It seems to me that the eyes of needles used to be much larger. Also I've noticed that when I drop a needle and have to bend over to pick it up the ground seems to be much further away than it was years ago!

When I first began hand quilting I only used betweens but found that they were terribly hard on my finger joints. For certain projects with certain battings they were fine but for others they were just too tiny and fussy so I started using other needles. I've hand quilted with all sorts including embroidery needles and applique needles and had good results with many. So now when I hand quilt I try a variety of needles until I find the one that works best for me at that moment in time. It might be a between or it just might be a different needle.

Here is an assortment of needles that I frequently use.


I apply my philosophy about hand quilting needles to other hand work. I use the needles that gives me the results that I want. I was recently converted to milliners needles when sewing together my patches that were prepared using English paper piecing (EPP). The results are dramatically better than I was getting with other needles. I've tried expensive brands such as Tulip Hiroshima (lovely needles) with less expensive brands such as John James. Both worked well for me so if the more costly needles are not in your budget try another less costly brand.

I use darning needles for basting my EPP patches. I find that the rigid needle doesn't flex so it works much better for me when I am basting from the back.

Basting from the back with a darning needle

My advice to you is try what's recommended but don't be afraid to try other needles. You might just find that you get better results with another and have happier fingers and hands!

Until I post again, happy sewing!
Karen H

Sunday, July 12, 2015

Mixing browns for the border and some reader questions about English paper piecing

The Green Parrot hexagon quilt is coming along nicely. You may recall that I added the dark brown border to the sides of the middle section. If not, here it is.


The same dark brown will border the entire quilt however I didn't quite have enough fabric (I was 10" short) so what I did was cut all of the hexagons that I could with the fabric I had and divided them into two equal piles, one for the top section and the other for the bottom section. I placed the top section on the floor and started placing the dark brown hexagons working from the middle top out towards the corners. I also placed some on the sides working up towards the corners. When they were all positioned I counted the number of hexagons I needed for the corners and cut them out from the new dark brown fabric. I stitched all of the brown border hexagons together into one long noodle and attached it to the top section.


The browns are different but because they will be placed strategically it will appear as though the addition of this fabric was intentional rather than out of desperation!

I've also cut out the olive-brown hexagons for the next round and I've basted them, stitched them into a noodle and attached the noodle to the left side of the middle section. There is not as much as an ombre effect as I would have liked however the fabric is a repeat of what is already in the quilt and I like the way the border looks. The final round will be the pale green from the centre (or at least that is my plan at this moment in time but that could change)!


I had a lovely email from a reader who is going to start her first hexagon quilt and she wanted some guidance on English paper piecing. The first bit of advice I always offer is to start out by making one hexagon rosette. While you may like the look of hexagons and English paper piecing you may find that it isn't your cup of tea. Before you cut up a stack of fabric make sure that it is something you will enjoy.


I was asked about basting the hexagons. I prefer to baste from the back so that the thread does not pierce the paper. This allows me to use my papers multiple times. I published a little tutorial here. Basting from the back will feel awkward at first but stick with it. If you baste through the paper the basting thread must be removed but if you back baste the thread stays in. You just pop out the paper! One advantage of this method is that the seam allowances remain held down in place.


If you thread baste through the paper you don't need a lot of stitches. You will notice in the example at the top that there are four stitches (see picture on left) and one of those four is just an extra stitch to hold the basting in place before I clip the thread which does not get knotted at the end in this method.

If folding over the seam allowances is a challenge try finger pressing them over the paper before you start basting. Eventually you will find that this step is unnecessary because you will know that the edge is folded over right at the edge of the paper.


An alternative to thread basting is starch basting the seam allowances. There is an excellent tutorial on this method at Traditional Primitives. She uses freezer paper hexagons and once the seam allowances are starch basted she removes the hexagon and reuses it!

Starch basting method from Traditional Primitives

I was asked if I press the hexagons after they are basted and the answer is a big "no"! You may find that there are slight variances in the size of your hexagons. If there is a soft crease you can ease in the extra bit of hexagon but if there is a hard crease from pressing it makes easing very difficult. I find that I never have to press my hexagon quilts until I am ready to baste them for quilting. They are handled so much that the folded seam allowances are well pressed with my fingers.

That's it for today. If you will be in the Toronto area next weekend it is Quilts at the Creek and I'll be doing a trunk show Saturday and Sunday. It is always a great show and a beautiful venue!

Until I post again happy sewing.
Karen H