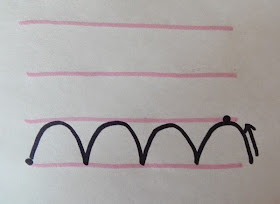
I like the look and feel of clam shell quilting and decided to give it a go. I wouldn't do a large area on a solid fabric until I was much better at it however I did squeeze some into my Mom's African banner quilt. It was surprisingly easy to do!
I started by drawing equidistant parallel lines on the area I wanted to fill with clam shells. I started at the dot on the lower left and made half circles that touch the line above. When I got to the far right I had to figure out how to get to the row above and I figured out two methods.
The first method is to backtrack on the last half circle until I got to the top where the dot is marked.
From there I made my half circles from the right to the left. The second method for preparing to stitch the row above is to stop at the mid-point of the half circle as indicated by the dot on the left.
From there I could just continue making the half circles.
Here are a couple of my practice sandwiches. Personally I found it easier to work with smaller clam shells rather than larger clam shells.
When I was making my Lazy Girl quilt I wrote about filling in the spaces with "doodling" and this would be a great bit of filler for that kind of quilting.
I'm stitching down the binding on Piccadilly to the Nines. I wrote a little tutorial about my easy method for joining the beginning and end of the binding. You will find it here. I like to cut my binding strips at 2 1/4" wide. I find that 2 1/2" is just a little too much whereas 2 1/4" is just perfect and the binding is nicely filled with the edge of the quilt.
I love a nice neat bound corner. One down, three to go!
Until I post again, happy sewing!
Karen H


Your quilting looks beautiful! I've not conquered FMQ yet, but someday..... :O)
ReplyDeletelove your little clam shells-thanks for the tutorial-I am keeping notes-lol
ReplyDeleteI have just been thinking of trying some clamshells free motion on my new machine. Isn't it funny how you always find someone else on the same wavelength? I think I will have to mark mine, though, or they will get away from me!
ReplyDeleteYour figure 8's look great in the border! Another good idea to remember. :)
You must work like lightning! I can't believe how much you get done. I'm dipping my toe into machine quilting -- thank you for these tips.
ReplyDeletewell done on working out the clam shells, It is an effective filler and adds interest to the Mc Tavishing, which i think can be a bit monotonous in large areas and looks great broken up with other textures
ReplyDeleteLove your quilting....thanks for the tutorial.
ReplyDeleteNice job on the mini clamshells. They are adorable!
ReplyDeleteYour binding is just so neat and crisp. I'll be checking out the tutorial. I love the look of the clamshells. They would make a great filler. I'll have to take some time and play with them.
ReplyDelete