Showing posts with label Road 66. Show all posts

Thursday, January 28, 2016

Setting triangles and diamonds for Road 66

Anne in South Wales (sorry I couldn't reply to your message Anne but you are a no reply blogger) asked about the size of the little triangles which form part of the path in my Road 66 quilt top.The path is made up of little triangles and diamonds.


The hexagons used in Road 66 are 1 1/4". A hexagon has six sides each of which is the same length. When we talk about the size of a hexagon we are referring to the length of each of the six sides.  Thus a 1 1/4" hexagon’s sides each measure 1 1/4"”.


The measurement from point to point of a hexagon is simply two times the size of a hexagon. This means that the point to point measurement of a 1/14" hexagon is 2 1/2".

A hexagon can be subdivided into three diamonds each of which has four sides. In the case of a 1 1/4" hexagon each of those four sides will measure 1 1/4". This is the size of the diamonds that I used in the path for my Road 66 quilt.

The triangles in the path (where the blocks intersect) are simply a hexagon divided into six segments. In the case of a 1 1/4" hexagon each of those three sides will measure 1 1/4". This is the size of triangles that I used in the path for my Road 66 quilt.


You can also fussy cut your diamonds or triangles and then sew them together to make some fun and interesting blocks. Three fussy cut diamonds sewn together make this interesting block.

You could use three different fabrics, one dark, one medium and one light to make a classic tumbling block.


Six triangles fussy cut and sewn together make one big happy hexagon like this!
All of these blocks are part of my quilt Hexagreens.

Hexagreens by Karen H 2009

To read more about constructing, deconstructing and reconstructing hexagons you may want to read a post that I wrote back in 2013!

There's be no sewing for me today because I'm going to a party to celebrate a special occasion with some friends. Hopefully I'll be back at it tomorrow!

Until I post again, happy sewing.
Karen H

Tuesday, January 26, 2016

Where did January go?

Where has the month gone? I've been very busy and in the process kind of lost my blogging momentum.  I taught two English paper piecing classes last week. The workshops were organized by the Rouge Valley Quilters' Guild and they were held at Log Cabin Yardage. It was fun to teach in a shop because I was able to pull bolts of fabric to demonstrate ideas. I think everyone had a great time and came away inspired to create. Many of us also came away with some new fabrics for our stashes!


I have a two week break until my next trunk show so hopefully I can get caught up on some projects including my QAL. I've got many of the components made and they just need to come together, Here is a sneak peek at some of the bits and pieces! It doesn't look like much right now but stay tuned because it is going to change and evolve. Part of the reason for the delay is that I am working from the outside edge of the quilt in towards the middle and that makes the math a little challenging but I'm getting there.


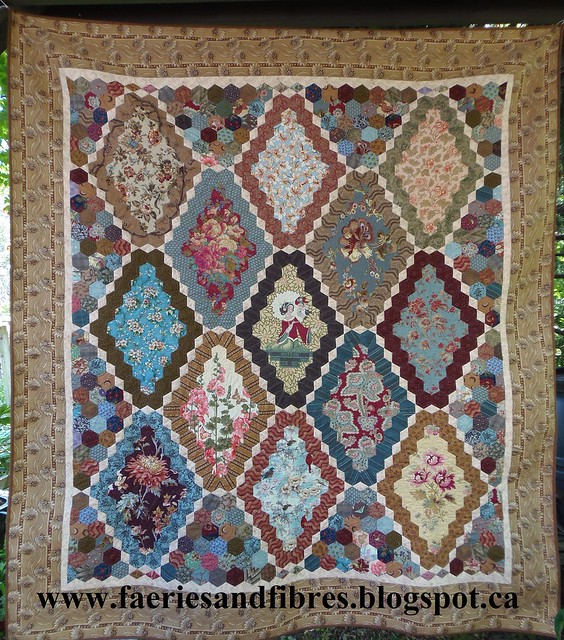
I've also managed to put together the rows of hexagon blocks for my Road 66 quilt. I'm really happy with how this quilt is turning out and can't wait to get some borders added to it. The quilt is made with 1 1/4" hexagons. The path that connects them is made with diamonds and triangles.


Now that the top is put together I need to get an accurate measurement of the quilt top. The quilt top design was featured in Di Ford's book Primarily Quilts and while there are measurements provided I never entirely trust them so I'm going to take my own measurements. Let me explain how I do this.

I have removed all of the papers from my quilt top except for those all around the outside edges. I keep them in the quilt until I'm ready to add the border. The paper stabilizes the hexagons and prevents stretching so I can get accurate measurements.

I place my ruler on the quilt top so that the left side lines up with the innermost V where the hexagons are stitched together (red arrows). I line up the 1/4" mark on the edge of the innermost hexagon along the top edge (green arrow). I measure each of the four sides. The top and bottom measurements should be the same and the side measurements should be the same. If there are any differences I measure again. If the variance is 1/4"ish I will either add that number to the opposite side or omit it from the side with the extra. I figure I can ease in 1/4" along the edge of the quilt. These measurements include the seam allowance.


Once I have my quilt top measurements I can position my ruler in the same way as shown above and any parts that are beyond the ruler are trimmed away to produce a straight edge. The last step is to release the seam allowances of the hexagons on the top edge (they are still basted to the paper). This will provide a long straight edge so I can add the border.

I've been hiding away my scraps and leftover bits in baskets and they are overflowing. Sometimes I cut them up and make 3" nine patches but I had lots of leftover hexagon papers so I've been chopping up the scraps and basting hexagons when I'm out and need something to keep my hands busy. They will all be tossed into a bag and when the inspiration to create hits I'll have them ready and waiting to be turned into something new!


Time for a cuppa and maybe some borders! Until I post again happy sewing.

Karen

Tuesday, December 29, 2015

More on Road 66

The holidays sure cut into sewing time but the fifth and final row of blocks for my Road 66 quilt (from Di Ford's book Primarily Quilts) are stitched together! I think that this is one of my favourite rows although rows one through four are right up there!


These blocks were so much fun to make with the fussy cutting and sewing. The hexagons are 1 1/4" which I find rather large but it means that the quilt sews up relatively quickly.

It addition to stitching the fifth row I also managed to add the third row. As you can see I've still not added the half hexagons to the top row but think I will wait until the top is together to add them.


I have a lovely coral fabric that I may use for the narrow border that will surround the quilt and then I think I will use this print for the final wide border. It is a Moda fabric from Edyta Sitar's Hope Chest line of fabrics. I love the golden tones and the soft pinks in this print.


Also don't forget that my Ottoman Pincushion Pattern is free until the end of the year. Go to my Craftsy shop or you can just click here to be taken directly to the pattern! I would love to hear from you if you make the pincushion. I've got ideas for more of them so when time permits I will test out my ideas and write up the patterns!


I'm linking up with WIP Wednesday over at The Needle and Thread Network. This is a great place where Canadian textile, fibre and fabric artists share what they are working on with others. If you have time pop on over and see what everyone is doing!

I likely won't post again until 2016 so I wish you all a very happy, healthy, safe and prosperous 2016! Until the next time, happy sewing!

Karen H

Monday, December 14, 2015

Still busy but trying to sew

I'm still crazy busy trying to work on a variety of projects including the sew along for 2016. Last Friday my Mom fell and broke her right elbow. She is in a cast for six weeks (at least) and there will be no sewing for the time being although knowing her she is trying to figure out how she can create something without moving her elbow.

She did manage to finish the hand applique work on her latest small African quilt just before the injury so I thought I would share it with you. She loves to create vignettes that depict the lives of women (usually grandmothers) and children. This time she also incorporated her love of quilt making and embroidery. I'll machine quilt it for her and when her arm is completely healed she will add her magical touch to really bring this quilt to life!


For my part I've managed to stitch the fourth row of my Road 66 hexagon quilt which is based on the design in Di Ford's book, Primarily Quilts. There's only one more row to assemble and then I can sew the rows together. I think that won't be in the near future what with helping my Mom every day, Christmas and other commitments.


I have been reading all of the lovely comments and will reply to each one as time permits.

Until I post again, happy sewing!
Karen H

Wednesday, December 2, 2015

Road 66 - Row 3 and more

I've kind of lost my blogging mojo because I am so busy with so many things right now. With trunk shows, teaching, visiting, planning QALs and company I just don't seem to have much in the way of free time! But today I've carved out a few moments to share my progress on my Road 66 quilt from the book Primarily Quilts by Di Ford.

This is row 3 of my Road 66 hexagon quilt stitched together.


Even better I've now stitched the first two rows together and the lovely path made of coral diamonds is starting to emerge. The little triangles are made with a darker coral/rust and they are a subtle colour change that I think is quite effective! As you can see I've still not added the fillers along the top edge.


Now I'm on to row 4 and I can add row three to the quilt. There are five rows in total so it will go quickly.

There was a question about the size of the quilt and the hexagons. The hexagons are 1 1/4" which is slightly larger than I normally use. The hexagon portion of the quilt will measure about 58" and I believe the length is around 68". To it will be added two borders and they will bring it up to a full size quilt.

I've got ideas for some new fussy cutting tutorials so when life slows down a little I will get to them! I'm afraid however that for the next couple of weeks my posts will continue to be rather sporadic but once the holidays are over I'll be back in the saddle and will publish more regularly.

Until the next time, happy sewing!
Karen H

Thursday, November 26, 2015

Road 66 - the second row

I had a lovely comment from Katie. She wrote "I noticed some half hexagons along the upper edge. I assume that the tails are left out as in diamond construction. But how do you keep the longer edge tucked under. Mine always wants to pop out. Is there a trick to this?" I was unable to email my answer because Katie is a no-reply blogger. This simply means her email address isn't linked to her blogger profile. For those of you who are new to blogging it also means that if you enter contests or giveaways by leaving a comment, you won't be entered because there is no way to contact you should you win. If you are looking to fix this there was an excellent tutorial on Quiltville's Quips & Snips. But I digress! Katie is asking about the construction of my Road 66 quilt which is named after the quilt in Di Ford's book Primarily Quilts.

The answer to Katie's question is that the tails are sticking out of the half hexagons (inside the red circles) for two reasons: the first is the shape of the paper and the second is to accommodate the border that will be added. The half hexagon has a "diamond" point and that is a sharp angle (30 degrees) and the tail is created because the point is narrower than the seam allowance This is not the case with a hexagon which is a 60 degree angle which is wider than the seam allowance. I could have basted my diamond and half hexagons so that all of the seam allowances are folded in such a way that there are no tails.


I wrote about that basting method here. The diamond would look like this from the right side. Notice there are no tails.

This is what it would look like from the wrong side. I generally use this method because it gives me a sharp point which makes joining the pieces much easier. Having to deal with that tail and move it out of the way is fiddly work so if the seam allowances are neatly folded in they aren't a problem.


However, I've left the tails when I prepped the diamonds and half hexagons of my Road 66 quilt because I want a straight outside edge on my quilt so that I can add two borders, one narrow and one wide. When I remove the papers and fold out the seam allowance I'll have a nice straight edge to which I can attach my borders. If the seam allowance are tuck away neatly on the wrong side as in the pictures above I run the risk of catching the edge of the fabric so that there is a little pucker and the seam allowance won't open properly.

So row 2 of my quilt is now stitched and ready to be added to row 1. Three more rows to go and I still have to make filler half hexagons for the top edge! Sew, sew, sew!


So one final comment: I reply to every comment left on my blog although as of late I've been slow in replying due to other commitments. However, if you don't hear back from me it means you are a no-reply blogger. Unless you update your profile or send me your email address I will have no way to contact you. Rest assured I do read and appreciate every comment left!

That is it for today; until I post again, happy sewing!
Karen H

Monday, November 23, 2015

Row 1 of Road 66

Sorry for the silence but I have been busy working away testing my pattern idea for my 2016 quilt along. It is going well! I can't show you what I'm doing just yet but be patient my friends and all will be revealed. There will be hexagons, traditional piecing and applique! So far I've only used fabrics in my stash and my plan is to use what I have. I am working with 1" hexagons to make the blocks.

I've also managed to make diamonds and triangles to connect my Road 66 hexagon blocks. The first row is now stitched together. I need to cut and add the half hexagons to fill in the top edge and I need to make the corner units too! It isn't a very exciting picture but you get the general idea of what the quilt is going to look like!


The diamond fabric is a coral/brick print that I got from Connecting Threads. It is a fine weave cotton with a lovely silky feel. I used a different print in a slightly darker shade for the little triangles, I basted through the papers because I don't plan on using them again.


I normally would fold & baste my fabric so that there are no dog ears when I make diamonds for English paper piecing but in this instance the diamonds are on the small side so I decided to leave the dog ears. They will be trimmed off when the border is added. I'm a firm believer in doing what works best for you!

Until I post again, happy sewing!
Karen H

Sunday, November 15, 2015

Teaching and sewing

My mantra is "less talking and more sewing" however as of late I've been doing the reverse. I've been to London (Canada, not England) to do a trunk show of my work and to teach my English paper piecing techniques. The London Friendship Quilters' Guild is a great bunch of quilt makers. They were warm, friendly and inviting. If you live in the area and are looking for a Guild to join, you won't be disappointed. One of the unique things that they do is invite area quilt shops to most of their meetings so that they can talk about their shop and share their wares. What a great service, especially for those who don't drive. This month they had Laurie and Robin from Stitcharie in Wyoming (a small town in Canada, not a state in the US).

They had such interesting fabrics and they also carry Tulip Hiroshima needles and they were very well priced. We made a special trip to the shop after the workshop and I picked up a few pieces of fabric to add to the stash. The women who run the shop are friendly and they clearly love what they do. It was a real treat to visit such a lovely little shop.

I think the members of the London Friendship Quilters' Guild enjoyed my trunk show and the workshop. There was certainly lots of excitement when I started sharing my techniques for made fabric. I think they would have enjoyed having more time spent on fussy cutting so I think I will make some revisions to my course so that I can give more instruction in that area. I didn't take pictures but I know that others did and if and when they forward them to me I'll be sure to share with you.

All this teaching and talking hasn't left much time for sewing but I have completed my Road 66 hexagon blocks and here they are!

I love the wavy red and blue print. There is so much visual interest in a wavy print. I just wish there were more of them on the market. I especially like those that would fall into the reproduction category.

I was sent some pink ombre print by my cyber friend Paula and I used it to make the six hexagons swirling around the middle. It is such a great print. It also comes in yellow and green. I've managed to find an online shop and have purchased some more of it to add to the old stash.


I didn't quite get the white print lines matched up when I was making this block but a little touch up with a brown Sakura pigma pen and you can't even tell. If it isn't right there is usually a way to make it right!


This is the final block. I'm not thrilled with it but I can live with it. I do really like the red flower in the middle and I suppose the yellow round works well. There is a bit of a black print at the outside edges of the yellow hexagons and it softens the corners so that the yellow hexagons actually look rounded. Maybe it is growing on me!


All of these rosettes will be connected with a path made of diamonds rather than hexagons. If full hexagons were used it would result in a much larger quilt. My quilt Butterscotch Ripple was joined with diamonds. It creates a different look to the quilt, one which I really like!

Butterscotch Ripple by Karen H 2013

So where will I get the diamonds? Easy peasy! A diamond is simply one third of a hexagon. In the following picture you can see that I've dissected a hexagon into three diamonds. I already have a master sheet of hexagons that I used for my Road 66 blocks so I'll simply make a copy, dissect the hexagons, make copies of the dissected hexagons and then cut them out.


These diamonds will be relatively small given that the hexagons are 1 1/4" so what I will do before basting is to fold the seam allowances over the paper and give them a finger press; this makes it very easy to ensure that the diamonds have lovely sharp points. In addition I plan on basting through the paper rather than basting from the back. Why you ask? Simply because it will be faster, easier and I don't plan on reusing the papers so if they have needle holes it won't matter.

Before I sign of I want to remind you that diamonds aren't just for connectors. Three diamonds can be fussy cut and then sewn back together to create this sort of effect.


Or how about this one?


If the fabrics aren't fussy cut but instead you use a one dark, one medium and one light fabric you have a tumbling block. Here you can see they are joined with triangles. Where do the triangles come from? Six triangles make the same hexagon so you just divide a diamond in half and voila....magic!


Want to have even more fun? Twelve diamonds make a hexagon star. You need six for the star and six for the background. What I particularly like about this star is that it is the background that is fussy cut and the star is cut from two tone-on-tone fabrics. The fussy cut background was intended to be made into a star but it just didn't work so I hung on to the diamonds until I figured out another way to use them. Never toss those basted hexagons or diamonds because at some point they may come in handy!


If you are interested in reading more about constructing, deconstructing and reconstructing hexagons you can read my blog post here.

I've got almost 30 quilts to unpack, refold and store away until my next trunk show. But first I'm going to make myself a nice cup of tea.

I'm linking up with on Help for Hexie-aholics at Sarah Did It.

Until I post again, happy sewing!
Karen H

Saturday, October 31, 2015

Work calls so sewing waits

I've been hired to do some consulting work and it is cutting into my sewing time. BAH! Every cloud has a silver lining so hopefully I'll be able to get myself some more fabrics with the money I earn! What quilt maker doesn't want more fabric?

I do however have two Road 66 blocks that I can share with you. I like the effect of the first block. The aqua hexagons seem to float on the dark striped background. The stripes don't line up perfectly but that's okay with me. My motto (or one of them) is this: if it bothers me I fix it and if I can live with it I leave it as it is. I find that the longer you leave things the easier it is to learn to live with them!


This is another interesting block. The middle rosette is made with a bit of fabric sent to my by my cyber friend in California. I had used the fabric to make a block for my Brinton Hall quilt and these lovely gold flowers were left over. I decided that this was a perfect spot to use those precious scraps!


Just in case you are interested, this is the block that I made with the same fabric. Now it is all gone but I managed to find an online shop that had some so I've order a bit more to add to my stash.


After my last post about my Mom (Anne H) and her quilts there were some questions about our quilting journey together. I started making quilts long before my Mom although she had taken a class where she learned to do a little applique. She saw what I was doing and decided to get started herself so I helped her out with what I had learned (most of which was figured out on my own). Her first quilt was a pink and off-white nine patch quilt. Although it is simple it is among her favourite quilts and she still uses it to this day! I taught her how to do English paper piecing and she has made several quilts and countless wall hangings. This is one that she made for me.


She embellished the hexagon flowers with a little bit of embroidery. Notice the fussy cut bee in the middle! That just screams "Anne H" because she often adds bees to her quilts.


Although her work centres primarily around applique with an African theme she still goes back to EPP hexagons every now and then!

Right! It is time for me to get back to work. Until I post again, happy sewing!

Karen H

Monday, October 26, 2015

Congratulations Mom

I'm sorry for the long silence. Why have I been so quiet? I've been working like crazy to get my Mom's (Anne) quilt machine quilted on my sewing machine so that she could bind it and show it at our Guild meeting. As usual Mom went and got her hair done so she was looking very nice for the meeting. The president announced that we were having a birthday celebration for a long time member and the oldest member of the Guild, Mom! There was a huge cake and she had help from Barbara and Klara when it came time to blow out the candles. Mom was very surprised that the executive had gone to the trouble to get her not one but two cakes!


The president went on to say that the executive had decided to recognize Mom's long membership by granting her an honourary membership. Was she surprised? You bet she was! It was such a special night for her and I can't say how grateful I am to the Guild executive for honouring her in this way. She is still on cloud 9!


After the main part of the meeting we had sew and share and that was Mom's chance to show off her newly completed A Little Bit of Africa. Unfortunately you can't see the quilting but you can see the finished quilt.


The members were very interested in her quilt and there was a lovely round of applause for her work! Way to go Mummsie!

Want to see another of Mom's quilts? We had friends visiting at the end of the week so we pulled out Mom's quilts and had a little trunk show. I managed to snap a few pictures. She made this quilt more than ten years ago and she reckons that there are more than 14,000 hexagons in it. It is huge but it is beautiful! It is entirely hand pieced and hand quilted.


Amidst all the excitement and entertaining I managed to finish two more Road 66 hexagon rosettes. I love the floral print in the middle. It is called Sophia Pearce from the Winterthur Collection. I stumbled across it at a local warehouse type store and bought all they had with was a few yards. There are some wonderful flowers in the print that will be perfect for broderie perse and fussy cut hexagons.

The pink ombre fabric was sent to me by a cyber friend in California. I had seen a picture of the Mount Mellick quilt she is working on and I commented on the fabric. Next thing I knew she sent me a chunk of it in the mail! In return I sent her a chunk of my Sophia Pearce fabric!


Tonight I am doing a trunk show on English Paper Piecing for the Rouge Valley Quilt Guild. Time for me to finish packing up the quilts and sort out my speaking notes!

Once again I apologize for the silence. One final reason for the silence is that I have been sketching and pulling fabrics for my next quilt along. It will of course involve English paper piecing, some traditional piecing and a little bit of applique. I think it will be a fun and hopefully educational quilt. Stay tuned for more details!

Until I post again, happy sewing!
Karen H