Showing posts with label Love Entwined. Show all posts

Sunday, December 1, 2013

Try it, you'll like it and Love Entwined

Did your mother encourage you to try new foods with the promise "you'll like it"? Mine did and she was often right although neither my brother nor I ever took to her grated carrots in mashed potatoes! Yesterday I took an Open Thread Bar workshop with Anita Zobens of Cotton Mills Thread Works.  Anita is an educator with Superior Threads.

We were to bring quilt sandwiches that measured 8 1/2" x 11" so that they are the size of standard paper. The top half was to be a light colour and the bottom dark. We used the embroidery stitches on our machines and experimented with all sorts of different threads.


This would give us the opportunity to see the effect of different threads on different colours. This in and of itself was a great lesson because different threads look very different depending on the fabric colour. This lovely variegated thread has a very different look on the two fabrics.


I experimented with some of the embroider stitches on my machine but decided I was more interested in experimenting with the threads and free motion quilting. I changed the foot to a darning foot and dropped the feed dogs. I wanted to quilt a little feather with a purple thread but I simply couldn't control the stitches and the needle was moving all over the place. What the heck? Oops, I still had the machine set for an embroidery stitch! Once I reset the mode it was fine!


I love the look and feel of silk thread. Very rich and it has a lovely sheen.


But no matter what I did I couldn't eliminate the whiskers on the back. I had a super fine poly thread (The Bottom Line) in the bobbin. I adjusted the tension from 1 to 9 and there was minimal improvement.


I eventually moved up to a heavier bobbin thread (So Fine 50 wt) and the whiskers on the back lessened but it still wasn't perfect. I have two Janome machines and had the same problem with both. The blue bobbin case doesn't help. I also tried a 70 and 90 needle with minimal change. If anyone has any suggestions I am open to them!

So what did I try that I thought I wouldn't like? Polyester threads such as Magnifico, Fantastico and Twist. They have a gorgeous sheen and my machine seemed to L-O-V-E them! And as it turned out I love them too! They have a rich sheen, are soft, hold their colour in hot and cold washing, don't shrink, do not produce lint and they are very affordable. I wasn't alone. Many of my classmates felt the same way!


I bought a cone of a green turquoise variegated thread that I think I'll use on Piccadilly to the Nines. You can see it in the bottom centre and the upper right in the picture above.


It will look great in the hourglass border.


My machine also really loved the So Fine 50 wt. It is another polyester thread and I'll use it to quilt the light background in the border and in the centre.

So Fine 50 wt.

So it was a good day and a wonderful workshop. Anita is a great speaker and extremely helpful and attentive.

I also purchased some spools of silk thread for the applique work on Love Entwined. I've almost completed Part 3. The red and pink hearts are pinned and ready for stitching down. In the next couple of days they will be stitched and then I can move on to the first vase and bouquet of flowers in the corner.


Finally don't forget to visit Quilting Gallery's Show and Tell. This week's theme is Stars. I'm showing A Pound of Stars but for all you hexie lovers be sure to check out Sheila's Stars Over Adelaide. It is gorgeous! You can vote for your favourites here.

That's it for today. Until I post again, happy experimenting with different threads!

Wednesday, November 20, 2013

An Update on my Love Entwined quilt and a give-away (my first)

I've been working away on so many things so progress on LE has been slow. But I did get the zigzag border pieces corrected and they are now stitched down. I've got two red posies pinned and ready to be stitched and have moved on to Part 3. I just couldn't resist! So here is where I'm at today.


Part 3 is the bit at the top. I've started stitching down what looks like cockscombs and I've used a soft gold fabric. There will be some melon wedges alternating between the cockscombs and I'm thinking of using a taupe fabric and I'll applique tiny orange flowers to give them a little sparkle. This quilt is looking lovely and warm.

Tomorrow is day one of Quilting Gallery's Blog Hop Party. I'm a participating blogger so that means I have a give-away planned for you. I hope you'll come back tomorrow so see what it is and what I've got planned for some upcoming posts. Here's a little teaser!

Until tomorrow, happy sewing!

Friday, November 15, 2013

Useful Patchwork Gifts, A Few of My Favourite Things and Love Entwined

I located the book that has the pattern for the quilt I call A Few of My Favourite Things. The book is Useful Patchwork Gifts and the name of the quilt in the book is My Room (Girl's Room).


The book was written by Chuck Nohara and it was published in 1993. There are a few quilts featured in the book.  I liked this scrap quilt which is described as a tablecloth with matching cushions!
 

I actually made this quilt as a baby gift for my friend's first child.

 
The quilt is consists of blocks that alternate large appliquéd numbers alternated with weird birds. Perhaps one day she will loan me the quilt so that I can take some pictures!


For those of you who love zakka style there are a some lovely little items that would delight you! Isn't this teapot cover cute?


I love hexagons so this basket is very tempting!


And now for the next four blocks in A Few of My Favourite Things! I have yet to photograph the entire quilt so fingers crossed that the weather cooperates so that I can get out and take a few pictures.


Progress continues on my LE quilt. The zigzag border is almost complete. I just have to make the corner units and then it will be ready to be stitched down. This panel measures 31.5". The zigzags are English paper pieced. My plan at this point is to pin the border down with tiny appliqué pins. I'll then stitch down the outside edge all the way around. Then I'll stitch down the inside edge however before doing so I will remove the basting thread and the papers.


For those of you who aren't familiar with Love Entwined it is a quilt pattern that has been drafted by Esther Aliu. The original was made in 1790! Esther is providing her pattern free of charge. The first section was released in June 2013 and each month another section of the pattern is released. Esther has set up a Yahoo group that you can join if you are interested in making this quilt. You can read about it here.

There'll be no post tomorrow because I am taking a half square triangle workshop with Jeanne Simpson. I've made zillions of half square triangles over the years but find that I always learn something new so I'm looking forward to tomorrow. And it is always fund to spend time with other quilters! So until I post again, happy sewing!

Monday, November 11, 2013

Measure once and cut twice

The making of the zigzag border of Love Entwined was going gangbusters! I decided to English paper piece the zigzags. I cut a huge stack of fabric and basted away for a couple of evenings. Look at the lovely stack of parallelograms that were completed.


I paired them up so I could start stitching them together.


In no time at all I had a stack of pairs sewn together so I stitched nine pairs together to see how they would look on my quilt. ARGHHH! The parallelograms are each just a little to large which means I've got to do some reverse sewing. ARGHHHH! I took apart the strip, shaved a whisker of paper off each paper. I then basted them for the second time and stitched them together for the second (and last) time. I tested once again and the strip is now a perfect fit.


As you can see it will be a scrappy border alternating light and darker prints.


So there you have it! I measured once and had to cut twice! So now I have hundreds of parallelograms to be re-engineered! I have said more than once that I learn something from every quilt I make. What I've learned from LE is that I should have made a test strip before diving in so I could make any necessary adjustments at the beginning. The good news is that there will be another zigzag border so the lesson will be put to good use!

Until I post again, happy reverse sewing!

Sunday, November 10, 2013

Progress on Love Entwined

Hello all you "The More The Merrier" quilters and you "One At A Time" quilters. It certainly looks like the majority prefers to have more than one project on the go at the same time! I have to admit that finishing a project is a wonderful feeling so I do admire the "One At A Timers" for that reason. But the feeling of excitement when I start a new project has so much allure, even more than finishing a project. What I have to say is that I am a firm believer in doing what works for you and what gives you both pleasure and a sense of accomplishment. And I am unanimous in that!

I have been working away on Love Entwined (LE) and it is so exciting pulling fabrics and experimenting! The pie wedge border is all stitched down so the next step is to add the ten little posies in between every other wedge of pie.  I am using The Bottom Line thread by Superior to stitch everything down. This fine thread just melts into the fabric and almost disappears. You can also see the flower I stitched down. There will be eight of them around the centre and another four at the edges. There'll be a little more about that later.


I love green and have tons of different green fabrics. How's a quilter to decide when there are so many choices? I decided to use five different greens!


Here the leaves are all stitched down. There are little stems and I will embroider them with a chain stitch with three strands of green floss rather than appliquéd stems.


The next step is the posies. I narrowed it down to two choices, both of which are fussy cut. The first is a little pink flower (this one is just rough cut from the fabric).


My second option is to repeat the circles in the compass.


I decided to go with the little pink flower so here it is stitched down.


Now back to those six petal flowers. Some people can get lots of points matching neatly in the centre and I could do that with back basting appliqué but I just didn't feel like doing that and as a result the points are not going to meet perfectly in the centre.


There is a solution to this problem! On May 24 I wrote about one of my Mom's first Africa quilts. She hand quilted the piece but there were a couple of small puckers. Her solution was to appliqué killer bees over the mistakes.

Killer bee covering a mistake

They looked so good that she added many more so that they looked intentional rather than being used to mask a mistake. The killer bees were the perfect finishing touch to her quilt! They add pizzazz!

Extra killer bee chasing the rhino right off the quilt!

What Mom taught me is that when you have a mistake that can't be fixed (or that you can't be bothered to fix) cover it up with something interesting! And that is exactly what I decided to do with these six petal flowers. There were three options that I was considering: a pink flower (on the right), the circles that I used in the compass (in the centre) or the circles I used in the compass only they are a little larger so that there is a cream border (on the left). I decided to go with the third option since I was going to use the pink flowers for the little posies between the pie wedges.


So as of this morning here is where LE stands!


The six petal flowers are made of pinks and reds and I threw in the odd bit of orange for a little pizzazz (I'm big on pizzazz).


The next step is to add a zigzag border and then I'll fill in the space between the centre and the border. That is going to involve a lot of work so I had better get cracking!

Until I post again, hope you get cracking too!

Friday, November 8, 2013

A Blogathon, the compass border on Love Entwined, more mugs and a question for you

Sew Sisters is a Canadian quilt shop (bricks and mortar and online). They have beautiful fabrics and very good prices. Sew Sisters is hosting a Canadian Blogathon from November 18 - 25th.  They've teamed up with Aurifil, Northcott and Robert Kaufman to bring you some fantastic giveaways! There will be host blogs with links to other blogs one of which will be mine! Sounds like great fun! There's a button to the Blogathon on the sidebar so check it out!

Work on Love Entwined continues. The compass is stitched down to the background fabric and the next step is to prepare and appliqué some pie wedges. I've got loads of charm squares that I've collected over the years so I plan on using many of them in this quilt which means it will be scrappy. These are the fabrics I selected for the wedges.


I gave them a good press and prepared them to be appliquéd. Roxanne Glue Baste-it was used to fix them in place. While the quilt will be scrappy I'll have to start thinking about how to provide at least some control the scrappiness whether with a particular fabric or a particular colour scheme. Right now it reads "warm" so my plan is to use lots of reds, pinks and roses and to use many of the circles that I used in the compass. I think that this plan will do the trick but the plan could change!


We took Mom for a little outing to a few shops one of which was the local thrift shop. Lucky me....I found two Japan mugs and I just love them. I like a big mug for my brew so I think that these might be better as Tiny World Make-Do Pincushions! The basket weave pattern around the bottom of the mugs is charming.


So I have a question for you. Are you a "one at a time" quilter or "the more the merrier" quilter? If you follow my blog you can probably guess which camp I'm in....the more the merrier! I know some people like to work on one project at a time and don't start another until the finish. And that is fine! I prefer to read one book at a time. But when it comes to needle arts I like to have lots of projects on the go and I have several good reasons to support this point of view:
  • I find that I learn and get inspired by the project I am working on and what I learn is transferrable to other in-progress projects;
  • If I get stuck and don't know what to do on a particular quilt I can set it aside and while I work on another project the solution generally comes to me (it's a little bit of being too close to the trees to be able to see the forest);
  • I find that there are certain projects that are better worked on in daylight so I need something that I can work on in the evenings;
  • I like variety and
  • It gives me an excuse to buy more fabric!
So which group do you fall into? Whichever it is I'm sure it is right for you! After all needle arts should be fun and there is no right or wrong, except when it comes to seam allowance which I learned the hard way in my early days! I say do what makes you happy and gives you pleasure! Time for me to get off my soapbox and work on Love Entwined!

Until I post again, happy sewing!

Thursday, November 7, 2013

Making circles to applique and Love Entwined - The Compass is finished!

Work continues on Love Entwined! The tiny 1/4" circles are appliquéd in place on the ring that circles the compass.


The excess fabric on the outside edge of the ring was trimmed away and the raw edge turned under. I've pinned the centre circle in place because I'm not yet sure that this is what I want to use.


The compass itself is still a little too bland for my liking. I went through my fabric and found this fabric that I bought when I went on a field trip with friends this summer. It is the perfect solution to my problem! I cut out some circles and prepared them to be appliquéd to the compass. Before I show you what I did I'll show you how I did it!


Although I described my method for making circles yesterday I thought I would demonstrate it with pictures. I have Mylar which is a heat resistant plastic template material but I'm always reluctant to use plastic if there is another more environmentally friendly alternative. For me that alternative is light weight cardboard. I save cardboard from cereal boxes and use it to make templates. So step one is to cut a circle from my cardboard that is the size of the finished circle. I make sure that the edges are smooth so you need sharp scissors and rather than chopping with the scissors I guide the cardboard through the scissor at the inner edge of the blades rather than at the point of the blades. The white circles in the  picture below are my cardboard templates.


I cut my fabric making sure to add a seam allowance. For tiny circles I add slightly less than a quarter of an inch. For larger circles like those in my Lazy Punk blocks I generally cut a seam allowance that is a little more generous than a quarter of an inch.

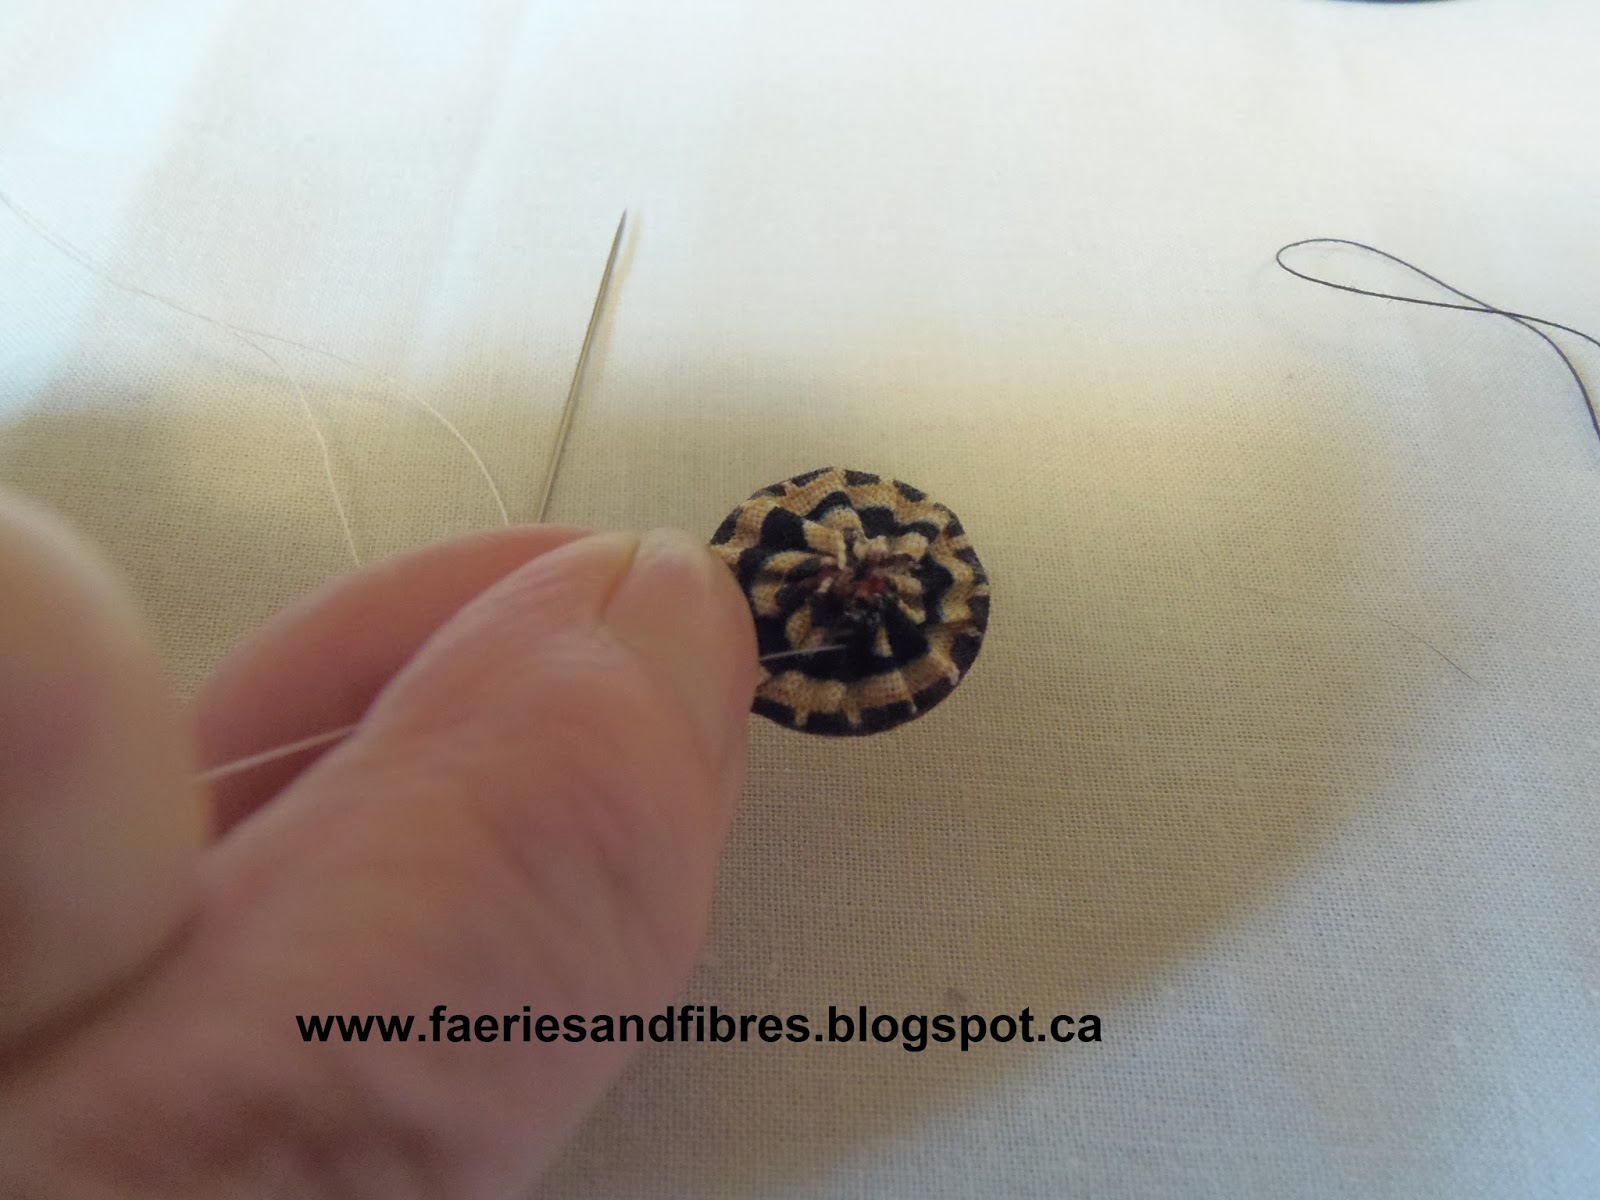
I thread a needle and take small basting stitches all around the outside edge of the circle. It is important to take small stitches so that the gathers will be small and the edge will turn under smoothly. Do not tie off the thread because it will be used to gather up the fabric.


I place the cardboard template in the centre of my fabric and I pinch the two together with my thumb and index finger.


With my other hand I gently draw up the thread to gather the fabric snugly over the cardboard. I leave the threaded needle attached.


I take the circle to my ironing board and press the right side and the back side. I then spray a little starch on the right side and press once again making sure to keep the heat on the piece until the starch is dry.


I gently loosen the gathers and remove the cardboard template.


I gently draw up the gathering thread to bring the gathers back in place.


I take a couple of tacking stitches through one of the gathers and then clip the thread.


There you have it! A 5/8" circle and a 2' circle with the same method. I used this same technique to make the 1/4" circles in the ring that circled the compass block in Love Entwined!

If I have a lot of circles to make I will cut out multiple cardboard templates and thread an equal number of needles. I'll do all of the gathering, pressing starching and stitching off. In no time at all I have a pile of circles all set to be appliquéd in place! I get dozens of uses out of each cardboard circle and when then are worn out, into the recycling box they go!


 So I made a bunch of circles from the fabric I showed you at the beginning of this post and I appliquéd then on the pink compass points. I am very happy with the effect!


I still think that this block needs an little something extra and I might just appliqué a little 1/4" circle in the middle. I've pinned one in place to give you an idea of the effect I am going for.

 The whole thing needs a good pressing before I stitch it in place so that will be on my to do list tomorrow.

Hope you enjoyed seeing how I make my circles. Until I post again, have fun making circles!