Showing posts with label Superior Threads. Show all posts

Wednesday, April 2, 2014

Piccadilly to the Nines, Lionel and another Soupcon trunk show

I just celebrated the one year anniversary of my blog and I've got two giveaways: a $30 gift certificate from Superior

and two yards of fabric that is ideal for fussy cutting or broderie perse!


To enter my giveaways go here. The winners will be announced on April 4, 2014! Good luck! As part of my anniversary celebration I thought I would share another story from the garden. This one is about Lionel and it was published back in August! Nice guy that he is, Lionel wouldn't hurt a fly or the sow bug on his schnoz! Want to know why? You can read his story here!


I've stitched my first Godstone Grannies block and it will be the block that is in the center of the quilt. I am very pleased with how it turned out! I couldn't get a picture that shows the colours to their best advantage but it is very buttery and caramelly and butterscotchy! And best of all there are zero calories in all that sweet goodness!
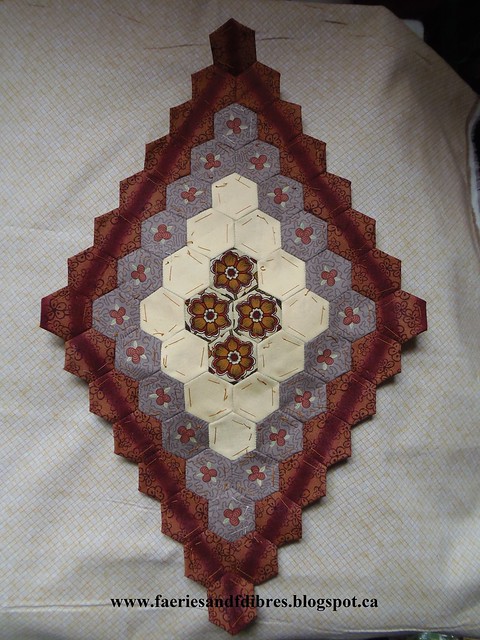

Yesterday I told you that I store my cut blocks in little bags. Some of these Godstone Grannies blocks are "unusual" in their arrangement so I printed a picture of the quilt, cut out the blocks and glued them to the back of the little paper with my block number and cutting instructions. When I'm ready to sew the block I'll have the little picture handy so I get the arrangement right!


Fingers crossed that I can get another block stitched in the next couple of days! But I'm itching to get going on the quilting of my Piccadilly to the Nines because I want to try out my new Fantastico thread from Superior.It is a bright green, lime green and turquoise variegated thread. It sounds bold but it is actually a very fresh green/blue thread! You can see it here. The quilt is pinned so it won't be long until I get started!


The Soupcon quilts keep rolling in! I am so impressed with all of the quilts. Each quilter has taken the ideas and then used her own creativity to make the quilt her own. It is so exciting and rewarding to see what everyone is doing! So how about a little trunk show? You know the routine....grab a cuppa, settle back and enjoy the picture show!

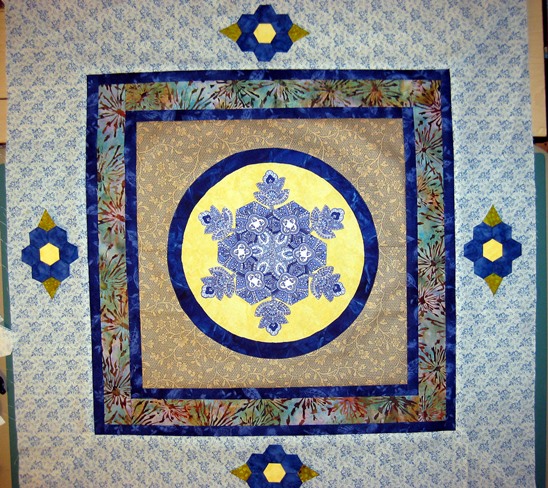
Angie's quilt is looking good! There's no doubt about it: the star is the star of this quilt! The yellow just glows and it shows off her blue star to the best advantage. I am a big fan of narrow borders because I think they frame a quilt so elegantly. Although I had planned a pieced border in between the narrow borders Angie use a batik and it works perfectly! I also like the way she has handled the little hexagons in the border! Keep up the great work Angie! Be sure to visit Angie's blog, Quilting Reader's Garden for more pictures!

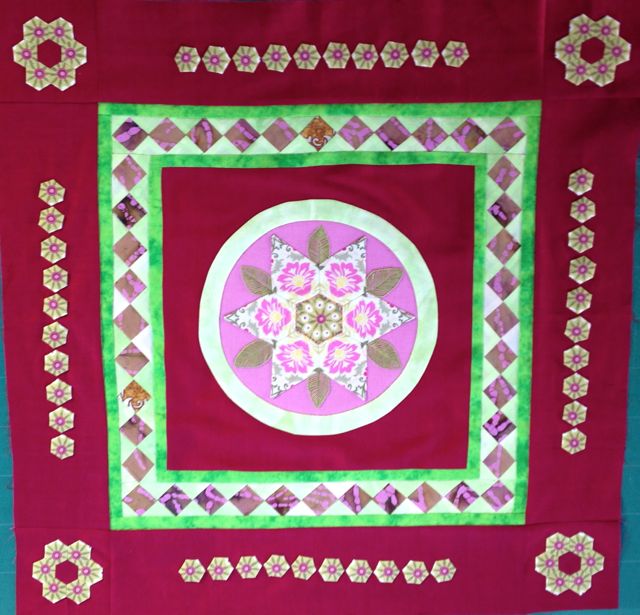
Jean, Jean my Soupcon machine!!! Jean Cockburn  has posted three more pictures of her Soupcon quilts and each one is different but there is one common thread and that is Jean's ability to boldly and confidently use colour. I really believe she has a rare talent! In the first quilt she has fussy cut all of the little hexagons in the border and they are wonderful.


Again Jean has fussy cut flowers for the hexagons in the border and they are so pretty. Such strong colours but there is a softness to this quilt and it has great appeal! Be sure to visit Jean's blog When You Love Blue.

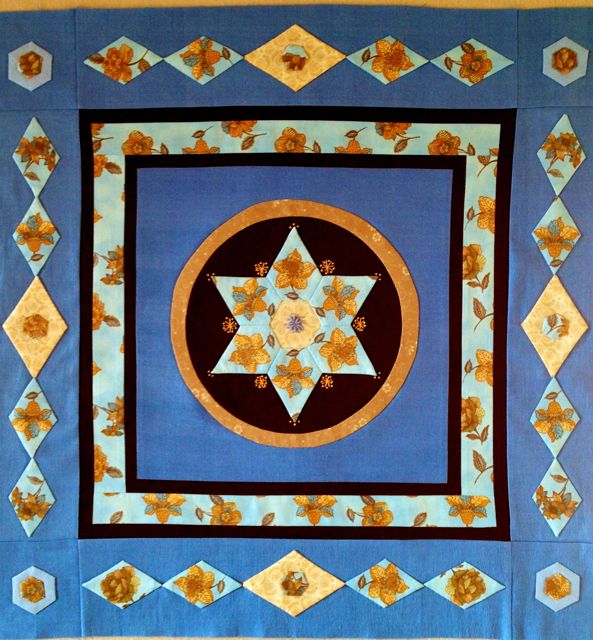
Jean's third quilt is my favourite of the three if for no other reason that blue and buttery gold is one of my favourite colour combinations. Again Jean has fussy cut flowers for the diamonds in the border. I think the effort that goes into fussy cutting pays off in spades when you see the results in a quilt.

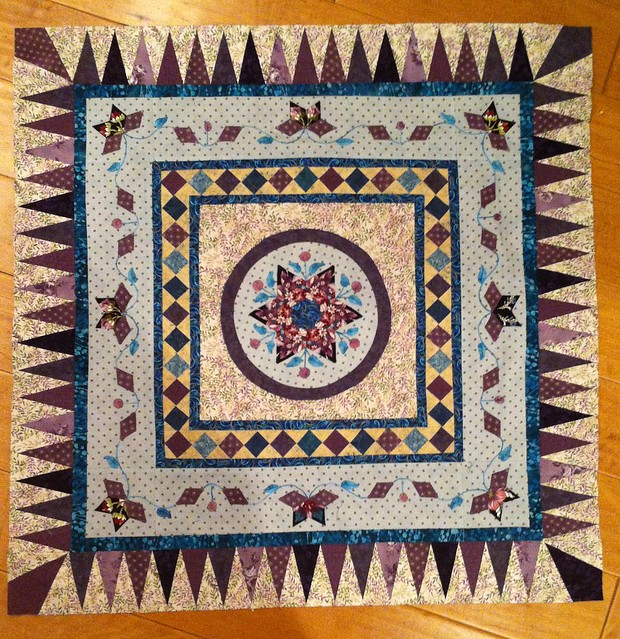
Colleen (aka Skootchover) has completed her Step 6 border and just look at what she has done in the corners! I LOVE it! My poor plain corners are going to have to be re-engineered! This is such a delicate quilt and Colleen has done a fabulous job of personalizing it each step of the way! I can see this quilt as the medallion of a fabulous full size quilt!


Deb Sew'n'Sew has also completed the final step and again we see a unique corner treatment. I love how the lavenders used in the border pull the whole quilt together in the best possible way! This is yet another quilt that started out pretty and it just kept getting better and better every step of the way. Be sure to drop by Deb's blog, The Toothfairy Quilter.

Well I think that's it for today. I've got some sewing to do. So until I post again, happy sewing!

Karen H

Tuesday, April 1, 2014

My Giveaway and getting organized for my Godstone Grannies

Before I get started don't forget to enter my giveaway. There are two prizes. The first is 2 yards of fabric perfect for fussy cutting. Celia in England inquired about the stripe fabric in my giveaway. Celia, you are a no reply blogger so I couldn't email the information (or enter you in the draw). The fabric is by R.E.D. International Textiles. The repeat is 8" along the width and 8" along the length.


and a $30 gift certificate from Superior Threads. A big thank you to Bob Purcell at Superior for this generous gift!


To enter my giveaways go here. I will draw the winner on Friday, April 4, 2014 at 9:00 EDT. I reply to every comment so if you don't hear from me it means you are a no reply blogger and you won't be entered unless you send me your email address. There are several no-reply comments so if you haven't heard from me please send me an email with your email or leave another comment with your email address so I can enter you in the draw!

There's another giveaway running over at Karen's Quilts, Crows and Cardinals. She is celebrating the launch of her design, pattern and quilting company, Redbird Quilt Co. with a month of giveaways.


You can read about Karen's giveaways here.  Also if you want to learn needle turn applique be sure to visit Karen's blog. She has at least six step by step tutorials to get you sewing like an expert in no time flat! The photographs and instructions are fabulous!

I'm getting started cutting my blocks for my version of the Godstone Grannies Coverlet.

The first thing I did was draw a "map" of my quilt block layout and I numbered the whole diamonds and the partial blocks. This quilt has some odd hexagon arrangements but most are a standard diamond arrangement starting with 4 in the center, a second round of 12 hexagons, a third round of 20 hexagons and a fourth round of 28 hexagons. Notice that the increment is 8 so if I were inclined to add a fifth round I would need 36 hexagons.


I cut multiple blocks at one time so I use my map to keep track of where I am. I make notes on the block to let me know where I am when cutting fabric. The diamonds in the quilt have four rounds so below my block number I write the rounds, 1, 2, 3 and 4. When I cut out one of the rounds I put a dot the upper point of the diamond to let me know I've cut some of the patches and I put an X through the round that is cut. In the example below I've cut all four rounds in diamond 1.


I used a marker to colour the dot so I know at a glance that an entire diamond has had all patches cut out.


I love these little zip top snack bags for storing my hexagon patches that are cut out. I've used them over and over again and they are a perfect size for my hexagon projects.


I cut the patches and put a little label in with the fabrics. It shows the block number and what rounds have been cut and what needs to be cut. I'll also use the label to make notes about the block to remind me of what I want to do with it! For example, while cutting I might have an idea about a particular fabric I want to use so I'll make a note of it and pull that fabric later on.


I like working this way because if I have a fabric that is repeated in several blocks I can cut that fabric all at once and then tuck the patches in the block bag they belong to.  When I've cut all of the patches I can fold up the fabric and put it away. If I cut one block at a time and I know I'm going to have to repeat fabrics then I've got to keep the fabrics together. I would rather just get the cutting over and done with quickly so I can start sewing!

When I need piles of hexagons from the same fabric I'll be using strips of fabric to cut them out. You can read about how I do this here. However many of the patches in my quilt will be fussy cut and I want to do it quickly. I won't be trying to create a perfect kaleidoscopic effect so each patch doesn't have to be exactly identical. In the picture below you can see my window template on the wrong side of my fabric. I center it over the motif, apply a tiny little dab of glue to my paper hexagon and press it to fabric. I do this for the number of patches I need and then I cut them out with scissors and shove them in their little zip lock bag! This method makes the job go a little faster!


Before I go, I thought I would share a link to some of my critters' summertime stories! This one is about the rabbits and  the dreaded Teetoo! It started here and ended here.


Until I post again, happy sewing!
Karen H

Monday, March 31, 2014

Happy Anniversary to Me (or rather to my blog)!

HAPPY ANNIVERSARY FAERIES AND FIBRES!


Today is my blog's one year anniversary! A bunch of friends dropped by to help me celebrate!

It has been a busy, productive year for me. I've shared quilts, patterns, tips, techniques and my first ever quilt along (QAL), Soupcon!  I've met many wonderful people that I wouldn't otherwise have met and blogging has allowed me to learn from others! But this is an anniversary party and what's a party without gifts? I've got some wonderful gifts that you could win!

As you know I love Superior Threads. To help me celebrate Superior Threads has very generously donated a $30 gift certificate as a giveaway for one of my blog readers! I would like to extend a very heartfelt thank you to Bob Purcell at Superior Threads for this gift. The lucky winner can use it to purchase the Superior products of her choice! If you haven't tried them you are in for a treat!


This is not a paid advertisement! I am a fan of Superior Threads and when I quilt I always use The Bottom Line in my bobbin. It is a fine polyester thread with a gorgeous sheen. But it isn't just for the bobbin - I also love to quilt with it. I used The Bottom Line to quilt this little miniature which was donated to my Guild's Silent Auction last Spring.


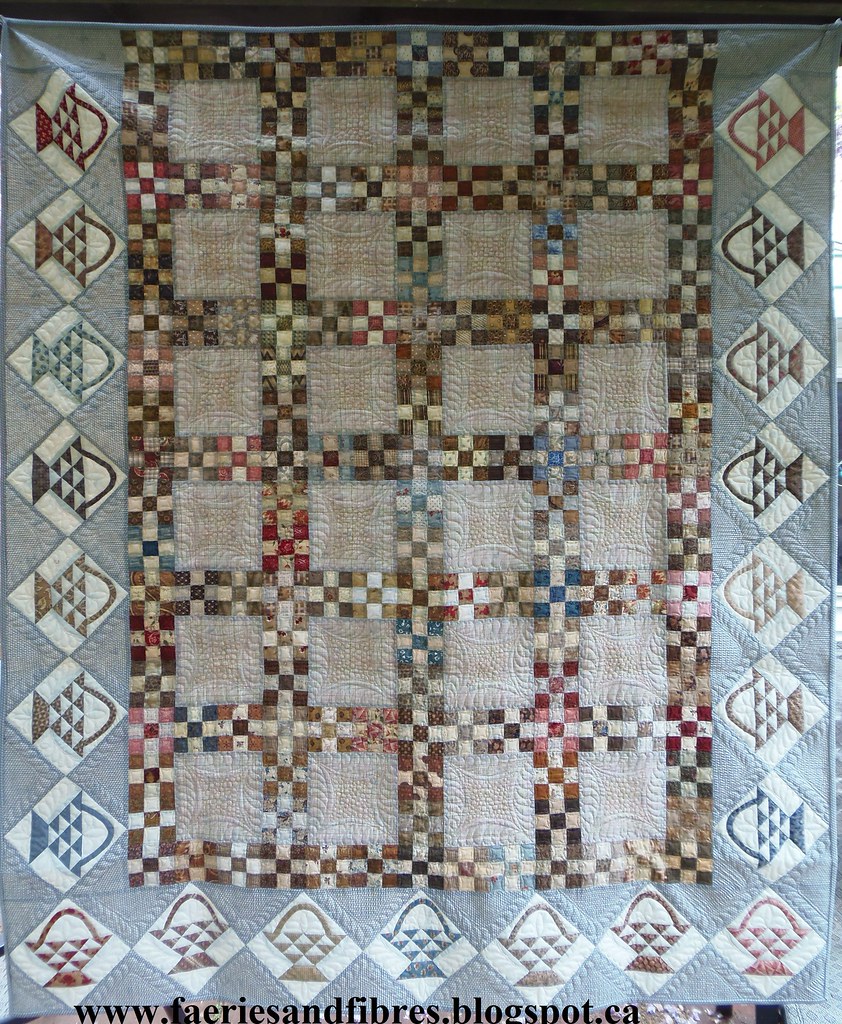
I also used it to quilt Baskets and Nine Patches. I used a lovely neutral colour (Statue) for most of the quilting and in the centre of the large beige squares I used Gold. Cindy Needham highly recommended that colour in one of her online classes and so I thought I would try it out. It is a very lovely and versatile colour that adds richness to a quilt.


I just finished quilting Lazy Girl and I used So Fine! on top and am in love with it. It is soft, has a little sheen and it is fine so when I backtrack I don't get a heavy thread build-up. Best of all it is very affordable and a cone goes a very long way! I used Monopoly for my stitch in the ditch. Again, one cone goes a very, very long way so it is a great investment!


Kimono is a silk and it is another of my favourites not only for quilting but also for applique. It just disappears into the fabric! I've been using it in my Love Entwined quilt. That project has been set aside for a while and I should get back to it!


And I've got cones of Magnifico and Fantastico that will be used in some upcoming projects including 81, The Giant Monstrosity!


But wait - there's more! I've got a second giveaway. I love to add fussy cut patches to my quilts so I have a bundle of fabric that is perfect for fussy cutting! It includes two prints each measuring one yard! There are so many great bits for fussy cutting including the stripes! One lucky person will win both cuts.


Enter my Giveaways!
So how do do you enter my giveaways? Simple! Just leave me a comment at the bottom of this post! Many of the comments I get are from no-reply bloggers. How do you know you are a no reply blogger? I answer every comment so if you don't hear from me you odds are that you are a no-reply blogger so be sure to add your email address to your comment. If you are a no-reply blogger and I don't have your email address you won't be entered in the draws. For three additional chances to win you can:
  1. Sign up for the Superior Threads newsletter here and leave me a comment to let me know. If you are already signed up just let me know in a comment.
  2. Follow my blog and leave me a comment to let me know how you are following. If you are already a follower let me know how in your comment.
  3. Mention my giveaway on your blog and leave me a comment with a link to your post for a fourth chance.
Remember, if you don't get an email from me it likely means you are a no-reply blogger so you won't be entered in the draw unless you include your email in a comment.

I'm a bit of a Neanderthal when it comes to computers so I'm going to select a winner the old fashioned way: each entry will go in a hat and I will draw the names of the winners at 9:00 am EDT on April 4th, 2014! Good luck everyone!

It was a very busy year for me;  300+ posts published, more than 80,000 page views and the odd ice storm complete with a multi-day power outage thrown. When the weather was good I shared pictures from my garden. This spider in the pink peonies last June is one of my favourites!


Along the way there were a few curios like my whisker collection.


Then there was Saturn Rock! It rocks!


I had fun with my stories about the critters in the garden such as the three part story about the zebras and Teetoo (Part 1, Part 2 and Part 3).

Zebra Fellow and Zebra Girl during the filming of 
the adventure story from the garden

How about the Turtle Girls doing yoga! Well at least one is doing yoga and I think she's mastered downward turtle!


The snow is almost gone so the garden will start up again soon and I hope to have more picture for you! Maybe this week I'll see the first of the snowdrops! And of course there will be quilts - lots of quilts!

For all of you hexie lovers I've got another QAL planned with a start date in April and more quilts, tips, techniques and ideas to share! The next QAL is called Value Proposition and I hope you'll follow along with me!

Thank you to my followers old and new! Blogging has been so much fun for me and I hope you've enjoyed reading and sewing along with me over the past year! I appreciate that you take time from your busy schedules to read my blog and I thank you from the bottom of my heart for all the lovely comments. I'll try to keep my future posts fun, pretty and most importantly informative!

As always, until I post again happy sewing!
Karen H

Sunday, March 30, 2014

A surprise, more machine quilting and Godstone Grannies

Tomorrow is March 31 and it is a special day for me! It is my blog's one year anniversary. I've very much enjoyed meeting and getting to know so many wonderful people. As you know I love working with Superior Threads. It is a great company with great products and wonderful customer service ad it shares loads of information that is helpful to quilters. Check out the long list of Superior reference guides here. Superior has agreed to help me celebrate my anniversary! How you ask? Come back tomorrow to find out!

I really enjoyed quilting the open spaces, also known as negative space, in my Lazy Girl quilt. I used Superior So Fine! on top and as always The Bottom Line in the bobbin. I wanted to try out a few more ideas but most of my quilts consist of many small pieces. So I asked my friend if she had a small quilt top I could play around with and she did! She made a lovely Chinese coins quilt from a bag of scraps. She pin basted the quilt so I could play around with it. As always step one is stitch in the ditch! I'll try quilting this one with some nice loopy designs including feathers in the beige columns!


The scraps are leftover from another quilter's project. There's always a home for scraps no matter the size or shape! This is such a bright and happy quilt. I've just about finished the stitch in the ditch and time permitting I'll get cracking on the quilting today or tomorrow!


I had shown you a little cardboard suitcase I found and I plan to use it to store the bits and pieces for my next project. So what am I going to make? You can see the clue on the right hand side! It's going to be another hexagon quilt!


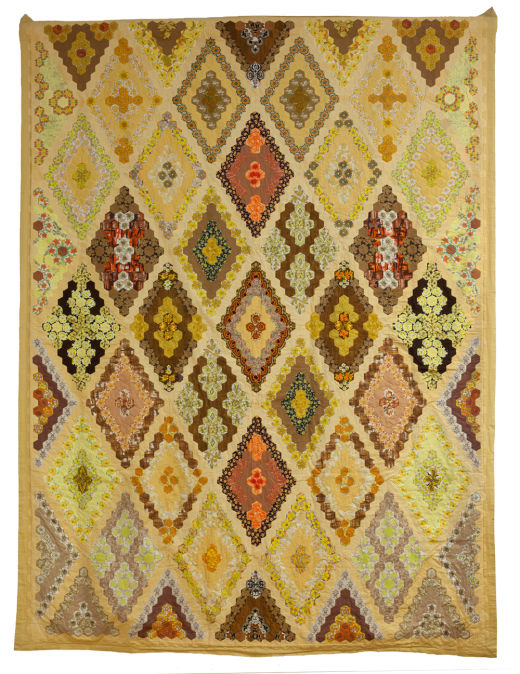
While travelling around the interweb I came across a picture of a hexagon quilt that I just fell in love with so it is the inspiration for my next hexagon quilt. The quilt is at the Quilt Museum and Gallery in York, England. It is a museum dedicated to quilting and textile arts. I encourage you to have a visit and a look around the Gallery.The quilt I am in love with is called the Godstone Grannies Coverlet and is dated 1960-1965. It was made at the WI Denman College by a group of women from several Women's Institutes. The description reads "materials for the patchwork were largely supplied by dressmaking friends". You can read about the quilt here.
Aside from the fact that the blocks are diamond shaped, I love how colour and print is used to create visual interest and secondly patterns. What you can't see clearly in this picture is that most of the patches are fussy cut. I'm not sure that I'll fussy cut all of the patches but I will certainly fussy cut many of them. The first thing I did was sketch out some of the blocks to be able to calculate the number of hexagons I would need for the path and the amount of fabric. I determined that I will need 17 hexies to make the "V" shape that is shaded in my diagram and I'll need 31 V's in total. I'm using a subtle rosey buttery print for the path. My diagram is sitting on top of my path fabric.


I've cut out all of my path fabrics and glue basted my 3/4" hexagons to the so that they can be thread basted.


Here is the first V completed!


Earlier this year I saw some 100% cotton napkins on sale and I was able to get a package of four for $3 so I snapped them up because I thought that they would be great for fussy cutting! This just might be the project that they go into!

I'll keep you posted on my Godstone Grannies hexagon quilt progress and my machine quilting progress!

And now a little Soupcon update and trunk show. I've been asked if I will share what I do with my two Soupcons as far as making them larger, quilting and binding. So I think I'll do just that (I need more hours in the day!). I'll get started as quickly as possible and I'll share with you what I do! And now for the mini trunk show!

Jean's been busy embellishing her Step 5 border on her pink and purple Soupcon. She had added lots of little details including some embroidered embellishments. I love the combination of diamonds with little hexagons on either side of the large hexagons. So very effective!


Cissa K has completed her Step 6 and this quilt is and absolute treat for the eye. There are lovely embellishments, fussy cutting and her fabric choices are making me drool. The little blue stars on the red hexagons are lovely! Well done Cissa!


Until I post again tomorrow, happy sewing!
Karen H

Friday, March 21, 2014

Filling in the spaces

I'm working my sock (or gloves) off on Lazy Girl! Do you think it is time for a pair of new gloves? They are pretty beat up but they are like a pair of old shoes....so comfortable!

I've quilted the feather that runs the length of the quilt on one side and am debating whether or not to stitch a feather on the other side. In the meanwhile I'll continue with the first feather. I echoed stitched around the feather. I'm using Superior's So Fine (LOVE IT) on top and Superior's The Bottom Line in the bobbin.


I added a second echo because I really want to flatten the area immediately next to the feather.

Here you can see both sides of the feather have a double echo. At this point the background on either side of the feather appears to come forward and the feather recedes. I want it the other way around.


To do this I'll fill in the background. My original plan was to meander or stipple but that gets boring very quickly. I saw my practice swatches and decided to just do a mish mash of different shapes and designs - kind of mindless doodling. I use my test swatches to test my threads, needle and machine setting each day before I start quilting and I think they look interesting so I'll just use a bunch of different stitches to fill in the background. Here is the first side filled in and I am a happy quilter! There are pearls, and swirls, feathers and bouncing bananas. I also tried a little bit of McTavishing! So Fine is a great thread for this type of quilting because it is fine enough that I'm not getting thread build-up but heavy enough that I can see the stitches.


Here it is a little closer. What I like about this stitching is that it is surprisingly easy or at least easier than feathers which require long, smooth, sweeping, large movements. While the feather shape itself is quite easy once you deconstruct it, you are working over a very larger area so you are making sure your quilt is flat and smooth and your hand/arm movements are even. The filler is small so it is very small muscle movement that is required and mistakes are less obvious! There is so much going on that if there is a mistake it isn't obvious and although it is densely quilted it goes very quickly.


Here is the other side of the feather filled in with doodling! When I worked myself into a corner I could just travel on or parallel to a line I had already quilted so that I could get to an unquilted area. Again I'm not getting a thread build-up because the So Fine thread by Superior is quite fine .


And one more close-up!


And this is the feather with both sides filled in. Now the feather comes forward and the background recedes which is exactly the look I was going for! I'm doing all of the quilting with Superior's So Fine and am just loving it! I'm having to do a little travelling (sewing on lines that have already been quilted) to get to other spaces so they can be filled in and I'm not getting a heavy thread build-up. The thread colour is soft grey so it works well with the background fabric and again helps minimize the thread build-up.


I've said it many times and it bears repeating - the only way to learn machine quilting skills it to practice, practice, practice. All of that practice is paying off because now I've got an interesting filler design and the idea came from my practice swatches! If' you want to get started free motion quilting (FMQ) my best advice is to make yourself some small sandwiches and use thread that you and your machine like and start quilting shapes that are comfortable. I'll bet you can quilt your name with no difficulty at all. Cursive writing is a great way to practice FMQ!

I've also got the next quilt back ready so when I done with Lazy Girl I can get started on Piccadilly to the Nines. I've got some beautiful thread for the hourglass border. It is a variegated green thread by Superior and it is called Fantastico. It has a gorgeous sheen and I can't wait to try it out!


Yesterday I had a sewing day with friends. My Mom pulled out a set of six old linens with beautiful cut work. They are little envelope and Mom was asking if anyone knew how they were intended to be used. The motif is a pear so I am assuming they have something to do with a dining room. Does anyone have any ideas?

Finally I have a request. Does anyone out there know of a shop that has this fabric in stock? If so could you leave me the details in a comment or send me an email. I just love the little birds and the colour but can't find the fabric anywhere. It is made by Moda and it is from the line Dominique II. The colour is paprika.


That's it for today! Until I post tomorrow, happy sewing!
Karen H