Did you miss me yesterday? I went to the CQA (Canadian Quilters' Association) Quilt Show. It was a juried show and there were many amazing quilts to be seen. I was hoping to be able to share some pictures but no photography was permitted in the juried show. However the winners are posted on the CQA site.
There was an invitational show and photography was permitted. One of the featured artists in the invitational show was Renske Helmuth who is an extremely talented appliqueist and teacher. Renske coordinates efforts amongst quilters in her Guild to create quilts which are auctioned off at the Mennonite Relief Auction each year. This year the theme for the quilt project was Africa. Although my Mom is not part of that guild she was allowed to submit a small quilt and it was included in the quilt. The finished quilt was on display and I was able to take a picture to share with you! The title of the quilt is A Cooperative Effort. How appropriate!
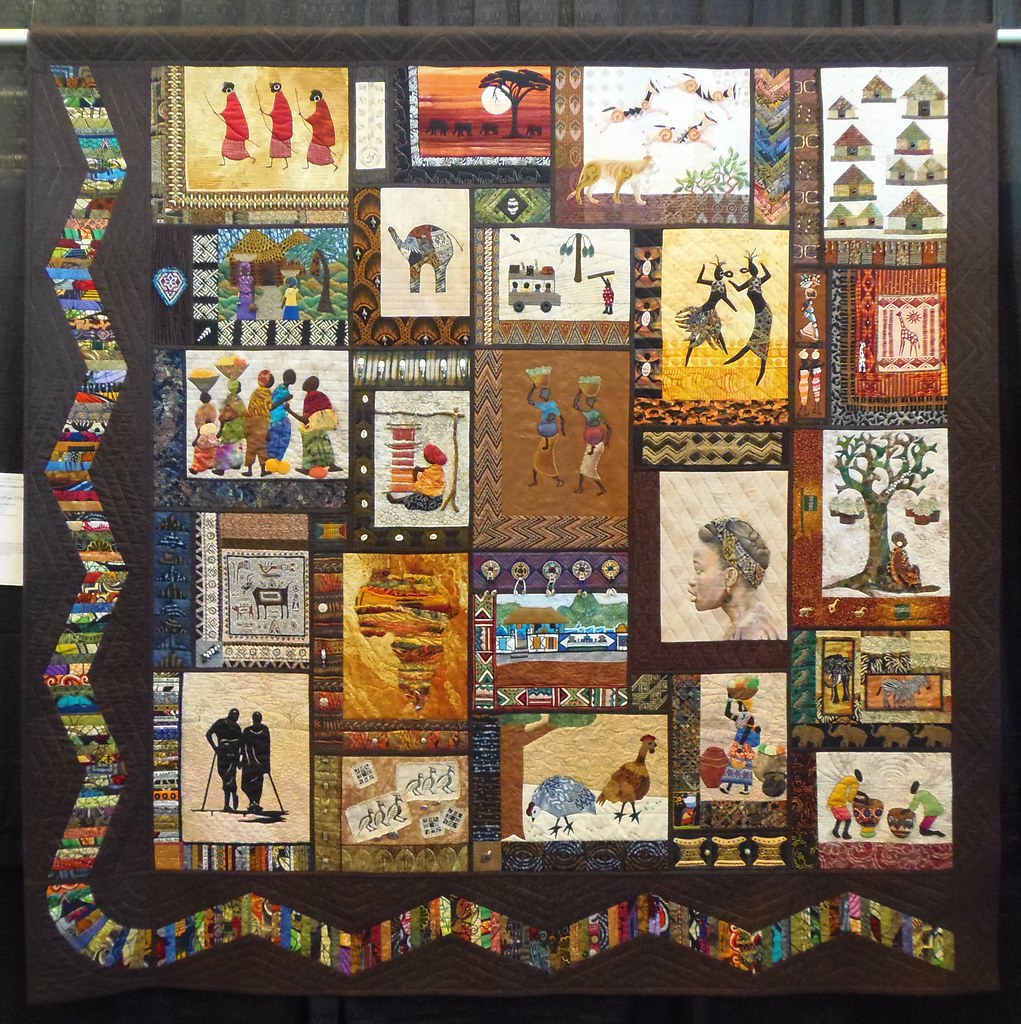
Isn't this quilt stunning? Do you recognize my Mom's quilt? It is in the upper left hand corner with the three Masai. This is what it looked like before it was trimmed. These pictures and a few others were posted on my blog on July 19, 2013. It was so exciting to see Mom's contribution in the quilt. I just LOVE her block and think it glows in the finished quilt!
I now have a few more Godstone Grannies (GG) blocks to share. Most of them now have the path stitched to them so this means I can start sewing the blocks together. I'll be sure to share my assembly plan with you in the next few days.
Today I plan to continue removing the ink stains from my Mom's Lazy Punk blocks with hairspray. Karen left a great comment explaining why the hairspray worked. I thought I would share her explanation with you. Karen wrote that "the reason it worked was the alcohol in the hairspray acted as a solvent. Works great on most ink stains. It can also work on grease as it breaks it down, although I've found original blue dawn to work best on grease.
I keep hydrogen peroxide, blue Dawn, and alcohol in my laundry
cupboard for just such emergencies. I call it my first aid kit for fabrics!
Hydrogen peroxide works on protein stains like blood and grass. Blue Dawn for grease based stains. And rubbing alcohol for inks, dyes and lacquer based stains."
Thanks Karen for a very informative and helpful message! Stains will be no match for us now that we are armed with this great advice!
On Friday I test drove the Juki TL2010Q and I'll share my thoughts on that machine with you tomorrow. Until then, happy sewing!
Karen H
Showing posts with label Masai. Show all posts
Sunday, June 15, 2014
Sunday, September 8, 2013
African quilts and 81 is DONE!
As promised here are the pictures of Mom's (Anne H) latest African themed quilts. I love her Masai pieces and hope that she has more planned. The colours are simple but striking and she is able to create so much movement in her pieces. The quilt is bound with a facing so the edge is "clean".
The tree trunks and branches are embroidered and she used acrylic paint to shade the trees. I quilted around the trees but not inside the trees so they are dimensional. I took the same approach with the Masai, the huts and the "drums" in the borders. The background is heavily quilting so the figures pop.
I like that Mom looks at her background fabrics and uses them to advantage. There was a dark mottled section in the middle ground and she lined that up with the doorway in the hut to create the illusion of a path. I think this piece turned out really well.
This is her second piece which depicts a village.
I love the way she made the roofs for the huts. She frayed the edge of the fabric to create the illusion of thatch. Another fine finish!
Speaking of finishes, I now have the final borders on "81". It is big....very big! It measures 92" by 97" and it is very heavy! I dread quilting it! I couldn't hang it to take a picture so I'm going to have to wait until some tall men drop by with a pick up truck. They can stand in the truck bed and hold up the quilt so that I can take pictures. In the meanwhile I spread in on a bed but can't get the whole quilt in the shot. But this will give you and idea! You can see some of the diamond border at the top.
No sooner did I get it on the bed when you-know-who showed up! Gump! I've said it before but it bears repeating....what is it with cats and quilts?
And before I go I thought I would share a few shots from the garden.
Until I post again, happy sewing!
The tree trunks and branches are embroidered and she used acrylic paint to shade the trees. I quilted around the trees but not inside the trees so they are dimensional. I took the same approach with the Masai, the huts and the "drums" in the borders. The background is heavily quilting so the figures pop.
I like that Mom looks at her background fabrics and uses them to advantage. There was a dark mottled section in the middle ground and she lined that up with the doorway in the hut to create the illusion of a path. I think this piece turned out really well.
This is her second piece which depicts a village.
I love the way she made the roofs for the huts. She frayed the edge of the fabric to create the illusion of thatch. Another fine finish!
Speaking of finishes, I now have the final borders on "81". It is big....very big! It measures 92" by 97" and it is very heavy! I dread quilting it! I couldn't hang it to take a picture so I'm going to have to wait until some tall men drop by with a pick up truck. They can stand in the truck bed and hold up the quilt so that I can take pictures. In the meanwhile I spread in on a bed but can't get the whole quilt in the shot. But this will give you and idea! You can see some of the diamond border at the top.
No sooner did I get it on the bed when you-know-who showed up! Gump! I've said it before but it bears repeating....what is it with cats and quilts?
And before I go I thought I would share a few shots from the garden.
The hops are almost ready for harvesting
And the artic kiwis will make a nice treat
Gump the Quilt Whisperer
Until I post again, happy sewing!
Friday, July 19, 2013
Anne H's Masai quilt is finished and making a swag border my way
Anne H (aka Mom) has finished her second small quilt for the Mennonite Relief Auction quilt. This one features three Masai.
Even with her broken right arm she is managing to slowly get work done. We go back to the specialist late next week to see how it is healing! At 93 it doesn't happen so quickly but we are keeping our fingers crossed that she is on the mend. If not, she has another three weeks to go in the cement brace.
I'm busy working away on Mon's Anna quilt and it is coming along nicely. A big thank you to Kath (you can visit her blog here and see a great video of her drive by Stonehenge!) who left a comment and asked how Mom and I managed to get such lovely smooth curves on the swags.
I learned how to sew using paper patterns when I was a kid and that knowledge stayed with me. I use these skills in all sorts of ways and one of them is the swag borders in the Anna H quilt. This is how Mom and I got the smooth curves on her Anna H quilt.
The first step was to determine the placement of the flower hexagons (the four hexagons at the bottom edge) because they would be the points where the swags connected. Once we had determined the correct placement these flowers were basted in place. We like to use Roxanne Glue Baste-It but you can use any method you choose.
The next step was to position the individual hexagons to form one swag between the two hexagons on the bottom edge. When we were satisfied with the arrangement they were glue basted in place.
You can see how the paper template fits under the original swag.
To create the next swag the template was moved to the next area where a swag was to needed and the edges of the hexagon flowers and the bottom of the border were lined up with the paper template. Then it was simply a matter of placing loose hexagons in place by lining them up with the paper template. They were then glue basted in place. Again I was doing this explanation quickly so in my haste things aren't quite lined up.
The borders were made separately and then attached to the centre panel. The corner swags were created after the borders were stitched to the centre panel. We used the same paper template method for the corners which means we arranged one swag and glued the hexagons in place. We then traced and cut out a paper template which was used on the other three corners to correctly place the hexagons.
I hope this explanation is helpful. If anything is unclear or you have questions please don't hesitate to ask! I am always more than happy to share with you.
This week's theme for Quilting Gallery's Show and Tell is Scrap Quilts. I've entered Cherry Blossom. Voting is open Friday until Monday at 6:00pm EDT. There are some stunning quilts entered and you can vote for up to six of them here. I'm still working away on the pattern for Cherry Blossom and will have it ready for you as soon as I can!
It is still beastly hot here and it will be for another day or two. But I still managed a quick tour of the garden and here's what's what today!
Until I post again, happy sewing!
Masai by Anne H, 2013 16" x 20"
Border detail with beads
Masai quilt back with quilting
Even with her broken right arm she is managing to slowly get work done. We go back to the specialist late next week to see how it is healing! At 93 it doesn't happen so quickly but we are keeping our fingers crossed that she is on the mend. If not, she has another three weeks to go in the cement brace.
I'm busy working away on Mon's Anna quilt and it is coming along nicely. A big thank you to Kath (you can visit her blog here and see a great video of her drive by Stonehenge!) who left a comment and asked how Mom and I managed to get such lovely smooth curves on the swags.
I learned how to sew using paper patterns when I was a kid and that knowledge stayed with me. I use these skills in all sorts of ways and one of them is the swag borders in the Anna H quilt. This is how Mom and I got the smooth curves on her Anna H quilt.
The first step was to determine the placement of the flower hexagons (the four hexagons at the bottom edge) because they would be the points where the swags connected. Once we had determined the correct placement these flowers were basted in place. We like to use Roxanne Glue Baste-It but you can use any method you choose.
The next step was to position the individual hexagons to form one swag between the two hexagons on the bottom edge. When we were satisfied with the arrangement they were glue basted in place.
You can see how the paper template fits under the original swag.
To create the next swag the template was moved to the next area where a swag was to needed and the edges of the hexagon flowers and the bottom of the border were lined up with the paper template. Then it was simply a matter of placing loose hexagons in place by lining them up with the paper template. They were then glue basted in place. Again I was doing this explanation quickly so in my haste things aren't quite lined up.
The borders were made separately and then attached to the centre panel. The corner swags were created after the borders were stitched to the centre panel. We used the same paper template method for the corners which means we arranged one swag and glued the hexagons in place. We then traced and cut out a paper template which was used on the other three corners to correctly place the hexagons.
I hope this explanation is helpful. If anything is unclear or you have questions please don't hesitate to ask! I am always more than happy to share with you.
This week's theme for Quilting Gallery's Show and Tell is Scrap Quilts. I've entered Cherry Blossom. Voting is open Friday until Monday at 6:00pm EDT. There are some stunning quilts entered and you can vote for up to six of them here. I'm still working away on the pattern for Cherry Blossom and will have it ready for you as soon as I can!
It is still beastly hot here and it will be for another day or two. But I still managed a quick tour of the garden and here's what's what today!
Blackberries ripening
Golden raspberries are ready for eating
Gooseneck loosestrife bud are starting to open
Gooseneck loosestrife close-up
Woodland poppy
Butterfly bush
Ox-eye daisy
Goldfish in the pond
Tuesday, July 16, 2013
Masai quilt is quilted, another hexagon how-to and the Zebra story continues
Anne H's Masai quilt is now quilted and has been returned to her for embroidery and beading. This quilt will be sent to Renske Helmuth so that it can be added to a quilt that will be sold at an upcoming Mennonite Relief Auction. I think this one is quite effective and once Mom adds her details it will be spectacular!
One more African themed quilt to go and then I'll be able to get to her Anna quilt! I'm itching to get started on that one. Here's another teaser! This is the centre medallion of her quilt.
She just got the backing fabric and I think it will work perfectly. I don't look for fabric that "matches" the quilt but I do look for fabric that will work with the quilt. In this case Mom wanted something soft and subtle so she chose a pale gold and cream floral print. It works well with the dark beige print that is the background for her medallion. The dark beige is on the left and the backing is on the right.
And now for another foundation pieced hexagon star. This one is a wonky star but each hexagon is identical.
If you haven't foundation pieced before you should know that the right side of your block will be on the blank side of the hexagon. When you look at the pattern below what you are looking at is the wrong side of your hexagon. The lines are your sewing lines. This means that the pattern on the hexagon is the reverse of the front.
So back to the garden. Yesterday you'll recall that Zebra Girl and Zebra Fellow went for a stroll when all of a sudden they heard something in the brush. So here's what happened next!
YIKES!!! It's Teetoo the Grey Panther from two doors down!! What do we do?
Quick thinker that she is, the resourceful Zebra Girl turns and with all her strength pushes on the tree!
She really gives it some welly and one more good push!
and down comes the tree! SPLAT! Just like the house landing on the Wicked Witch of the West in The Wizard of Oz!
Fortunately for the Teetoo the Grey Panther it was only a "flesh wound" and he recovered quickly - mind you he did have a whopper of a head ache the next day! I doubt he'll mess with Zebra Girl again!
Until I post again, watch out for Teetoo the Grey Panthers and happy sewing!
One more African themed quilt to go and then I'll be able to get to her Anna quilt! I'm itching to get started on that one. Here's another teaser! This is the centre medallion of her quilt.
She just got the backing fabric and I think it will work perfectly. I don't look for fabric that "matches" the quilt but I do look for fabric that will work with the quilt. In this case Mom wanted something soft and subtle so she chose a pale gold and cream floral print. It works well with the dark beige print that is the background for her medallion. The dark beige is on the left and the backing is on the right.
And now for another foundation pieced hexagon star. This one is a wonky star but each hexagon is identical.
If you haven't foundation pieced before you should know that the right side of your block will be on the blank side of the hexagon. When you look at the pattern below what you are looking at is the wrong side of your hexagon. The lines are your sewing lines. This means that the pattern on the hexagon is the reverse of the front.
So back to the garden. Yesterday you'll recall that Zebra Girl and Zebra Fellow went for a stroll when all of a sudden they heard something in the brush. So here's what happened next!
YIKES!!! It's Teetoo the Grey Panther from two doors down!! What do we do?
Zebra Fellow, not being much in the way of a great thinker, just does the big skedaddle!Quick thinker that she is, the resourceful Zebra Girl turns and with all her strength pushes on the tree!
She really gives it some welly and one more good push!
and down comes the tree! SPLAT! Just like the house landing on the Wicked Witch of the West in The Wizard of Oz!
Fortunately for the Teetoo the Grey Panther it was only a "flesh wound" and he recovered quickly - mind you he did have a whopper of a head ache the next day! I doubt he'll mess with Zebra Girl again!
Until I post again, watch out for Teetoo the Grey Panthers and happy sewing!
Monday, July 15, 2013
Working for Mom - her Masai quilt and her Anna hexagon quilt
I'm working away on quilting Anne H's (Mom) Masai quilt for a Mennonite Relief Auction quilt.
The quilt is in need of a good pressing with starch and then I'll quilt it for her so she can bead and embroider like crazy. She is still in her brace for her broken right arm and it will be another week and a half before we know if it is mending. She uses her right hand to move the needle through the fabric and then pulls the thread with her left. It is a long slow process but when you feel the urge to create it is overwhelming and one finds a way to do it. At least that is how it is for Mom and me!
My next task will be to machine quilt and large quilt for Mom. Last summer while on vacation we each made the same quilt top but we used colours that appealed to us. Like me Mom has a wide variety of likes when it comes to fabric patterns, designs, patterns and colours. The quilt is called Anna and it was designed by Karen Cunningham. It is a hexagon quilt and these re great portable projects. I had a good length of background fabric for Mom and she liked it so I gave it to her for her quilt. The next step was to select a fabric with a largish print that could be centred in the hexagon circles. She settled on a soft robin's egg blue with morning glories, dragonflies, butterflies and spider webs! This is a close-up of one of the blocks...it's a little taste of what's to come. There will be more pictures in the days few days!
It is just like this spider web in her garden!
And since many of you seem to like hexagon quilt blocks here is a close-up of a block from my quilt Loopers in the Sky with Diamonds and the foundation hexagon I designed to make this star.
They stop to have a little chat about this and that!
Zebra Girl takes the initiative and goes in for a quick smooch!
The quilt is in need of a good pressing with starch and then I'll quilt it for her so she can bead and embroider like crazy. She is still in her brace for her broken right arm and it will be another week and a half before we know if it is mending. She uses her right hand to move the needle through the fabric and then pulls the thread with her left. It is a long slow process but when you feel the urge to create it is overwhelming and one finds a way to do it. At least that is how it is for Mom and me!
My next task will be to machine quilt and large quilt for Mom. Last summer while on vacation we each made the same quilt top but we used colours that appealed to us. Like me Mom has a wide variety of likes when it comes to fabric patterns, designs, patterns and colours. The quilt is called Anna and it was designed by Karen Cunningham. It is a hexagon quilt and these re great portable projects. I had a good length of background fabric for Mom and she liked it so I gave it to her for her quilt. The next step was to select a fabric with a largish print that could be centred in the hexagon circles. She settled on a soft robin's egg blue with morning glories, dragonflies, butterflies and spider webs! This is a close-up of one of the blocks...it's a little taste of what's to come. There will be more pictures in the days few days!
It is just like this spider web in her garden!
And since many of you seem to like hexagon quilt blocks here is a close-up of a block from my quilt Loopers in the Sky with Diamonds and the foundation hexagon I designed to make this star.
The centre of the hexagon was fussy cut and the border was made with this hexagon. I've written numbers on the hexagon foundation to show you the order of placement and sewing.
I use my machine and set the stitch length shorter. If you are new to my blog I have written about this technique. Some of the posts are May 30, May 31 and June 3.
A couple of years ago I wrote two instruction booklets that I had planned on selling. They are called Easier than Pie and Easier than Pie and Beyond. They explain how I do English paper piecing and foundation piecing on hexagons. I think one of my summer projects will be to dust them off, update them and post them so that you have a resource document to help you out!
And now for a quick tour of the garden!
Balsam flower buds - aren't they unusual?
A little shrub, don't know what, is starting to bloom
Yellow trumpet vine
Oh look - what's that over there? Looks like two of the zebra's decided to go for a walk in the garden. I don't know if that's such a good idea since zebras generally travel in herds.
They stop to have a little chat about this and that!
All of a sudden they hear something in the brush. What was that? YIKES!!!!! Zebra Fellow is shaking in his jeans but Zebra Girl keeps her wits about her!
To be continued.........
Until I post again, happy sewing!
Subscribe to:
Posts (Atom)