Showing posts with label Godstone Grannies. Show all posts

Monday, September 1, 2014

More about basting hexagons and more about quilting Good Golly Miss Mollie

Chantal left a comment in which she asked if the basting method I wrote about yesterday would work with 2" hexagons. I think that it would provided that the seam allowances were turned and finger pressed before basting but I'm just guessing as I've never worked with 2" hexagons. What would work is Missie Carpenter's method which uses freezer paper and starch. You can read about it here. I've tried it and it works beautifully so be sure to check it out!


James P left a comment and asked "when you're turning over your fabric edge to baste, how can you tell you are against the paper piece? Using normal paper I would think it is too thin to feel an edge". I'm answering the question here because James is a no-reply blogger. I reply to every comment so if you don't hear from me that would be the reason. Now as for the paper I use regular 20lb bond printer paper and I can feel the edge. If I am unsure I will pinch the fabric between my fingers to press in the fold and then lift the seam allowance to ensure that the fold is against the paper. Sometimes however the weight or texture of the fabric is more challenging so what I'll do is finger press all of the seam allowances before I baste. This is what it looks like once it has been finger pressed.  The basting goes easily and smoothly when the fabric is prepared in this way.


When I finger press I work in a counter clockwise position. For demonstration purposes I`ve pressed the seam allowances with my Dritz Petite Press so that there will be a nice sharp fold for the pictures but it isn't necessary to do this - a good pinch with your fingers is sufficient. To start I fold down the top seam allowance and finger press.


Working counterclockwise I'll turn over the seam allowance to the left and I'll finger press.


It will look like the hexagon in FIG 1. I turn the seam allowance at the bottom left (FIG 2) and finger press. I repeat these steps as shown in FIG 3 and FIG 4. At this point there is only one seam allowance to turn.


I fold the last seam allowance tucking it under the top edge and finger press.


Eventually you will get to know the feel of the fabric against the paper and you'll likely just skip the finger pressing!

I continue to machine quilt Good Golly Miss Mollie (my version of the Godstone Grannies coverlet) on my domestic sewing machine. There have been several comments about the small feathers in the 3/4" hexagons. I find the smaller shapes less challenging than the larger feathers. Try drawing a perfect circle that is 8" in diameter. Tough, isn't it? Now try drawing a circle that is the size of a small coin. Much easier! A wobble in a big circle is much more noticeable than a wobble in a small circle whether it is drawn or quilted. When quilting small I don't have to reposition my hands when I'm in the middle of quilting a shape makes for smoother quilting lines. Enough about this - how about some of the quilting in the hexagons?

I filled the following block with feathers, figure 8s, melon wedges and teardrops. To quilt the feathers in the pale yellow and those above and below the centre cross I drew lines for the spine.


In the following picture you can see a teardrop, melon wedges, figure 8 quilting and the feathers. The lines I drew for the spine have not yet been removed.


I prefer not to do any marking so I gave some thought to quilting designs that would not require marking. If the spine of the feather was going to be straight I would need a line but if I went for a curvy spine I could use the shape of my hexagons as a guide. So I quilted a curvy spine in the white round of hexagons and added the feathers. I start at the top of the spine and quilt down to the base. When I get to the base I quilted the plumes all the way back to the top. When I get there I come back down parallel to the spine to create a vein. I think it adds depth and dimension. I then started again at the top and quilted the feathers on the opposite side.


Here is a close-up of how I filled the centre four hexagons! I really like the texture that is created with this simple motif!


I used this same approach to quilt the odd shape in the taupe hexagons in this block.


Here's another example of an odd shape filled with feathers. I didn't quilt the other side of the spine and I think that it is needed so I will go back and add it to the quilting.


Phew! Lots of words and lots of pictures. Time for me to do some sewing so until I post again, happy sewing!
Karen H

Monday, August 25, 2014

Quilting Godstone Grannies AKA Good Golly Miss Mollie

The quilting of Good Golly Miss Mollie is well underway. This quilt is my interpretation of the Godstone Grannies quilt which is at the Quilt Museum in York, England. You can see the original and read about it here. The name of my version of the quilt comes from Mollie Simmonds who was the leader of the group that made the original quilt in the early 1960s.

I've made oodles of hexagon quilts and usually have a pretty good idea as to how to quilt them on my domestic sewing machine (a Juki TL2010Q) but this one was a bit of a challenge because there is a variety of blocks and they can be quite different from one another. There are 31 whole diamonds in the quilt one of which is unique (the block in the centre) and the rest are pairs of blocks. There are also 4 pairs of half diamonds on the sides and 5 pairs of partial diamonds at the top and bottom. The colour is not right in this picture - it looks quite grey but in fact it is more buttery and peachy.


Normally I ditch quilt first, then quilt the border, bind the quilt and then go back and quilt the blocks. So what are the challenges? This quilt is entirely hand pieced using the English paper piecing method so ditch quilting isn't my preferred option. The second challenge is that the border is very narrow which means I'll have to quilt the partial blocks all around the quilt before I can bind it.

My solution was to quilt melon wedges in each of the path hexagons. I like this method because it creates a nice little start and there are relatively few starts an stops. This is a little bit of what it looks like. It isn't perfect - far from it but I'm not at all bothered because I know that once the whole thing is quilted the little imperfections will disappear! It also works the same as ditch quilting which stabilizes the quilt so that I can quilt the border and bind the quilt before quilting the diamond blocks.


What to do with the rest of the blocks? I don't like marking so I want to do as little of it as possible. I decided to work with the shapes created within the diamonds and use them as my inspiration for the quilting! Here is the same side block quilted! I quilted the orange rosette and its centre and then the four partial orange rosettes along the bottom edge. Then it was onto the feather swags on the side followed by the small swag below the orange rosette! I'm a happy quilt maker. I'll quilt the second partial block that is the same as this one in the same manner! That's two done and lots more to go!


Now that I have an idea about how to quilt the blocks I will ditch quilt the outside edge of the quilt where the hexagons were appliqued to the border strips and I'll quilt the border. I like close straight lines so I think that's what I'll do! When I've got it done I'll share pictures of the border quilting!

Until I post again happy sewing!
Karen H

Wednesday, July 2, 2014

The Godstone Grannies hexagon quilt - attaching a border to a hexagon quilt

So how do you finish the edges of a hexagon quilt? There are loads of ways. Kath left a comment and she wrote the following: I made enough hexies in my chosen border colour to go right round my quilt, but I adapt the shape with sides 4,5 and 6 forming a square.When I baste them to the papers, I left side 6, the outer edge 1/4" un-basted. I attached them all round my quilt as , then used my machine to attach the matching border. The unbasted, unsewn edge is what lines up with the edge of my border. 

Thanks Kath! This is a great technique and I used it on my quilt Mom's Flower Bed.


Mom's Flower Bed, 2011

Karen (not me) also left a comment. This is what she wrote: I am half way through a baby sized hexie quilt and I've decided to do a shaped border by stitching the last row of hexies and flipping them to the back over the top of the backing material before completing the hexies. They will be top stitched down giving a hexie shaped border. This article explains it better. 

Thanks Karen! I've seen that post by Amy of Badskirt but I haven't tried the technique! Please let us know how it works out when you finish your baby quilt!

My Godstone Grannies (GG) was entirely hand sewn so once the diamonds were stitched together I just wanted to get the border attached and be done with it! So my plan was to applique the quilt top to a narrow border. I used that method to make my Stars in the Loft quilt and it worked perfectly.

Stars in the Loft, 2002

Before we get started a little bit of advice in the form of a helpful tip!

HELPFUL TIP: I remove all of the hexagon papers and basting threads except for those all around the outside edge of the quilt. This will keep the edge stable until after it has been appliqued to the border.

Border strips have to be cut accurately or the border will be ruffled or puckered and it won't lay flat when it comes time to quilt. Believe me, I know this because I am speaking from experience! How do I determine the length of the strips? I could measure the length and width of the quilt through the middle but I don't like doing this because I can measure three times and come up with three different measurements. Instead I measure my blocks and then do a little math to calculate what I will need.

I've decided that I want to applique my quilt to 2 1/2"  border strips and I want to miter the corners so this will have to be taken into account when I do my calculations. 

The Side Strips for the Border
I measured the length of a diamond block from the top point of the path fabric to the bottom of path where there is a pair of path hexagons touching (I've excluded the last path hexagon at the bottom that completes the diamond shape) and the measurement is 20 1/8". I've placed small orange circles on the right and left to show where I stared measuring and where I stopped.


There are four diamonds in the length of the quilt so I will need strips that are:
  • four diamond lengths (20 1/8" X 4) plus one hexagon for the bottom of the path plus the last hexagon that was excluded from my diamond measurement. That hexagon is 1 1/2".
  •  5" which is two times the strip width of 2 1/2". 
The measurement I come up with is 87". I want to have a little wiggle room so that the strip is slightly longer than I need so I'll add another 4" so my strip length is 91". Once I've done the applique and mitered the corners the extra fabric will be trimmed.

ALTERNATE METHOD OF MEASURING: Sometimes you don't have blocks right out to the edge as does my GG quilt. For those quilts I simply measure ten hexagons and use that measurement to make the registration marks on my border strips. 

The Top and Bottom Strips for the Border
Next I calculate the strip length for the borders on the top and bottom. The diamond block width is 11 3/4" from the edge of the path on one side of the block to the edge of the block (excluding the path on the other side) . 


There are five partial diamonds at the top and bottom so I will need strips that are:
  • five half diamond lengths (11 3/4" X 5) plus the last hexagon that was excluded from my diamond measurement. That hexagon is 1 1/4"
  • 5" which is two times the strip width of 2 1/2"
The measurement I come up with is 65". I want to have a little wiggle room so that the strip is slightly longer than I need so I'll add another 4" so my strip length is 69". Once I've done the applique and mitered the corners the extra fabric will be trimmed.

Attaching the Side Strips for the Border
I start with the side strips. I make a mark on the wrong side that is about 4" from the end and them I make marks that are 20 1/8" apart. I place the border on my quilt top with wrong sides up and I line up the marks on the border with the diamonds making sure that the border overlaps the innermost hexagon on the seam allowance. I pin well. 


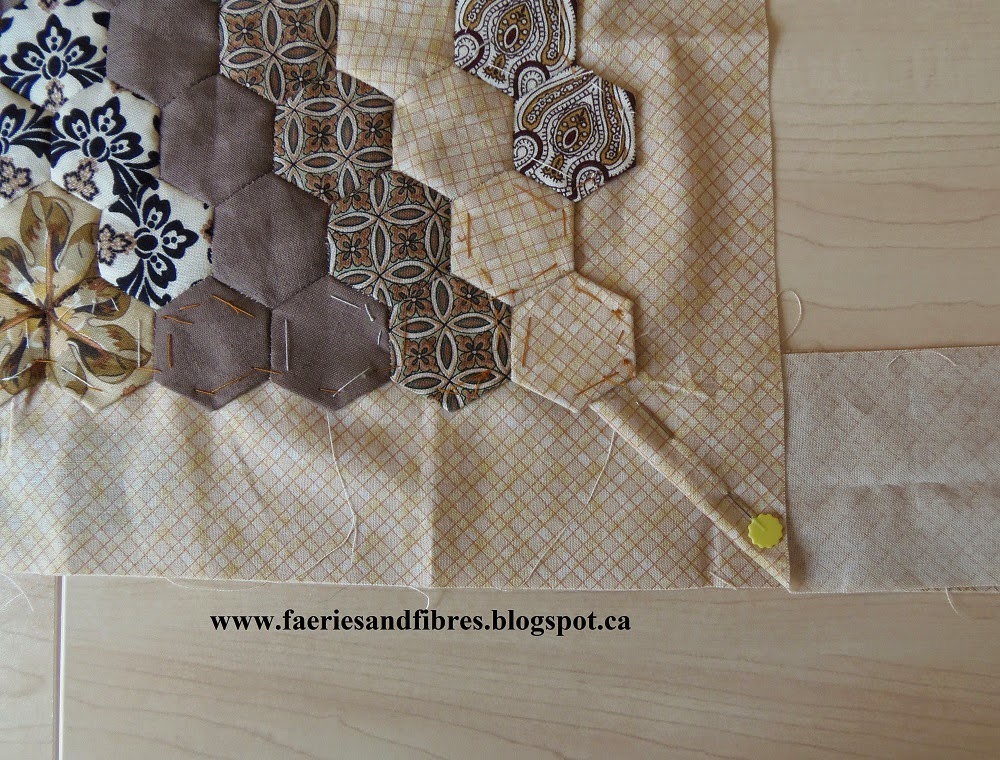
I like to thread baste the border to the quilt top but you could just pin with applique pins or you could use applique glue if you prefer. In the next picture is a view of the wrong side of the quilt with the border basted to the quilt top. Notice that the papers and basting thread are still in the quilt top. They can be removed after the quilt has been appliqued to the border. When I thread baste I like to start and stop one hexagon in from the ends. This will make mitering the corners easier.


In this picture you see the quilt top from the front; it is basted to the border. I baste the border to the opposite side. If I were hand quilting I would trim the excess border fabric after I had completed the applique but this quilt will be machine quilted so the extra fabric won't present a problem.


Attaching the Top and Bottom Strips for the Border
The next step is to prepare and baste the top and bottom borders. Once again I make a mark on the wrong side that is about 4" from the end and them I make marks that are 11 3/4" apart. I place the border on my quilt top with wrong sides up and I line up the marks on the border with the diamonds making sure that the border overlaps the innermost hexagon on the seam allowance. I pin well. and thread baste starting and stopping one hexagon from the ends. The corners will look like this.


Mitering the Corners
I fold one strip in the following diagram and pin. I can now thread baste that seam and the hexagons at the ends that were not basted to the borders. The quilt top is now read to be appliqued to the border. I used a thread that matched the border fabric. I also stitch the miter by hand with tiny stitches and then trim away the excess fabric.


The borders are appliqued and the corner is mitered, stitched and trimmed.


So there you have it....one more method of finishing the edge of a hexagon quilt. This one works for me and I hope it will work for you too! I stitched my border down by hand but there's no reason why you couldn't do  machine applique for a fast and perfect finish!

The finished  GG hexagon quilt top!

This is the backing I've selected for the GG quilt. It will be a very tight squeeze. I've got 4 1/2 yds. but could do with an extra 4". You can see I've also made the binding from the path fabric. I'll keep it with the quilt until I'm ready to use it!

For more hexagon inspiration pop over to A Quilting Reader's Garden for Hexie Weekend!

Until I post again, happy sewing!
Karen H

Monday, June 30, 2014

Godstone Grannies - the top is together

The last sections of hexagons for my Godstone Grannies (GG) quilt top are stitched together! I'm going to drag this out just a little bit! Silvana left a comment on my last post and she asked how I combined the colours so I thought I would share some of the things I do or think about when I make a scrap quilt.
  • I don't spend a lot of time thinking about fabric choices. I try to work quickly. If I like something I will go with it and if I'm not sure I will either set it aside and think about it or discard the combination right way.
  • I like to play with my fabric. I will put oodles of fabrics on a big table. I move them around and sometimes I’ll see a colour or print combination that really works and it is often a combination that I wouldn't have thought about. 
  • I try to use fabrics that are the same style. For example I wouldn’t combine children’s prints with Civil War prints.
  • I think about the "tone" of my quilt. I am fond of muddy or earthy tones. A little bit of bright thrown in with earthy or muddy tones will make a quilt sparkle but a lot of brights will mute the effect of the earthy tones/muddy tones. If I want a bright quilt then a little bit of muddy colours will make the brights really shine. If I use equal amounts it just doesn't work because neither stands out.
  • I think about what the overall colour of my quilt will be. The more of that colour I use the more likely the quilt will read that colour even though other colours are used.
  • I don’t match fabrics when I am buying. I just buy fabrics that I like; I figure that my tastes don't really change so the new fabric will probably work with what I've already got in my stash.
  • Colour is important but value is more important. Value is the lightness or darkness of a fabric when compared to another fabric. I try to make sure that there are lights, mediums and darks in most blocks. The eye sees value first and colour second.
  • When I make a scrap quilt I try to repeat some of fabrics in more than one block. This makes the quilt look more cohesive. In this way I don't have to worry that each fabric goes with all of the others. As long as some of them are repeated they will all work together!  
  • Using a single fabric for the path in a hexagon quilt will separate the blocks and it also makes the quilt look more polished because it is a fabric that flows throughout the quilt.
  • I like to make little 3” nine patches with my scraps. It is a great way to learn about colour and value. When I do this I think of colour combinations I would never have considered. If the block doesn’t look beautiful it will still work in a quilt because it is small but if it works, I have a good idea for combining colours for another quilt! If the block looks really bad I can take it apart and make something different or I can just throw it out!
The lecture is over so it is back to my GG quilt top! In this picture you can see that I've attached the lower right corner to the center strip. Looking good!


The last step was to attach the upper left corner....just one long seam and GG would be a hexagon quilt top! I am so pleased with how this quilt has turned out. The path fabric appears grey but in fact it is a very dull, faded pale peach.


The final step is to add narrow border strips around the quilt top. If I were to just place border strips on the quilt with the right sides together and stitch the border to the quilt top by machine I would have to cut through the hexagons at the edges and that would change the look of my partial diamonds, many of which were fussy cut for effect. I don't want to do that so I am going to add a narrow border to give the quilt straight edges. My plan is to applique the quilt to the borders. I want to do it this way for three reasons:
  • I do not want to cut through my hexagons,
  • a narrow border will make quilting the hexagons at the edge easier (it gives me something to hold when I quilt) and
  • I want flat, smooth, straight edges to make it easier to attach the binding when the quilting is done.
I'll explain how I'll  attache the border in an upcoming post!

Until I post again, happy sewing!
Karen H

Saturday, June 28, 2014

Godstone Grannies......the final stretch!

I've stitched all five units of my Godstone Grannies (GG) hexagon quilt so now it is a matter of assembling the five units! This was my construction plan, one large center diamond and the four corners.


The lower left corners have been stitched to the large diamond in the middle. All of the papers have been removed except for those all around the outside edge.


In the following picture the upper right corner has been stitched to this unit!


The next step is to stitch the two remaining corners to the quilt.


I think that once they are all sewn together I am going to add a narrow border to give the quilt a straight edge. I've worked out a plan for how I will add the border and will share with you in an upcoming post!

I'm linking up with Angie's Hexie Weekend at A Quilting Reader's Garden. If you've shared a hexagon project on your blog why head over to Angie's blog and share with others? It is fast and easy and it is also a great way to get inspired by others. Angie is particularly interested in seeing replica's of old hexagon quilts that you've made or are working on. She has a picture of a very different hexagon quilt that is a replica of one made in 1920! Be sure to go take a look here!

Until I post again, happy sewing!
Karen H

Thursday, June 26, 2014

More progress on Godstone Grannies

I've now stitched more of the Godstone Grannies (GG) diamonds together into larger units and with each stitch I am getting more and more excited to see the GG quilt coming together. As I previously told you I have a plan for stitching the blocks together and I do that to give me nice long continuous seams to sew. It just makes the sewing much more efficient. The picture below is the unit that will be the lower left corner of the quilt and it will be attached to the large center diamond.


This is the large center diamond to which it will be attached.


This is the unit that will be the upper right corner of the quilt and it too can now be stitched to the diamond.


I always find it interesting how some blocks might not seem so attractive on their own but once they are joined together with the others it all seems to work just fine! That's why I don't worry so much about blocks that are less than beautiful! That being said if something really bothers me I'll fix it but sometimes it is good to take a wait and see approach!

Tomorrow I'll be publishing Block 6 in my Value Proposition Hexagon Quilt Along (QAL) and I'll try to get it up first thing so you'll have some fun sewing for the weekend! If you missed the previous blocks you'll find links to each under the tab Quilt Alongs by Karen H.

Until tomorrow, happy sewing!
Karen H

Monday, June 23, 2014

The Grannies are coming together and two readers' Soupcon quilts to share

The diamond blocks for my Godstone Grannies (GG) coverlet are coming together.  I have a plan for stitching the blocks together. They will be sewn into five sections and then those five sections will be stitched together.

I've stitched nine blocks together for the big diamond in the center. I can't tell you how happy I am with how this is turning out! I've not laid the whole thing out to have a look so it is a bit of a surprise for me to see it develop! The papers and basting threads have been removed except for those around the outside edges.


Two more lovely readers have finished their Soupcon quilts. For those of you who are new to my blog Soupcon was my first Quilt Along. The instructions are available under the tab Quilt Alongs by Karen H or you can just click here to go to that page.  Soupcon is a French word that means a little bit. I called my quilt Soupcon because it includes a little bit of many different techniques that I like to use in my quilt making!

Kath has not only completed her quilt top but she now has it hanging in her new sewing room! It is so pretty with lovely little butterflies appliqued in the center medallion! You can see close-ups of her work on her Flicker page.


Carrie P has completed her quilt top. She decided against adding the foundation paper pieced border and I think it is a good decision. I love the last border. Those diamonds frame the quilt so nicely. Carrie did a wonderful tutorial titled "Applique Points"; you will find it here. I'm looking forward to seeing how Carrie quilts her Soupcon.


In May 2013 I published a tutorial on basting points for English paper piecing but the same techniques could be used for applique; I would give the basted diamond a spritz of starch and press with a hot, dry iron before removing the basting threads and paper.  You will find my tutorial here.


Until I post again, happy sewing!
Karen H

Tuesday, June 17, 2014

The last three Grannies and the next steps

I have stitched together the last three blocks for my Godstone Grannies (GG) coverlet. This is so exciting because it means the quilt top isn't far off. I've got a plan for stitching it together and I will share that with you but first the last three blocks!


I have a plan to stitch together each of the blocks. The first step is to stitch the path to each block. I have broken down the path so that I can stitch 17 hexagons together to make a triangle. It gets stitched to the top edge of each block. In this picture you can see the path of 17 hexagons stitched to the block.


The side filler half diamonds will need 9 path hexagons. This is a half diamond for the right side of the quilt with the path stitched to it.


From there the blocks get stitched into sections and the sections will be stitched together. I like to draw a diagram of how my quilt top will be stitched together. For me the easiest thing to do is to break it down into manageable sections. This is my plan for stitching the GG coverlet. I will stitch my diamond blocks into five sections. Each of the blocks is numbered (I pin a little tag with the number to my block). In the diagram below you can see the numbers in each diamond so I can sort my diamonds for stitching together. For example, I will need blocks 7, 11, 12, 15, 16, 17, 20, 21 and 25 to make the large center diamond.


I'll stitch the nine diamond blocks together to make the large diamond for the center. The next step will be the upper right corner and the lower left. Finally I'll stitch the blocks for the upper left and lower right corners. I had previously shown you the beginning of the upper left being stitched together. There is one more row of diamonds to be stitched together. Once that is done I can sew the rows together and the upper left corner will be complete.


I plan on stitching a narrow border to the quilt top once the piecing is complete. When I reach that point I will share with you how I do it!

Be sure to check out Sarah's Help for Hexieaholics where there's always plenty of inspiration and links to other bloggers who love hexagons!

I've been doing some piecing on my Juki TL2010Q and tomorrow I'll write about my findings. Until then, happy sewing!
Karen H