Showing posts with label directional prints. Show all posts

Thursday, July 3, 2014

Working with directional prints and 81

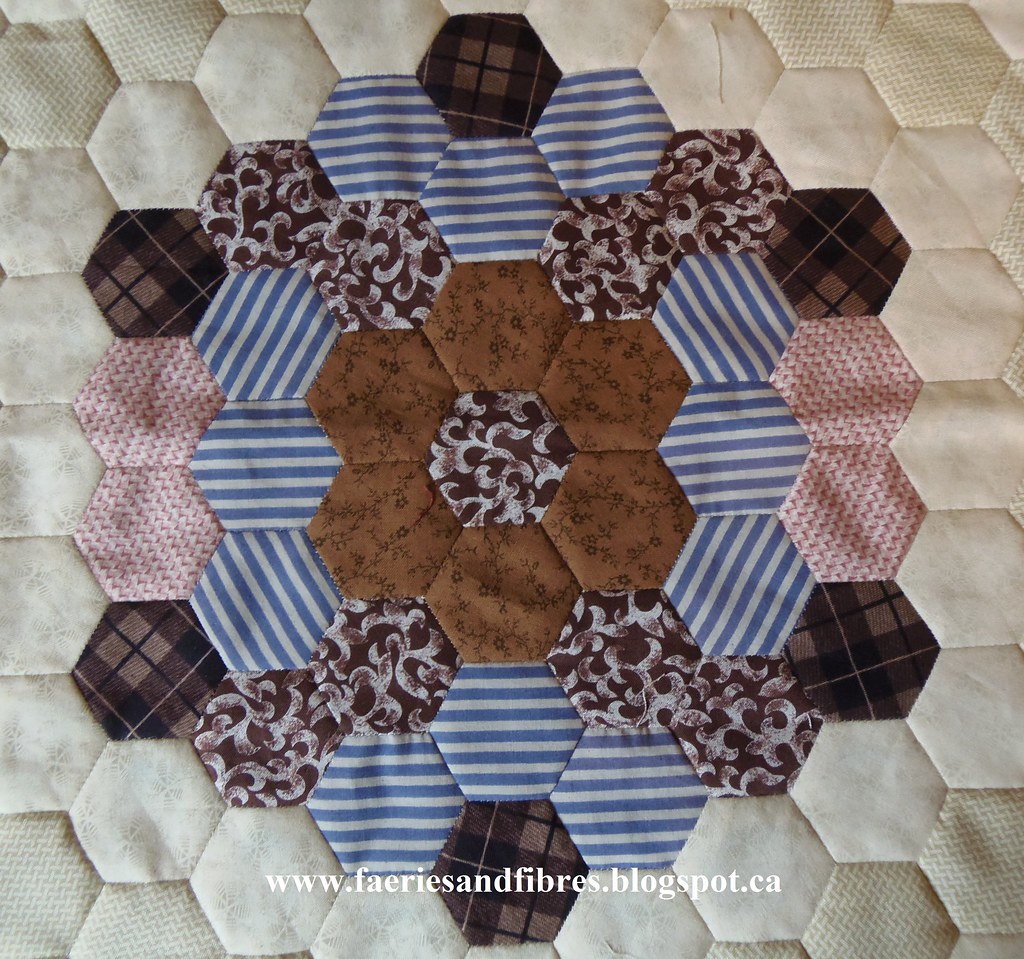
When I published the pattern for Block 6 of my Value Proposition Hexagon Quilt Along (QAL) I suggested that if you work with a directional print such as a stripe that you pay particular attention to the direction of the stripes. Below is my Block 6. Notice how the direction of the stripes on the sides are mirror images. The same is true for the top and bottom. I find that this formal balance is easier on the eyes and it places the focus is on the block design and the central rosette in particular. When the stripes are just placed any which way the eye can't find a place to rest.


I want to thank Bunny of The Creative Hare for allowing me to share her attempts at Block 6 with you. Bunny had asked me to look at her block and tell her what I thought of her first attempt. The colours are wonderful (that batik glows like a sunset) but the stripes do not appear to be arranged in any particular fashion. It is hard to know where to look - the block is loaded with movement but it is frenetic which is to say wild and uncontrolled. When I look the block my eyes are drawn to the striped hexagons on the left side. I suggested that she rearrange the stripes with the goal of making them more symmetrical.


This is Bunny's second attempt. While the top and bottom are not identical they are very similar and the result is a much more balanced and visually pleasing block. The stripes also create a subtle secondary pattern and that focuses the eye on the rosette in the center of the block. I also think that the colours are more pronounced in this block! The block has a more complex and layered look and all that was required was to move around the directional fabric hexagons! Simply beautiful!


This lesson can be applied to all blocks, not just hexagons, and the result will be a block or quilt that is much more interesting! Try it with a small nine patch block to see what happens! One more skill to add to your tool box!

My Guild is having a quilt show in September and there's nothing like a quilt show to light a fire. I've registered several quilts and half of them are not yet quilted. One of the quilts is 81 The Giant Monstrosity. It looks washed out with the light shining through it but it is anything but washed out.


I've appliqued little butterflies all over the quilt but have done so in a symmetrical fashion!


81 is big..... 92" x 95" and I've been worried about quilting something so large. But I've pin basted the quilt and last night I bit the bullet and got started. I was thinking that the 9" harp in the Jukster might be tight but as it turns out it is just fine. Let the quilting begin!


Until I post again, happy playing around with your directional prints!
Karen H

Tuesday, June 25, 2013

Using directional prints

Using directional prints such as stripes and border prints can a great deal of visual interest to a quilt whether a little is used in a block or the print is used to border a block or the entire quilt. I wide variety of uses for directional prints. 

When used in hexagons it is pretty straight forward provided the hexagons are the first ring around the centre.
 
Directional print surrounding the centre
 
Directional print radiating

In the example below I didn't have six identical patches but I did have two groups of three that were similar so I just alternated them and it works!


In the following block I could only fussy cut three patches so to complete the block I added three stripe patches as connectors.
 

Here is another example of  directional print that was used to good advantage. It was taken from the border of a cheater block.


When a second round of hexagons of a directional print is used, you will need to cut two sets of six patches. In the block below you will see that half of the patches have a directional print that runs from corner to corner of the hexagon and in the other set of six it runs from flat side to flat side. The two sets of directional prints are alternated to create a radiating effect.


I like to cut my hexagons from strips of fabric and for this reason I always cut directional print strips a little wider so I have the option of turning the hexagon on point.

As you know I am partial to nine patches; here are a few examples of directional prints used to good effect in nine patches.


In this block the directional print is taken from a border print and I placed the patches in the 12, 3, 6 and 9 o'clock positions. The orange patches look like they are floating above the black!

Directional prints make great borders, inner and outer.  In this example a stripe is used to border the centre medallion. Notice that the stripe is perpendicular to the block.


A second directional print in the same colourway is used for the two outer borders and the stripes run parallel to the quilt sides.


And here is the quilt with the directional print borders.

And look what's blooming!


Until I post again, happy sewing!