Showing posts with label Value Proposition. Show all posts

Friday, February 19, 2016

Progress and the Value Proposition Hexagon Quilt Along

I love to show progressions so I though I would recap the progression of my 2016 Quilt Along (QAL) quilt. There will be three main fabrics to make this quilt and then the rest will be scraps. My design is a medallion quilt with a few borders. The medallion begins with a bird that was appliqued to a light background. If you don't like applique you could substitute a large print instead.


The bird was reverse appliqued to a solid green fabric. The solid green is one of my three main fabric choices. I chose the solid green because it gives a "flat" effect.


To the solid green I appliqued a ring of solid white hexagons. The solid white was my second fabric choice.

I next appliqued the medallion to a lovely green print and it is my third fabric choice. These three fabric choices, solid white, solid green and green print, will be used in other parts of the quilt but the remaining blocks and appliques will all be made with assorted scraps.


There is one final green border and it is a repeat of the solid green fabric. I should have spend a little more time smoothing it out when pinning it to the fence but it was very cold so I wanted to just take the pictures and get back inside where it was warm! That is it for the green fabrics until I get to the very outside edges of the quilt at which point they will be used again!


I'll be posting more pictures showing the progress of the 2016 QAL quilt so stay tuned. Once the top is together I can write up the instructions and start posting the patterns.

In 2014 my quilt along was called Value Proposition. You can find links to the basic instructions here OR if you prefer you can visit my Craftsy Store where you can purchase the  entire Value Proposition Quilt Pattern. It is a 60+ page booklet that includes everything everything you need to know about English paper piecing. It covers topics such as fabric selection, rapid fire cutting techniques, back basting, whip stitch and simplified quilt assembly methods. There is also a FAQ section that you will find helpful. The reason I mention this is that one of my readers has finished her Value Proposition Quilt. Deb of The Tooth Fairy Quilter sent me pictures of her quilt and gave me permission to share them with you! How exciting is that? For me it is very exciting!

What you can't see is that there are many little fussy cuts in this quilt. The ones that are my favourites are little white sheep on a caramel coloured background. Well done Deb and congratulations on a fine finish!


Another reader, Mary Huey of Quilting Through Rose-Colored Trifocals has almost finished her interpretation of Value Proposition. In this picture you can see that Mary's quilt is being basted in preparation for quilting. 


The picture above is on Mary's blog and she very graciously sent me another picture of the quilt so that you could see it in its entirety! I love the addition of the floral fabric in the border. It has a lovely shabby chic look and feel. Can't you just picture this quilt on a old white enameled bed frame? I can. It would make a lovely summer quilt.


If you were following the Value Proposition Flickr Group you will already have seen Cynthia's interpretation of Value Proposition. This version is completely different from the other two. It reminds me of a bag of jelly beans! The colours are so bright, clear and vibrant! Cynthia used a striped fabric for the border and it is a different treatment from the other two but equally impressive!


Finally this is my Value Proposition quilt. It was inspired by an antique quilt.


Hope you enjoyed seeing Deb, Mary and Cynthia's work along with mine. Did you finish your Value Proposition quilt? I would love to share it on my blog so why not send me an email to let me know.

Until I post again, happy sewing!
Karen H

Monday, August 31, 2015

The Meadery and Men-An-Tol

I've been working on The Meadery. I had a piece of cotton home decorator fabric that I planned on using for the centre medallion of the quilt.


Something about it wasn't working for me. First the grey background wasn't quite right for the honeycomb and the medallion was too "solid". By that I mean there was too much of one thing. As I was pondering what to do I recalled a megalith in Cornwall (the idea of this quilt is to reflect my Cornish heritage). The megalith is called Men-an-Tol which in the Cornish language means hole stone. You can read more this granite wonder about it here.


Many (many) years ago I visited Men-an-Tol with family members. They told me that in bygone days women would pass their children through the hole to prevent rickets. I was about to set off on a seven month back-packing trip with a friend so we decided to crawl through the hole ourselves. And guess what? Neither of us developed rickets! But I digress.

I thought that if I removed the middle of my medallion that the medallion would take on the appearance of the circular stone and it could represent Men-An-Tol in my quilt. Since the name of my quilt is The Meadery it seemed appropriate to reverse applique a bee skep in the middle.The next step is to trim away the outer fabric and applique the whole thing to a creamy background.


I continue to work on two large diamonds for this quilt and they will flank the medallion. Men-An-Tol has two upright stones and the diamonds will be a fine representation of those pillars.


Men-An-Tol also has a third stone that has fallen and is at the foot of one of the uprights. You can see it at the base of the upright stone on the right. So I've begun work on a third unit that will represent that fallen stone. There will be multiple rounds of hexagons but this is a start. And the bee is front and centre! My hope is that as I add the next rounds with darker fabrics that a pale cream wheel with spokes will appear.


I've been working on producing a pattern for my Value Proposition Hexagon Quilt. The block patterns are available free of charge on my blog but I am going to put them all together with detailed instructions for English paper piecing and a new and simplified method of putting the quilt top together. The pattern will be available on Craftsy. I was finally able to get a better pictures of the finished quilt top for the cover of my pattern.


Mind you I had some "help". Gump and Jinx decided it would be fun to get behind the quilt and wrestle! What is it with cats and quilt I ask you? It looks like the quilt has been caught by a breeze but in fact it is Gump's mighty tail that is holding up the quilt! Once the wrestling started the quilt fell down! Good think those cats are cute otherwise I would be clipping their tail feathers!


That's it for today. Until I post again, happy sewing!

Karen H

Friday, June 26, 2015

Two finishes (sort of)

Today I have two finishes for you. When I say finishes I mean they are quilt tops but they are technically not "finished" because they are not quilted. They will eventually be quilted but I've got a trunk show in July and if I baste them for quilting they will be far too bulky to take to the show. My trunk show will be part of a huge outdoor quilt show in Toronto. It will be at Black Creek Pioneer Village and the name of the show is Quilts at the Creek. I went in 2013 and there were over 300 quilts on display. You can get a sneak peek of what I saw here.  If you are in the Toronto area you really should plan on attending this show. It is well worth the price of admission!

I have finished the border on Value Proposition hexagon quilt. When I last showed it to you I had a print border at the top and bottom and an off-white border on the sides. I thought the side borders looked rather bland and unfinished. They needed something dark on the edges. I have an old wavy print in my stash so I cut it out and appliqued it on top of the off-white border.


This is the finished quilt top. I like the result.


I also managed to take a picture of my "edited" Birds in the Loft hexagon quilt. At 128" long it was just too long so I removed two rows of hexagon rosettes from the top and two from the bottom. This is the before picture.


This is the final quilt top after the rows were removed. It is still large but it is much more manageable and I think it looks more like a quilt and less like a carpet!


The extra hexagon rosettes will be used to surround my parrot medallion quilt. The leftover stars from the border of Birds will be incorporated in the medallion. I've already prepared two of them for the sides of the frame for the medallion and I've now completed the second pair for the medallion. These two will be above and below the medallion.


Now I can start putting the hexagon frame together so I can add it to the parrot medallion. Pictures will follow! I'm also going to start cutting strips of fabric for the extra rosettes I need to surround the parrot medallion. Work, work, work but oh what fun it is!

Until I post again, happy sewing!
Karen H

Tuesday, June 9, 2015

Birds in the Loft - the BIG reveal

I've been busy, very busy! I finished Birds in the Loft and added borders to two other quilt tops. Today I'll share all of them with you plus my next project!

My Birds in the Loft hexagon quilt is together and as promised it is BIG! Very big! It measures a whopping 97" by 128"! Even I was shocked at the measurements and I already knew it was big (I think I was afraid to measure it until it was done). Not only is it big but it is also very heavy. Honestly this means it is not a quilt that could be used because it is too long for even a king size bed!

Birds in the Loft by Karen H 2015

I ordered a Hobbs Polydown king size batt because it is lightweight (this quilt does not need more weight) and I'll have to look at getting extra wide backing rather than using a pieced backing. Given its size there is a good possibility that it will never get quilted. On the other hand I might just take a couple of rows off the top and two off the bottom to make it shorter. It would still be wide but it would be more of a square than a rectangle. Oh well, I had fun putting it together and for me that's what it is all about. I might have fun taking it apart and putting it back together again too! I am sure that I would eventually find a use for the leftover hexagons (there would be 50 of them if I take out the rows).

For now I have smaller quilts that can be basted for quilting. I added a lovely wide border to my Lozagons hexagon quilt. My plan is to fill that border with free-form feathers similar to those I quilted in Babs quilt Yellow Bird quilt. I'm not sure how I would machine quilt this one and may consider combining hand and machine quilting. I'll decide when it is pinned and ready for quilting!

Lozagons by Karen H 2015

Finally I added borders to my Value Proposition hexagon quilt. I appliqued the quilt top to side strips and then I added the top and bottom borders. I have a lovely wavy brown stripe fabric and I think I will applique it to the sides of the quilt.

Value Proposition by Karen H 2015

If you are new to my blog Value Proposition was a hexagon quilt along in 2014. You will find all of the instructions and patterns under the tab Quilt Alongs by Karen H at the top of this page.

One final note about Value Proposition; I found a mistake! I am always going on about the use of directional prints and as I started pinning the borders to the quilt I found a mistake. The striped hexagon in the red circle is going in the wrong direction. How the heck did I miss it?


I also tend to go on quite a bit about learning to live with mistakes but if you just can't live with them, then one should fix them. This is a mistake (albeit a tiny mistake) that would bother me so fix it I did. It isn't a big change but it would have bothered me knowing it was there!


I've been casting about for a new project and have settled on a series quilt in QUILTmania (issue 107). The name of the quilt is Brinton Hall by Leigh Latimore. The first part is the blue section with all of the hexagons. I think it will be a great way to use scraps and also to feature some large prints in the seven panels in the centre. I've already started pulling fabrics!

That's it for today. Until I post again happy sewing!
Karen H

Friday, December 19, 2014

Value Proposition Hexagon Quilt - The Path and Border Options


If you are new to English paper piecing (EPP) and have made the 22 blocks that make up the Value Proposition Hexagon Quilt you might be wondering how they are put together into the quilt top and then once you've got them together, how you finish the quilt. That's what today's post is all about!

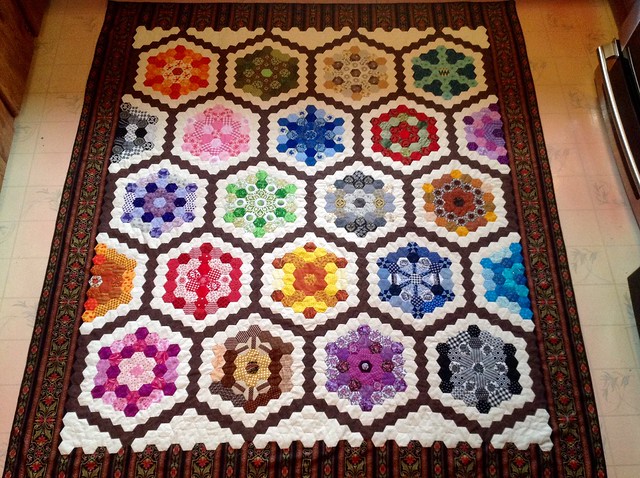
This is my quilt top put together without any borders! I designed the quilt with a triple light coloured path. In today's post I'll write about:

  • Constructing the path;
  • Sewing the blocks without a path;
  • Two methods of adding borders and
  • Finishing the quilt without a border.
Value Proposition Hexagon Quilt by Karen H 2014 approx. 62" x 71"

Constructing the Path
If you haven't already done so now it is time to decide on the path fabric! I designed the quilt with a triple path. I chose two light fabrics but you should select fabrics that appeal to you and that suit your blocks! The outer path surrounds each block and the middle path which is marked in pink is between the blocks after the outer path is sewn to them. As I look at this picture I realize I didn't colour in the pink in the lower right hand corner! Good thing I'm cute; otherwise I would be fired! 

You will need 24 hexagons of outer path fabric for each of the 18 blocks. In addition to the 18 full blocks there are 4 side setting block and they will each have 13 hexagons stitched to them.


You will also need to construct units made of outer path fabric for the corners (see Outer Edges of Path Fillers in diagram below) as well as the Vs for the top and bottom (see Top and Bottom Fillers in diagram below) . These units will be sewn to the quilt after the middle path has been attached.


The original middle path diagrams were not quite right so I've redrawn them and colour coded them to make placement easier. My original post on this topic has also been updated with these diagrams. This is what you will need to construct from your middle path fabric.

Middle Path Colour Key

The following diagram shows where these units will be placed. Notice that there are 18 pink units. Each one will be attached to each of your 18 full hexagon blocks. The units coloured in blue, green, gold, red and grey will be used to fill the remaining spaces.


Sew the middle path to the blocks in the first row and then stitch them together. Add the filler pieces at the top and corner. Repeat the process for the second row and then stitch the two rows together. Continue in this way until the top is assembled.

Don't want to make a path so what do you do?
No everyone will want to go to the effort of making a triple path so there is an alternative option that is available to those of you in that boat. Consider the following possibilities:
  • applique the hexagon blocks to a piece of wide backing fabric or
  • applique the hexagon blocks to background squares set on point.
The applique can be done by hand or by machine with a tiny zigzag stitch and invisible thread.

If you want to use a wide backing fabric it should measure at least 62" x 71". Fold the fabric vertically and horizontally and lightly press. Next fold the sides and line up the outer edges with the vertical fold and lightly press. Finally fold the top and bottom and line up the edges with the horizontal fold. These folds will serve as registration lines to help you line up your Value Proposition blocks. This is a fast easy and effective way to finish and you'll have nice straight outer edges so you can add borders!

The second option is to applique the blocks to background squares. You will need a 15 1/2" square for each of the 18 blocks. The square will finish at 15". You will also need side setting triangles for the partial blocks and to fill the spaces at the top and bottom. For the side setting triangles cut 2 squares that measure 22 1/2". Cut each of them on both diagonals (each square will yield 4 side setting triangles). The last pieces you will need to cut are the four corners and for those you will cut 2 squares that are 11 1/2" and cut on the diagonal (each square will yield 2 triangles). This will produce a larger quilt that that with a path but it is a quick and easy way to finish your blocks!

Once your blocks are appliqued you can add borders (if you want them) in the usual manner.


Adding border(s) to a hexagon quilt
Once you've sewn the middle path and filler pieces you've got your Value Proposition  quilt top put together! You might be asking "now what?" It is time to decide how to finish your quilt top. Here are some options for your consideration:
  • applique the quilt top to a border fabric or
  • create a straight edge by trimming the top then add a border.
When I was designing the quilt one of the options I considered is appliqueing the top and bottom edges of the quilt to a chintz print and then straighten the sides of the quilt and leave them without borders. I've seen this type of finish in very old quilts and it is interesting so if that is the look that appeals to your aesthetic why not consider it? Alternatively you could omit the top and bottom and add side borders. A third option is to use wider borders on the top and bottom and narrower borders on the sides (or vice versa). How about using to different but complementary fabrics for the borders, one for the top and bottom and the other for the sides? Use your imagination to make your Value Proposition quilt uniquely yours! Borders will go a long way to change the look and feel of your quilt.

I am considering appliqueing my quilt top to this fabric. It is from Andover's Winterthur Museum line. I've had it in my stash just waiting for the right quilt and Value Proposition might be it!


This is the look it would create.


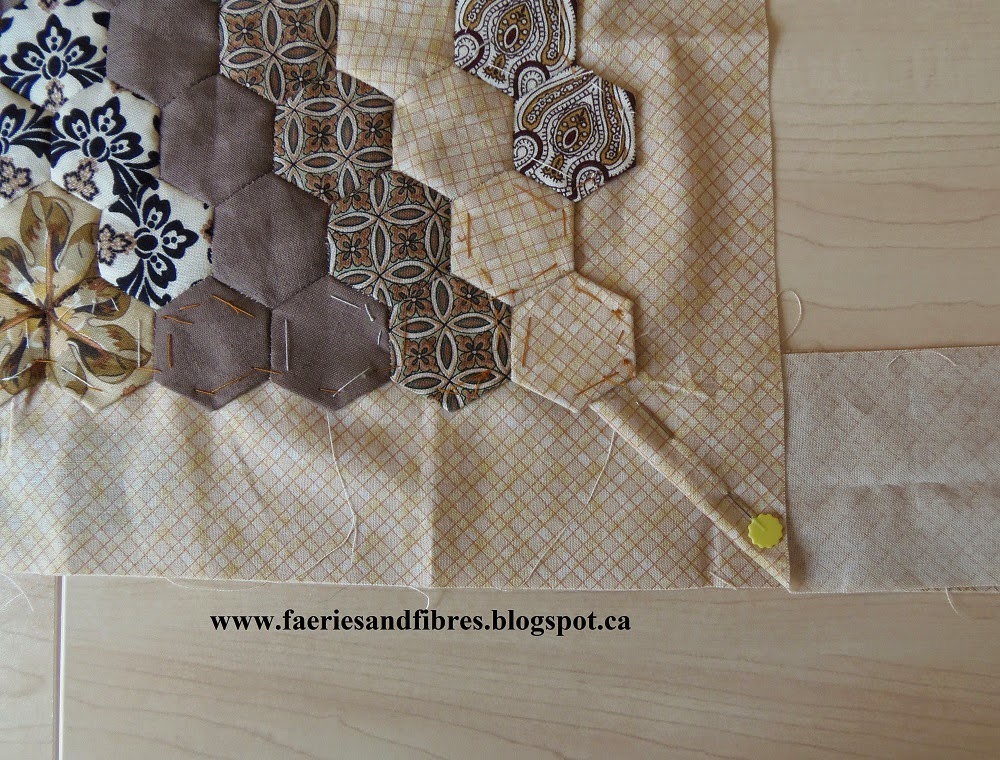
I wrote a tutorial that explains how to applique a hexagon top to a border. The zigzag edge of the hexagons is not trimmed; I applique the hexagons to a strip of border fabric in order to create a straight outer edge. From there you could add additional borders or just bind the quilt. You will find my tutorial here. I also provide instructions for creating a mitered corner. I think my method is pretty simple and straight forward so do read it over before you make your decision.

Good Golly Miss Mollie by Karen H 2014

If you prefer to eliminate the zigzag edge of the hexagons so that the quilt top is straight edges all the way around there is a wonderful tutorial on Jo Morton's blog. You will find it here. I would like to thank Jo for allowing me to use a picture from her blog. To do this you remove the papers from the outer edge, press the quilt, trim the excess fabric (in the picture below it is the white hexagons that were trimmed down) and then add your border fabric. Don't forget to measure your quilt top and cut the border fabric to fit the top. Never just cut a strip of border fabric and sew it to the quilt top because they will not lay flat!

Image courtesy of Jo Morton of Jo Morton Quilts

How about finishing the quilt without a border?
What if you don't want to add borders or straighten the edges? This is an interesting option that allows you to maintain the zigzag edge of the hexagon quilt top exactly as it is without trimming. There is a great tutorial by Amy of  Badskirt blog and I would like to thank her for allowing me to share a picture from her blog. Amy demonstrates how you would use hexagons to finish the edges of your quilt. You will find the tutorial here.


Image courtesy of Amy Gunson of Badskirt


There you have it - options for finishing your Value Proposition Quilt. I hope I've given you lots of food for thought! If you're working on  Value Proposition please be sure to post pictures of your progress on the Value Proposition QAL page on Flickr.  I hope that you'll post pictures of your completed quilt tops too! If you have a blog and post pictures on your blog let me know so I can visit your blog and send others over to see your masterpiece! 

If after reading along you are tempted to get started on my Value Proposition Hexagon Quilt links to all of the patterns and instructions  are under the tab Quilt Alongs by Karen H just under the banner at the top of this page. 

Thanks so much to those of you who sewed along with me and also to those of you who read along! I appreciate each and every comment and email message that you sent to me. I replied to each one so if you didn't hear back from me it would mean that you are a no reply blogger and I have no way to contact you unless you leave your email in the comment. The safest way to do this is to replace the "@" in your address with "at" and you could replace the "." with "dot"!

I'm linking up with The Needle and Thread Network - a great place for Canadian bloggers to share their work with others!

Phew! I'm done! I hope you enjoyed this QAL! I'm thinking about another QAL for 2015 so if you are interested stay tuned! Until I post again, happy sewing!
Karen H

Saturday, December 13, 2014

Value Proposition Hexagon Quilt - The Reveal

Yesterday I published the last block pattern in my Value Proposition Hexagon QAL.


In all there are 18 whole blocks and 4 partial side setting blocks. I designed the pattern with a triple path and selected two fabrics, both of which are very light but the middle path is just a shade darker. The effect is very subtle but it appeals to me because it shows off the blocks. A darker fabric would have made for a very dramatic quilt. It's all about personal taste! So now it is time to reveal my Value Proposition Quilt before the border is attached.


I am very pleased with how my quilt top turned out and if you've been sewing along I hope you are equally pleased with yours! If you didn't sew along but wish that you had it isn't too late. Links to all of the instructions and patterns are available under the tab Quilt Alongs by Karen H.

I know many of you have used the Flickr page to post pictures of your blocks and I sincerely thank you for that. I am very impressed with what I am seeing. If you haven't taken a look here are three quilt makers who have taken pictures of their blocks.

On Friday December 19 my post will be about the path (for those of you who need the help) and also about finishing the edges of the quilt. Those of you who are new to English paper pieced hexagons are likely asking how to deal with the edges of the quilt I will have several options for finishing your quilt! This is one of the fabrics that I am considering for the border on my quilt.


It is from Andover's Winterthur Museum line. This is what it would look like on my quilt. I also have an aqua print that I'm considering using (if I can find it in my stash)! It is still up in the air but hopefully I'll have made my decision by next week!


I'm liking up with Angie over at Quilting Readers Garden where you will find more hexagon inspiration!

Until I post again, happy sewing!
Karen H

Friday, December 12, 2014

Value Proposition Quilt Along - Block 18

Welcome to the 18th and  last hexagon block in my Value Proposition Hexagon Quilt Along. I hope you've enjoyed making the blocks. This has been a fun quilt for me (it is hexagons so of course it is fun) to make and to share. I've got my border fabric selected so next Friday I'll share pictures of the fabric and how I will attach the border fabric to my quilt top. So let's get going on the last block!


Value Proposition Map for Block 18


Value Proposition Recipe for Block 18
  • Cut 7 Light identified as A on Map (1 for Centre and 6 for Round 2)
  • Cut 4 Light that are slightly darker identified as B on Map (for Round 3)
  • Cut 6 Medium identified as on Map (for Round 2)
  • Cut 10 Medium-dark identified as D on Map (6 for Round 2 and 4 for Round 3)
  • Cut 10 Dark identified as E on Map (for Round 3)

My Value Proposition Block 18

Once again I chose to use a striped fabric to add visual interest to my quilt. You could do the same or you could use "made" fabric! Make it your own!


This is my Block 18! In case you haven't guessed, it is one of my favourites! Once again you can see that I've used the muddy colours that I'm naturally drawn however they look just as good if not better done it other colours and fabrics.


And there is photographic proof of this on the Value Proposition QAL page on Flickr. Head on over and see what others are doing,. While you are at it why not add pictures of your own Value Proposition Hexagon blocks I hope that you'll post pictures of your completed quilt tops too! If you have a blog and post pictures on your blog let me know so I can send others over to visit!

All of the patterns and instructions for my Value Proposition Hexagon QAL are under the tab Quilt Alongs by Karen H just under the banner at the top of this page. Have fun making Block 18. Tomorrow I'll share a picture of my quilt top minus borders. I love it and can't wait to add borders and get it quilted. I have a feeling it is going to be a well used and well loved quilt!

Next Friday (December 19) I'll write about adding the path (for those of you who need help) and options for finishing the edges of the quilt including attaching borders! If you need information about construction the path you will it here

I hope you enjoyed my Value Proposition Hexagon QAL. If you have any questions please feel free to leave a comment or send me an email. I send an email response to every comment so if you don't hear from me it means you are a no-reply blogger and I have no way of contacting you (unless you leave me your email address).

Until I post again, happy sewing!
Karen H

Friday, December 5, 2014

Value Proposition Quilt Along - Side Setting Blocks 3 & 4

Welcome back to my Value Proposition Hexagon Quilt Along. Today I'll share the last two side setting blocks and next Friday I'll publish the instructions for the final block! I will repeat one more time what I've said many times before! This is your quilt and you should make it your way. If you don't like a block then design your own or repeat one of the blocks that you do like. The same holds true with the side setting blocks. Follow the patterns that you'll find below, design your own or use half of a block that I've already published! 


Value Proposition Map for Side Setting Block 3


Value Proposition Recipe for Side Setting Block 3
  • Cut 6 Light identified as A on Map (for Round 3)
  • Cut 8 Mediums identified as B on Map (1 for Centre, 2 for Round 2 and 4 for Round 3)
  • 8 Dark identified as C on Map (4 for Round 1 and 4 for Round 2)

My Value Proposition Side Setting Block 3


Value Proposition Map for Side Setting Block 4


Value Proposition Recipe for Side Setting Block 4
  • Cut 4 Light identified as A on Map ( for Round 3)
  • Cut 7 Mediums identified as B on Map (1 for Centre and 6 for Round 3)
  • Cut 7 Dark-medium identified as on Map (2 for Round 1 and 5 for Round 2)
  • 4 Dark identified as D on Map (2 for Round 1 and 2 for Round 2)

My Value Proposition Side Setting Block 4


I set up a Value Proposition QAL page on Flickr so that you can post pictures of your blocks and also see what others are doing! There are many very different and exciting blocks to see and there are also some pictures showing a bunch of blocks arranged together and that is very exciting to see! 

If you are looking for previous Block installments of my Value Proposition Hexagon QAL you will find all of the links under the tab Quilt Alongs by Karen H just under the banner. Have fun making with the final two Side Setting BlocksThe final block, Block 18, will be available on December 12, 2014. 
I hope you are enjoying my QAL that uses English paper piecing. If you have any questions please feel free to leave a comment or send me an email. I send an email response to every comment so if you don't hear from me it means you are a no-reply blogger and I have no way of contacting you (unless you leave me your email address in the comment).

Until I post again, happy sewing!
Karen H