
Thanks Kath! This is a great technique and I used it on my quilt Mom's Flower Bed.

Mom's Flower Bed, 2011
Karen (not me) also left a comment. This is what she wrote: I am half way through a baby sized hexie quilt and I've decided to do a shaped border by stitching the last row of hexies and flipping them to the back over the top of the backing material before completing the hexies. They will be top stitched down giving a hexie shaped border. This article explains it better.
Thanks Karen! I've seen that post by Amy of Badskirt but I haven't tried the technique! Please let us know how it works out when you finish your baby quilt!
My Godstone Grannies (GG) was entirely hand sewn so once the diamonds were stitched together I just wanted to get the border attached and be done with it! So my plan was to applique the quilt top to a narrow border. I used that method to make my Stars in the Loft quilt and it worked perfectly.

Stars in the Loft, 2002
Before we get started a little bit of advice in the form of a helpful tip!
HELPFUL TIP: I remove all of the hexagon papers and basting threads except for those all around the outside edge of the quilt. This will keep the edge stable until after it has been appliqued to the border.
Border strips have to be cut accurately or the border will be ruffled or puckered and it won't lay flat when it comes time to quilt. Believe me, I know this because I am speaking from experience! How do I determine the length of the strips? I could measure the length and width of the quilt through the middle but I don't like doing this because I can measure three times and come up with three different measurements. Instead I measure my blocks and then do a little math to calculate what I will need.
I've decided that I want to applique my
quilt to 2 1/2" border strips and I want to miter the corners
so this will have to be taken into account when I do my calculations.
The Side Strips for the Border
I measured the length of a diamond block from the top point of the path fabric to the bottom of path where there is a pair of path hexagons touching (I've excluded the last path hexagon at the bottom that completes the diamond shape) and the measurement is 20 1/8". I've placed small orange circles on the right and left to show where I stared measuring and where I stopped.

The Side Strips for the Border
I measured the length of a diamond block from the top point of the path fabric to the bottom of path where there is a pair of path hexagons touching (I've excluded the last path hexagon at the bottom that completes the diamond shape) and the measurement is 20 1/8". I've placed small orange circles on the right and left to show where I stared measuring and where I stopped.
There are four diamonds in the length of
the quilt so I will need strips that are:
- four diamond lengths (20 1/8" X 4) plus one hexagon for the bottom of the path plus the last hexagon that was excluded from my diamond measurement. That hexagon is 1 1/2".
- 5" which is two times the strip width of 2 1/2".
ALTERNATE METHOD OF MEASURING: Sometimes you don't have blocks right out to the edge as does my GG quilt. For those quilts I simply measure ten hexagons and use that measurement to make the registration marks on my border strips.
Next I calculate the strip length for the borders on the top and
bottom. The diamond block width is 11 3/4" from the edge of the path on
one side of the block to the edge of the block (excluding the path on the other
side) .

There are five partial diamonds at the top and bottom so I will need strips that are:
Attaching the Side Strips for the Border
There are five partial diamonds at the top and bottom so I will need strips that are:
- five half diamond lengths (11 3/4" X 5) plus the last hexagon that was excluded from my diamond measurement. That hexagon is 1 1/4"
- 5" which is two times the strip width of 2 1/2"
Attaching the Side Strips for the Border
I start with the side strips. I make a mark on the wrong side that is about 4" from the end and them I make marks that are 20 1/8" apart. I place the border on my quilt top with wrong sides up and I line up the marks on the border with the diamonds making sure that the border overlaps the innermost hexagon on the seam allowance. I pin well.

I like to thread baste the border to the quilt top but you could just pin with applique pins or you could use applique glue if you prefer. In the next picture is a view of the wrong side of the quilt with the border basted to the quilt top. Notice that the papers and basting thread are still in the quilt top. They can be removed after the quilt has been appliqued to the border. When I thread baste I like to start and stop one hexagon in from the ends. This will make mitering the corners easier.

In this picture you see the quilt top from the front; it is basted to the border. I baste the border to the opposite side. If I were hand quilting I would trim the excess border fabric after I had completed the applique but this quilt will be machine quilted so the extra fabric won't present a problem.

Attaching the Top and Bottom Strips for the Border
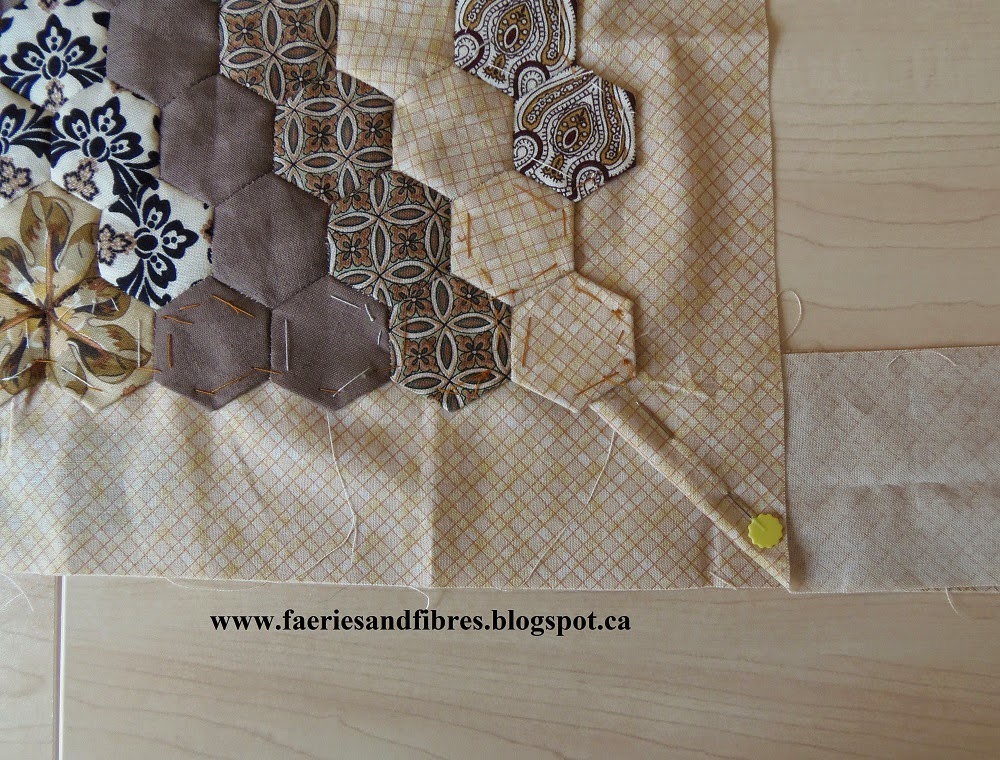
The next step is to prepare and baste the top and bottom borders. Once again I make a mark on the wrong side that is about 4" from the end and them I make marks that are 11 3/4" apart. I place the border on my quilt top with wrong sides up and I line up the marks on the border with the diamonds making sure that the border overlaps the innermost hexagon on the seam allowance. I pin well. and thread baste starting and stopping one hexagon from the ends. The corners will look like this.

Mitering the Corners
I fold one strip in the following diagram and pin. I can now thread baste that seam and the hexagons at the ends that were not basted to the borders. The quilt top is now read to be appliqued to the border. I used a thread that matched the border fabric. I also stitch the miter by hand with tiny stitches and then trim away the excess fabric.
The borders are appliqued and the corner is mitered, stitched and trimmed.

So there you have it....one more method of finishing the edge of a hexagon quilt. This one works for me and I hope it will work for you too! I stitched my border down by hand but there's no reason why you couldn't do machine applique for a fast and perfect finish!
The finished GG hexagon quilt top!

This is the backing I've selected for the GG quilt. It will be a very tight squeeze. I've got 4 1/2 yds. but could do with an extra 4". You can see I've also made the binding from the path fabric. I'll keep it with the quilt until I'm ready to use it!

For more hexagon inspiration pop over to A Quilting Reader's Garden for Hexie Weekend!
Until I post again, happy sewing!
Karen H
I like to thread baste the border to the quilt top but you could just pin with applique pins or you could use applique glue if you prefer. In the next picture is a view of the wrong side of the quilt with the border basted to the quilt top. Notice that the papers and basting thread are still in the quilt top. They can be removed after the quilt has been appliqued to the border. When I thread baste I like to start and stop one hexagon in from the ends. This will make mitering the corners easier.
In this picture you see the quilt top from the front; it is basted to the border. I baste the border to the opposite side. If I were hand quilting I would trim the excess border fabric after I had completed the applique but this quilt will be machine quilted so the extra fabric won't present a problem.
Attaching the Top and Bottom Strips for the Border
The next step is to prepare and baste the top and bottom borders. Once again I make a mark on the wrong side that is about 4" from the end and them I make marks that are 11 3/4" apart. I place the border on my quilt top with wrong sides up and I line up the marks on the border with the diamonds making sure that the border overlaps the innermost hexagon on the seam allowance. I pin well. and thread baste starting and stopping one hexagon from the ends. The corners will look like this.
Mitering the Corners
I fold one strip in the following diagram and pin. I can now thread baste that seam and the hexagons at the ends that were not basted to the borders. The quilt top is now read to be appliqued to the border. I used a thread that matched the border fabric. I also stitch the miter by hand with tiny stitches and then trim away the excess fabric.
The borders are appliqued and the corner is mitered, stitched and trimmed.
So there you have it....one more method of finishing the edge of a hexagon quilt. This one works for me and I hope it will work for you too! I stitched my border down by hand but there's no reason why you couldn't do machine applique for a fast and perfect finish!
The finished GG hexagon quilt top!
This is the backing I've selected for the GG quilt. It will be a very tight squeeze. I've got 4 1/2 yds. but could do with an extra 4". You can see I've also made the binding from the path fabric. I'll keep it with the quilt until I'm ready to use it!
For more hexagon inspiration pop over to A Quilting Reader's Garden for Hexie Weekend!
Until I post again, happy sewing!
Karen H
