Showing posts with label hexie. Show all posts

Friday, August 22, 2014

Value Proposition - Block 10

I'm back from my blogcation and will kick off my return with Block 10 of my Value Proposition Hexagon Quilt Along (QAL). I had a great two week hiatus and am raring to go and hope you are too! This time I've got a simple hexagon block that will focus on primarily on light value with one dark added for punch. I really like this simple block!


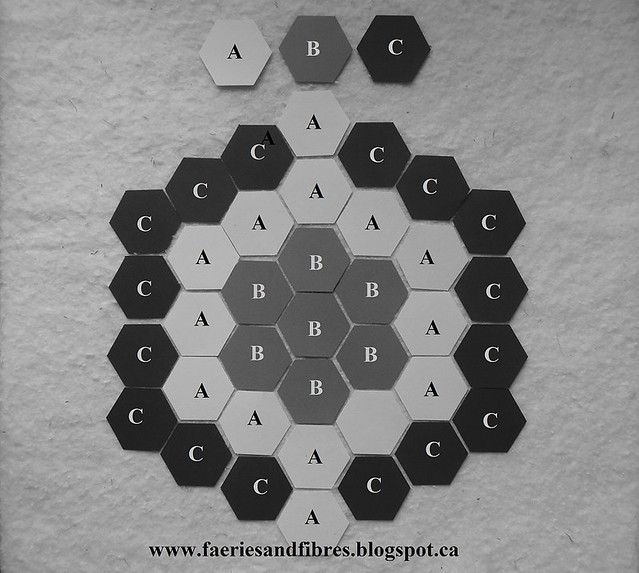
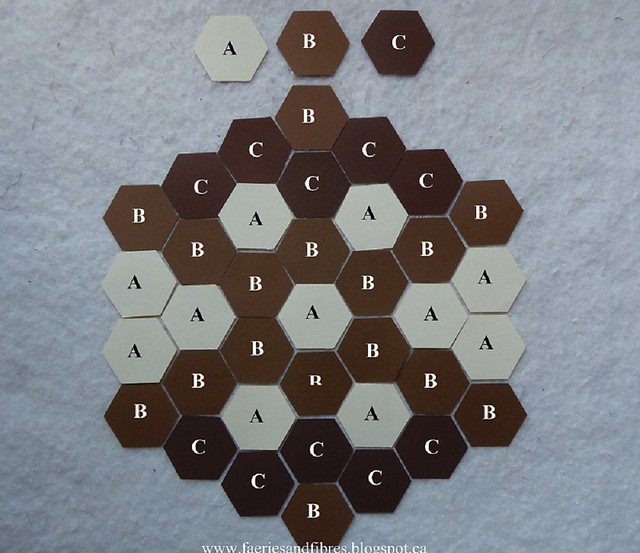
Value Proposition Map for Block 10


Value Proposition Recipe for Block 10
  • Cut 12 Light* identified as A on Map (6 for Round 1 and 6 for Round 2)
  • Cut 18 Light** which are a little darker identified as B on Map (Round 3)
  • Cut 7 Dark identified as C on Map (1 for Centre and 6 for Round 2)
* I used two different Light fabrics but you could use a single fabric if you prefer
** I cut six from the same fabric and the remaining 12 were cut from scraps

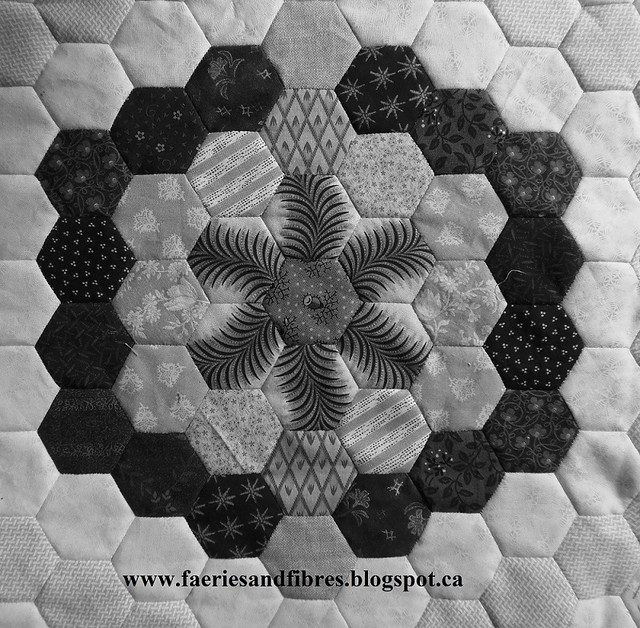
My Value Proposition Block
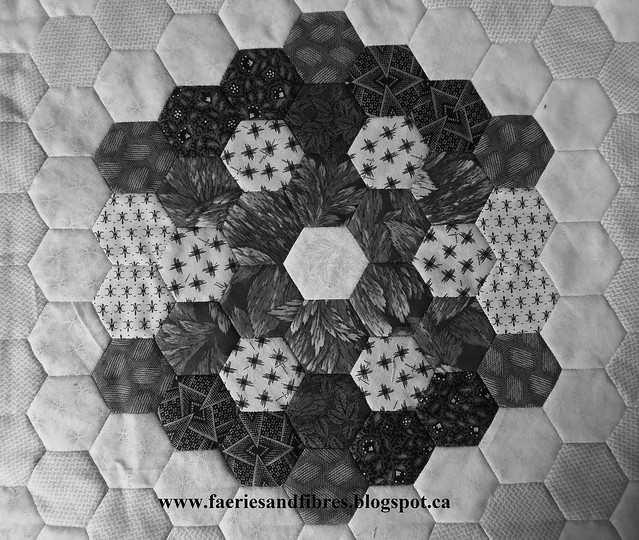
This is my block shown in black and white. The Lights for Round 1 and 2 are just off white. I used two different fabrics however both are the same value. You could do the same or you could use two different fabrics of the same value. I would strongly recommend that if you chose to use two fabrics that in addition to being the same value they should also be the same colour.


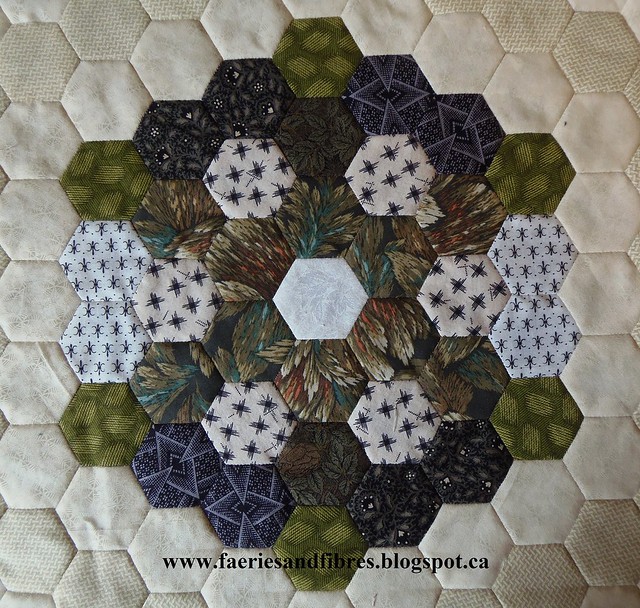
This is my block in colour and you can better see some of the decisions I made. I chose to use a pale yellow fabric at the tips of the spokes in Round 3 The remaining fabrics in Round 3 are a similar value but I chose to go with a variety of taupes so the yellow could shine.


I set up a Value Proposition QAL page on Flickr so that you can post pictures of your blocks and also see what others are doing! There are many very different and exciting blocks to see and there are also some pictures showing a bunch of blocks arranged together and that is very exciting to see! 

If you are looking for previous Block installments of my Value Proposition Hexagon QAL you will find all of the links under the tab Quilt Alongs by Karen H just under the banner. Have fun making Block 10. I think it is time for another side setting block so I'll post the pattern for the Side Setting Block 2 on Friday, August 30, 2014. Block 11 will be available on September 5, 2014.

I hope you are having fun with my QAL! If you have any questions please feel free to leave a comment or send me an email. I send an email response to every comment so if you don't hear from me it means you are a no-reply blogger and I have no way of contacting you (unless you leave me your email address).

Until I post again, happy sewing!
Karen H

Friday, May 30, 2014

Value Proposition Quilt Along - Block 4

Welcome to Block 4 of my Value Proposition Quilt Along (QAL). I've told you other blocks are my favourites but this one really is one of my favourites and it will stay that way until I show you the next block which will of course be my favourite!


Before I get started I have a SPECIAL ANNOUNCEMENT! There are four half blocks in the Value Proposition Quilt and they are used to fill in the spaced on the sides. I'll share the first of the four half blocks one week from today so be sure to come back on June 6, 2014 for the first Value Proposition half block!

Value Proposition Map for Block 4


Value Proposition Recipe for Block 4
  • Cut 14 Light identified as A on Map ( 12 for Round 2 and 2 for Round 3)
  • Cut 7 Medium* identified as B on Map (1 for Center and 6 for Round 1)
  • Cut 16 Dark identified as C on Map (all for Round 3)
* You may want to fussy cut one B Medium for the Center and cut the remaining 6 hexagons from a directional print such as a stripe. This will add visual interest and it is loads of fun!

My Value Proposition Block
This is my block shown in black and white. It is very scrappy. Notice I've used a variety of dark prints and a variety of light prints. If you have leftover hexagons from other blocks this is a great time to use them provided they are the correct value. The darks I've used are very dark and they form what looks like a "C" and a mirror image "C". When selecting your fabrics you want to ensure that you have strong contrast between the lights and the darks so that the "Cs" show up! The lighter scraps I used in Round 2 (and 2 in Round 3) are on the darker side of light, especially the pair in the 12 o'clock and 6 o'clock positions (you could go lighter if you prefer). I've used the diamond fabric at the top and bottom in the same position in Round 2 to give the block balance. The same is true of the deep beige linen-look print in the same positions in Round 3. I used a directional print for Round 1 and I love the visual interest that is created with the print that I chose. In addition I fussy cut one hexagon for the Center.

 If your prefer you can make this block with only three fabrics OR you can use three fabrics but fussy cut the center hexagon! Whatever you do have fun! And why not give a directional print a try for Round 1?


So now I'll show you a colour picture of my block! The darks are navy and brown and I think that they work together perfectly because they are the same value (or very close in value).


I set up a Value Proposition QAL page on Flickr so that you can post picture of your blocks and also see what others are doing! There are many very different and exciting blocks to see so do drop by and if you have time leave a comment if you see something you like!

If you are looking for previous Block installments of my Value Proposition QAL you will find all of the links under the tab Quilt Alongs by Karen H just under the banner. I hope you enjoy making Block 4. The first half block will be available on June 6, 2014 and Block 5 will be available on June 13, 2014. If you have any questions please feel free to leave a comment or send me an email. I send an email response to every comment so if you don't hear from me it means you are a no-reply blogger.

Until I post again, happy sewing!
Karen H

Friday, May 16, 2014

Value Proposition Quilt Along - Block 3

Welcome to Block 3 of my Value Proposition Quilt Along (QAL). I hope you are having fun making these blocks but if you haven't got the time to make them now I hope that at least you are enjoying seeing them! I like this block because of the strong contrast in value however once you see the layout you might prefer to use a less stark contrast. It is up to you because you are making your quilt!


Value Proposition Map for Block 3


Value Proposition Recipe for Block 3
  • Cut 11 Light identified as A on Map (1 for Center, 6 for Round 2 and 4 for Round 3)
  • Cut 16 Dark-medium identified as B on Map (6 for Round 1, 4 for Round 2 and 6 for Round 3)
  • Cut 10 Dark identified as C on Map (2 for Round 2 and 8 for Round 3)
My Value Proposition Block
This is my block shown in black and white. It reminds me of a moth or a butterfly!


This is my block in colour. While the block could be made of just three fabrics I chose to use a variety of scraps. I thought that it added a little more interest and I didn't have enough of some of the fabrics to cut the required number of hexagons! For example I didn't have enough of one of the black prints in Round 3 so I cut what I could and then added a second black print. They were positioned across from one another to balance the block. I'm naturally drawn to the earthy, muddy colours. When you make your block use the colours that appeal to you!


If you have extra hexagons hang on to them because you might find that they will fit in quite nicely into some of the scrapier blocks to come! My version of Block 4 will be quite scrappy!

I set up a Value Proposition QAL page on Flickr so you can post pictures of your blocks and see what others are doing! It is always exciting for me to see how others take my ideas and make them their own so please do join in the fun and share your pix!

If you are looking for previous installments of the Value Proposition QAL you will find all of the links under Quilt Alongs by Karen H just under the banner. I hope you have fun making Block 3. Block 4 will be available on May 30, 2014. If you have any questions please feel free to leave a comment or so send me an email. I reply by email to every comment. If you don't hear from me it means you are a no-reply blogger so I have no way of contacting you unless you leave your email address in your comment!

Until I post again, happy sewing!
Karen H

Tuesday, May 13, 2014

Another GG Block

On May 9 I wrote about how I altered a fabric that I wanted to use in my version of the Godstone Grannies (GG) coverlet. If you missed it you will find it here.  I had the right fabric for the block but it was the wrong colour (the hexagon on the left in the picture below). I had planned on using my yellow Sakura pen but it ran out of ink (the hexie in the middle). I used watercolour paint and textile medium to tint the fabric to the desired shade (the hexie on the right)! I cut out all of my hexagons, basted them to the foundation paper and tinted them.


I watered down the yellow watercolour paint and then added the textile medium. All of the hexagons were painted and allowed to sit for 24 hours. The colour was heat set with a medium heat iron. In addition to these yellow hexagons I added three other fabrics (the fabric on the far right is the one that I tinted with the paint and textile medium).


Voila - the finished GG block! I also used a black Sakura pen to blacken the edges of the yellow hexagons where they touched the center hexagon.


This block is one of a pair and the second one is cut, basted, painted and ready to be stitched. I am pleased with how my block turned out! If the paint-textile medium is used sparingly the fabric remains soft and pliable. At this point I estimate that half of the blocks are finished. The remaining blocks are all basted and are waiting to be stitched together. Most of the path is cut and basted so it should go a little more quickly from here on!

Before I go I thought I would share another one of the blocks from my Ausiegons quilt. One of the fun parts about making the quilt was the ability to experiment with colour combinations and print combinations. I learned so much and in the end all of the blocks worked together. I am fond of this colour combination!


There'll be no post tomorrow but I'll be back on Thursday. Until I post again, happy sewing!
Karen H

Wednesday, May 7, 2014

Godstone Grannies and Sheila's quilt

I just want to remind everyone that I reply to every comment so if you don't hear back from me it means you are a no-reply blogger so I have no way to contact you!

Last night I finished stitching another Godstone Grannies hexagon block. I like the look of the brown double diamond in this one. Bees were fussy cut for the centers of each diamond. This is the first of a pair and the second one is cut, basted and ready to be stitched together! The hexies are 3/4".


I checked out the Soupcon Flicker Group and I see Sheila is adding borders to her Soupcon quilt. I think what she is doing is absolutely perfect. I had been eyeballing this border for another quilt so I am pleased to see it in action on Soupcon. Well done Sheila!


I finished quilting my Mom's African banner quilt so she can now start embellishing it with beads and whatnot. The busy fabric at the top and bottom was a great place to experiment with different designs. I tried out some clam shell quilting to fill a little spot and it turned out reasonably well. I'm okay with reasonably well! Tomorrow I'll show you how I did it!

Until I post again, happy sewing!
Karen H

Friday, May 2, 2014

Value Proposition Quilt Along - Block 2

It is time for Block 2 in my Value Proposition QAL! This is a very simple but effective block. You only need two fabrics to make this block however I would recommend that you swap out the center hexagon for one lovely fussy cut hexagon. If you prefer not to fussy cut that is perfectly fine - you are making your quilt!


Value Proposition Map for Block 2
Block 2 reminds me of a wagon wheel. The "spokes" are a lighter value than the background. For this block I would recommend using only two fabrics, one for the spokes and the other for the background plus your fussy cut center. Most of the blocks in this quilt can be made with scraps but for this one use only the two (or three with the center) fabrics to maintain the design. The fussy cut fabric in the center of my block is the same value as the background.


Value Proposition Recipe
  • Cut 19* Dark-medium (1 for the center*, 6 for Round 2 and 12 for Round 3 identified as B on the Map)
  • Cut 18 Light-medium  (6 for Round 1, 6 for Round 2 and 6 for Round 3 identified as identified as A on the Map)

* you can substitute one fussy cut hexagon for the center in which case you will cut 18 hexagons for the fillers between the spokes

My Value Proposition Block
This is my block shown in black and white.


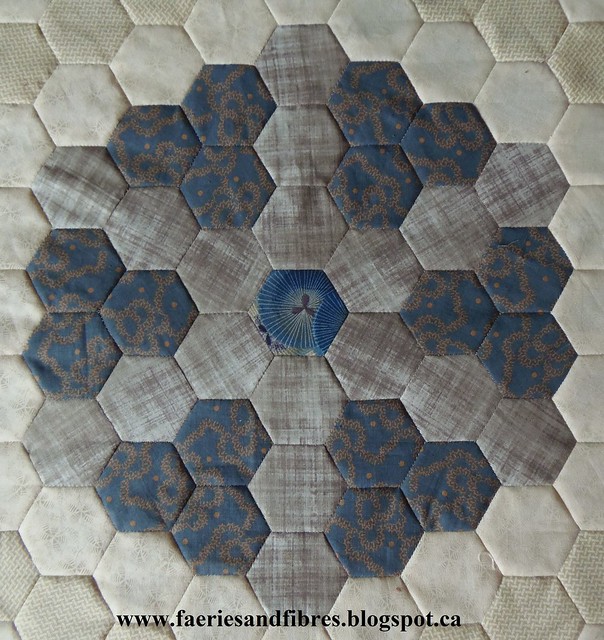
This is my block in colour. I used a taupe crosshatch fabric for the spokes and a dark blue for the background. The center was fussy cut from another blue of similar value as the background.


I set up a Value Proposition QAL Flickr page so that you can post pictures of your blocks and also see what others are doing!

If you are looking for previous installments of the Value Proposition QAL you will find all of the links under the tab Quilt Alongs by Karen H just under the banner. I hope you have fun making Block 2. Block 3 will be available on May 16, 2014! If you have any questions please feel free to leave a comment or send me an email.

Until I post again, happy sewing!
Karen H

Monday, April 21, 2014

Organizing a hexie project

It seems there is interest in knowing how I organize my hexie projects so I thought I would share my tips and how I do things. My current project is the Godstone Grannies quilt so I'll use it to show you how I got organized. Let's start of with some ground rules!

GROUND RULE #1: Relax and enjoy the rhythm of what you are doing.

GROUND RULE # 2: It isn't a race. It will be done when it is done and not a minute sooner..

GROUND RULE #3: If you get bored mix it up....baste, cut or stitch.

GROUND RULE #4: Admire our work and take pride in it. We are our own worst critics and we shouldn't be. You know how hard you worked so be your biggest cheerleader!!!

GROUND RULE #5: Fix mistakes that will drive you crazy and leave alone those that won't. I find that left long enough there isn't very much that bothers me and I expect you will find the same! This will dramatically reduce the amount of fixing that you need to do!

GROUND RULE #6:  I rarely layout my blocks to see how many I have yet to make because it can be overwhelming and disappointing to realize after hours and hours of sewing that I might not have made as much progress as I had hoped. Once a block is completed I put it in the bottom of the box and there it stays until my project is close to completion.

I like to have a nice project box to store the bits and pieces of my project. This is the cardboard suitcase I found for my Godstone Grannies (GG) quilt! I'll use it to store bits and pieces of blocks, completed blocks, cut strips and my pattern but at the beginning I just used it to hold fabrics I thought I might use to make my blocks. In this picture I pulled a bunch of fabrics that I thought I would  use. Some were used in the blocks and some were not - it was a "first draft" of fabric choices!


If my quilt is an original design the first thing I do is draft my quilt on hexagon paper. This is a design for a quilt that I saw in a magazine. I drafted it on paper first because I wanted to make some changes. I have since made the quilt top but I've not yet showed it to you. I will when I am ready to quilt it! In this quilt I used pink highlighter to identify the path that was going to be made from a particular fabric.


If the inspiration is from an antique quilt as was the case with my GG quilt I print a picture of the quilt. The arrangement of the diamonds in some of the blocks is unusual so I printed a second picture of the quilt. I cut up the second picture and the diamond I cut out is kept with the fabric patches for that diamond block.


My GG quilt is just large diamonds so I only needed to draft patterns for the few of the blocks (on the right). I also sketched a plan that shows all of the diamonds (on the left). I numbered each of the blocks so I'll know where to place the completed diamonds. I use the plan to make notes to tell me what I've cut out, what I need to cut or special fabric choices. Once an entire block is cut out I outlined it with green on the plan. If I've started cutting the block but did not cut all the patches I just make a dot at the top of the diamond. I can tell at a glance where I am with my quilt and what is done and what needs to be done.


I also cut make a window template in case I want to fussy cut some patches. I keep everything clipped together and I store it in the project box.


The first thing I do is calculate how much fabric I need for the path between the hexagons. I wrote about it here. I cut the required number of strips and then cut them down into hexagons. The papers are tacked to the back with a little bit of glue stick and they are all tossed in a bag. I wrote about how I do here. With my method I can cut and prepare hundreds of hexagons for basting in no time flat! I store the hexagons in a bag with basting thread, needles and a pair of small sewing scissor so I can grab the bag and baste any time I want.


I get bored if I am doing the same thing over and over again so I like to mix it up. Sometimes I feel like basting so that's what I'll do. Others I feel like stitching so that's what I do. I generally work in stages so there will be multiple blocks or the path in various stages of sewing. For example, when I have a bunch of path hexagons basted I'll sew them into pairs. I sew the pairs into a strip of four and the strips of four into a strip of eight. Two sets of 8 plus one will make the V part of the path and it is ready to be stitched to a hexagon diamond block. I just toss the complete Vs into the project box. I don't count how many I've made....I just make them! I'll count when I get close to finishing the quilt.


HELPFUL TIP: If I have a small piece of thread in my needle rather than toss it I'll use it to baste one hexagon. You'll be surprised how quickly the hexagons will pile up.

I like to do most of the fabric cutting at the outset for a couple of reasons. I don't particularly enjoy cutting so I want to get it out of the way so that I can sew but more importantly if I do most of the cutting at the beginning I can repeat some of the fabrics in several blocks and the gives a scrap quilt a more cohesive appearance. I love these little snack bags for storing cut patches. I use one bag per block.


I cut out my patches for each block and put them in a little bag with a tag that has the block number from my plan and I glue the picture of the diamond to the tag so I'll know how it goes together. Most of the GG blocks are duplicated so I put one block in each little bag and I pin the two bags together. The bag at the top is cut and has the papers attached but I've not started basting. In the pair of bags at the bottom I've basted but not yet stitched. I wrote about this process here.


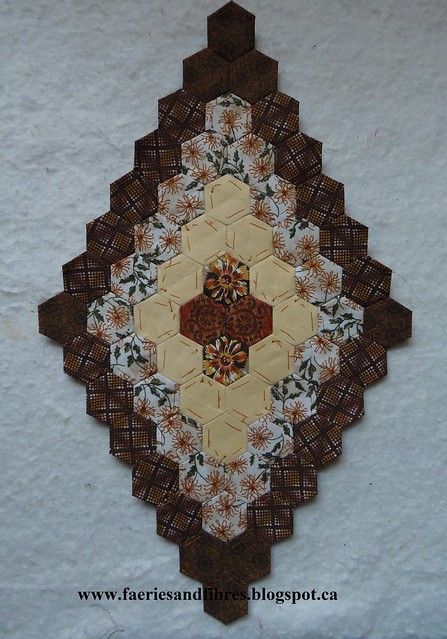
Repeating a few fabrics in different blocks gives a quilt a more controlled appearance. It will still be scrappy but not wildly so. What I do to repeat fabrics is analyze the picture of the quilt to decide which fabrics I will repeat. One such fabric was the solid pale yellow in the block shown below. For that round I needed 12 hexagons. I decided which other blocks would have that fabric and the number of patches that would be needed. I cut them all out at the same time and the patches were put in the bag with the tag that has the block number and block picture. I keep the remaining fabric in the project box so that if I need more of it I don't have to go searching.

I always have a small bag at the ready with bits of my sewing project so if I'm going out and think I might have time to sew I can grab it and toss it in my purse. What do I keep in the bag? Sewing threads that match my fabrics, basting thread (I like to buy cheap serger thread for this), scissors, a mini glue stick, some paper hexagons and my fabric hexagons. Basting is great for when out and about because you don't have to think about fabric direction or placement. I love basting when taking public transit because people are fascinated and I get a kick out of seeing how long they can keep it in before they ask "what are you doing"? When not in use my grab bag is stored in my project box.

Some of my hexagon sewing supplies for my bag

Knots are not fun so I like to sew so that I have to make as few knots as possible. In the picture below you can see one of the filler pieces that will be at the top or bottom of the quilt. I've stitched the hexagons together into rounds starting with the center three at the bottom and working out. 


If I don't feel like sewing I just pin them all together and toss them in the project box and do something else! 


When I am ready to sew them together I'll sew the three beige units at the bottom in the center to the first round. Then I'll attach the second round followed by the third.


Here is a block set out on my sandpaper board. I've sewed the middle four orange flowers together. The next round is the pale yellow and the hexies are stitched together; notice that it isn't stitched closed. This makes it easier to stitch around the center orange flowers. Ditto the next round with yellow print.  I'll stitch the yellow round to the orange center with yellow thread. Once I've got all the way around I'll then be able to stitch the opening closed. The final round is in various states of assembly. I like laying the block out this way; it ensures that the pieces go together correctly.


Once the rounds are stitched I pin them together with their identification tag and toss them in the project box. These make good portable projects for sewing when I'm out and about. When I see a block that tickles my fancy at that moment I pull it out and work on it!


Once I've stitched a block I will pin a piece of the path to it. I can sew them together at that point or later on.


Completed blocks always go to the bottom of the project box where they can pile up. In no time flat I've got a quilt!

So there you have it - a few of my tips for how I get organized! Any questions? Fire away because I'm always willing to share! I reply to every comment by email so if you don't hear back from me it is because you are a no reply blogger which means your email address isn't available to me.

Here is my latest GG block!


Hope you have a nice day and that you find time to take a few stitches.

Happy sewing!
Karen H

Wednesday, April 9, 2014

More reader questions and another GG block

I love having the opportunity to respond to reader questions about how I do things. I'm not an expert but I'm more than happy to share with you what I do to to achieve results with which I am happy. The "I" part of that statement is critical. I worry very little about what others think about my work - I am more concerned with what I think if my work. I know my weaknesses and strengths and when I work I never compare my work to that of others. Instead I compare it to my own work. If I think I can or should do better then I try to do better. If I think I've done the best possible work taking into consideration all of the challenges and issues then I'm happy with the result! Soooooo, bearing all of this in mind I am pleased to respond to questions about what works for me!

I was asked to show the back of my Mom's Anna quilt that I quilted on my domestic sewing machine. Angie wrote that sometimes she gets too much puffiness and it doesn't quilt out and she was wondering what could cause this problem. There can be many reasons for the puffiness. If your quilt top doesn't lay flat it won't quilt flat so that is the first thing I would look at. However for me the main cause is usually related to the creation of the quilt sandwich. It is important that it be as well made as possible and this is what I do to achieve a well sandwiched quilt.

First I press my quilt back with spray starch. I find it keeps the back flat and smooth and it helps the quilt glide smoothly under my needle when I start quilting. I also press the top with spray starch. You can purchase spray starch or you can make your own for pennies a bottle! I've got a recipe under the tab Tips and Tutorials. In the picture I've got a bottle of gin; it should have been vodka! Oops! Oh well at lease you ca see the basic ingredients!


To baste my quilt I clamp the quilt back to a table making sure it is flat, taut and smooth. In the picture below you can see I use office clips to clamp it to the table. I start by clamping in the middle of the top and bottom. I then clamp one over from each of those. Next I clamp in the middle on each side and then place a clamp on either side of those. Every step of the way I am gently pulling the fabric to make sure it is taut. Once I've clamped the entire back I run my hand over the backing. If there is any movement or rippling in the fabric I pull and reclamp so that it is eliminated.


I next layer my batting making sure that it is flat and smooth and finally the quilt top goes on top.


I pin baste so that my pins are roughly 4" apart. I stitch in the ditch (SID) on every main seam so I bear this in mind when pinning; I don't want pins that will be on any of the main seam lines because I don't want to have to remove them as I stitch in the ditch. Removing pins too soon can introduce problems on the back (I learned that the hard way). I generally SID with Superior Monopoly on top and The Bottom Line in the bobbin. I like using the invisible thread on top because it disappears so if I veer off the seam a titch it won't show!

By following these steps I find that any puffiness is eliminated. Honestly the starch makes a really big difference so if you haven't tried it before you really should try it at least once!

In a separate email Angie told me she was curious to know of the SID lines show after the quilt is quilted. The answer is it depends. If the area is densely quilted they virtually disappear. If it isn't they can be seen. The following two pictures are the back of my Lazy Girl quilt. You can see the SID is barely visible in the first picture but it is visible in the second. Personally this doesn't bother me but if it did I could use water soluble thread for SID. It would disappear entirely when the quilt is washed.


Finally I would like to share my latest GG (Godstone Grannies) quilt block with you. There is no fussy cutting in this one! Phew!  I'm considering replacing the four hexagons in the center but will put off the decision until more of the blocks are made so that I can get a feel for how the quilt is shaping up. If I think this block need a little sparkle I'll change the four hexies and if not....it is done!


That's it for today! Tomorrow I'm taking a day off to have some fun with my Mom. I'll be back on Friday with some hexie talk and more ideas for solving the puffiness problem that can happen when quilting! Until I post again, happy basting!
Karen H

Wednesday, March 26, 2014

Found my fabric, more Soupcon quilts, another hexie project and the next QAL

I found my fabric but it is a brown background rather than the paprika. Nonetheless it is gorgeous! I found it online at Alewives Fabrics. They have a lovely online shop with loads of wonderful fabrics and great customer service! I plan on shopping there in the future! Here is my fabric! Sooooo pretty - I adore those little birds! I've no idea what I'm going to make with this fabric (maybe a border for hexagon quilt) but it will come to me!


There are another couple of Soupcon quilt pictures on the Soupcon FLICKR GroupNellie Durand has completed step 6 of Soupcon! Isn't it fabulous? She took my ideas and then put her personal touch each step of the way! Step 6 was the foundation paper pieced border and Nellie turned the spikes so that the pinks are pointing inward plus she added a pieced corner. I think I might just do some reverse sewing and add a pieced corner to my blue Soupcon! This is a really lovely quilt!


Jean Cockburn has completed Step 5 of her Soupcon and she also put her own personal stamp on the quilt but creating her own unique border. Nellie commented that the quilt makes her think of pink dogwoods which are about to bloom where she lives. It makes me think of pistachios!  It is a vibrant and exciting quilt. I love the little pop of pale green in the center! Jean has colour confidence and I truly admire that skill!


I found a little cardboard suitcase in a shop and thought it would make a perfect box for my newest project. What kind of project? Well here's the suitcase with some of the fabrics I pulled and there's a little window template that will be a hint about what I'm going to make!


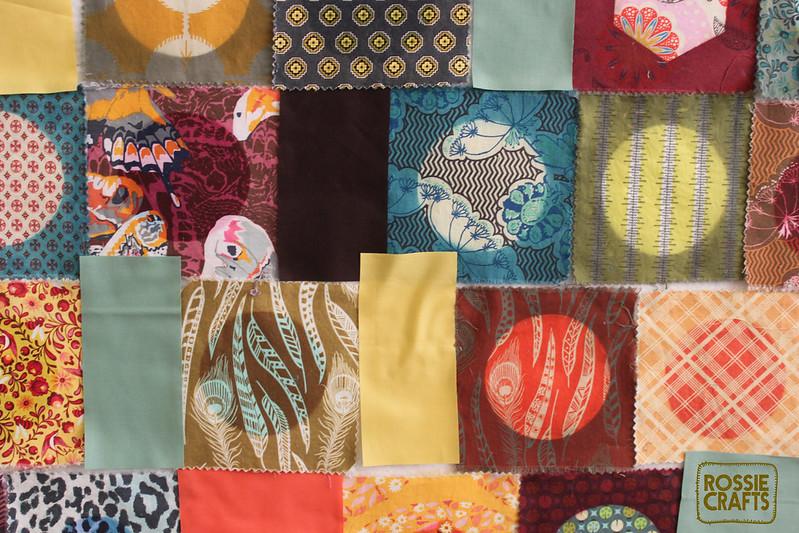
This morning I was reading my blog feed an found an interesting post on Rossie Hutchinson's blog. She showed her finished quilt and linked back to how she made the blocks. You can see the quilt on her March 23 post. What I found most interesting was how she made the blocks. She used 5" charm squares and bleached the darker fabrics and dyed the lighter fabrics. Aren't these blocks fabulous? I love the effect she has achieved!


She explains the process here. I've never done any dying although I have used bleach to alter fabrics. I am really tempted to give this one a go when the weather gets better so that it can be done outside.

I've now finished my quilt top for the next quilt along (QAL), Value Proposition. My quilt is made of 1" hexies but there is no reason why you couldn't use a larger or smaller hexagons. There are 18 whole blocks (and some partial blocks) in the quilt and you will have your choice of a single path or a triple path between the blocks. I used a triple path and it created a secondary design that I think is lovely. I don't know about you but I find it so hard to wait a month for each block so I think I will publish a block every two weeks. Would that suit you? Each block will consist of  a center flower with two extra rounds of hexies. In the process I'll share some ideas for creating some interesting effects in you quilt. For example we will use applique, sew new fabric and we will create  our own prints! Sound interesting? I sure hope so! It won't be long until we get started!

Time for this lazy girl to get back to quilting her Lazy Girl quilt! Until I post again, happy sewing!
Karen H