Showing posts with label path. Show all posts

Friday, March 20, 2015

It is Spring!

It is Spring....or so they say! With the temperature sitting at freezing it doesn't feel that way but the arrival of the robins and red-wing blackbirds is a sure fire indication that Spring is indeed here.

This is a little Spring time quilt that I made as part of my Guild's Paint Pot Challenge. The organizers got a bunch of paint chips from the home improvement store and put them in an empty paint pot. We each reached into the pot and pulled out a chip. The challenge was to make a small quilt that featured the paint chip colour and the name of our quilt had to be the name of the paint chip! It was great fun and challenged us to work with colours we might not have ordinarily used. That was the case for me but imagine my surprise when I discovered I did had that colour in my stash! The name of my paint chip and my quilt is Rosy Outlook!

Rosy Outlook by Karen H  2012
14 1/2" x 17 1/2"

I used my Sakura Pigma pens to add details to the birch tree trunks, veins to the leaves and  feathers to the fabrics that I used to make the bird. It's legs were drawn on the quilt after the bird was attached.


Today I thought I would answer a reader question about the path and share a few more rosettes for my Birds in the Loft quilt. I love both of these rosettes! The green middle in the first is another treasured fabric; there isn't much left!


The blue fabric has been in my stash a long time and I think I have enough for a couple of individual hexagons and then it will be gone, gone, gone!


Now for the reader question/ I was asked why I am adding path hexagons to only one side of the rosette and not the other.


I want the hexagons to fit together with a single round of path hexagons. If I add them on both sides there will be a double row of path hexagons. Think of it like sashing between square blocks. There is only one sash between two blocks and this holds true with hexagon rosettes (and diamonds). It is important to understand that if you have two hexagons between rosettes they will not line up. Instead a slope will develop. I wrote about it here. If there is a full round of path hexagons around each rosette they would look like the rosettes on the left.


A picture speaks a thousand words so here are a few pictures to explain what happens. In this picture two rosettes have the five path hexagons stitched to them. When I put them together notice how they fit nicely and will stay in a nice straight line.


If I add path hexagons to both sides this is what would happen when I try to put them together. Notice the slope has developed!


If you want your blocks to be in a straight line the path must be an odd number. Birds in the Loft will have a single path. My Value Proposition quilt has a triple path.


Another way to straighten rosettes is to add a small diamond between. The diamond is simply on third of a hexagon. I wrote about constructing, deconstruction and reconstructing hexagons here.


I used the diamond method of connecting the units in my quilt Butterscotch Ripple. It is another option for joining hexagon units!

I hope you enjoyed this blog entry. Until I post again, happy sewing!
Karen H

Wednesday, February 25, 2015

A path for Birds

On Monday I wrote about making the round of rosettes that will frame the medallion in my Birds in the Loft hexagon quilt. I neglected to mention that the units made of three caramel prints will also need to have a path fabric added in order to fit everything together. There are eight of these units so the sewing will go quickly.


In the past I've written about constructing the path for a hexagon quilt. Hexagon rosettes will surround the medallion in my Birds in the Loft hexagon quilt and they will be separated by an off-white path. The easiest method of constructing the path is to sew together five hexagons and then these hexagon unit is stitched to the rosette. My thread colour will match the path hexagons.


I'll need to cut and baste 900 hexagons. The cutting will be fast and easy. I'll start by cutting 2 1/2" strips of path fabric and then I'll quick cut the fabric using the method I wrote about here.  So how many strips will I need? I can cut 18 hexagons from each strip so I'll need fifty strips which translates into 3.25 meters or 3.5 yards of fabric. I sure hope I have enough but if not I'll pull something similar and add it to the mix! I will need to prepare more path hexagons to finish the outer edges of the rows of rosettes but I'll write about it when I get to the point where I need them.

I will attach the path units of five hexagons to 180 of the rosettes. The remaining 20 rosettes will surround the medallion and many will require a different number of path hexagons. They are attached to the caramel connector units that go around the medallion will also need the path hexagons attached to them but they will need different numbers of hexagons depending on their position in the ring around the medallion. In the following diagram you can see the medallion with the rosettes. Inside each rosette I've indicated the number; it corresponds to the diagram that shows the placement of the 100 pairs of rosettes. Beside the rosette I have placed a number and it tells me the number of path hexagons that need to be stitched to the rosette. From this point on the rosettes with the path of five hexagons shown above will fit perfectly around the medallion. I'll explain how in an upcoming post.


For now how about another rosette or two? Well your wish is my command so here we go! I struggled with selecting a centre for this rosette. I just set it aside and every now and then I auditioned it on different fabrics until I found a good fit!


The dragonfly in the middle is cut from the same piece of fabric that I used for the four bees in the medallion. I really think it is a good idea to repeat fabrics in this way to control the scrappiness of the quilt.

Time for me to do some cutting and basting so until I post again, happy sewing!
Karen H

Sunday, April 13, 2014

Value Proposition Quilt Along (QAL) - The Path

If you are considering sewing along in my next QAL, Value Proposition, you will want to start thinking about the layout. You don't have to do anything at this point other than think!

The inspiration for the quilt is an antique quilt made up of hexagon flowers (or rosettes if you prefer) and each of the flowers was surrounded by the background fabric. This meant each flower was exactly the same size so when stitched together it was the same as no path at all.  In the picture below the hexagon flowers on the left are of an identical size. When stitched together you can see what happens...a slope develops. The flowers on the right have a single path in between and when sewn together the rows and columns are straight. In order for a path to do what it is intended to do it must be made up of an odd number.


The flowers in Value Proposition will have a path.  It will be up to you to decide whether you want a single path or a triple path. I chose to use a triple path for two reasons: I felt that it showcased the blocks and I used the center of thee triple path as an additional design element that is not part of the original quilt. If a triple path seems like a lot of work or does not appeal to you then a single path can be used but it will result in a smaller quilt.
Single path

Triple path

You will need many hexagons for whichever path you choose. I baste mine as I go along. Every time I have a few moments I basted a few and then put them into a bag. If I'm sewing hexagons together and I have a little thread left over I use it to baste another hexagon.  If I don't feel like basting I stitch the path hexagons into pairs so that they are ready to sew together into larger elements. I used two fabrics for my path and it created a lovely and interesting accent. I'll write more about what I did, the colours I chose and why I chose them in the next few days. I will also provide information on fabric requirements for the path For now all you need to do is consider which layout holds greater appeal. If you prefer to postpone the decision that will be fine. You can wait until you have a few blocks under your belt!

The snow is finally gone and the Spring flowers are starting to come up. We have oodles of snowdrops which have naturalized. I love these little Himalayan flowers!


The crocuses are popping up all over the place! They are such jolly little flowers.


The colours of the snowdrops and crocuses are reflected in this Godstone Grannies (GG) diamond hexagon block which is cut out but not yet basted!  The taupe fabric is a scrap that I rescued from the freebie table at my Guild's meeting earlier this week. It fits perfectly with the colour scheme of my GG quilt!


Until I post again, happy sewing!
Karen H

Tuesday, March 4, 2014

How much fabric do I need for a path?

Thank you for all the get well wishes. I'm feeling a little better but feeling terribly guilty about my silence so I thought I would do a quick post.

A reader asked me how much fabric she would need if she wanted to add single path between her hexagons. The answer of course depends upon a number of factors such as the size of the hexagons and the size of the quilt.

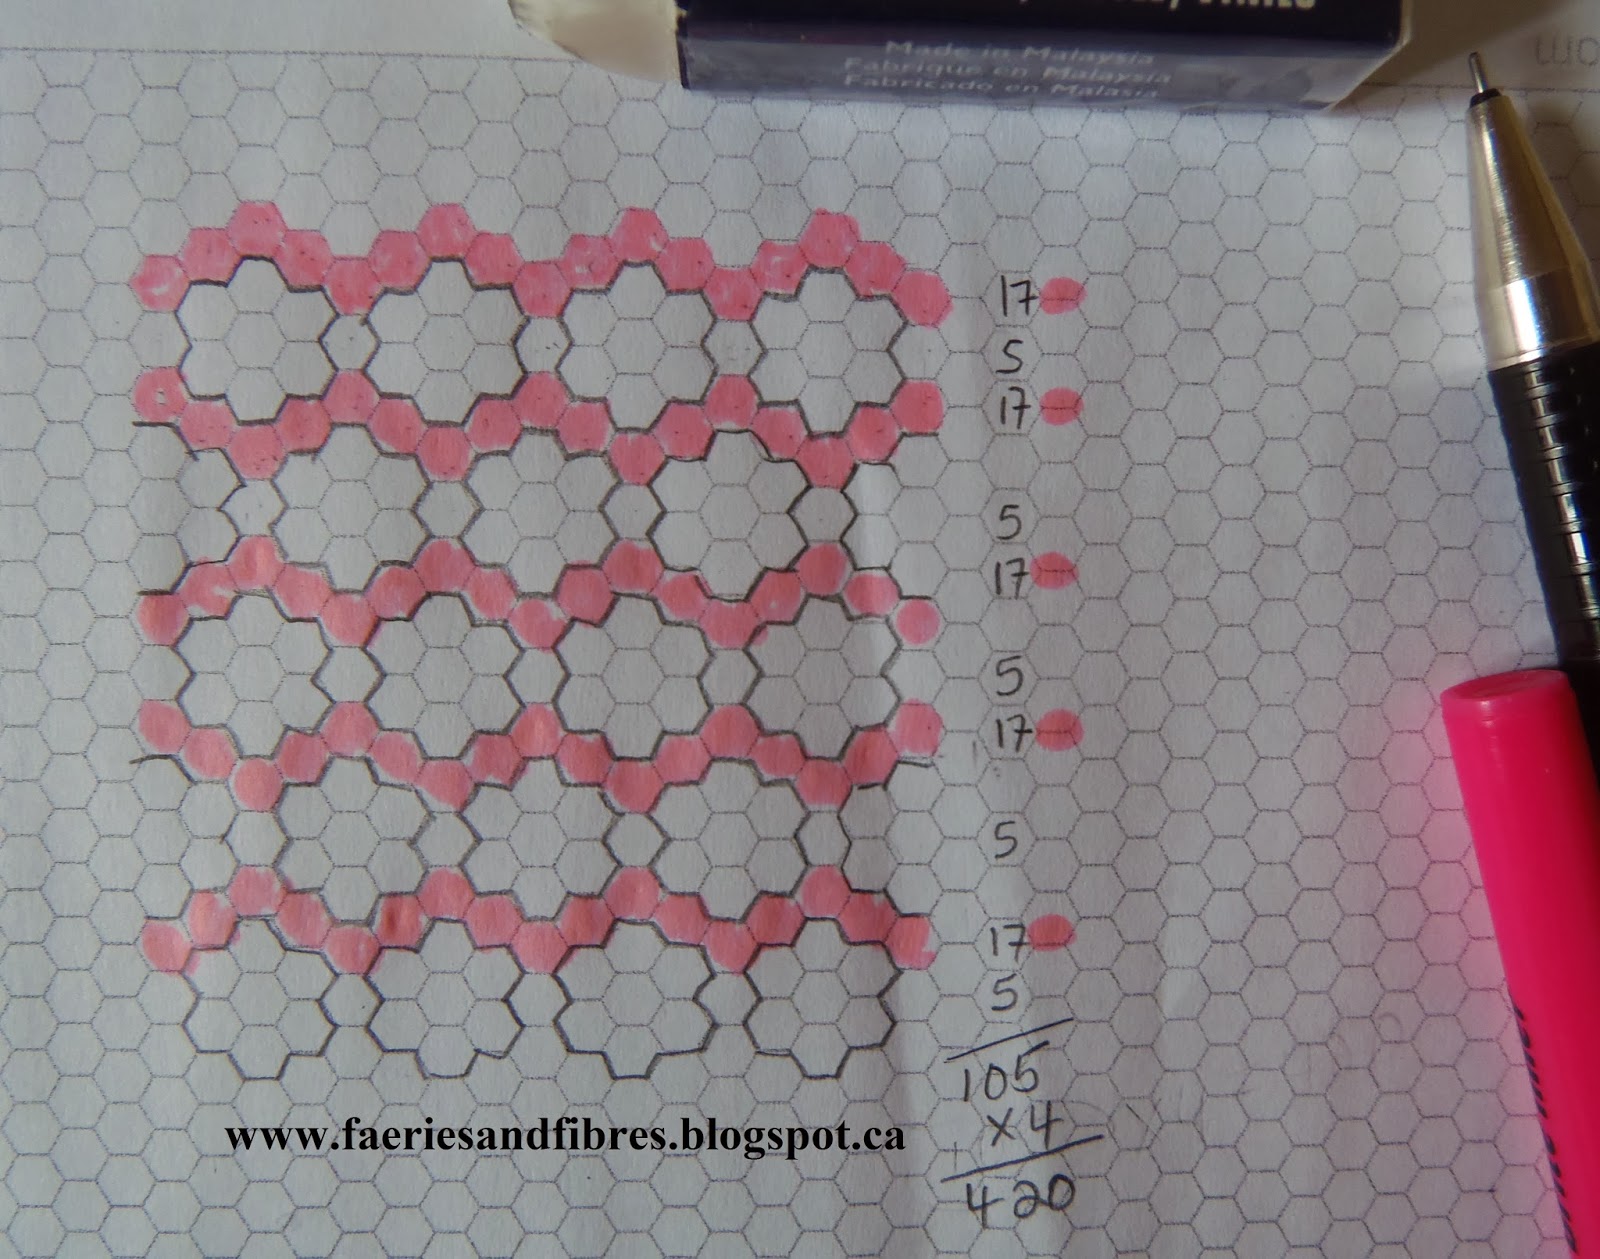
To figure out how much fabric is required you would need to know the number of hexagons form the path. You don't need an exact number; and approximate number is good enough. The simplest way to do this calculation is to diagram one quarter of your quilt on design  paper. Hexagon design sheets can be downloaded for free from Print Free Graph Paper and also from Paper Pieces. In the picture shown below I've sketched out one quarter of a quilt. The "flowers" are made of a single round of 1" hexagons around a center hexagon. I coloured the horizontal rows above and below each set of hexagons.


I count the number of hexagons in each of these rows and the number is 17. There are 5 hexagons (shown as white) that connect the rosettes. I note these numbers down the side of my diagram.


The sum is 105 hexagons for the path. Since the diagram is one quarter of the quilt I multiply this number by four for a total of 420 hexagons. I might need a few more or  few less but this number is close enough to calculate fabric requirements.

The hexagons will be cut from strips of fabric. For 1" hexagons I cut strips that are 2 1/2 inches. You can read more about cutting hexagons from strips of fabric in my post on February 25, 2014.  If you cut 2 1/2" squares from your strip you will end up with 16 to 18 hexagons depending on the width of your fabric. So measure your strip and divide it by 2 1/2" to determine the number of hexagons each strip will yield. Let's assume that we will get 18 hexagons per strip. We know we need 420 hexagons for the path. To determine the number of strips to cut we simply divide 420 by 18. The answer is 23.33333 so we just round that up to 24 strips. The last step to calculate the amount of fabric require is to multiply the number of strips, 24, by the width of the strips 2 1/2". The result is 60" which is 1.7 yards or 1.6 meters! I like to have a little extra just in case so I would round it up to 2 yards/meters. It is that simple!

To recap the formula is:
(Number of Hexagons/Number of Hexagons per strip)*size of strip = number of inches required

so for 1" hexagons in my example the formula is

(420/18)*2.5" = 60"

Do I always calculate the amount of fabric I will need for a path? Usually I don't. If I run out of fabric I simply add a similar fabric to the mix and I think it makes for a more interesting quilt.

Until I post again, stay healthy and happy sewing!
Karen H

Wednesday, February 26, 2014

Hexagons with and without the path

After my post yesterday I had a comment and a couple of emails about the use of a path. Kathy had commented that she has seen hexagon flowers sewn together randomly in a quilt without the use of a path. That is exactly what I did when I made my hexagon quilt Ausiegons. I made flowers but instead of one round of hexagons around a center there were four rounds of hexies. It takes some planning to complete the quilt.

Ausiegons

When hexies are sewn together in this manner the quilt will become a parallelogram rather than a rectangle. To correct this I added filler pieces to the top, bottom and sides and then the quilt was appliqued to a brown border to give the quilt a rectangular shape. There is nothing wrong with this sewing hexagon flowers one next to the other - the quilt just has a different look and feel but it takes some planning to make the filler shapes because they will have to be different to accommodate the shape of the quilt . If you are a beginner it may be a little challenging planning to fill in the sides to create a rectangle.

To demonstrate the effect of  flower hexies with and without a path I did a quick sketch to demonstrate. The sketches on the left are sewn together without a path and on the right with a path. On the left you can see the slope developing whereas on the right the quilt remains squared. If you sew your hexagons together into diamonds the same issue will arise if a path is not used.


If you chose to add a path there will still be filler pieces created for the top, bottom and sides but the top and bottom fillers will be the same as will the side fillers. And importantly the quilt will have a different look. So before you make the decision whether or not to use a path do give some thought as to how you want your quilt to look and perhaps even sketch it out on hexagon graph paper. The paper above was downloaded from Print Free Graph Paper. You can also find free downloadable design sheets at Paper Pieces.

I hope this explanation will be helpful! Until I post again, happy sewing!
Karen H

Tuesday, February 25, 2014

Cutting lots of hexagons for a path and I'm still a lucky girl

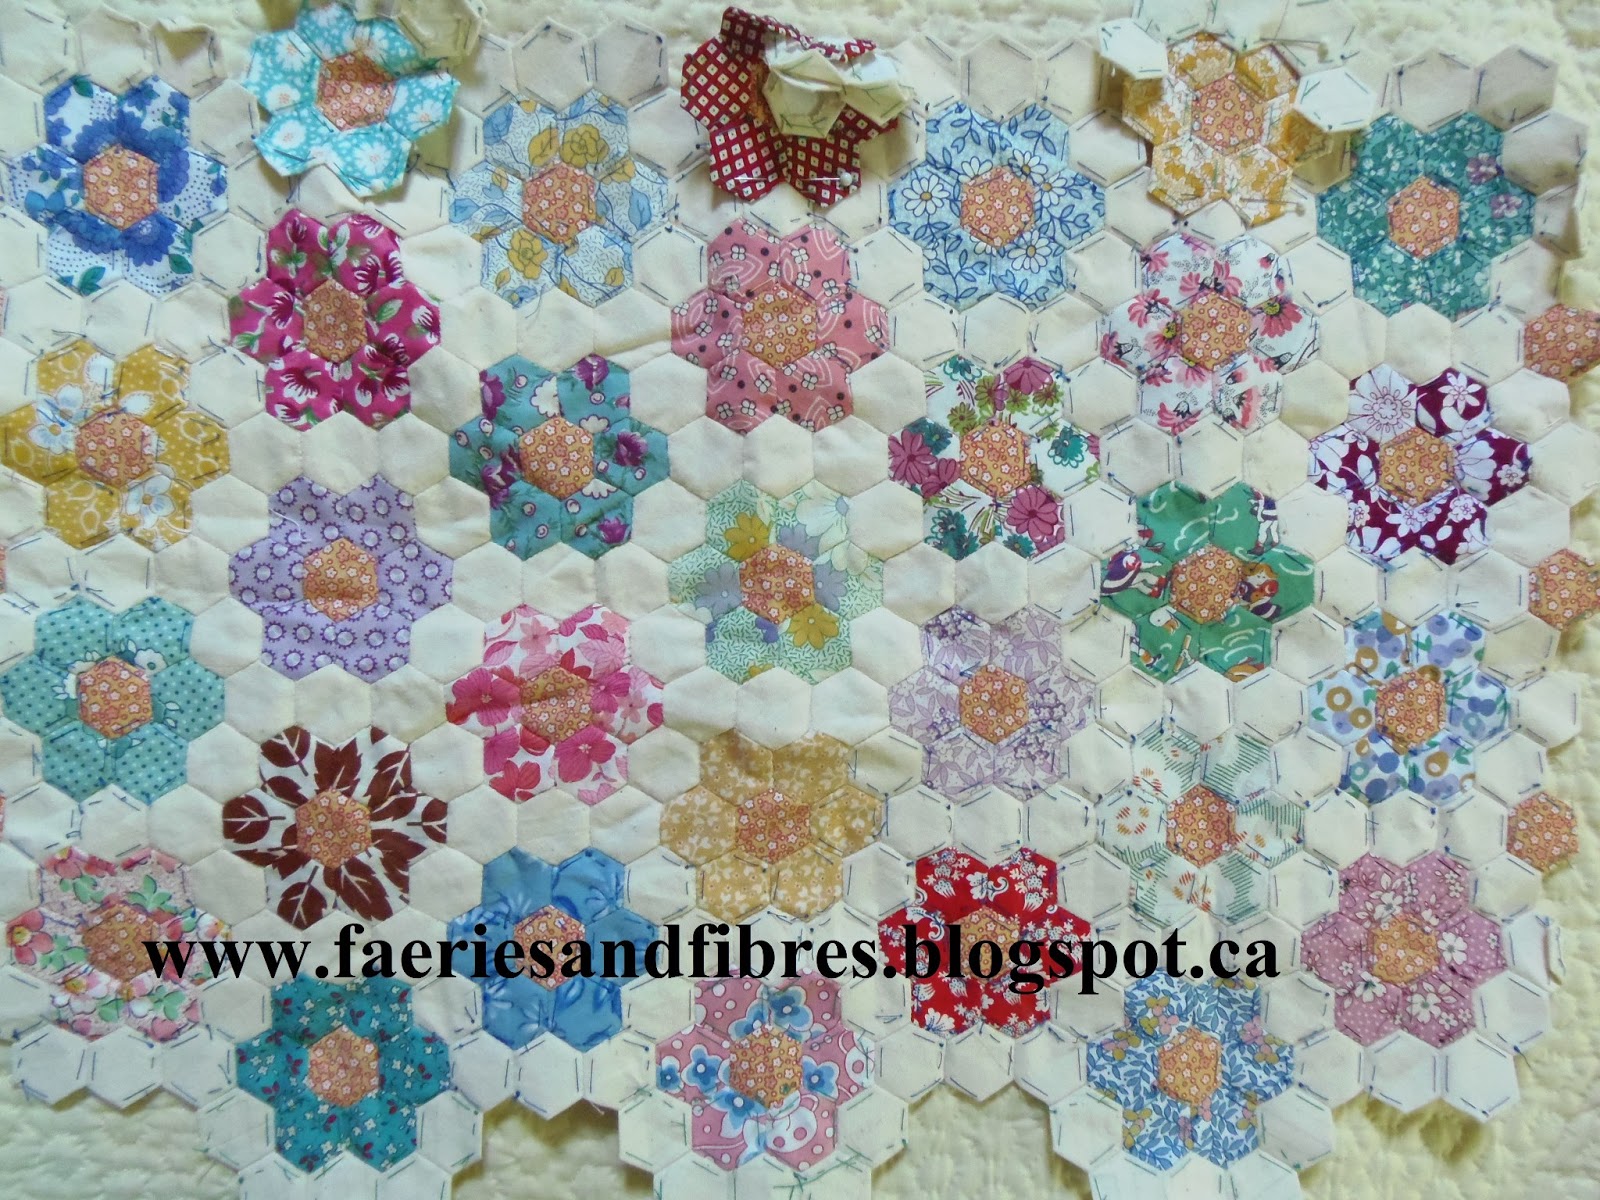
I am working on another hexagon quilt but I can't show it to you just yet!  What I can tell you is that it will have a path between the hexagons. The picture below is an example of a quilt with a path. The pink hexagons are the path.


In my view the path serves two purposes - it separates the hexagons so that they can shine and secondly it keeps the quilt square. If the hexagons are the same size (i.e. they have the same number of rounds) and butted one up to the next a gentle slope develops. This was the case with my quilt Ausiegons which is my version of an antique quilt in an Australian quilt registry. There is no path in this quilt.


If you look closely at the left hand side you can see this slope. I dealt with it by adding filler bits which straightened it enough that I could applique the entire quilt to border strips so that the quilt would be square. If you are a beginner this might be a little challenging so the use of a path is highly recommended.


If you decide to add a path to a hexagon quilt it will act exactly the same way as a sashing on a quilt made of square blocks. This means you have only one path between two hexagons. You do not sew the path around each hexagon because you will end up with a slope when the blocks are stitched together.

If you add a path you will need lots of hexagons made from the same fabric. I don't mind cutting fabric for the hexagons that will form the block because it is part of the creative process but I don't like to spend a lot of time cutting a single fabric for the hexagon path. I want that part done quickly so I can get to the really fun part, the basting and sewing. In this post I'm going to show you how I cut and prepare my path hexies quickly and painlessly!

To get started I cut strips of fabric and I want to cut strips in the most economical manner so that there is little waste and if there are any leftover strips they will be of a usable size. I am working with 1" hexagons so I determined that I would need 2 1/2" strips. I cut my strips from my fabric using the method I described on February 2, 2014.

I line up the selvage edges of two strips so that I'll be cutting through four layers. I trim off the selvages and then cut 2 1/4" sections.


I take a stack of four patches and set a paper hexagon on top.


I use my scissors to trim off the corners being sure to leave at least 1/4" seam allowance. It doesn't need to be an exact 1/4" all around (more is better) because when basted to the paper the finished hexagon will be the exact size needed.


Paper can be slippery so after the first cut I often make a fabric template which will stick to my fabric. I use it as a pattern to trim the corners.


In no time flat I had a pile of fabric hexagons.


I use a tiny dab of fabric-safe glue to hold the papers to the hexagons and again I want it done fast! To start I lay out a bunch of hexagons with the wrong side facing up.


A little dab of glue on the paper is all it takes to hold the paper to the fabric. And when I'm done it will release easily! In the past I've been asked about the little marks you see on the hexagons; I use a master template and I mark the size on the master sheet so the marks you see are the size of the hexagons which is 1". I always make sure that I place the glue on the blank side of the hexagon.


To speed up the gluing process I apply a dab of glue to a paper hexagon, pick it up and then I apply the glue to a second hexagon but I leave it stuck to the glue stick. I place the first hexagon on the fabric and then grab the second and place it on the hexagon. The glue sets fairly quickly since I'm only using a little bit so I work quickly.

In less than thirty minutes I had a pile of almost 200 hexagons ready for basting!


And now for something entirely different. I'm still a lucky girl. Look what I got in the mail: the threads that I won from Lorraine at Colour Complements! These threads are simply gorgeous! The colours are rich and vibrant and they have a glorious sheen. You can get your own from her etsy shop. All four threads are hand dyed and the package included knitted tubular ribbon, #8 DMC perle cotton, twisted rayon and #5 DMC perle cotton.


Now that I have a pile of hexagons ready to baste I had better get cracking! So until I post again, happy sewing!
Karen H

Friday, June 14, 2013

The Garden Path

Hexagons are fun and easy to make but once you have a pile of them it is time to start thinking about how you will put them together and this requires some thought and planning. I like to design a road map or plan about how they will go together. There are many places where you can get free design sheets. There is a wide variety available at Paper Piece; a plain hexagon design sheet is available here.

The most familiar method of putting hexagon motifs together is with a “path” between the flower (or diamond) motifs.
 
 
Think of the path as sashing. Many make the mistake of surrounding each flower or diamond motif with the path fabric only to find that the motifs don't fit together with a single path. When you use a sashing with square blocks, there is one sash between two blocks and the same is true with hexagons motifs; there will be one path between two flower or diamond motifs. The following picture shows double flower motifs with a single path.


Hexagons can be sewn directly to one another without a path but this does present some challenges.
Single flowers

Double flowers

When sewn directly to another a slope begins to develop. If you are working out the design on a square sheet of paper it feels like a serious problem but this can be resolved with a few filler pieces and my tilting the design sheet.

Double flowers with design sheet shifted

The problem is that some filler pieces will need to be constructed to fill the spaces on the sides. I made a quilt which I call Ausiegons. It was inspired by an antique hexagon quilt in Australia. I’ll write about this quilt and pictures of my quilt another time however for today I want to show you that by using filler pieces on the outside edge it is possible to have a quilt with edges that are not sloped.


Another option for assembling the hexagon motifs that doesn't involve a path is to use filler hexagons. In the diagram below I've use pink fillers around the centre and then blue for the next round of fillers.
 
 
So there you have it!  A few ideas for putting it all together! I hope that the creative juices are flowing. I'll leave you with a picture of a real garden path...mine!


Until I post again, happy sewing!