Tuesday, September 29, 2015

The pilchards have colour

I've added a little more colour to my pilchards. They are a oily fish and I wanted to give them some of that iridescent look that that type of fish often has. I added some ocher and violet to create the effect and am very pleased with how it turned out! I love how the print of the fabric shows through and creates the illusion of fish scales! In case you are new to my blog these pilchards will be a block in my Cornish quilt which I am calling The Meadery.


The pieces that will connect the fish were constructed and sewn to the fish.


All that's left is to decide what fabric I will use in the middle and then make a brown ring for the barrel.

I've also managed to stitch another block for my Road 66 quilt. These blocks are so much fun to make and they are big. The hexagons are 1 1/4" whereas my hexagons for The Meadery are 3/4"!


That's it for today. Time for a cuppa and a little sewing! Until I post again, happy sewing.
Karen H

Sunday, September 27, 2015

There's something fishy here

Today I want to talk about a small fish, the pilchard. They were rebranded more recently as Cornish sardines. Pilchards are a small schooling fish that was for hundreds of years very important to the economy of Western Cornwall. Two of the main fisheries were in Mount's Bay. The fish were then processed in Newlyn and Mousehole both of which are within walking distance of Penzance. Pilchards are a schooling fish and fishermen used seine nets to catch them. For over 450 years, tonnes were caught and processed for export each year.

Fishing Pilchards with Seine Net by Stanhope Forbes

The pilchards were salted, arranged like the spokes of a wheel in barrels and then pressed.  The fishery like many has been in steady decline due to changing tastes and over-fishing. Nonetheless it was an important part of my father's early life.

Pilchard wheel

So what have pilchards got to do with quilting? Plenty! My plan is to make a quilt block for my Cornish hexagon quilt, The Meadery, that represents the Cornish pilchard fishery in Newlyn and Mousehole. Pilchards and mackerels were often use to make starry gazey pie, a dish that my father ate as a boy. The fish are baked in a pie crust with their heads poking out of the pastry crust so that they appeared to be gazing heavenward! I've already made a quilt which I call Starry Gazey Pie. I used a fabric with fish to make the six pointed stars. I fussy cut them so that their heads and tails were used to create interesting effects. I should take a better picture of this quilt and some of the blocks (it is officially on my to-do list).


But I digress. I've designed my block that will represent the pilchard wheel. To begin I pieced six pilchards from hexagons. There will be connecting pieces to join them and to add shading. There will also be an outer ring to represent the barrel. So here are my pilchards. I used three fabrics and made one pair of fish from each. I liked the silvery grey colours I chose because they reminded me of fish, salt and fish scales.


Before I put it all together there is one more step and it will be magic! These little strips of hexagons don't look much like pilchards but with a little help from a dark blue Sakura Pigma pen they are transformed!


They need a little more work before they are ready to be sew together. The spots on their lateral lines should be solid and I may use a black Pigma pen to add a little more depth to my fishies! I have a few other pens that aren't intended for fabric but what the heck; I may just use them to add a little more shading to the fish. If you want to try drawing on your fabric practice on paper first. Once you are happy with your design use a non permanent marking tool (I used a Frixion pen) to draw the outline of the image. When you are happy with it you can take your permanent marking pens to the fabric.

Before I go I wanted to thank ES for the comment she left about Men-An-Tol. I wanted to send you a little note but sadly you are a no-reply blogger. I reply to every comment so if you don't hear back from me it means there is no email address attached to your profile so I have no way to contact you unless you provide me with an email address OR you send me an email.

That's it for today! Time for me to sew these pilchards together and then get cracking on the next block for my quilt. So until I post again, happy sewing!

Karen H

Wednesday, September 23, 2015

First day of fall and a progress report

Red Maples and Berries by Karen H 2012

It is the first day of Fall and it feels like it. The sky is grey and there is a haze. It would be a good day for sewing if I didn't feel so rotten. I'm not sure if it is hay fever/seasonal allergies or a cold but I just want to curl up on the couch with two cats and watch TV. Before I do that I thought I would share my progress on my hexagon quilt The Meadery and also Road 66.

The latest shape I have created for my hexagon quilt The Meadery is intended to represent Lanyon Quoit in Cornwall, England. It is a dolmen (a megalithic tomb) dating from the Neolithic period (3500-2500 BC). The original was knocked down in a storm and was subsequently re-erected at right-angles to its original position around 1815. Originally there were four upright stones but one was too badly damaged to be used. I have visited this site and it is a little unnerving to walk under the monument.

Lanyon Quoit

So here is my interpretation of Lanyon Quoit. The rosette/flower in the centre represents the cap stone and the three spokes radiating outward represent the uprights that support it. I used an old fabric from my stash to make the quoit; it looks like lichen covered stone so it was perfect for this block. The yellow and green rings represents gorse which grows in the area. This block will be appliqued to the background fabric which is a very pale grey so the colours swill really shine.


The second piece I want to share is a block for my Road 66 quilt. The original quilt is in a book Primarily Quilts by Di Ford. These blocks are so much fun to make. The hexagons measure 1 1/4" which I find to be a little large. The 1" and 3/4" fit more comfortably in my hands.


It is a short post today. The cats are beckoning me to come cuddle so I'm off to do just that. Until I post again, happy sewing!

Karen H

Sunday, September 20, 2015

Where does the time go?

I have been so busy that time just got away from me and I forgot to post pictures of my progress on my Cornish quilt, The Meadery.

I have completed the third diamond that will rest on its side. It represent the Men-An-Tol stone that is on the ground (hence the final round of green). The large diamonds that represent the upright stones are finished and they are a little larger than this one.


I had some help when I was taking the pictures. My lovely green-eyed Gump was there every step of the way!

I've also pieced a bee skep. I fussy cut a piece of fabric (lower centre) so that the bees could get in and out! I will applique some bees around the skep when I am putting the quilt together.


I may round the outside edges to soften it and make it look more like the skep in the middle of the Men-An-Tol stone in the picture below.


I've also made one more rosette for the Road 66 quilt. Fussy cutting is so much fun and you can create such pretty blocks,


I'm selecting and cutting fabric for the next element in my Meadery quilt and hope to have it finished for my next post so do come back for a visit!

Until I post again, happy sewing!
Karen H

Wednesday, September 16, 2015

Hexagons.....a disease

I've been working on so many hexagon projects and want to start even more. It is a disease - I can't help myself! In addition to working on projects I'm dreaming up ideas for the next ones and already have a good idea of what I am going to do! So now that I know I am itching to get started but really need to focus on two or three works that are already in progress!

First off I've added another round to the third diamond for my hexagon quilt The Meadery. There will be three diamonds, two of which will be upright and will flank the centre medallion and a third diamond will be on its side below the medallion. These component will represent a Cornish ruin, Men-An-Tol. What you can't see in this picture is that there are two large stones on either side of the donut and there is a third stone which was once upright but is now laying flat in the ground.


I've almost finished the diamonds that will flank the medallion and I've just added a round to the diamond that will represent the stone on the ground. There is one more round to go and I'm considering a pea soup green to represent the grass.


Once I've finished the Men-An-Tol units I'll be on to the next Cornish landmark, Lanyon Quoit at near Madron! Originally there were four upright stones on which was placed a huge cap stone. The uprights are about 1.5 meters tall. In the early 1800s the quoit was damaged in a storm and it was subsequently re-erected with only three of the upright stones because the fourth was damaged. So my plan is to represent this megalith with hexagons and I already know how I am going to do it! In the distance you can see the engine house of a tin mine. I hope to incorporate this element in the quilt. Will have to ponder it a little more.


So the second project I've also been working on a class sample for my English Paper Piecing Workshops. I will be teaching all of the techniques, tricks and tips I used to make this medallion. I am also going to use these same techniques to border this block which can be used as a wall hanging or as the centre of a quilt.


The third project I've been working on are blocks for a Road 66 hexagon quilt. I had already shared this block back in January. The rosettes are made with 1 1/4" hexagons.


When I see a fabric I like I will cut either 6 hexagons for the first round or 12 for the second round. I put them together in a little bag and when I have a few minutes I'll baste a few or sew a few. So those few minutes here and there have added up and here is another block.


Time to get cracking. Until I post again I hope you can find the time to take a stitch or two. Happy sewing!
Karen H

Sunday, September 13, 2015

One diamond down and more about directional prints

The final round has been stitched to one of the diamonds that will flank the centre medallion in my quilt The Meadery. I used a deep honey gold fabric and I think that it worked perfectly! The diamond is made with 3/4" hexagons so it is quite large. Now I have to stitch the gold to the second diamond.


Quite often  I write about directional prints and the concept of paying attention to the direction of the print when constructing any type of block whether it is a simple nine patch or a hexagon rosette. This is a simple little nine patch made of scrap. Notice how I've used two directional prints, the white in the corners and the beige stripe that makes the cross. The block would not have been anywhere near so effective had I not paid attention to the direction of the print.


Stripes are a great example of a directional print. Make them work for you, not against you. In the following picture I've used the same fabric in two different ways but it both I paid careful attention to the direction of the stripes.


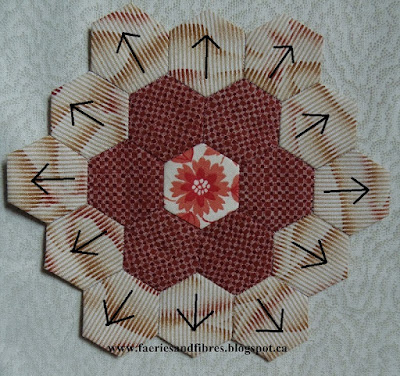
This hexagon rosette is a directional print and I made sure that the white chrysanthemums were radiating out from the centre. 


Again you can see that the pale vines are radiating out from the centre. 

You can look at some fabrics and you know they are directional but others may not be so obvious. This first fabric is clearly a directional print.


But if you weren't sure here's a simple little trick. Make a fold so that you have a right angle. If the fabric looks the same on both sections it likely isn't directional but if it looks different then it is directional and you will want to bear this in mind when cutting and sewing. You can see in the following picture that the little trees are on their sides on the folded fabric.


This first rosette was stitched without giving any thought to the direction of the fabric. It would work just fine in a quilt.


However I am a firm believer that it is the little details that take a quilt block (or hexagon rosette) from fine to much better! You can see that in this block the little trees are radiating out from the centre and it makes a difference to the look of the block.


Some fabrics may be more challenging. At first glance you may not thing that this is directional but look closely at the little green and yellow figure 8s with the white cross bars. The green is in the upper left and the yellow the lower right. The little white bar runs from lower left to upper right.


When the fabric is folded you can see that it is a directional print. Not is is a subtle difference so it wouldn't make a huge difference in a block but I think it is worth noting the direction of the print and placing your fabrics accordingly.


In this block I did pay attention to the direction of the print when I positioned and stitched my hexagons.


It feels like Autumn the past two days - cool and drizzling rain. I went for a good long walk yesterday and picked a bunch of crab apples for my Mom to make jelly. Aren't the colours glorious. I think that they would make a fabulous quilt! I might just go pick some more today before I settle down for sewing.


Until I post again, happy sewing!
Karen H

Wednesday, September 9, 2015

Going round and round

I've added another round to my diamonds that will flank the medallion on my quilt The Meadery.


There are lots of hexagons to baste for this round and for the next round. I always have a small bag of hexagons for basting in my purse. Every time I have a few spare minutes I haul it out and baste. You would be amazed how quickly the job gets done when you make use of those minutes. Here you can see some of the hexagons for the next round basted.


Those little sewing scissors stay in my sewing bag (upper left corner) as does a small spool of thread. I save my empty spools of Gutermann thread and wind my inexpensive polyester basting thread on them. You can see that the spool above is almost empty so it is time to fill another with basting thread!  I like to baste from the back  and that means the basting thread will remain in my quilt. For this reason I prefer to use a light colour basting thread because it works on all colours of fabric whereas a dark thread may show through a light colour fabric.


As to how many hexagons I need for the next round of the diamond, each round increases the number of hexagons needed by eight. I chose to use a piece of fabric in the middle of the diamond rather than hexagons but had I used hexagons there would have been 8 of them (excluding the hexagon in the middle). The first round of hexagons is made up of 16 hexagons. The pale cream is 24, the yellow is 32, the dot fabric round is 40 and the latest round of grey blue is 48. The next round is going to be a deep honey gold and I'll need 56. There are two diamonds so that is a total of 112 hexagons to baste!

If I were making a traditional flower or rosette of hexagons I would start off with 6 hexagons (excluding the middle hexagon). The number of hexagons required increases by 6 for each additional round so there are 12 hexagons in the second round.


If you are using a directional print as in the block above here's a bit of helpful information. It is the flat edge of a hexagon that radiates out in the first round of hexagons. In the second round the flat edge of the six hexagons radiate out and the second six radiate out from point to point. This means that you will have to cut the hexagons differently to ensure that the print is always moving in the same direction.


If there were a third round of 18 hexagons, the flat edge of six would radiate out and the pointy bits of the remaining 12 would radiate out.

Enough talking. Time for me to brew a cuppa and do some basting/sewing! Until I post again, happy sewing!

Karen H

Sunday, September 6, 2015

A diamond shaped open donut and combining fabrics

It has been beastly hot and humid once again and that cuts makes doing anything an effort but I did get some sewing done.

Remember this hexagon rosette/flower? It will represent one of the Men-An-Tol stones.


I've constructed an "open donut" to turn this rosette into a diamond. You can see that the hexagons inside the red circle haven't been stitched together to close the diamond. It will make sewing this unit to the rosette much easier.


Here they are together but not yet stitched. The colours look wishy-washy but in reality they are very nice.


I plan to add two more rounds of hexagons to this unit, one light and one dark.

The pattern for my Value Proposition Hexagon Quilt is now available on Craftsy. The patterns are available for free under Quilt Alongs by Karen H but if you are looking for them all in one place with all of the instructions you need to make the quilt (everything from fabric, selection, rapid fire cutting techniques, basting, sewing, organizing and putting the top together) then my booklet may be of interest. It is roughly 60 pages in length and it is jam packed with how-tos with loads of pictures each step of the way. You will find it here.

I had a pile of fabric on a table and two of them jumped out at me! I thought they would be great together in a hexagon rosette. I used 1 1/4" hexagons to make this one.


Sometimes I am asked how I come up with fabric combinations and the simple answer is just arrange a bunch of fabrics on the table and look at them. Move them around and sooner or later a pair of them will jump out at you and say "we belong together"! I always make the outer ring first as an "open donut". I can then audition the fabric I thought belonged with it. If they still belong together I cut the middle hexagon and add it to the donut. If they don't belong together then I just audition more fabrics inside the open donut. Sooner or later something will work!

Before I go I though you might enjoy seeing a picture of the angel's trumpets (brugmancia) blooming in the garden. There are at least 25 blossoms and each one is at least 8" long! During the day they are very pretty but at night they release the most glorious, sweet perfume.


I'm linking up with:


That's it for today. Until I post again keep cool and keep sewing!

Karen H

Thursday, September 3, 2015

Growing the diamonds and Africa

Another round of hexagons has been added to the large diamonds that will flank the centre medallion of my hexagon quilt The Meadery. This time it was a round of creamy coloured dotted fabric.I think the next round will be a blue-grey to reflect the sea (an important part of Cornish life) and also the stone used to make Men-An-Tol.


I would normally have filled in the centre of the diamond but I've been unsure about what I wanted to put in the middle until now. You will recall the medallion I am using for the middle. I really liked the print but it just wasn't working with the honeycomb. The colour was wrong and there was just too much of the same thing so I remove the middle and replaced it with a piece of fabric with a bee skep.


I thought the middle of the medallion would work perfectly in the large diamond and as I've said many times before, if you repeat a fabric in the quilt it will give it a more cohesive look and feel.

I got a sheet of my hexagons and cut out the middle diamond shape. I put it on the medallion  fabric making sure that it was smooth and flat. I traced inside the diamond.

I cut out the shape leaving a generous seam allowance all the way around.


I line up the centre of the large diamond on the lines and applique it to the piece of fabric. This is the same method I used for my Brinton Hall blocks. Once the applique is done I can trim the excess fabric. I find that it is easier to do this reverse applique if there is extra fabric.

I've been helping my Mom put together her latest quilt. There will be pictures soon. This quilt has 17 appliqued blocks which she designed. She has a love for African themed quilts, children and grandmothers, all of which are reflected in this quilt. Today I thought I would share pictures of three of the blocks. The first is my Mom and her friend Quinnie when they were little girls living on homesteads.


The second is a grandmother and her grandchild. I really like how she fussy cut the fabric to make the chair.


The third is a little boy trying to feed an elephant. I'm not sure that would ever happen but it sure is a cute block!


I've been busy making a pattern for my Value Proposition quilt. Included are new simplified instructions for constructing and attaching the middle path. The pattern will really be almost a book because it will cover everything from fabric selection to basting, and sewing. When it is finished I'll put it up on Craftsy. The free patterns will still be available on my blog but for anyone who wants them all in one place they can purchase the pattern!

If you need a morning/afternoon/evening smile check out Selvage Blog's post about sewing machine thingys! It is sure to make you smile!

That's it for today. I've got more sewing to do so until I post again, happy sewing!
Karen H