Thursday, November 26, 2015

Road 66 - the second row

I had a lovely comment from Katie. She wrote "I noticed some half hexagons along the upper edge. I assume that the tails are left out as in diamond construction. But how do you keep the longer edge tucked under. Mine always wants to pop out. Is there a trick to this?" I was unable to email my answer because Katie is a no-reply blogger. This simply means her email address isn't linked to her blogger profile. For those of you who are new to blogging it also means that if you enter contests or giveaways by leaving a comment, you won't be entered because there is no way to contact you should you win. If you are looking to fix this there was an excellent tutorial on Quiltville's Quips & Snips. But I digress! Katie is asking about the construction of my Road 66 quilt which is named after the quilt in Di Ford's book Primarily Quilts.

The answer to Katie's question is that the tails are sticking out of the half hexagons (inside the red circles) for two reasons: the first is the shape of the paper and the second is to accommodate the border that will be added. The half hexagon has a "diamond" point and that is a sharp angle (30 degrees) and the tail is created because the point is narrower than the seam allowance This is not the case with a hexagon which is a 60 degree angle which is wider than the seam allowance. I could have basted my diamond and half hexagons so that all of the seam allowances are folded in such a way that there are no tails.


I wrote about that basting method here. The diamond would look like this from the right side. Notice there are no tails.

This is what it would look like from the wrong side. I generally use this method because it gives me a sharp point which makes joining the pieces much easier. Having to deal with that tail and move it out of the way is fiddly work so if the seam allowances are neatly folded in they aren't a problem.


However, I've left the tails when I prepped the diamonds and half hexagons of my Road 66 quilt because I want a straight outside edge on my quilt so that I can add two borders, one narrow and one wide. When I remove the papers and fold out the seam allowance I'll have a nice straight edge to which I can attach my borders. If the seam allowance are tuck away neatly on the wrong side as in the pictures above I run the risk of catching the edge of the fabric so that there is a little pucker and the seam allowance won't open properly.

So row 2 of my quilt is now stitched and ready to be added to row 1. Three more rows to go and I still have to make filler half hexagons for the top edge! Sew, sew, sew!


So one final comment: I reply to every comment left on my blog although as of late I've been slow in replying due to other commitments. However, if you don't hear back from me it means you are a no-reply blogger. Unless you update your profile or send me your email address I will have no way to contact you. Rest assured I do read and appreciate every comment left!

That is it for today; until I post again, happy sewing!
Karen H

Monday, November 23, 2015

Row 1 of Road 66

Sorry for the silence but I have been busy working away testing my pattern idea for my 2016 quilt along. It is going well! I can't show you what I'm doing just yet but be patient my friends and all will be revealed. There will be hexagons, traditional piecing and applique! So far I've only used fabrics in my stash and my plan is to use what I have. I am working with 1" hexagons to make the blocks.

I've also managed to make diamonds and triangles to connect my Road 66 hexagon blocks. The first row is now stitched together. I need to cut and add the half hexagons to fill in the top edge and I need to make the corner units too! It isn't a very exciting picture but you get the general idea of what the quilt is going to look like!


The diamond fabric is a coral/brick print that I got from Connecting Threads. It is a fine weave cotton with a lovely silky feel. I used a different print in a slightly darker shade for the little triangles, I basted through the papers because I don't plan on using them again.


I normally would fold & baste my fabric so that there are no dog ears when I make diamonds for English paper piecing but in this instance the diamonds are on the small side so I decided to leave the dog ears. They will be trimmed off when the border is added. I'm a firm believer in doing what works best for you!

Until I post again, happy sewing!
Karen H

Monday, November 16, 2015

Online Trunk Show


Soma of Whims and Fancies is having a virtual trunk show and it is called Trunk Full of Quilts. Many of the blogs I follow are participating so I thought what the heck........why not join in the fun! Trunk Full of Quilts is open to everyone. All you have to do is write a blog post, publish pictures of finished quilts, bags, pillows, wall hangings et cetera so that readers can drool over what you've made. There will be draws for prizes (no judging or voting is involved). But honestly, I think the best part of this event is sharing what we do with others. It is a great way to learn and get inspired.

I have been quilting for more than 35 years. I am know primarily for my English paper piecing but I love all sorts of quilt making. I've designed several patterns and they are available on Craftsy. I've also designed and published two free quilt alongs and plan to launch my third in early 2016. So with all that being said here is my little trunk show!

This wall hanging is called Flora and Fauna, Parts of the Garden. It is full of all sorts of plants and critters. You can see close-ups of the piece here.


Here are a couple of close-ups. The first one has a grasshopper, a bee and a small worm.


I love these mushrooms. The grasshopper is a personal favourite and who doesn't like little red lady bugs?

Can you see the praying mantis hiding on the branch? He is after that orange Japanese beetle!


What most people don't notice until I point it out is that the brown fabric has ant tunnels quilted and then there are little red ants embroidered.


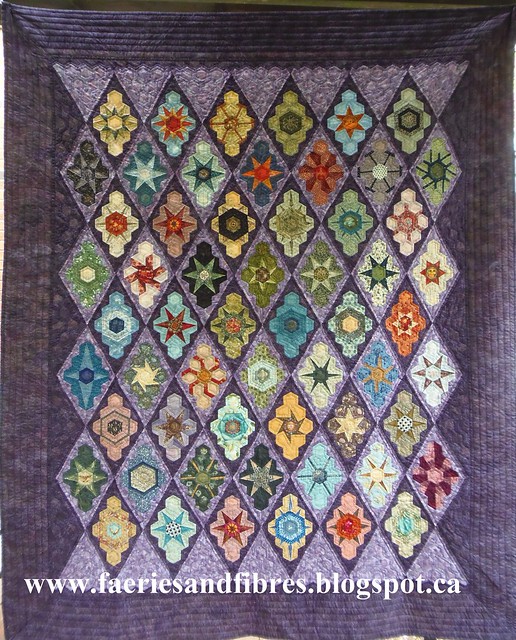
This is one of my hexagon quilts and I call it Stars in the Loft. It was inspired by an antique quilt in the Met Museum although at the time I made it I had no information about the original quilt at all. All I had was a small black and white picture. I developed my own techniques to make new and interesting designs with hexagons. This quilt is hand pieced and hand quilted.


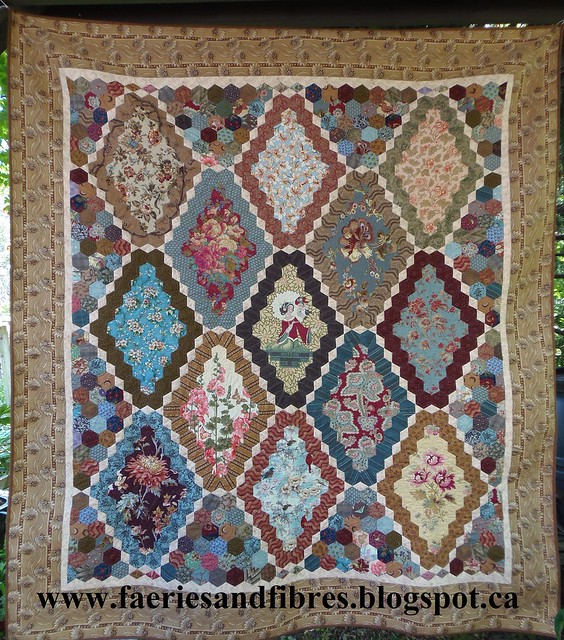
This quilt is called 81 The Giant Monstrosity. It was also inspired by an antique quilt. I knew it would be big when I was making it but had not idea just how big it would be. I wrote up a pattern for this quilt if you are interested.


As of later I am known for my English paper piecing but I also like other designs. The humble nine patch is such a simple beginner block but there are so many design opportunities, especially if the blocks are small. I call this quilt Cherry Blossom because of the colours. This quilt was pieced and quilted on my domestic sewing machine.


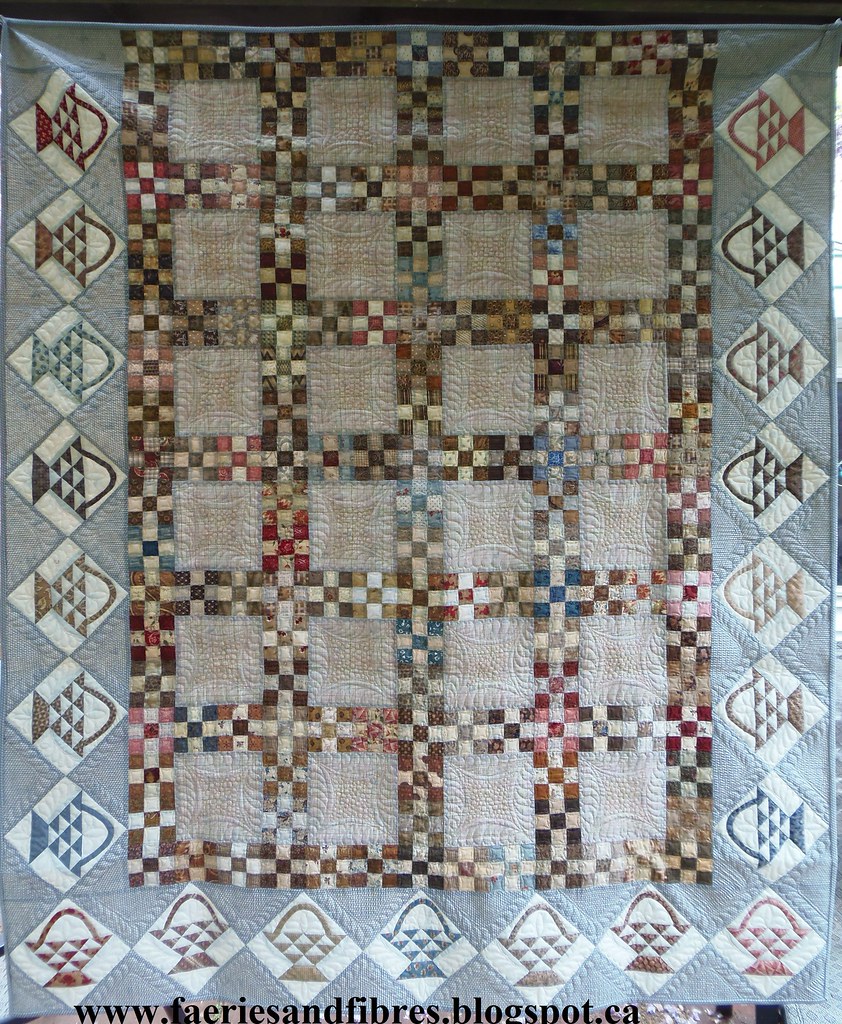
Another of my nine patch quilts was inspired by an antique quilt. This one is called Baskets and Nine Patches. I use my scraps as leaders and enders and I make nine patches. There is always a big box of patches ready and waiting to be turned into a quilt! This quilt was pieced and quilted on my domestic sewing machine.

Good Golly Miss Mollie is based on a quilt made by the women at the Denham College WI. It is hand pieced and entirely machine quilted on my domestic sewing machine.


This is a traditional block recently popularized by Jen Kingwell. Her version is pieced but I just wasn't interested in that tricky piecing so mine is appliqued. All of the pieces were prepared quickly with glue and then they were all glue basted to the background. I call my quilt Lazy Punk. What you can't see in the picture is that the side setting triangles are made with a lovely toile print. The thing that makes it unique is that the figures are skeletons! This quilt was hand appliqued, then the blocks were stitched together by machine and I quilted it on my domestic sewing machine.


This is one of my earliest quilts. I was a beginner with no access to other quilters, books or lessons. I wanted to make this quilt and figured the easiest way would be to English paper piece it. I had bought a pound of fabric scraps by mail order and used many of them to make this quilt so I call it A Pound of Stars. The quilt is made entirely by hand.


The quilt is called Mom's Flower Bed. All of the stars, except for the dark green stars, are made with a single fabric. It is pieced by hand and is both hand quilted and machine quilted (the feathers in the border).


I reminds me of my Mom's garden. She is an avid gardener and loves her bees so I added some to the centre of my quilt. You can see then in the blue/green batik hexagons.


The last quilt is called Loopers in the Sky with Diamonds. This quilt is English paper pieced and hand quilted.

The second last piece is a wall hanging called A Challenging Year. The focus is a year in the life of a cherry tree. This was a challenge that I participated in. There were three or four challenge fabrics and I was able to add another five. I extended the colours by bleaching some of the fabrics and by added embroidered details.


The last piece is Quilting Bees. I made this one for my Mom because of her love of bees. This little quilt measures 12 1/2" square. She hangs it in her sewing room.


I hope you enjoyed my trunk show. If you have a blog why not head on over to Soma's and link up your own trunk show? It is a great way to meet new people and get inspired!

Until I post again, happy sewing!
Karen H

Sunday, November 15, 2015

Teaching and sewing

My mantra is "less talking and more sewing" however as of late I've been doing the reverse. I've been to London (Canada, not England) to do a trunk show of my work and to teach my English paper piecing techniques. The London Friendship Quilters' Guild is a great bunch of quilt makers. They were warm, friendly and inviting. If you live in the area and are looking for a Guild to join, you won't be disappointed. One of the unique things that they do is invite area quilt shops to most of their meetings so that they can talk about their shop and share their wares. What a great service, especially for those who don't drive. This month they had Laurie and Robin from Stitcharie in Wyoming (a small town in Canada, not a state in the US).

They had such interesting fabrics and they also carry Tulip Hiroshima needles and they were very well priced. We made a special trip to the shop after the workshop and I picked up a few pieces of fabric to add to the stash. The women who run the shop are friendly and they clearly love what they do. It was a real treat to visit such a lovely little shop.

I think the members of the London Friendship Quilters' Guild enjoyed my trunk show and the workshop. There was certainly lots of excitement when I started sharing my techniques for made fabric. I think they would have enjoyed having more time spent on fussy cutting so I think I will make some revisions to my course so that I can give more instruction in that area. I didn't take pictures but I know that others did and if and when they forward them to me I'll be sure to share with you.

All this teaching and talking hasn't left much time for sewing but I have completed my Road 66 hexagon blocks and here they are!

I love the wavy red and blue print. There is so much visual interest in a wavy print. I just wish there were more of them on the market. I especially like those that would fall into the reproduction category.

I was sent some pink ombre print by my cyber friend Paula and I used it to make the six hexagons swirling around the middle. It is such a great print. It also comes in yellow and green. I've managed to find an online shop and have purchased some more of it to add to the old stash.


I didn't quite get the white print lines matched up when I was making this block but a little touch up with a brown Sakura pigma pen and you can't even tell. If it isn't right there is usually a way to make it right!


This is the final block. I'm not thrilled with it but I can live with it. I do really like the red flower in the middle and I suppose the yellow round works well. There is a bit of a black print at the outside edges of the yellow hexagons and it softens the corners so that the yellow hexagons actually look rounded. Maybe it is growing on me!


All of these rosettes will be connected with a path made of diamonds rather than hexagons. If full hexagons were used it would result in a much larger quilt. My quilt Butterscotch Ripple was joined with diamonds. It creates a different look to the quilt, one which I really like!

Butterscotch Ripple by Karen H 2013

So where will I get the diamonds? Easy peasy! A diamond is simply one third of a hexagon. In the following picture you can see that I've dissected a hexagon into three diamonds. I already have a master sheet of hexagons that I used for my Road 66 blocks so I'll simply make a copy, dissect the hexagons, make copies of the dissected hexagons and then cut them out.


These diamonds will be relatively small given that the hexagons are 1 1/4" so what I will do before basting is to fold the seam allowances over the paper and give them a finger press; this makes it very easy to ensure that the diamonds have lovely sharp points. In addition I plan on basting through the paper rather than basting from the back. Why you ask? Simply because it will be faster, easier and I don't plan on reusing the papers so if they have needle holes it won't matter.

Before I sign of I want to remind you that diamonds aren't just for connectors. Three diamonds can be fussy cut and then sewn back together to create this sort of effect.


Or how about this one?


If the fabrics aren't fussy cut but instead you use a one dark, one medium and one light fabric you have a tumbling block. Here you can see they are joined with triangles. Where do the triangles come from? Six triangles make the same hexagon so you just divide a diamond in half and voila....magic!


Want to have even more fun? Twelve diamonds make a hexagon star. You need six for the star and six for the background. What I particularly like about this star is that it is the background that is fussy cut and the star is cut from two tone-on-tone fabrics. The fussy cut background was intended to be made into a star but it just didn't work so I hung on to the diamonds until I figured out another way to use them. Never toss those basted hexagons or diamonds because at some point they may come in handy!


If you are interested in reading more about constructing, deconstructing and reconstructing hexagons you can read my blog post here.

I've got almost 30 quilts to unpack, refold and store away until my next trunk show. But first I'm going to make myself a nice cup of tea.

I'm linking up with on Help for Hexie-aholics at Sarah Did It.

Until I post again, happy sewing!
Karen H

Sunday, November 8, 2015

Once again I ask you "What was she thinking?"

So it appears that there was interest in my quilt making journey and how I got to where I am today.  I am not in the least embarrassed to show you my older quilts. I'm proud of the fact that I was fearless and solved problems on my own. I made quilts that had I know how difficult they were, I would not have even attempted to make them! But ignorance is bliss and when faced with a problem I just used the skills and knowledge I had to figure out a solution. Actually sometimes I forgot to use that knowledge as is the case with today's quilt!

For me English paper piecing (EPP) was (and still is) the go to technique for creating complex designs without the need for precision cutting of fabric or marking of sewing lines on the patches. It is how I made the Wagon Wheels quilt I showed you the other day, I'm working away on requilting it and am enjoying the hand work. Polyester batting needles so nicely!


I also use this technique to make my Pound of Stars quilt.


More recently I used it to make Gardens of a King quilt top which is a pattern I tested for Missie of Traditional Primitives. You see, English paper piecing is not just for hexagons!


Honestly, if you want to do precision piecing of virtually any block, English paper piecing is the way to go. The quilt I am going to show you today was made around the same time as Pound of Stars and Wagon Wheels. What makes this one different is that it involved much more complex curved piecing and what I learned in making it was "use what you know". In this case I didn't use what I knew. I was accustomed to sewing clothes and I new about clipping curves (like when you are setting in the sleeves on a shirt) but it never occurred to me to clip the curves when I made this quilt. What quilt pattern is it? Well it was the pickle dish pattern and here is my version of the pattern.

Cranberry Glass Pickle Dish by Karen H

It isn't a large quilt but it has been used extensively over the years and it shows absolutely no signs of wear. For the most part it was stitched with the cheapest polyester thread I could find and I think that the two beige fabrics used where the rings connect might be polycotton! Here you can see both the polyester stitching and the beige fabrics.


One of the things I ask myself is what was I thinking when I used black - it was a nightmare to hand quilt on black. Because I didn't clip ANY of the curves  there were areas that just would not lay flat. So what did I do? Quilt the heck out of them of course! I wasn't entirely successful (actually I wasn't successful at all) but nonetheless I forged ahead and in the end the quilt did what it was supposed to do and that was get used! The second red triangle in from the right on the top curve is a leftover from the red border sashing in my Wagon Wheels quilt. The second red triangle in from the left on the top curve is a piece of the fabric I used on the backing of this quilt. I remember where and when I bought it. It was an older cotton fabric and only 36" wide. It was 100% cotton and I bought it because it was inexpensive!


I still hadn't figured out how to bind a quilt so I just trimmed the backing and batting (polyester of course) down and then turned under the edge of the quilt top (1/4" please) and the quilt backing and I whip stitched the two together. 


If I were to remake this quilt today would I make it the same way? The answer is yes and no. I would probably use EPP to make parts of the top and I would probably still use polyester thread (the quality today is excellent and it is inexpensive) but I would clip curves and make better choices in fabric colours (no more black thank you very much). 

Still, I like this quilt, warts and all. I learned a lot making it and it is yet another quilt that has been loved and used. Really, isn't that why we make quilts?


I don't plan on entering any of my quilts in a juried show because it just isn't my thing. I critique my own work and give myself a pat on the back when it is deserved. For me the most important elements of quilt making are taking pleasure in the process of making the quilt and knowing that the finished quilt gave someone warmth and comfort. My Cranberry Glass Pickle Dish ticks both boxes! 

Thank you for all the lovely comments on the last post. There were a few from No-Reply Bloggers so while I was unable to send you a person note (there is no email attached to your profile) I did read every comment.

Until I post again, happy sewing!
Karen H

Wednesday, November 4, 2015

What was she thinking?

I'm sure I mentioned this in the past but I am primarily self-taught. I had made many quilts before I moved to a place where I discovered quilt shops, quilt guilds and places where you could take classes. Up until that point I improvised and today I thought I would share with you one of my very early quilts. This one is more than 28 years old as you can likely tell based on the small calicoes that I used. When you see some of the pictures I'm about to share I'm sure you will be asking yourself "what was she thinking that she put the quilt together in that way?" She/me was thinking outside the box. Because I was self-taught I was figuring things out and solving problems in ways that would work for me.

I made the quilt in question for my brother and recently asked him if he still had it. About two years ago I gave him another quilt for his bed and he swapped out the original for the new quilt. He knew he had folded up the old quilt and put it away but couldn't remember where. He eventually did find it (packed away with a missing transducer for his fish finder). From a distance it looks pretty good but it is in a state.


The colours aren't quite right in this picture but you can see the design. The inspiration was a picture of an antique quilt in an old magazine. I still have that picture!

The wagon wheels are entirely English paper pieced because I couldn't figure out how else to to construct them. There isn't a machine stitch in the quilt.


I also couldn't figure out how set the wheels in the background fabric, sew the blocks together, add the sashing or bind the quilt. I pretty much didn't know the "proper" (i.e. efficient) way to sew the quilt top together. So, I turned under the edges of the wheels, cut out a circle from the green fabric and turned under the edges and then I whip stitched the wheel into the centre of the background block. Okay, maybe that part makes some kind of sense. But I did the same thing to sew the blocks together as you can see in the following picture!


Why I didn't just sew them on my sewing machine is not too much of a mystery. I didn't know that there was such a thing as a 1/4" patchwork foot (this was more than 28 years ago so maybe there was no such thing). Also I strongly disliked marking sewing lines (and still do to this day) so turning under the edges and whip stitching the quilt together just seemed (or is that seamed) like a reasonable approach.

Not only did I sew the blocks together in this manner but I also added the sashings in the same way!


I had no idea how to bind the quilt so once it was quilted I turned the backing to the front, turned under the raw edge and stitched it to the quilt. Needless to say the edge of the quilt is well worn and frayed (notice the lower left corner). I'm going to have to search for some matching olive cotton so that I can add a double fold binding.


Not only did the binding fray but the off white quilting thread is breaking down. I am pretty sure that I used white Mettler cotton quilting thread. I recall when I was quilting with it that the end of the thread would get fluffy and separate but didn't give it much thought. However, the thread is breaking down terribly and what I am seeing is the same effect I saw at the end of the thread as I was quilting. I am going to have to requilt all of the wheels. The green thread I used in the background is perfectly intact (it wasn't Mettler). This time around I am going to use YLI hand quilting thread. In this picture you can see there is missing quilting thread. In some blocks it is entirely gone.


I've already requilted the Dresden plate portion of this block. The quilting in the outer ring of triangles is also breaking down but I will requilt all of the Dresden plates first to stabilize the quilt. Then I can go back and quilt the triangles at my leisure.


There are also a few worn spots on the back ..... toe holes my brother calls them! Clearly this quilt was well-used but honestly, if a quilt is developing "toe holes" it is time to tell the quilt maker that there is a problem and give her a chance to fix.

Although this quilt would not win any ribbons and likely wouldn't fetch much in an auction, it is one of my favourites and I am proud of it. It is full of memories. I recall spending many hours at my father's bedside in the hospital. I sat and sewed while he slept. He eventually recovered but all of those moments spend with him are stitched into the quilt.

I'm not upset about the condition of the quilt. I made it and gave it as a gift. I let it go. All of the wear and tear speaks to the fact that my brother had many years of enjoyment out of this quilt. So once it is mended, requilted and freshly bound will he get it back? Not a chance! This one will be given a gentle laundering and it will be retired from use!

Hope you enjoyed this post. I've got plenty of sewing to do so until I post again, happy sewing!

Karen H