Sunday, April 6, 2014

Reader comments, quilting on a domestic sewing machine, Soupcon and Godstone Grannies block 3

There've been some great comments from readers to I thought I would mention them in this post.

On April 3 I showed you how to make your own value finder for next to nothing. Sheila suggested that you make two and one of them in your purse or wallet for when you go fabric shopping! What a great idea!


I also had a question from Kathy. She wanted to know if I quilt on a long arm machine and the answer is "no". I work on a domestic sewing machine. The first thing I do is stitch in the ditch on all seams. I like to use Superior Monopoly on top and Superior The Bottom Line in my bobbin. The pictures below are of my Mom's Anna quilt (the design is by Karen Cunningham but I couldn't find a pattern anywhere so I drafted my own pattern). In addition to stitch in the ditch I also stitched around every appliqued hexagon. This anchors my quilt and allows me to move around to different areas.


I also don't like marking quilts so I do a minimal amount of marking or no marking. In the case of the lines in the border I did mark guidelines that were about 1/2" apart. I used my free motion foot to stitch on the line and then I would follow the edge of the applique over 1/4" and then stitch a line in between the marked lines. When I got to the top I would again follow the edge of the applique until I got to the next drawn line.


The lines are not perfectly straight nor are they evenly spaced but if you don't look too closely it is just fine!


When you look at the quilt you see the whole and not the individual parts. And if you do look at the quilting up close and say "um Karen, those lines are crooked" my answer is a) you should see my first quilt - those lines were very crooked or b) I never noticed that before or c) yes they are! At the end of the day I'm not overly bothered by what other people think of my work. I quilt because it makes me happy and I have no intentions of entering a juried show. However I am bothered by what I think of my work and if I'm happy with it that's fine. If I'm not happy with my work and can't live with what I've done then I fix it. If I can live with it (that's usually the case because it is easier than the fix) then I live with it!

In the case of quilting the elongated hexagons I simply stitched a line that was roughly 1/4" away from the edges of the center row of hexagons and filled the area with figure 8s. For the outer rows of hexagons I just quilted 1/4" in from the outside edge and filled the space with free form feathers.


I also added faux trapunto dragonflies in the border. You can read how I did it here.


This is the finished Anna quilt made by my Mom. I made one as well but it is sitting in the "to be quilted" pile!


My work on Godstone Grannies (GG) continues and I've now completed a third block. This one is a little muddier than the first two but I like this kind of block because it helps the others shine. I've still got quite a few blocks to cut out but I'm getting there! Almost all of the blocks are duplicated so I'll make the first set and then go back to the beginning and make the second set.


There are a few more Soupcon pictures posted on the Soupcon FLICKR Group so I thought I would share them with you.

Raewyn is off to  a fine start with her Soupcon. I absolutely love the fussy cutting in this block. Her cutting is so precise that it looks like a single piece of fabric rather than six patches stitched together! The soft curves of the embroidered vines add movement to what I think is a very exciting start. I can't wait to watch Raewyn's progress!


Jean Cockburn is slowing down. She only has one Soupcon posted this time but I'll bet that is because she put so much work into this one. Look at all the gorgeous little stars and the fussy cuts.


 She fussy cut the circles from the border fabric and placed them in the center of her hexagon flowers in the outer border! What a great way to pull it all together! Jean has so many Soupcons on the go and they are all so different!

Susan's (Stichin Witch) quilt is a study in butter and blue. I love all of the Civil War prints she has used in her quilt. I can see that one of the things Susan has done is to repeat fabrics in the same position on each side of the outer border and this is a great way to maintain the scrap feel of a quilt but add control in a very subtle way. Notice the navy dotted fabric is in the center on each side and on either side is a striped blue fabric that is fussy cut. She has also used the same gold fabric in the center of each hexagon flower and that fabric is in the center of pieced border and in the corners of that border. This little tricks give the quilt a lovely pulled together look! Great job Susan!


Well I think that's about it for today! I have one or two or a dozen things to do so until I post again, happy sewing!
Karen H

Friday, April 4, 2014

The Winners of my Anniversary Giveaways and my second Godstone Grannies (GG) block

It is time to announce the winners of  giveaways. The prizes are a $30 gift certificate from Superior Threads and 2 yards of fabric from me!

I want to once again thank Bob Purcell and Superior Threads for very generously donating this gift certificate. I love and use Superior products, threads and needles, because I get good results and in my opinion they are very good value for the money spent. I don't have any paid advertising on my blog and I don't get paid to promote products so when I blog about a product it is because I like it and use it.

So here we go.....INSERT DRUM ROLL PLEASE!!!!!

The winner of the $30 Superior gift certificate is Lorraine. She wrote "Congratulations Karen on your one year anniversary. Judging from your photos it ha been a busy and productive one. Looking forward to seeing what the next year brings".  Congratulations Lorriane!

The winner of 2 yards of fabric is Donna W. She wrote "Happy Anniversary!!! Thanks for your wonderful blog. I enjoy reading it". Congratulations Donna W.

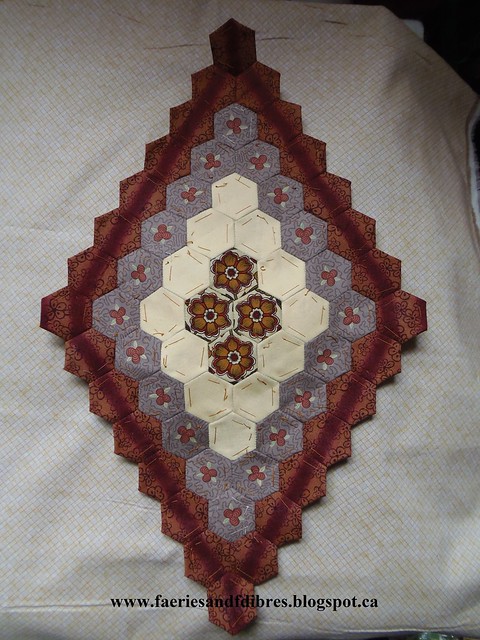
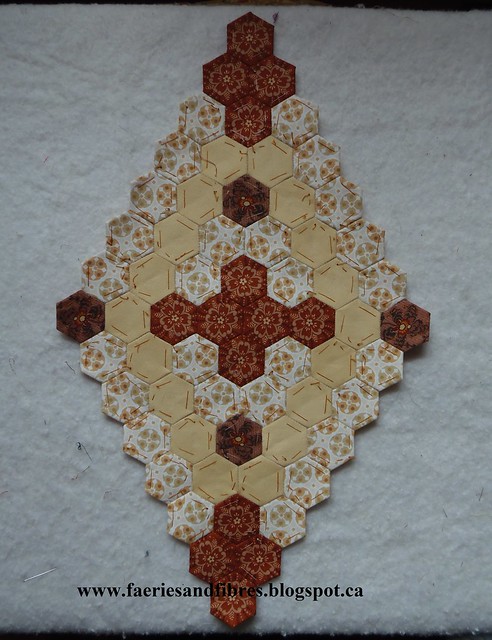
I finished my second block for Godstone Grannies (GG) and I love it! Wouldn't an entire quilt made of this block be fabulous? It would be great made in bright prints. If a 1" hexagon were used you would need less blocks to make a quilt. There will be 31 diamonds in my quit which used 3/4" hexagons. No doubt as I go along I will fall in love with other blocks in my GG quilt but for now, this is my favourite child! Also I'm linking up with Angie's A Quilting Readers Garden for Hexie Weekend where you can find oodles of hexie inspiration!


I wanted to respond to a question posed in one of the comments. Penny asked me to recommend what size of stencil would be the most useful and what would I recommend. What I told her was that I've purchased some stencils but I rarely use them because I dislike having to mark the entire quilt. However the stencils that I have purchase are usually a wreath design and they are generally about 8" square. The size you will need really depends on the size of block that you want to fill. I purchased a book Dream Feathers by Peggy Holt and it opened my eyes to a whole new world of possibilities.


The book is on my Cherry Blossom quilt and the feathers were constructed using many of the techniques discussed in that book.  I also use them to quilt Nine Patches and Baskets.


I used Superior's The Bottom Line to quilt. The colour Statue was used throughout with the exception of the pebbles which were quilted with Gold which I wrote about in the past. It was a colour recommended by Cindy Needham in her Craftsy class. It is a neutral with a little pizzazz and I love it! You can see that a different colour thread has been used but it is subtle and elegant! It really adds some richness to the quliting.


So I've been using what I learned in large part from Dream Feathers and have combined it with my practice doodles and that is how I ended up with quilting designs like those in my Lazy Girl quilt.  I used Superior Monopoly to stitch in the ditch first and then the feather and background fill were worked with Superior So Fine!


So Penny my advice is that if you want to buy stencils by all means do so. Buy designs that are versatile so that you can use the entire design or just parts of the design. But also try experimenting with your own designs. Feathers look difficult but honestly with a little practice you will be amazed at how easy they are and best of all, each plume does not have to be identical. The eye sees the whole an not the individual components. Echo the feathers and then fill in the background with any kind of craziness and you'll have something special. The secret is to use a good thread that is fine and that blends so that what you see is the quilting design rather than the stitches.

Thanks to each and every one of you for reading my blog and to those of you who were able to find the time to comment, an extra big thanks! Right, gotta run! I've got stuff to do today!


Until I post again, happy sewing!
Karen H

Thursday, April 3, 2014

New Toys (one purchased and one homemade)

I got myself a new toy! I read about it on Mary's blog, Through Rose-coloured Trifocals. She wrote about a tool manufactured by Fiskars, a squeeze punch! You can read Mary's post here. I thought I would like to get myself a punch but there are no craft stores in my area so I started with Fiskars. They weren't available on the Canadian site so I called was told they could have one shipped from the US but it was going to be expensive. So I looked around a little more and found one on eBay for about one third of the price in stores! Even with the postage it worked out to be much less expensive. My squeeze punch arrived today and here it is on my work station which right now resembles Bikini Atoll! Yikes! Need to do something about that.....later!


I've tried it out and it works like a charm! The size is X-Large and the hexagons are 1". I believe the Large cuts 3/4" hexagons so I'll add that to my wish list of toys!

Somewhere I've got a red acrylic value finder. It is used to check the value of different fabrics. Value for a quilter is the relative lightness or darkness of one fabric to another. A medium blue next to a navy blue will look light and that same medium blue next to a light blue will look dark. It isn't always as easy to determine value when the fabrics are different colours so that's where the value finder comes in handy. The red neutralizes colour so all you see is the relative lightness or darkness. It's a handy little tool.....if you can find it which I can't. So what's a girl to do? I can't buy one but since there are no craft or quilting stores in my area so I thought I would make a value finder. I have some red cellophane and my handy dandy new squeeze punch. I took a piece of card stock and folded it in half and punched out a hexagon. Here it is opened up.


I used my glue stick to glue a piece of red cellophane in place. The final step was to place glue around the edges of the cellophane and all along the edges of the white card stock. I closed it and pressed to make sure the glue held.


And here it is.....my second new toy, a homemade value finder! If I lose this one I can just make another in no time flat!


I continue to work on the hexagon diamonds for my Godstone Grannies quilt. I've started piecing my second block. I particularly like this one which is a good thing because there are two of them! There are still more blocks to cut out so I am reluctant to put fabric and hexagon accouterments away because they might  go the way of  first value finder! So for now I'll just keep cutting!


Lastly don't forget to enter my one year anniversary giveaways! There are two prizes, a $30 gift certificate from Superior Threads and a package of two one yard cuts of fabric that is perfect for fussy cutting or broderie perse!


To enter simply leave a comment but there are easy ways to get extra entries. You can read all about it here. I will draw the names of the winners at 9:00 am EDT on Friday, April 4, 2014. Good luck everyone!

Until I post again, happy sewing!
Karen H
Wednesday, April 2, 2014

Piccadilly to the Nines, Lionel and another Soupcon trunk show

I just celebrated the one year anniversary of my blog and I've got two giveaways: a $30 gift certificate from Superior

and two yards of fabric that is ideal for fussy cutting or broderie perse!


To enter my giveaways go here. The winners will be announced on April 4, 2014! Good luck! As part of my anniversary celebration I thought I would share another story from the garden. This one is about Lionel and it was published back in August! Nice guy that he is, Lionel wouldn't hurt a fly or the sow bug on his schnoz! Want to know why? You can read his story here!


I've stitched my first Godstone Grannies block and it will be the block that is in the center of the quilt. I am very pleased with how it turned out! I couldn't get a picture that shows the colours to their best advantage but it is very buttery and caramelly and butterscotchy! And best of all there are zero calories in all that sweet goodness!


Yesterday I told you that I store my cut blocks in little bags. Some of these Godstone Grannies blocks are "unusual" in their arrangement so I printed a picture of the quilt, cut out the blocks and glued them to the back of the little paper with my block number and cutting instructions. When I'm ready to sew the block I'll have the little picture handy so I get the arrangement right!


Fingers crossed that I can get another block stitched in the next couple of days! But I'm itching to get going on the quilting of my Piccadilly to the Nines because I want to try out my new Fantastico thread from Superior.It is a bright green, lime green and turquoise variegated thread. It sounds bold but it is actually a very fresh green/blue thread! You can see it here. The quilt is pinned so it won't be long until I get started!


The Soupcon quilts keep rolling in! I am so impressed with all of the quilts. Each quilter has taken the ideas and then used her own creativity to make the quilt her own. It is so exciting and rewarding to see what everyone is doing! So how about a little trunk show? You know the routine....grab a cuppa, settle back and enjoy the picture show!

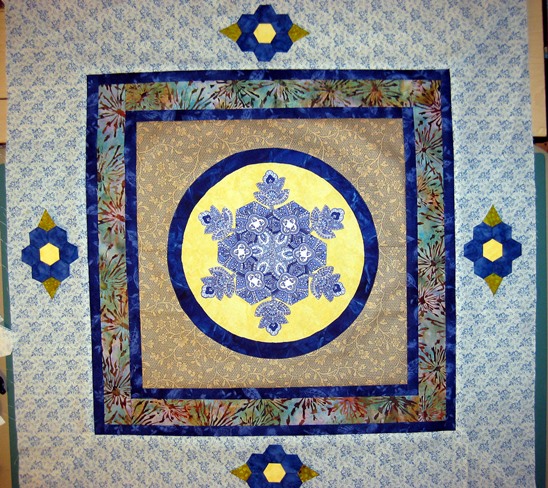
Angie's quilt is looking good! There's no doubt about it: the star is the star of this quilt! The yellow just glows and it shows off her blue star to the best advantage. I am a big fan of narrow borders because I think they frame a quilt so elegantly. Although I had planned a pieced border in between the narrow borders Angie use a batik and it works perfectly! I also like the way she has handled the little hexagons in the border! Keep up the great work Angie! Be sure to visit Angie's blog, Quilting Reader's Garden for more pictures!


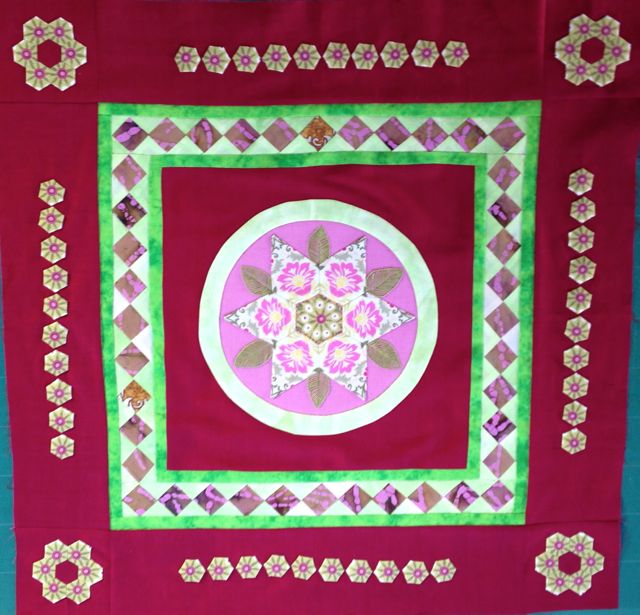
Jean, Jean my Soupcon machine!!! Jean Cockburn  has posted three more pictures of her Soupcon quilts and each one is different but there is one common thread and that is Jean's ability to boldly and confidently use colour. I really believe she has a rare talent! In the first quilt she has fussy cut all of the little hexagons in the border and they are wonderful.


Again Jean has fussy cut flowers for the hexagons in the border and they are so pretty. Such strong colours but there is a softness to this quilt and it has great appeal! Be sure to visit Jean's blog When You Love Blue.


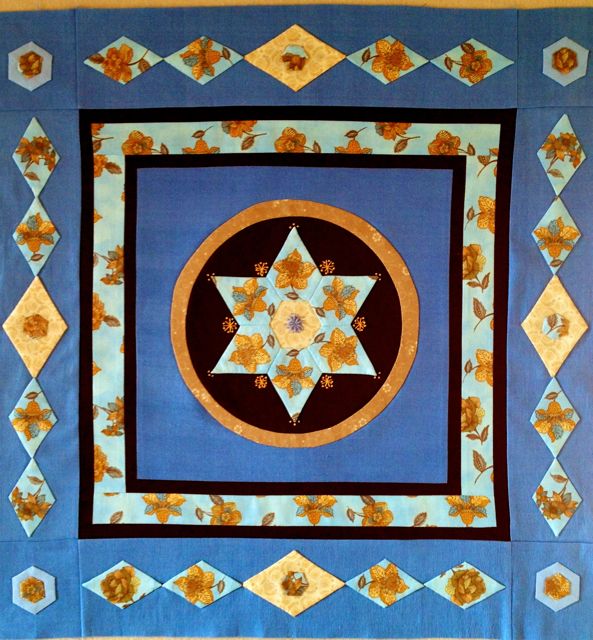
Jean's third quilt is my favourite of the three if for no other reason that blue and buttery gold is one of my favourite colour combinations. Again Jean has fussy cut flowers for the diamonds in the border. I think the effort that goes into fussy cutting pays off in spades when you see the results in a quilt.


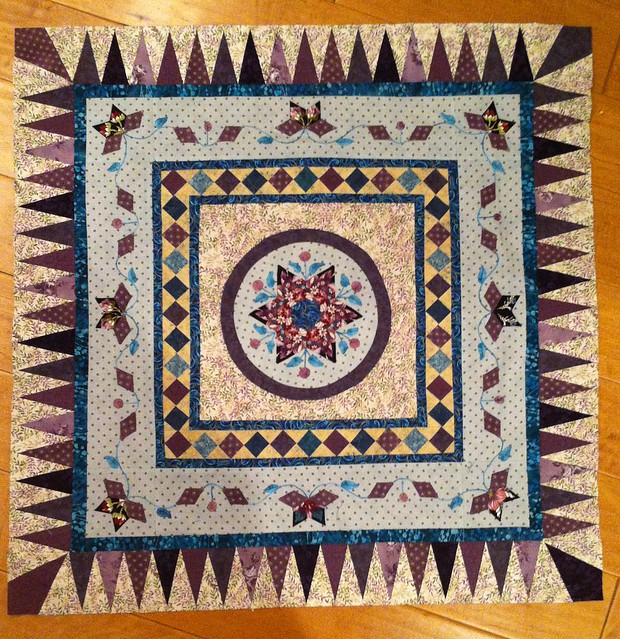
Colleen (aka Skootchover) has completed her Step 6 border and just look at what she has done in the corners! I LOVE it! My poor plain corners are going to have to be re-engineered! This is such a delicate quilt and Colleen has done a fabulous job of personalizing it each step of the way! I can see this quilt as the medallion of a fabulous full size quilt!


Deb Sew'n'Sew has also completed the final step and again we see a unique corner treatment. I love how the lavenders used in the border pull the whole quilt together in the best possible way! This is yet another quilt that started out pretty and it just kept getting better and better every step of the way. Be sure to drop by Deb's blog, The Toothfairy Quilter.


Well I think that's it for today. I've got some sewing to do. So until I post again, happy sewing!

Karen H

Tuesday, April 1, 2014

My Giveaway and getting organized for my Godstone Grannies

Before I get started don't forget to enter my giveaway. There are two prizes. The first is 2 yards of fabric perfect for fussy cutting. Celia in England inquired about the stripe fabric in my giveaway. Celia, you are a no reply blogger so I couldn't email the information (or enter you in the draw). The fabric is by R.E.D. International Textiles. The repeat is 8" along the width and 8" along the length.


and a $30 gift certificate from Superior Threads. A big thank you to Bob Purcell at Superior for this generous gift!


To enter my giveaways go here. I will draw the winner on Friday, April 4, 2014 at 9:00 EDT. I reply to every comment so if you don't hear from me it means you are a no reply blogger and you won't be entered unless you send me your email address. There are several no-reply comments so if you haven't heard from me please send me an email with your email or leave another comment with your email address so I can enter you in the draw!

There's another giveaway running over at Karen's Quilts, Crows and Cardinals. She is celebrating the launch of her design, pattern and quilting company, Redbird Quilt Co. with a month of giveaways.


You can read about Karen's giveaways here.  Also if you want to learn needle turn applique be sure to visit Karen's blog. She has at least six step by step tutorials to get you sewing like an expert in no time flat! The photographs and instructions are fabulous!

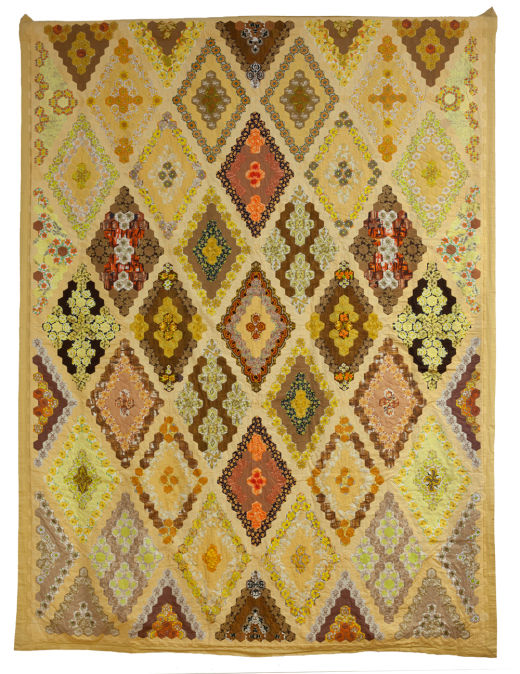
I'm getting started cutting my blocks for my version of the Godstone Grannies Coverlet.

The first thing I did was draw a "map" of my quilt block layout and I numbered the whole diamonds and the partial blocks. This quilt has some odd hexagon arrangements but most are a standard diamond arrangement starting with 4 in the center, a second round of 12 hexagons, a third round of 20 hexagons and a fourth round of 28 hexagons. Notice that the increment is 8 so if I were inclined to add a fifth round I would need 36 hexagons.


I cut multiple blocks at one time so I use my map to keep track of where I am. I make notes on the block to let me know where I am when cutting fabric. The diamonds in the quilt have four rounds so below my block number I write the rounds, 1, 2, 3 and 4. When I cut out one of the rounds I put a dot the upper point of the diamond to let me know I've cut some of the patches and I put an X through the round that is cut. In the example below I've cut all four rounds in diamond 1.


I used a marker to colour the dot so I know at a glance that an entire diamond has had all patches cut out.


I love these little zip top snack bags for storing my hexagon patches that are cut out. I've used them over and over again and they are a perfect size for my hexagon projects.


I cut the patches and put a little label in with the fabrics. It shows the block number and what rounds have been cut and what needs to be cut. I'll also use the label to make notes about the block to remind me of what I want to do with it! For example, while cutting I might have an idea about a particular fabric I want to use so I'll make a note of it and pull that fabric later on.


I like working this way because if I have a fabric that is repeated in several blocks I can cut that fabric all at once and then tuck the patches in the block bag they belong to.  When I've cut all of the patches I can fold up the fabric and put it away. If I cut one block at a time and I know I'm going to have to repeat fabrics then I've got to keep the fabrics together. I would rather just get the cutting over and done with quickly so I can start sewing!

When I need piles of hexagons from the same fabric I'll be using strips of fabric to cut them out. You can read about how I do this here. However many of the patches in my quilt will be fussy cut and I want to do it quickly. I won't be trying to create a perfect kaleidoscopic effect so each patch doesn't have to be exactly identical. In the picture below you can see my window template on the wrong side of my fabric. I center it over the motif, apply a tiny little dab of glue to my paper hexagon and press it to fabric. I do this for the number of patches I need and then I cut them out with scissors and shove them in their little zip lock bag! This method makes the job go a little faster!


Before I go, I thought I would share a link to some of my critters' summertime stories! This one is about the rabbits and  the dreaded Teetoo! It started here and ended here.


Until I post again, happy sewing!
Karen H