

and a $30 gift certificate from Superior Threads. A big thank you to Bob Purcell at Superior for this generous gift!
To enter my giveaways go here. I will draw the winner on Friday, April 4, 2014 at 9:00 EDT. I reply to every comment so if you don't hear from me it means you are a no reply blogger and you won't be entered unless you send me your email address. There are several no-reply comments so if you haven't heard from me please send me an email with your email or leave another comment with your email address so I can enter you in the draw!
There's another giveaway running over at Karen's Quilts, Crows and Cardinals. She is celebrating the launch of her design, pattern and quilting company, Redbird Quilt Co. with a month of giveaways.

You can read about Karen's giveaways here. Also if you want to learn needle turn applique be sure to visit Karen's blog. She has at least six step by step tutorials to get you sewing like an expert in no time flat! The photographs and instructions are fabulous!
I'm getting started cutting my blocks for my version of the Godstone Grannies Coverlet.
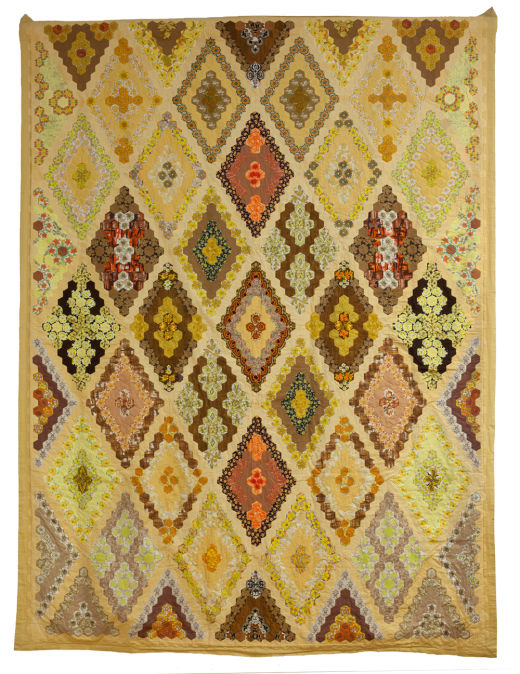
The first thing I did was draw a "map" of my quilt block layout and I numbered the whole diamonds and the partial blocks. This quilt has some odd hexagon arrangements but most are a standard diamond arrangement starting with 4 in the center, a second round of 12 hexagons, a third round of 20 hexagons and a fourth round of 28 hexagons. Notice that the increment is 8 so if I were inclined to add a fifth round I would need 36 hexagons.

I cut multiple blocks at one time so I use my map to keep track of where I am. I make notes on the block to let me know where I am when cutting fabric. The diamonds in the quilt have four rounds so below my block number I write the rounds, 1, 2, 3 and 4. When I cut out one of the rounds I put a dot the upper point of the diamond to let me know I've cut some of the patches and I put an X through the round that is cut. In the example below I've cut all four rounds in diamond 1.

I used a marker to colour the dot so I know at a glance that an entire diamond has had all patches cut out.

I love these little zip top snack bags for storing my hexagon patches that are cut out. I've used them over and over again and they are a perfect size for my hexagon projects.

I cut the patches and put a little label in with the fabrics. It shows the block number and what rounds have been cut and what needs to be cut. I'll also use the label to make notes about the block to remind me of what I want to do with it! For example, while cutting I might have an idea about a particular fabric I want to use so I'll make a note of it and pull that fabric later on.

I like working this way because if I have a fabric that is repeated in several blocks I can cut that fabric all at once and then tuck the patches in the block bag they belong to. When I've cut all of the patches I can fold up the fabric and put it away. If I cut one block at a time and I know I'm going to have to repeat fabrics then I've got to keep the fabrics together. I would rather just get the cutting over and done with quickly so I can start sewing!
When I need piles of hexagons from the same fabric I'll be using strips of fabric to cut them out. You can read about how I do this here. However many of the patches in my quilt will be fussy cut and I want to do it quickly. I won't be trying to create a perfect kaleidoscopic effect so each patch doesn't have to be exactly identical. In the picture below you can see my window template on the wrong side of my fabric. I center it over the motif, apply a tiny little dab of glue to my paper hexagon and press it to fabric. I do this for the number of patches I need and then I cut them out with scissors and shove them in their little zip lock bag! This method makes the job go a little faster!

Before I go, I thought I would share a link to some of my critters' summertime stories! This one is about the rabbits and the dreaded Teetoo! It started here and ended here.

Until I post again, happy sewing!
Karen H
This comment has been removed by the author.
ReplyDeletewow your new quilt does look amazing-I am off to check out the links
ReplyDeleteOh Karen -- your shout-out just warms my heart! Thank you so much for your sweet comments, support, and for all that YOU do to inspire your readers! You are always giving and sharing and showing. Can't wait to see that Godstone Quilt grow... thanks again! Hugs, the other Karen
ReplyDeleteThis is a great way to keep organized and see the process along the way.
ReplyDeleteI love reading how you start making this design and organise it. There's a lot for me to learn and I can use all the help I can get :-))
ReplyDeleteDutch greetings
The coverlet is going to be gorgeous! Those rabbits are much cuter than the ones that frequent my petunias!
ReplyDeleteGreat tips for organizing and keeping on track with all those hexies! I should adapt that for the antique one that I'm reproducing!
ReplyDeleteI just love this fabric and cannot find it anywhere, can you, will you tell where you got it please?
ReplyDelete