

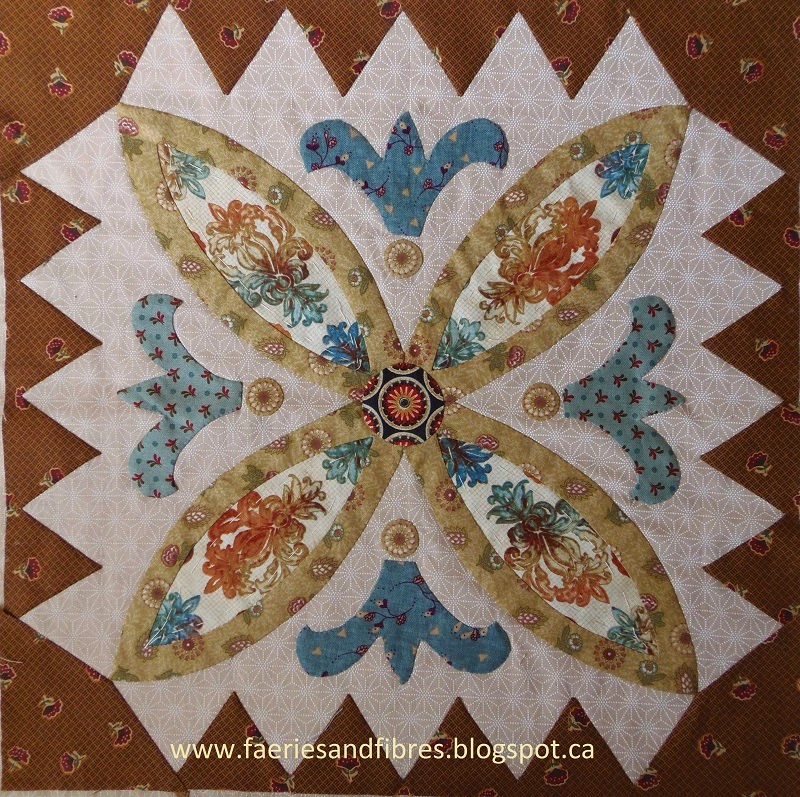
When we started Missie had drafted the pieced blocks and she had a rough idea about how the quilt would look but she hadn't designed the entire quilt. There were 16 pieced blocks and I was to make two of each. I think this is one of my favourite blocks - I love the colours! The print fabric used in the "eye" was a tiny scrap that I trimmed away from the backing fabric of a quilt I machine quilted for my Mom. In was in the can of scraps to go in the garbage. I fished it out and was able to fussy cut the four pieces!
.jpg)
Once the blocks were made they were reverse appliqued to background fabric. Missie planned to use a variety of light fabrics but I opted to use a single light fabric for all of the blocks. It is amazing what a difference the reverse applique made. The blocks looked so polished! A block like this
.jpg)
looked like this when framed with the background fabric.
.jpg)
The pieced blocks finish 6" across so that makes for some small pieces of fabric. English paper piecing was the method used to construct these blocks and instead of thread basting, I used Missie's English paper piecing method which uses freezer paper and starch. You can see her tutorial here.
Missie designed a simple applique design for the centre medallion. All of her applique work is done with wool but I decided to use cottons. The circle in the middle is not part of the pattern. I thought that my fabrics needed to be spiced up a bit so that was my first addition. Including little details like this is a great way to put your own stamp on a quilt while still maintaining the original design.

I still thought it needed a little more so I cut some circles from the gold fabric and appliqued them to the base of the fleur de lis. The background fabric in this block is the same fabric used throughout the quilt.

Here is the finished medallion.
If you look closely at the original quilt you will notice a pieced block with a face. It is one of the blocks that really caught my eye and I wanted to try it out so I drafted my own pattern (a dinner plate was my starting point) and I drew a face. I had thought about using it as my medallion but have set it aside and will find another way to use it!

The next task was stitching 12 fruit and flower blocks for the border. The applique technique I chose to use was back basting applique. You can see my tutorial here. I love the cherries! Almost all of the fabrics used for the pieced blocks and the applique blocks were cut from leftover bits in boxes of tiny scraps!

Each of the 12 blocks was to be framed with crescents and I went with butterscotch and caramel colours because I think they add richness. And of course I added my own detail! Each of the blocks has an insect of some sort - there's a ladybug on the leaf in the cherries block.

When I cut the crescent shapes there were some scraps and I used them to make the periwinkle stars that are placed between the applique blocks in the border. I added the circle as my own person touch. It is a repeat of the fabric used in the middle of the centre medallion. Repeating fabrics in this way adds not only visual interest but it gives the quilt a cohesive feel.

The last blocks were four pieced corner blocks for the outer border. I so enjoyed making the faces that I decided to put one in a border block. I LOVE this sun face! Again Missie's plan was to use light background fabrics but I liked the effect of the green border in the original quilt so I pulled an old green print from my stash and I think it is the perfect complement!

If you have a sun you need a moon so I drafted a block for the opposite corner and added a moon face in the middle!


Gardens of a King by Missie Carpenter 2014
Now I am SOOOOOO excited to share with you my finished quilt top! It is the same quilt but it has a different look and feel.The green border fabric anchors my blocks and gives the quilt some weight. I also added my own personal touches like the circle appliques, butterfly and insect appliques and the sun face (upper left) and moon face (lower right).

Gardens of a King by Karen H 2014
Making this quilt was a great experience. It is definitely not a quilt for a beginner but it is a quilt that is manageable for those with experience hand sewing. If you are a fan of the Dear Jane or Nearly Insane quilts this one is for you!
Missie is posting tutorials on her blog to assist with the making of the quilt. If you are interested in the pattern it is now available for purchase here. As a reminder I have no financial or other interest in Missie's pattern. I made the quilt and have blogged about the making because I thought it would be a fun and interesting experience!
Hope you've enjoyed following the making of Gardens of a King. If you are making the quilt I would love to hear from you. I reply to every comment so if you don't hear back from me it means you are a no reply blogger and I have no way to contact you unless you include your email address in the comment!
I'm linking up with the Needle and Thread Network where you will find interesting posts from great Canadian quilters!
Tomorrow is the final block in my Value Proposition Hexagon Quilt Along! Until then, happy sewing!
Karen H
Oh Karen your version of the quilt is stunning! I agree about the green border, it really makes a big difference along with the extra little details that added. They were well worth your time and effort!
ReplyDeleteOh Karen, it is absolutely stunning! What a beautiful quilt. You must be so proud of your finish! I love all the little extras you added. Well worth it.
ReplyDeleteLove your quilt! It is the perfect balance of color and value Well done!!
ReplyDeleteThis is a most excellent quilt and I'm so excited to see it finished. I love the green as well. Now we know NEVER, EVER throw away a scrap....giggle.
ReplyDeleteAbsolutely beautiful Karen - well done on a fabulous rendition! Amazing how those little touches change the whole dynamic of the quilt.
ReplyDeleteOh Karen! Your top is just beautiful. nd with the special details of you, it has its own look.
ReplyDeleteHugs
Marina
LOVE IT! Just beautiful!
ReplyDeleteI'm with the others - the green borders are an amazing change to Missies version. Congrats on a beautiful finish!
ReplyDeleteWow Karen, I'm off to buy the pattern, love it Thankyou!
ReplyDeleteA wonderful quilt Karen. I have thoroughly enjoyed reading your blogs covering the quilts progress. I am going to add this quilt to my 2015 must do projects, the list is getting rather long!
ReplyDeleteI've really enjoyed following the making of the blocks, and now it's wonderful to see the finished quilt. It's absolutely beautiful!!
ReplyDeleteBoth Missie's and your quilt are beautiful, I'm seriously tempted!
ReplyDeleteWhat a great accomplishment. This quilt is spectacular!
ReplyDeleteCongratulations! I know you both worked so hard on that quilt. You both are amazing quilters.
ReplyDeleteOh my word!!!! What a great job! I love these so much. And being a historian. . and having pieced a Dear Jane. . . oh. . . dear. . . . ;D
ReplyDeleteMagnificent Karen! Amazing to see two such different interpretations of the same pattern too.
ReplyDeleteEr did I read that right ........ 'It was in the can of scraps to go in the garbage.'
Scraps in the garbage!
A dreadful thing to say!!
Your quilt is just beautiful! I love all your added details that make it all your own and add to the charm!
ReplyDeleteThe sun and moon blocks are perfect for a garden themed quilt--every morning/night one is there!! Love your colors and special details. Thanks for showing the challenges & great bits of the quilt.
ReplyDeleteYour quilt is just beautiful. I'm more partial to the coloring in your quilt. It seems to be more dramatic to me.
ReplyDeleteI have been watching your progress. Everything has come together to make a beautiful quilt top.
ReplyDeleteAbsolutely lovely! It must have been such a rewarding project to work on! I will be interested to see how you approach the quilting.
ReplyDeleteamazing work!! you both have created a piece of art.
ReplyDeleteWow! Your quilt is incredible! Love the way you took the pattern and added details to make it truly your very own. Such a BEAUTY!
ReplyDeleteI really am leaning toward your version of this quilt as I get myself organized to begin. I was challenged with finding enough of the scrappy light colored background to follow Missy's version. I think I'm going to use the outer border idea of a darker shade that works with all the other colors you've chosen.
ReplyDeleteThanks for the assistance in moving forward with this awesome quilt.