Showing posts with label hexagons. Show all posts

Wednesday, December 2, 2015

Road 66 - Row 3 and more

I've kind of lost my blogging mojo because I am so busy with so many things right now. With trunk shows, teaching, visiting, planning QALs and company I just don't seem to have much in the way of free time! But today I've carved out a few moments to share my progress on my Road 66 quilt from the book Primarily Quilts by Di Ford.

This is row 3 of my Road 66 hexagon quilt stitched together.


Even better I've now stitched the first two rows together and the lovely path made of coral diamonds is starting to emerge. The little triangles are made with a darker coral/rust and they are a subtle colour change that I think is quite effective! As you can see I've still not added the fillers along the top edge.


Now I'm on to row 4 and I can add row three to the quilt. There are five rows in total so it will go quickly.

There was a question about the size of the quilt and the hexagons. The hexagons are 1 1/4" which is slightly larger than I normally use. The hexagon portion of the quilt will measure about 58" and I believe the length is around 68". To it will be added two borders and they will bring it up to a full size quilt.

I've got ideas for some new fussy cutting tutorials so when life slows down a little I will get to them! I'm afraid however that for the next couple of weeks my posts will continue to be rather sporadic but once the holidays are over I'll be back in the saddle and will publish more regularly.

Until the next time, happy sewing!
Karen H

Monday, October 20, 2014

Five minutes of sewing here and there

I've been busy and have managed to stitch up a bunch of blocks. I always have a little sewing kit at the ready so if I go out and have five minutes of sitting and waiting I can take a few stitches. It might not be much sewing but all those five minutes sure add up! This is my sewing kit and it was made for my by Bunny of The Creative Hare. It was made from a free pattern that you can find here.


It is very spacious inside so I can fit a few spools of thread, scissors and my EPP (English paper piecing) pieces. I store spare needles inside the flap. I use my little pouch every day and just love it. It would make a terrific holiday gift for a sewing friend!


So what have I made in those five minutes of sewing here and there? Well let me show you some Lozagon hexagon blocks and Gardens of a King blocks that I've managed to finish in those sewing minutes! This Lozagon is kind of wishy washy isn't my favourite but it will work just fine in the finished quilt.


Some years ago I had been at a White Elephant sale in a church basement and I bought a bag of old scraps, many of which were cut as blades for Dresden plate blocks. I am using some of those scraps in my Lozagons quilt. In the next block you can see some of the prints in the hexagons that surround the solid centre. Unfortunately I was only able to cut five hexagons from the scraps so I went through my stash and found a fabric that was a similar colour but a different print. Even though it is a striped fabric I think it works just fine. I love having the occasional odd patch because it adds interest! The purple flowers on the white background in the outer border are also cut from the old scraps!


How about some Gardens of a King Quilt blocks! This is a pattern I'm testing for Missie of Traditional Primitives. The more blocks I stitch the better I'm getting at making them and I adore these tiny treasures! Missie is also testing the pattern and you can get a sneak peak of what's to come here! For now I'll share some of my blocks with you.

Originally I had dark brown for the outer round of triangles but it was too close in value to the green fabric. I tried the gold scraps and they work perfectly.


I didn't throw out the brown triangles; instead I used them for my second block. Blue and brown are a great colour combination so I searched my stash for the right blue (I needed a blue that was a lighter value than the brown) and this is what I came up with. Notice I rotated the centre pie wedges. This was a mistake and I considered correcting it so that it would be the same as the previous block. My attitude is fix the things that will bother you and leave the rest alone. This is a mistake I can live with so it will stay as it is!


The next two blocks have more pieces (each has 56 pieces). I was dreading sewing this block because of all the pieces but I took care when prepping the patches for EPP, stitched carefully and the blocks came together nicely. I particularly like the red/pink ring around the first of these two blocks. I used a single grey fabric so that the centre star could really pop and I think that this was a good choice!


This second block is much darker and more dramatic. It isn't perfect but I can live with it!


Right - I'm off to see if I can find some spare minutes so I can get cracking on more Lozagons hexagon blocks and Gardens of a King blocks! Until I post again I hope you are able to find five minutes to take a few stitches!
Karen H

Sunday, August 31, 2014

Basting hexagons from the back and removing papers

One of the quilt makers who is working on the Value Proposition Hexagon Quilt Along asked a question about basting hexagons. She noticed that sometimes threads appear on the front of the hexagon and sometimes they don't and wondered why this is so. There are two methods of basting hexagons. I mentioned this in my August 4, 2014 post and offered to do a tutorial.

In the upper set of hexagons in the picture below the fabric is basted to the paper so the threads show on the right side of the hexagon. In the second set of hexagons the basting is only through the fabric so no thread shows on the front.


I use both methods and like them for different reasons. When the basting goes through the paper I know that there is a paper in the quilt top if I see thread on the right side of the quilt and this is important because if you don't get the papers out you may find a paper stuck in the quilt when quilting time arrives! I like the other method where the basting does not touch the paper so they aren't damaged which means I can get multiple uses out of each paper. In addition the basting stays in the quilt and holds the seam allowances down. This can be important if the quilt top is going to be handled a great deal as it is stitched together.

I had offered to do a quick tutorial on basting so that the threads don't show on the front and today is the day I deliver that tutorial! To start I like to use a tiny dab of glue to tack my paper hexagon to my fabric. I don't worry about precise seam allowances. As long as it is 1/4" or more I'll be fine. To begin I fold over the top seam allowance and then I fold over the left seam allowance. With a knotted thread I place my needle through the fabric to the right of the fold and come up on the other side of the fold. I take a one more stitch so that the fold is tacked down.


I turn the hexagon counterclockwise, fold over the next seam allowance and tuck it under. I take a stitch as indicated in the following picture.


I draw up my thread and the fold will be tacked down.


I turn the hexagon counterclockwise, fold the seam allowance, tuck it under and take a stitch to hold the fold down.

I continue in this manner until I get to the last seam allowance. I fold it, tuck it under and take a stitch to hold the fold down.


I take two more stitches in the same place and clip my thread. Notice that the edge on the top right doesn't have thread that carries over to the beginning point. I like to leave it this way because it makes the removal of paper much easier.


HELPFUL TIP #1: The basting thread will remain in the quilt so if you are basting a light colour fabric it would be a good idea to use a light colour thread.

HELPFUL TIP #2: I like to use inexpensive serger thread for basting. I can get giant cones for only a dollar or two and they last for a very long time!

When I use this method of basting the papers can be removed at any point however I prefer to leave them in place until the hexagon is completely surrounded by hexagons. In the picture below you can see that the yellow hexagon is entirely surrounded by hexagons.  I use a crochet hook to remove the paper.You can see the tip of the crochet hook on the right just between the start and stop points of the basting.


I slide the crochet hook between the paper and the fabric at the edge that is between the starting point of my basting and the finishing point. I lift the hook and the paper is released. I can now grab the paper with my fingers and pull it out.


The paper is starting to get a little ratty  so it might just have reached its life expectancy although I think I might be able to squeeze just one more use out of it! It has already been used a few times so it really doesn't ow me anything!


I hope this tutorial has been helpful and informative! Until I post again, happy basting!
Karen H

Monday, August 4, 2014

Reader questions about making 81

There have been several questions about how I made my quilt 81 The Giant Monstrosity. Some were from no-reply bloggers which means I can't reply to the comment or question. I reply to every comment so if you don't hear from me it means you are a no-reply blogger and I have no way to contact you unless you provide me with your email address. Anyhoooo, I thought I would answer the questions here!

Where did I get the pattern for 81 The Giant Monstrosity?
I made my own pattern. I saw pictures of the original quilt  (below) which was made in the 1800s. I fell in love with it (what lover of hexagons wouldn't) and I drafted my own pattern. This is the original quilt.


This is my version before I added my final diamond border. I made mine in brighter colours. The grey fabric in the centre panel is different from the grey in the border and that's just fine.


I started with the centre panel for my quilt. It is a single piece of fabric with 81 hexagon rosettes and stars. I determined the measurements for the borders as I went along. I did make some changes to my version of the quilt. For example I swapped out the pieced blocks in the corners for appliqued baskets and I added a slightly different diamond border. While I drafted my own pattern there is a commercial pattern available for this quilt from Threadbear. The Threadbear pattern is by Corliss Searcey and her version of the quilt measures 72" x 82". My quilt measures 92" by 97". I believe the title of her pattern is English Basket Quilt.

What size are the hexagons and diamonds?
I used 3/4" hexagons. You will find the template I used for my hexagons here. Each side of the diamond measures 1 1/4". I drafted my own diamond master template, made copies and cut them up as I needed them. I explained how I draft them here.


Are the hexagon rosettes and stars appliqued?
Yes. After the stars and rosettes were stitched I gave them a spritz of starch and pressed with a hot dry iron. The basting threads and papers were removed and I used Roxanne Glue-Baste-It to affix them to the background for applique.

When I thread baste my diamonds I do the corners a little differently. The method I use results in diamonds that look like the diamond on the left in this picture. You can read how I do this here. I makes the applique much easier because there are no dog ears to be tucked in!


What kind of paper do I use for the hexagons?
I just use regular 20lb bond printer paper and don't seem to have problems. You can get printer paper that is a little heavier but not quite as heavy as cardstock and that might be a better option for you or you can use cardstock. I use a glue stick to tack my papers to my fabric (a tiny dab of glue is applied to the paper never the fabric) and I use only enough glue to hold the paper in place on the fabric so when it comes time to remove the paper the bond is very weak and in most instances the paper just pops out. If you prefer not to use a glue stick another option (which I've used for 1/2" hexagons) is to use applique pins. They are very tiny and unobtrusive so your thread won't get tangled around them when you baste.

Are the papers reusable?
Sometimes. If the paper is in good shape I will reuse it. Otherwise it goes in the recycling box. In order to be reusable I want nice sharp corners so if the paper is chewed up at the corners I get rid of it!

What basting method do I use?
In the past I basted through the fabric (the brown hexagons in the picture below) and will continue to do so when making my foundation paper pieced English paper piecing hexagons. However when as of late I've been basting only the fabric at each corner fold without piercing the paper (the turquoise hexagons in the picture below). With this method the basting thread remains in the quilt and the papers just pop out quite easily. The bonus is that the papers remain relatively intact which means most of them can be reused. Let me know if you would like a little tutorial!


There is an alternative to thread basting and it involves the use of starch and freezer paper. Missie of Traditional Primitives explained her method and you can read about it here. I've tried this method and it works really well. There are no threads or papers to removed however you will need a little iron such as Clover's Mini Iron or Dritz's Petite Press for this method.

If you have questions about the making of 81 please feel free to send me an email or leave me a comment and I'll be more than happy to reply. It's time for me to get back to quilting 81. Until I post again, happy sewing!
Karen H

Monday, July 14, 2014

More about Hexagreens and the reveal

Yesterday I shared some pictures of parts of my quilt Hexagreens. I have a fabric that I just love and I have used it to make Hexagreens, Mom's Flower Bed and Flora and Fauna, Parts of the Garden. 

In the case of Hexagreens and Mom's Flower Bed the diamonds were fussy cut, some using templates and others were cut from strips of fabric that I cut parallel to the selvage. This method produces oodles of patches in no time flat. The thing is that when you do it from strips you have no idea how the block will turn out! You can read about how I cut my diamonds from strips here. To start you need a fabric with lots of action! This is the fabric I used. 


All of the floral print stars were cut from this fabric. Depending on how the diamonds were arranged the block could look very different. All of the stars in the quilt below were from the fabric above using a strip method of cutting diamonds.

Close up of Mom's Flower Bed, 2011

By placing the green print at the point in the middle a really nice effect was created. 


Sometimes the diamonds just don't work together so instead I would use them to surround the star. In creates another interesting effect.


This is the centre medallion in Hexagreens. The bright green was used here and also in the border. It was also used for the centres of the stars that you can see in the upper right and left corners as well as the lower right and left corners. Repeating the green fabric helps to pull the quilt together and although it is scrappy and multicoloured it reads as a green quilt.

Close-up medallion in Hexagreens

I also repeated some of the stars. The following star was made in multiples. I used it around the medallion and I also used it in the border. I used a brown fabric for the background but ran short so I added a second brown print and made sure that it was used in many of the stars so that it would just blend in! Sometimes it is a good thing to run out of fabric. By adding a second or third similar fabric it can add depth and dimension to a quilt! 


While this medallion looks complicated it is actually made of large hexagons. I used my foundation paper pieced English paper piecing method to create all of the stars with the needle points! Colour placement was also a factor. Let me show you a close-up of how some of the components were constructed. 


So what does the whole quilt look like? It looks just like this!

Hexagreens by Karen H

Did I have a design for this quilt? No! I started by making the large brown and orange star in the middle. Once it was done I thought about what could come next and I decided on the first round of little stars. The next round was fussy cut stars from the fabric at the beginning of this post. I put the orange stars in the corners and two yellow stars in between them. The quilt developed just like that. Each time I finished something I would think what next! It was a fun quilt to make although it did present a few challenges! Maybe one day I'll write a pattern for this quilt! For now I have plenty to do so it will be a job for a future date!

That's it for now. I want to get Bab's quilt finished so I can get back to 81 The Giant Monstrosity! Until I post again, happy sewing!
Karen H

Sunday, July 13, 2014

Hexagreens

I've had a busy weekend so far and there is more to come. That means not much time for blogging or sewing so today it will be quick! I was going through my pictures and I think I've given you sneak peeks at some of the blocks in my quilt Hexagreens so I thought I would share a few more. The name of my quilt comes from the fact that it is a scrap hexagon quilt. I used a fresh, lively green in the centre medallion and in the border to pull all the scraps together!

Hexagreens is an original design and it is made up of large hexagons that have been deconstructed and reconstructed to create some interesting designs. I wrote a little tutorial about constructing, deconstructing and reconstructing a hexagon. You can find it here.

If you start with a hexagon, in this case it was a large hexagon, it can be divided into three diamonds. 


Fussy cutting those diamonds will create interesting effects!


That same large hexagon can also be divided into twelve diamonds, six of which make a star and the remaining six fill in the edges.


In this block the fussy cuts were used for the outer diamonds. It gives the hexagon a different look!


I used these techniques to construct many of the hexagons in Hexagreens. Some of the large hexagons in this quilt were leftovers from another quilt (Mom's Flower Bed).  


I'll share more pictures of this quilt in the coming days an I'll also explain some of the techniques I used to construct this quilt. For now I'm off for more fun with friends. Hopefully tomorrow I'll be able to get back to quilting. Until then, happy sewing!
Karen H

Monday, June 30, 2014

Godstone Grannies - the top is together

The last sections of hexagons for my Godstone Grannies (GG) quilt top are stitched together! I'm going to drag this out just a little bit! Silvana left a comment on my last post and she asked how I combined the colours so I thought I would share some of the things I do or think about when I make a scrap quilt.
  • I don't spend a lot of time thinking about fabric choices. I try to work quickly. If I like something I will go with it and if I'm not sure I will either set it aside and think about it or discard the combination right way.
  • I like to play with my fabric. I will put oodles of fabrics on a big table. I move them around and sometimes I’ll see a colour or print combination that really works and it is often a combination that I wouldn't have thought about. 
  • I try to use fabrics that are the same style. For example I wouldn’t combine children’s prints with Civil War prints.
  • I think about the "tone" of my quilt. I am fond of muddy or earthy tones. A little bit of bright thrown in with earthy or muddy tones will make a quilt sparkle but a lot of brights will mute the effect of the earthy tones/muddy tones. If I want a bright quilt then a little bit of muddy colours will make the brights really shine. If I use equal amounts it just doesn't work because neither stands out.
  • I think about what the overall colour of my quilt will be. The more of that colour I use the more likely the quilt will read that colour even though other colours are used.
  • I don’t match fabrics when I am buying. I just buy fabrics that I like; I figure that my tastes don't really change so the new fabric will probably work with what I've already got in my stash.
  • Colour is important but value is more important. Value is the lightness or darkness of a fabric when compared to another fabric. I try to make sure that there are lights, mediums and darks in most blocks. The eye sees value first and colour second.
  • When I make a scrap quilt I try to repeat some of fabrics in more than one block. This makes the quilt look more cohesive. In this way I don't have to worry that each fabric goes with all of the others. As long as some of them are repeated they will all work together!  
  • Using a single fabric for the path in a hexagon quilt will separate the blocks and it also makes the quilt look more polished because it is a fabric that flows throughout the quilt.
  • I like to make little 3” nine patches with my scraps. It is a great way to learn about colour and value. When I do this I think of colour combinations I would never have considered. If the block doesn’t look beautiful it will still work in a quilt because it is small but if it works, I have a good idea for combining colours for another quilt! If the block looks really bad I can take it apart and make something different or I can just throw it out!
The lecture is over so it is back to my GG quilt top! In this picture you can see that I've attached the lower right corner to the center strip. Looking good!


The last step was to attach the upper left corner....just one long seam and GG would be a hexagon quilt top! I am so pleased with how this quilt has turned out. The path fabric appears grey but in fact it is a very dull, faded pale peach.


The final step is to add narrow border strips around the quilt top. If I were to just place border strips on the quilt with the right sides together and stitch the border to the quilt top by machine I would have to cut through the hexagons at the edges and that would change the look of my partial diamonds, many of which were fussy cut for effect. I don't want to do that so I am going to add a narrow border to give the quilt straight edges. My plan is to applique the quilt to the borders. I want to do it this way for three reasons:
  • I do not want to cut through my hexagons,
  • a narrow border will make quilting the hexagons at the edge easier (it gives me something to hold when I quilt) and
  • I want flat, smooth, straight edges to make it easier to attach the binding when the quilting is done.
I'll explain how I'll  attache the border in an upcoming post!

Until I post again, happy sewing!
Karen H

Saturday, May 31, 2014

Another secret tote bag swap and more Godstone Grannies

I signed up for Lia's Handmades fourth Secret Tote Bag Swap. The theme is Summertime! I chose to work with osnaburg because it looks like linen and linen is definitely a summertime fabric! I've tried to incorporate many of the things that my partner said she liked. I've been posting pictures but she hasn't left any comments so I'm hoping I'm on the right track! This is the first pull of fabrics, some of which I am using and others not!


To start I tracied the pattern for the front and back of the bag on osnaburg and then I quilted it with straight lines. I made a pile of hexagons in bright summertime colours and prints and am now in the process of appliqueing them to the panel. I used the straight quilting lines to align all of the hexagons and I used my Roxanne Glue Baste-It to hold them in place before stitching them down. I have several hexagons that still need to be stitched down but once they are done the rest of the construction process should go quickly.


I repeated the same process for the other side of the bag. My next step will be to make the side panels and outside pockets. I'll use more osnaburg for the side panels and a nice summertime print, likely in a pretty aqua blue or turquoise, for the outside pockets. The bag is the 241 Tote by Noodlehead. It is a simple pattern with excellent instructions.


 I want to add some embellishment so there might be a grasshopper like this one tucked in there somewhere! Grasshoppers have appeared in many of my quilts and tote bags! They are a little bit of a personal signature of mine. If you would like to make your own bug I published a little tutorial for stitching these little creatures and you will find it here.

This is a grasshopper that I slipped in another tote bag

I hid this little grasshopper in my quilt  Lazy Punk

I continue to work on the Godstone Grannies (GG) blocks. Making good progress but I need more time because I've got so much to do! This block is one of two filler blocks for the top and bottom. Both are now stitched together.


Look what happened when I tried to take a picture of the second GG block! Mr. Nosy cat (Forest Gumby) had to see what I was doing! I just don't understand what it is with cats and quilts! SCAT cat!!!!!


Here is the block without the Gump! This is one of two blocks and both are now stitched.


Well my tea is getting cold and I've got some sewing to do so until I post again, happy sewing!
Karen H

Wednesday, April 9, 2014

More reader questions and another GG block

I love having the opportunity to respond to reader questions about how I do things. I'm not an expert but I'm more than happy to share with you what I do to to achieve results with which I am happy. The "I" part of that statement is critical. I worry very little about what others think about my work - I am more concerned with what I think if my work. I know my weaknesses and strengths and when I work I never compare my work to that of others. Instead I compare it to my own work. If I think I can or should do better then I try to do better. If I think I've done the best possible work taking into consideration all of the challenges and issues then I'm happy with the result! Soooooo, bearing all of this in mind I am pleased to respond to questions about what works for me!

I was asked to show the back of my Mom's Anna quilt that I quilted on my domestic sewing machine. Angie wrote that sometimes she gets too much puffiness and it doesn't quilt out and she was wondering what could cause this problem. There can be many reasons for the puffiness. If your quilt top doesn't lay flat it won't quilt flat so that is the first thing I would look at. However for me the main cause is usually related to the creation of the quilt sandwich. It is important that it be as well made as possible and this is what I do to achieve a well sandwiched quilt.

First I press my quilt back with spray starch. I find it keeps the back flat and smooth and it helps the quilt glide smoothly under my needle when I start quilting. I also press the top with spray starch. You can purchase spray starch or you can make your own for pennies a bottle! I've got a recipe under the tab Tips and Tutorials. In the picture I've got a bottle of gin; it should have been vodka! Oops! Oh well at lease you ca see the basic ingredients!


To baste my quilt I clamp the quilt back to a table making sure it is flat, taut and smooth. In the picture below you can see I use office clips to clamp it to the table. I start by clamping in the middle of the top and bottom. I then clamp one over from each of those. Next I clamp in the middle on each side and then place a clamp on either side of those. Every step of the way I am gently pulling the fabric to make sure it is taut. Once I've clamped the entire back I run my hand over the backing. If there is any movement or rippling in the fabric I pull and reclamp so that it is eliminated.


I next layer my batting making sure that it is flat and smooth and finally the quilt top goes on top.


I pin baste so that my pins are roughly 4" apart. I stitch in the ditch (SID) on every main seam so I bear this in mind when pinning; I don't want pins that will be on any of the main seam lines because I don't want to have to remove them as I stitch in the ditch. Removing pins too soon can introduce problems on the back (I learned that the hard way). I generally SID with Superior Monopoly on top and The Bottom Line in the bobbin. I like using the invisible thread on top because it disappears so if I veer off the seam a titch it won't show!

By following these steps I find that any puffiness is eliminated. Honestly the starch makes a really big difference so if you haven't tried it before you really should try it at least once!

In a separate email Angie told me she was curious to know of the SID lines show after the quilt is quilted. The answer is it depends. If the area is densely quilted they virtually disappear. If it isn't they can be seen. The following two pictures are the back of my Lazy Girl quilt. You can see the SID is barely visible in the first picture but it is visible in the second. Personally this doesn't bother me but if it did I could use water soluble thread for SID. It would disappear entirely when the quilt is washed.


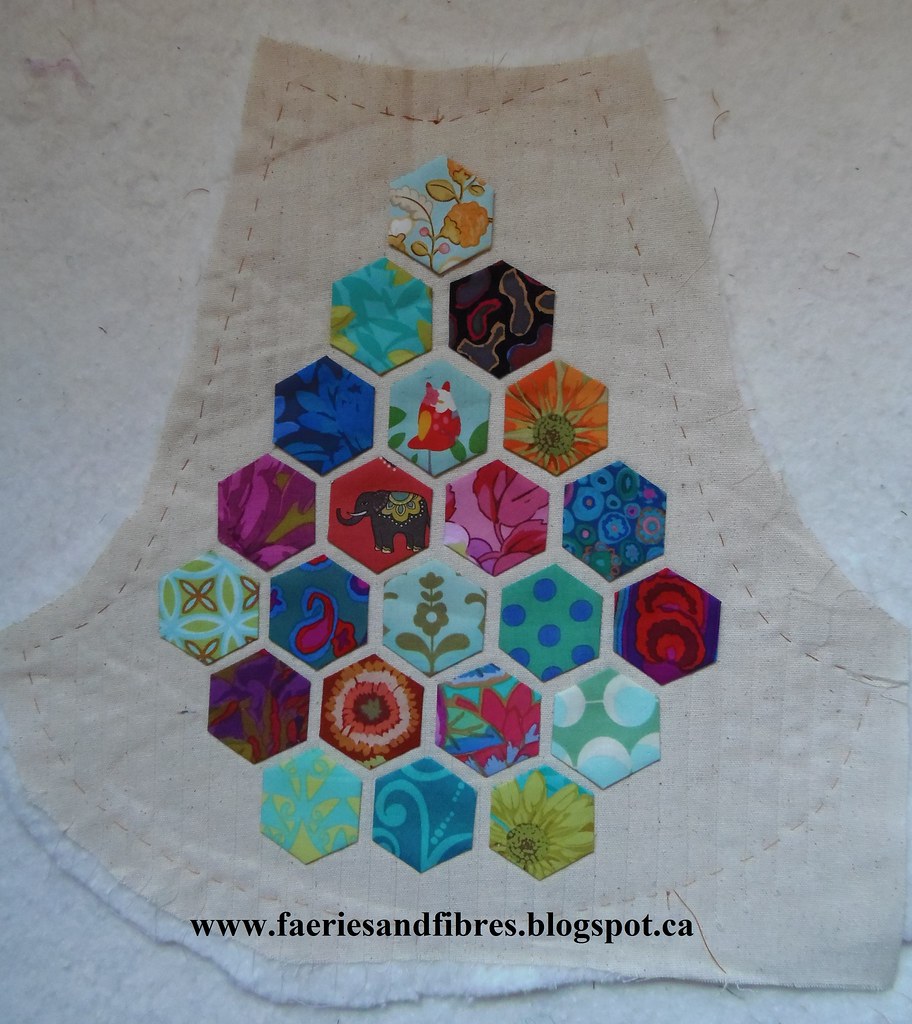
Finally I would like to share my latest GG (Godstone Grannies) quilt block with you. There is no fussy cutting in this one! Phew!  I'm considering replacing the four hexagons in the center but will put off the decision until more of the blocks are made so that I can get a feel for how the quilt is shaping up. If I think this block need a little sparkle I'll change the four hexies and if not....it is done!


That's it for today! Tomorrow I'm taking a day off to have some fun with my Mom. I'll be back on Friday with some hexie talk and more ideas for solving the puffiness problem that can happen when quilting! Until I post again, happy basting!
Karen H