Showing posts with label orange crush. Show all posts

Saturday, September 21, 2013

Fussy cutting diamonds - sort of!

Quilting Gallery's Show and Tell theme this week is Quilts for Teens. I entered Orange Crush; I made it for my friend's teenage daughter. I've posted a free pattern for this quilt; you can find it here under the Patterns tab.  There are some really wonderful quilts entered so I hope you will visit the page and vote for your favourites! You can see them all and vote here!

Orange Crush, 2013

For fun I snuck a little grasshopper in one of the blocks. I told her I did it but didn't tell her where I hid it so she had some fun exploring the quilt!


I promised to show you how I "fussy cut" the patches for my star blocks in Mom's Flower Bed. The quilt was made using the English paper piecing method.


To be technically correct they are not "fussy cut" but they have the appearance of being fussy cut. The following instructions are based upon using diamonds to make six point stars but you could also use hexagons or even squares. The process would be similar but not the same; for now I'll focus on diamonds.

To make the stars you will need the following:
  • fabric,
  • paper diamonds for English paper piecing,
  • marking tool and
  • a clear template (you can read more here).
Selecting a fabric The size of the paper diamond will influence the scale of the print. I have a smallish diamond so I wanted a smaller scale print. I chose a floral print with several different types of flowers. leaves and colours. If there isn't enough variety the blocks will all look very similar. This is my fabric. The vines give movement and there is a good variety of flowers and leaves. While it looks dull there is a subtle variety of colours.


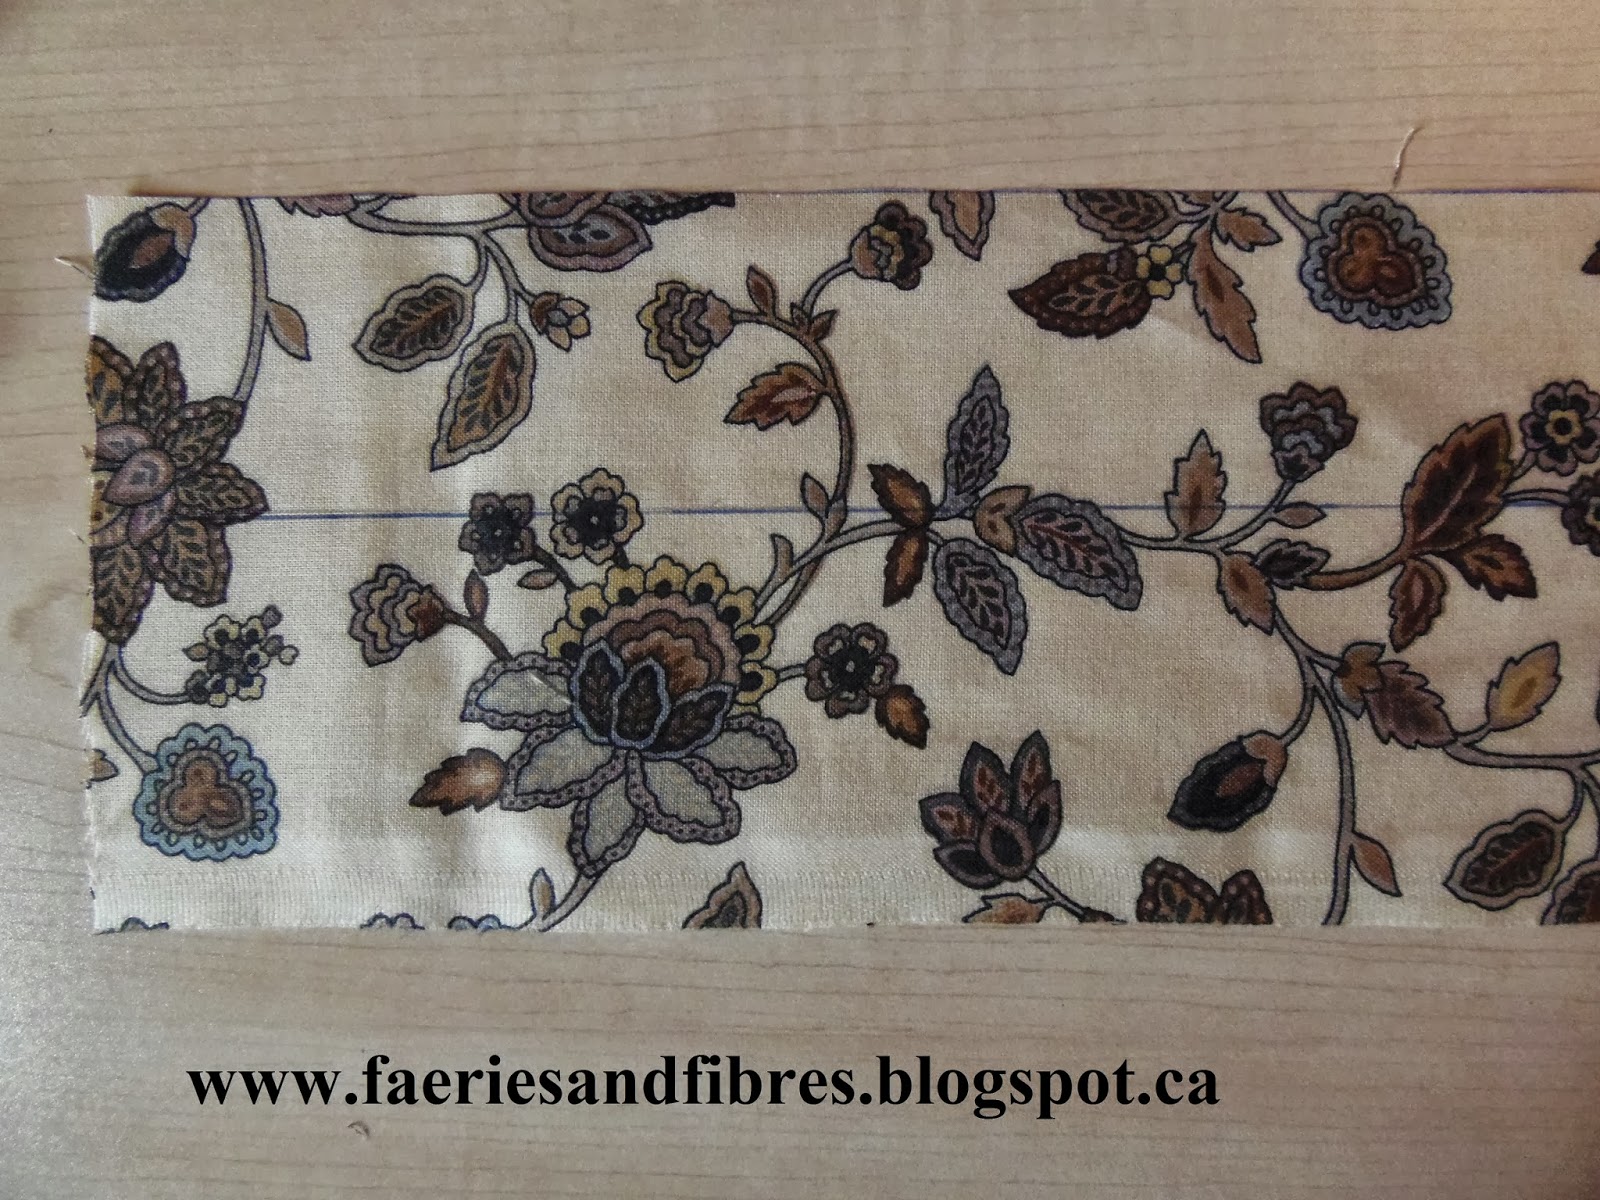
When selecting the fabric it is important to look for the "repeat".  The design is usually repeated along the raw edge and always along the selvedge edge. We will work with the repeat along the selvedge. In the following picture the selvedge edge is at the bottom. You will notice that there is a flower in the lower left corner. If you scan across the selvedge edge you will see that the same flower doesn't repeat until the lower right corner. The distance between is almost 12 1/2".  I need six diamonds to make a star so I will need six repeats (12 1/2" x 6 = 75").  This means I will need 2 metres of fabric which is slightly over two yards. The greater the distance between the repeat the more fabric you will require and the shorter the distance the less fabric. However, if the distance too shorter the stars may not be as varied. I find that 8" to 12" is a good repeat to work with.


I cut strips of fabric that run parallel to the selvedge but before I do this I must determine the width of the strips to cut and to do that I need the diamond that will be used for English paper piecing. I measure the height of my diamond from parallel edge to parallel edge. In this case it measures 1 1/8”.  For ease I round up to the nearest quarter of an inch which makes the measurement 1 1/4". 


The paper diamond does not include seam allowances so they must be added (top and bottom) to the measurement.  If I add 1 /2" to the 1 1/4" the width of the the strip will  be 1 3/4”.  With this method if you are a little more generous with the cutting it is better because it gives you a little wiggle room for adjustments. If I were just starting out I might be tempted to add another 1/8 to 1/4". I've already added 1/8" with the rounding up of the size of the paper template so I'll be fine with the 1 3/4" strip.

Preparing the fabric for cutting The first strip will be larger than the required 1 3/4" size because of the selvedge. Mine measures 1/2". This means the first strip will be cut at 2 1/4". All of the subsequent strips will be cut at 1 3/4".  To prepare to cut the first strip I place my ruler so that the 2 1/4" mark lines up with the edge of the selvedge. I use a ruler that is longer than my repeat. Once the ruler is lined up on the selvedge I make sure that the top edge of the ruler hits the first motif and the repeat motif at the same spot as indicated by the red dots.


 I draw a line on the fabric between the two motifs and a little beyond. I move the fabric along and once again line up my ruler on the selvedge making sure that the top of the rule lines up with the drawn line and that it hits the next repeat at the same point. I again draw a line. I repeat this step until I have a line drawn on the six repeats.

I now go back to the beginning and line up the 1 3/4" mark on my ruler on the drawn line. I draw a line making sure it hits the repeats in the same spot. I do this one or two more times.


I now am ready to cut my first strip. With sharp scissors I cut on the second line that I drew. If you prefer you can cut on the first line.


The next step is line up my ruler on the line at the 1 3/4" mark and trim the seam allowance away.


I cut this strip in half on the line with scissors or a rotary cutter.


I lay the left end of my strip on the cutting mat (it is in the centre) and find the beginning of the fourth repeat (at the bottom).


I place my clear template on the fourth repeat, draw a line and then cut on that line.


I line up the cut edge on the remaining strip lining up the print. I pin and cut.


I repeat this process until I have six strips.


I select one strip and with my clear template, I place it at the far left and draw a line. I move it to the right and draw another line. I repeat this right to the end of the strip. In the photograph below I have drawn all of the cutting lines on the strip.

 I pin near the line on each diamond and cut with scissors or a rotary cutter on the line.

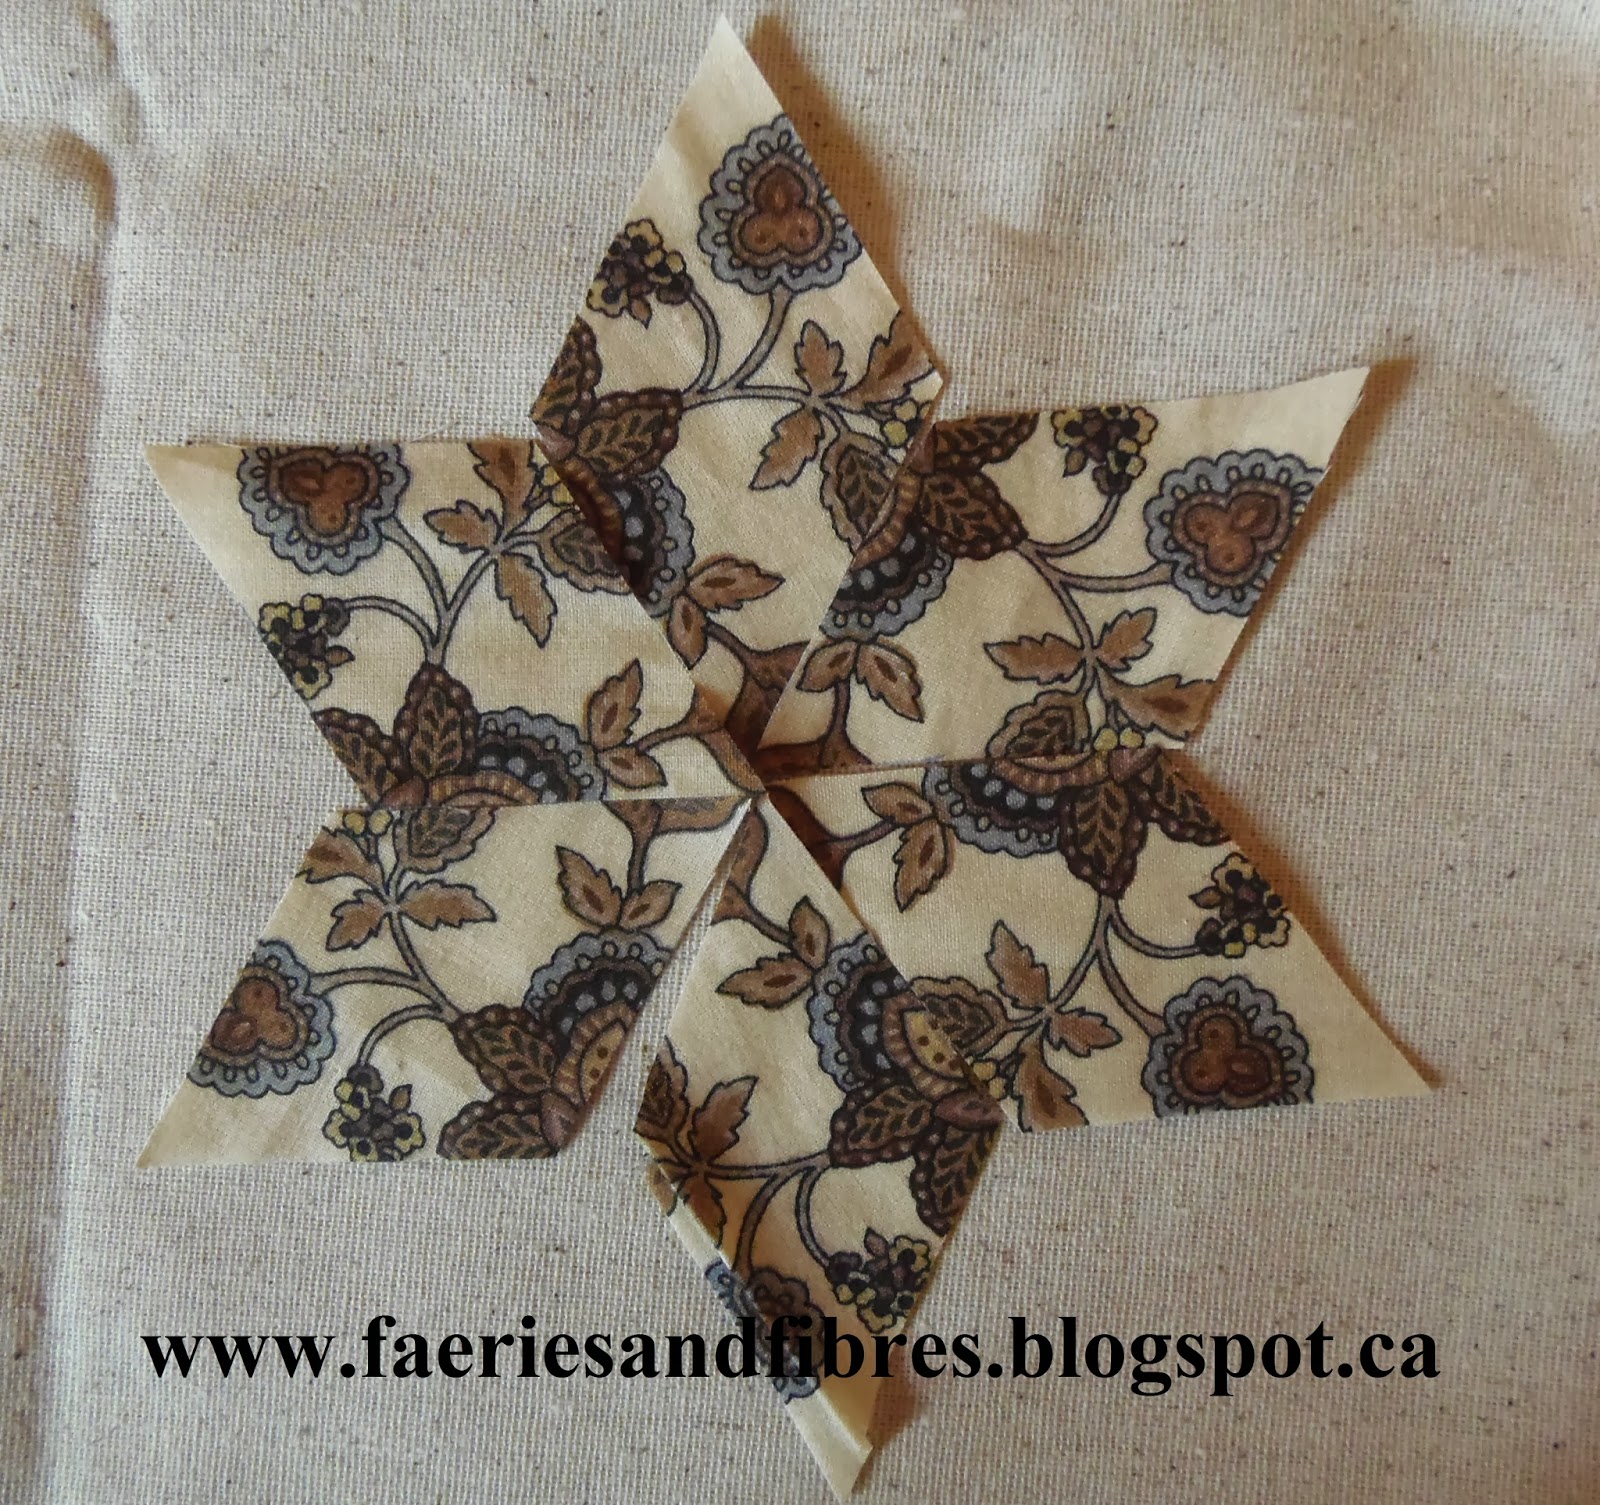
I now have several sets of diamonds.


And this is what some of the first star looks like!


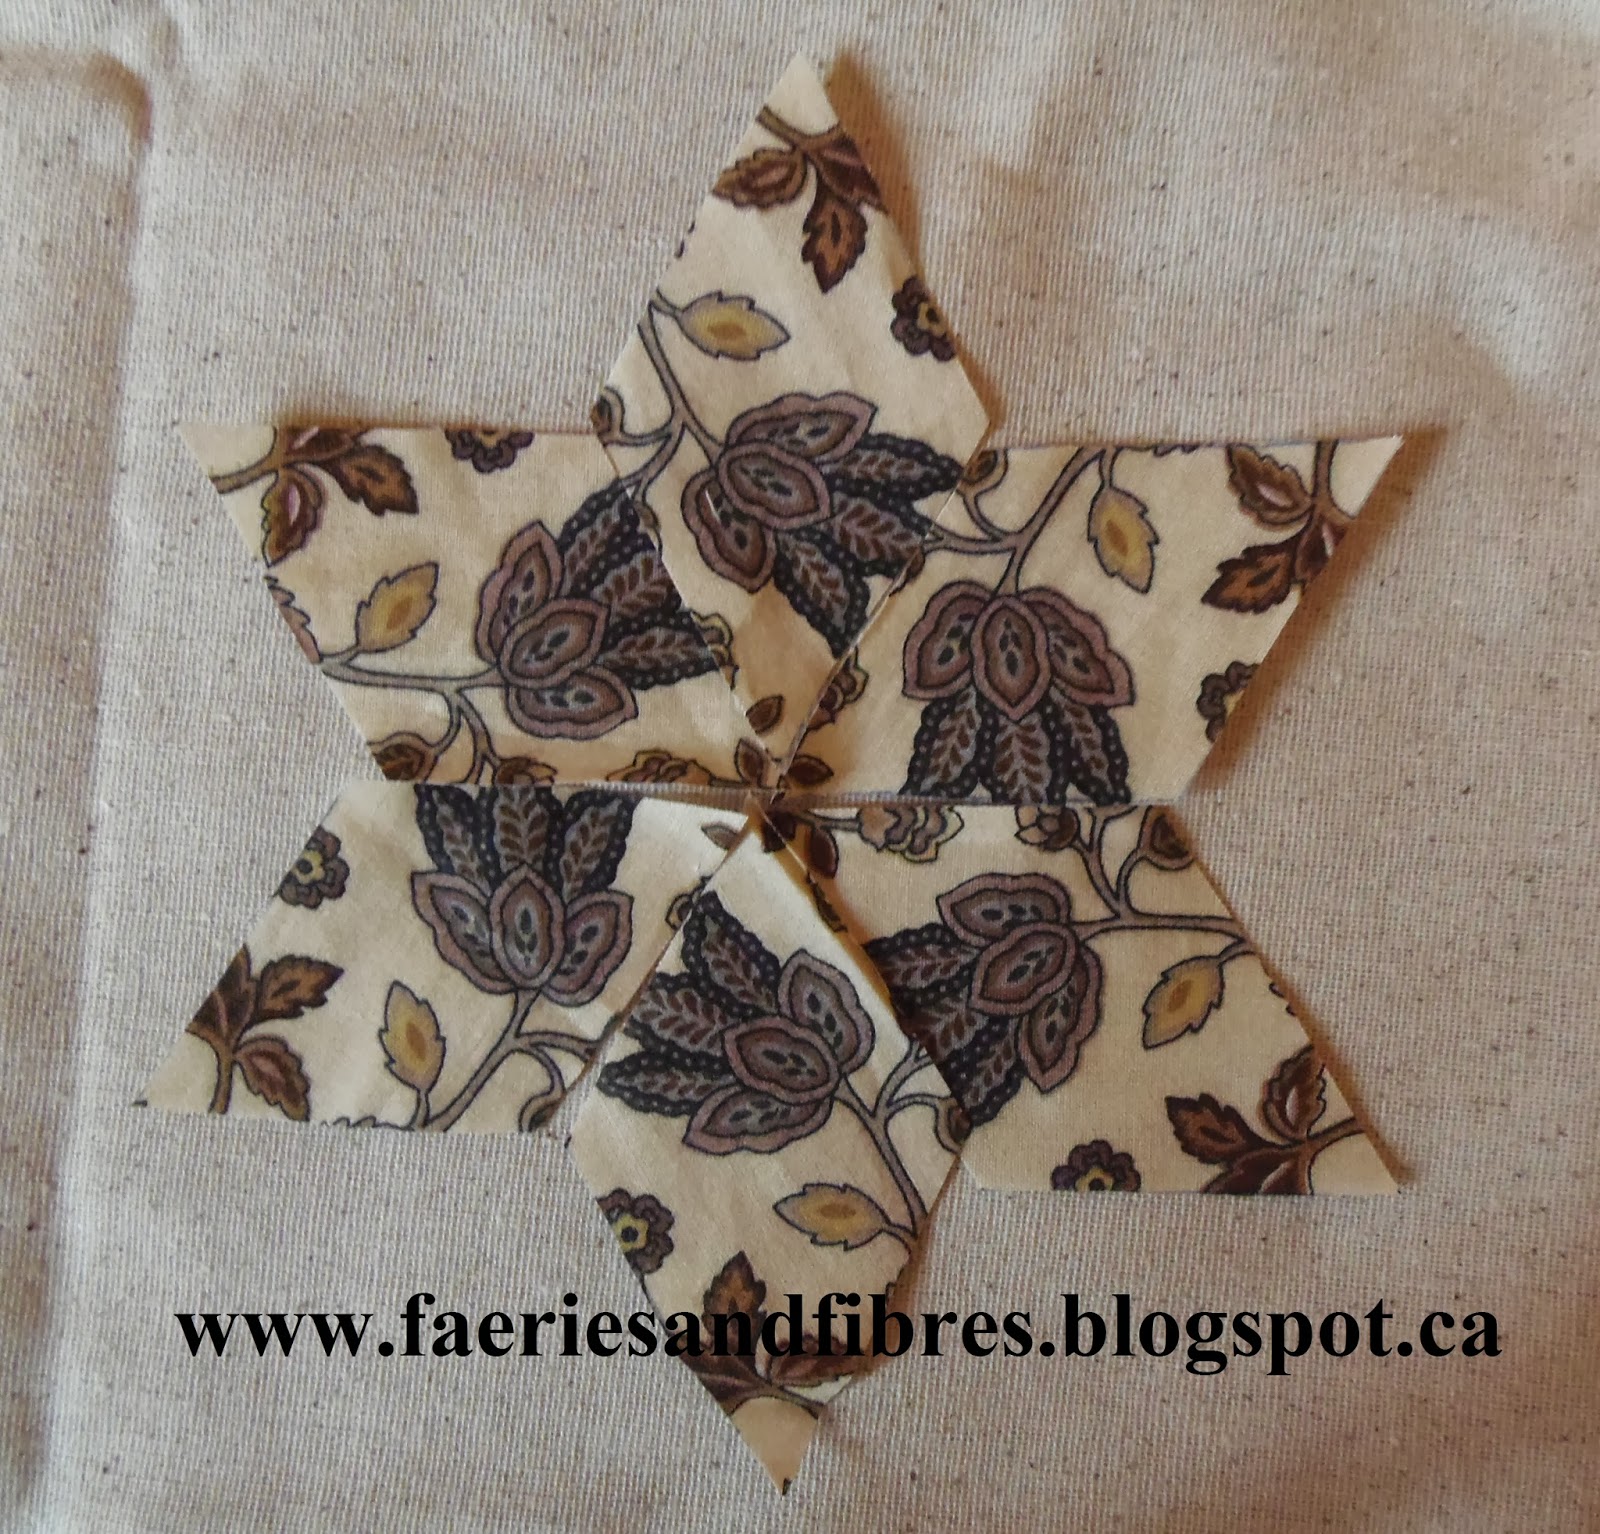
When the points are moved to the centre we have an entirely  different star!

 Here is the second set of diamonds.

And when the points are moved to the centre we have yet another star!

The third set of diamonds yields this star! 

Again when the points are moved to the centre a new star emerges!

The stars will look a little different when they are basted and stitched together but you get the general idea!

I draft my own diamonds (amazingly easy if you have a sheet of graph paper, or lined/ruled paper, a mechanical pencil and an Omnigrid ruler with a 60o  angle marking). I'll show you how in an upcoming post!

Phew! This was a long post. Time for a cup of tea and maybe some sewing! So until I post again, happy sewing!

Thursday, June 6, 2013

Orange Crush anyone? and thank you for voting

Christina’s quilt should be finished today and there is a lot of orange in the quilt…orange and white stripes, white with orange dots and wild orange prints! And there are lots of other bright colours like fuchsia, ruby, lime, blueberry and grape! And the backing is a lovely melon and lime print. All of these colours remind me of soft drinks.
 

Given all of the lovely soft drink colours (but primarily orange) I’ve decided to call this quilt “Orange Crush”! Orange Crush is a popular soft drink!

This quilt is made up of two blocks that measure 7 1/2" finished. Block A is very scrappy but not entirely scrappy – there is some control. A single background fabric is used in each block. The X is made with four different fabrics. The cross is made with two fabrics. While this is definitely a scrap quilt and each block is different the use of a single fabric in certain positions within the block gives a cohesive look to the quilt.
 

Block B is also scrappy however I’ve used the orange and white stripes in each block to give some continuity to the quilt while still maintaining its scrappiness! And again in order to give a cohesive look to the quilt the same fabrics are used in the same positions within a block. For example the corners use a single fabric and the centre of the cross is a second fabric and the top, bottom and sides of the cross are a third fabric.
 

This is what four blocks look like when put together!

 
I opted for simple straight line quilting on the diagonal but I used a variety of sherbet coloured threads! And I followed my own good advice and stitched in the ditch before I did any other quilting and it quilted like a dream! I used my machine quilting my way technique which means stitch in the ditch, quilt the border, bind the quilt and then go back and quilt the middle!

I am pleased with the quilting in the border. Aside from the fact that is fast and easy to do, it flattens the quilt and I like that look! I was able to quilt right out to the edge of the quilt so any wonky turns are covered by the binding. Mind you the turns on the inner edge of the border have to be a little smoother! This is a great way for a beginner to quilt a border and it looks more refined than simple stippling or meander quitting. I love feathers but they can be scary, especially if you are just getting started so this is a great alternative!


At the corner the lines radiate our from the inner corrner like sun rays.

Back of quilt with sunray design from corner

It is helpful to use some sort of temporary marker to draw some guide lines for both the rays and along the border. It helps to keep you on the “straight and narrow”! I would space the lines every three to four inches. I've used red to give you an idea about the spacing and placement of the temporary lines you would mark to quilt in this way.


If you haven’t tried this method of quilting a boreder give it a go. I always struggle with how to quilt a border made with a busy print (or a quilt for a male) and I think this is a good solution. I should mention that once the sun rays were quilted and the quilt bound I went back and stippled in the half moon shapes on the inner edge of the border.


Phew...lots of words. So here it is.... Orange Crush!

Orange Crush

Orange Crush (the centre)
 
Yesterday I finished the quilt for Christina's brother Alex and his has an appliqued grasshopper on the backing (it hides a small problem). There are no problems in Christina’s quilt but I think she deserves her own grasshopper. It is also a way to add your personal “signature” to a quilt! You can also quilt your initials into the quilt. Remember, if a quilt is lost or stolen a label can always be removed making it hard to identify a quilt but if you are in the habit of hiding the same identifying mark in each quilt it is another form of signing the piece! And it makes a nice little surprise for the recipient! You can read more about identifying marks here.
 
Can you see the grasshopper?

Here she is!
 
And now for a little good news for me! Late yesterday evening I received an email from Quilting Gallery advising me that my quilt Stars in the Loft tied for second place in Show and Tell. Thank you to everyone who voted not just for my quilt but for any quilt. It is so nice to know that people see and appreciate the quilts that are entered. The theme was Memory Quilts/Creative Expression and if you had a chance to take a look and read the stories I know you will agree that they were all desrving of support. Once again, thank you!

Stars in the Loft

I'll leave you with a few pictures from the garden!


Trailing clematis
 
Trailing clematic close-up

Teetoo the neighbours cat rolling around in a stump hole
 
Are they the best when they are asleep?
 
Kentucky yellowwood tree in bloom
 
Pawpaw tree in bloom
 
Until I post again, happy sewing (and maybe a little gardening)!