And what exactly are those "things"? Why they are the hexagon rosettes that were stitched together complete with border to make the bottom section of my Birds in the Loft hexagon quilt! This weekend my goal is to complete the middle section. Fingers crossed that on Monday I'll have something exciting to share with you!
There were several questions about the Tulip Hiroshima Milliners Straw Needles.
First off the size I am using is No. 10. I bought them from Hancocks of Paducah. In Canada Sew-Sisters carries this brand of needle however they do not have the Milliners Straw Needles on their site. I've written to ask if they carry them and will keep you posted in case you want to give them a try! Yes they are expensive. I paid $7.65US for six needles however I plan to look after them so that I get lots of use out of each one. And let's put it in perspective.....when you pay $15/m for fabric the needle is the least of the expense of making a quilt! There are other less expensive brands available. I believe that John James also makes a straw needle. If you know of an online Canadian shop (or US shop) that sells Milliners Straw Needles why not leave a comment and share the information with all of us?
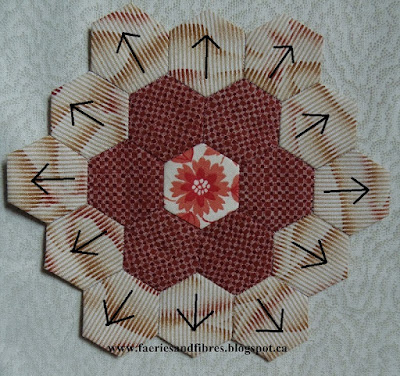
I had some used 3/4" hexagon paper and decided to cut some fabric and make a rosette. It isn't in aid of anything - it was just fun, mindless sewing. This is what I made.
The striped outer ring of hexagons is a directional print. Notice how a subtle stripe radiates out from the centre? What you may not notice at first glance is that the stripes radiate out from the point of a hexagon on six of them and on the other six they radiate out from a flat edge.
When I want to cut a fabric like this what I do is draw an arrow on the hexagon paper to show the direction of the stripe. Then I tack my paper to the fabric with the arrow matching the direction of the stripe and I cut out the fabric with scissors. When it comes time to sew them together I sort them into two piles (stripes from the point and stripes from the flat edge). To sew them together I just alternate a stripe from the point with a stripe from the flat edge! This technique will work with any directional print and it makes the sewing together so easy because you don't have to think about what way the fabric is meant to be positioned! If you use this technique for the hexagons that surround the centre you would only need six that radiate from the same direction. If you wanted to add another round of hexagons to what I've done you would need six and twelve.
That's it for today. Until I post again, happy sewing!
Karen H


Thank you for the "draw the arrow" tip! No more stewing about how to place a directional fabric while sewing! How clever.
ReplyDeleteYour hexie project looks so pretty, can't wait to see the center attached!
ReplyDeleteThanks Gretchen - sorry I couldn't contact you but you are a no reply blogger! :-(
DeleteWell that's a dughhh moment. Thanks for the tip on marking the paper for the strip or any pattern direction.
ReplyDeleteI am going to add a letter for the color on my 4 inch pineapple paper piece project.When I made my sample block I was always having to check which color to use. Thanks for the tip, simple, but why didn't I think of that.
ReplyDeleteGreat tip! I'm always drawing on my papers to help me out, so I'm glad you shared this idea.
ReplyDeleteElizabeth