Sunday, February 28, 2016

Let there be hexagons

I've mentioned that there will be hexagons in my 2016 Quilt Along quilt which I call The Empire Quilt. Today I thought I would share a picture of one of the eight hexagon blocks that are to come. This design reminds me of a wagon wheel. I chose to use variegated shades of teal for the six spokes but they would be equally nice were they made from a single fabric (maybe fussy cut for extra zip)!


The bird blocks that I've shared seem to be very popular so here is yet another. These three little birds are kookaburras, need eyes and feet. Kookaburras are a type of kingfisher native to Australia; I know that the colours are wrong but I used the scraps of fabric that I had on hand so my kookaburras are pink! The little crests on their heads are made from leftover scraps from my Easier Than Pie & Beyond quilt border print fabric. Their wings are made from an earthy tone leafy fabric; I used it because the print looks like feathers. The background fabric is washed-out in this picture.


In this picture the background fabric colour is more accurate. Now my little birds have eyes and feet. I stitched their feet using a simple chain stitch but they looked rather small and flat so I stitched over the chain stitch with a satin stitch and the feel loot much more dimensional. I used a variegated thread so each bird's feet are a little different! The eyes were cut from a fabric with a circle print. I needle-turn appliqued them in place. They are small but they were appliqued in no tine flat. An alternative would have been to embroider little eyes or use my ink pens to draw then on. There's always more than one way to do things.


The next step was to reverse applique the birds to a square of white fabric. As cute as the birds are I think the block looks bland.


There was too much blank space so I once again did some broderie perse applique. A leaf was appliqued to the top of the circle, and to the midpoint on the branch. At the far left a cluster of blue flowers was appliqued. I'm much happier with this block with the extra bit of applique. Sometimes you just need to add a little more to make it right.


My blogging tine will be limited this week because I've got a trunk show scheduled and a workshop so I'll be away from home for four days. I'll try to squeeze in another post before I go. Until then, happy sewing!
Karen H

Thursday, February 25, 2016

Easier Than Pie & Beyond and The Empire Quilt

I've added the final wide cream border to my Easier Than Pie & Beyond quilt. I think it frames the blocks perfectly and will provide plenty of space for fun and interesting quilt designs. I've received a number of emails about the size of the hexagons in my Easier Than Pie & Beyond pattern books. They are 1" which sounds small but they are actually a very nice size to work with. However, if it is too small for you then simply enlarge the patterns on your printer/copier until you have the size you would like to work with. I think that 1 1/4" would be a great size and they would work up very quickly.


Where does the name of this quilt come from? I've been making these types of blocks since the 1990s and I always knew that they were deceptively easy to make. The blocks are simple rosettes/flowers made with 1" hexagons and while they look complex the designs are easy to make, easier than pie! If you can sew a straight line and do a simple whip stitch (or ladder stitch if you prefer) you can make any or all of the designs. I would love to get started quilting it however I have a trunk show next week and would like to take this with me to show so it will remain a quilt top for now.

I've also been asked questions about my 2016 Quilt Along (QAL). Rest assured it will be coming soon! I generally like to name my projects; it helps me keep my various projects straight in my mind and also it makes it easy to label pattern pieces and fabrics. I've been struggling with a name for this quilt and have finally settled on The Empire Quilt because the quilt reads as empire green. Want another sneak peek at the quilt? Today I'll share the next sets of borders that were attached to the medallion.

The triangles and diamonds were basted over regular printer paper before being pressed with a little spray starch. I could also have used freezer paper or no-melt mylar to prep the pieces. However, I had paper on hand so that's what I used. Once the pieces were prepped they were stitched to the borders and the borders were attached to the medallion. The next border is a wide border and it is going to be full of wonderful hexagon fun! It is also where I will be using the bird appliques that you've seen. Stay tune for more pictures in the days to come.

Mary Huey of Quilting Through Rose-Colored Trifocals is running a Y-seam link-up party and I'm linking up. There are all sorts of ways of doing Y seams and English paper piecing is only one of them. Pop on over to the party and see what everyone is doing!

Until I post again, happy sewing.
Karen

Tuesday, February 23, 2016

Broderie perse

I love broderie perse because it is a wonderfully easy way to add details such as flowers and leafs without the work of cutting out and appliqueing individual petals. So what is broderie perse? It is the art of appliqueing motifs from a print onto a background. One trick is to use a background that matches the background in the print. Let me give you an example. The flowers are cut from one fabric and the brown branch from another. For the branch I simply tacked it in place with applique pins and needle-turn appliqued it in position. The branch was straight enough that I could turn under most of the background fabric so that all I was left with was the branch. I could have done the same thing with a strip of brown print fabric but I already had a scrap of the branch fabric so why not use it? The flowers are more detailed so I cut them out leaving more background in places where I wanted to avoid deep curves or sharp points. The flowers were cut out and pinned to the background so that I could needle-turn applique them in place. My background fabric is fairly busy so the background beige in the flowers almost disappears.


Having difficulty seeing where the flowers stop and the background fabric begins? That's the beauty of broderie perse! In the following picture I've outlined the flowers so you can see  the separation.


Here is an example of a set of leafs that were appliqued to the branch. I love the colour, shading and detail in the leafs.


In the next picture I've outlined the section that was done in the broderie perse method. I was quick and easy to do because there were no sharp points or deep concave curves.


The flowers and leafs are part of one of the blocks for my 2016 Quilt Along. I am guessing that you are curious to see the block so here it is! I will be doing more with this block before it is finished and ready to join the "flock"! If I were to make this block again I would like have used a busier print for the bird's body but it is done. If it really bothered me I would either change the body with pens and paints or replace the body with a different fabric or just make a new block. But I can live with it so live with it I shall. Once it is stitched into the quilt it won't be a problem because there will be plenty of other loveliness to see!


Until I post again, happy sewing!
Karen H


Sunday, February 21, 2016

Easier Than Pie & Beyond - the final two borders and it's almost a top

Today I will share the final two rows, row 6 and 7, of my Easier Than Pie & Beyond quilt. First is row six.


The second rosette from the left is called Ninja Star. It is such a simple design but oh so easy to make.It is from Book 1 of my Easier Than Pie & Beyond booklets. I've got an idea for how I can use this design in a different way and am thinking about a new quilt that will use it to create something that I hope will be very interesting and exciting!


This is the 7th and final row.


Again I am partial to the second rosette from the left. I call that one Split Decision and it is from Book 4.

I know you are itching to see what they look like when they are all stitched together but first let me remind you of the fabric I chose for the first border.  The fabrics are the right were used in the making of the rosettes. Each rosette had a centre cut from the fabric at the top right. Each rosette was bordered with the remaining two fabrics on the right. The border for the quilt was to be made from the fabric on the left. I was debating between using the floral print or the striped part of the print. I settled on the stripe.


Once the top was together with the filler pieces added to the sides, top and bottom I added an off-white 1" border so create a visual stop for the blocks. Then I added the print border fabric shown above.  Yes, yes I know you are itching to see the quilt top so let me scratch that itch for you! This is it, Easier Than Pie & Beyond, but there is one more border to go! I had hoped I would have enough of the cream inner border fabric but I don't so I'll have to dig through my stash to find the right fabric! So far I am beyond delighted with how this is looking!


So there you have it. Be sure to come back soon and I'll show you the quilt top with the final border. Until I post again, happy sewing!

Karen H

Friday, February 19, 2016

Progress and the Value Proposition Hexagon Quilt Along

I love to show progressions so I though I would recap the progression of my 2016 Quilt Along (QAL) quilt. There will be three main fabrics to make this quilt and then the rest will be scraps. My design is a medallion quilt with a few borders. The medallion begins with a bird that was appliqued to a light background. If you don't like applique you could substitute a large print instead.


The bird was reverse appliqued to a solid green fabric. The solid green is one of my three main fabric choices. I chose the solid green because it gives a "flat" effect.


To the solid green I appliqued a ring of solid white hexagons. The solid white was my second fabric choice.

I next appliqued the medallion to a lovely green print and it is my third fabric choice. These three fabric choices, solid white, solid green and green print, will be used in other parts of the quilt but the remaining blocks and appliques will all be made with assorted scraps.


There is one final green border and it is a repeat of the solid green fabric. I should have spend a little more time smoothing it out when pinning it to the fence but it was very cold so I wanted to just take the pictures and get back inside where it was warm! That is it for the green fabrics until I get to the very outside edges of the quilt at which point they will be used again!


I'll be posting more pictures showing the progress of the 2016 QAL quilt so stay tuned. Once the top is together I can write up the instructions and start posting the patterns.

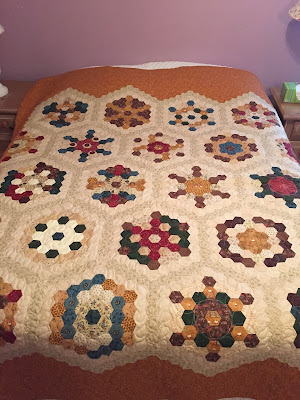
In 2014 my quilt along was called Value Proposition. You can find links to the basic instructions here OR if you prefer you can visit my Craftsy Store where you can purchase the  entire Value Proposition Quilt Pattern. It is a 60+ page booklet that includes everything everything you need to know about English paper piecing. It covers topics such as fabric selection, rapid fire cutting techniques, back basting, whip stitch and simplified quilt assembly methods. There is also a FAQ section that you will find helpful. The reason I mention this is that one of my readers has finished her Value Proposition Quilt. Deb of The Tooth Fairy Quilter sent me pictures of her quilt and gave me permission to share them with you! How exciting is that? For me it is very exciting!

What you can't see is that there are many little fussy cuts in this quilt. The ones that are my favourites are little white sheep on a caramel coloured background. Well done Deb and congratulations on a fine finish!


Another reader, Mary Huey of Quilting Through Rose-Colored Trifocals has almost finished her interpretation of Value Proposition. In this picture you can see that Mary's quilt is being basted in preparation for quilting. 


The picture above is on Mary's blog and she very graciously sent me another picture of the quilt so that you could see it in its entirety! I love the addition of the floral fabric in the border. It has a lovely shabby chic look and feel. Can't you just picture this quilt on a old white enameled bed frame? I can. It would make a lovely summer quilt.


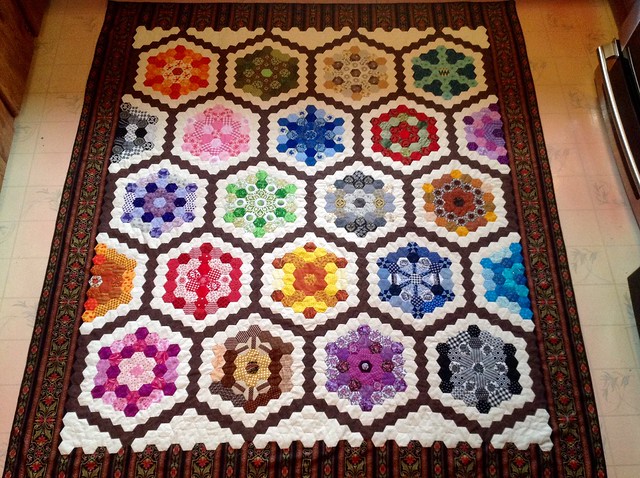
If you were following the Value Proposition Flickr Group you will already have seen Cynthia's interpretation of Value Proposition. This version is completely different from the other two. It reminds me of a bag of jelly beans! The colours are so bright, clear and vibrant! Cynthia used a striped fabric for the border and it is a different treatment from the other two but equally impressive!


Finally this is my Value Proposition quilt. It was inspired by an antique quilt.


Hope you enjoyed seeing Deb, Mary and Cynthia's work along with mine. Did you finish your Value Proposition quilt? I would love to share it on my blog so why not send me an email to let me know.

Until I post again, happy sewing!
Karen H

Tuesday, February 16, 2016

Easier Than Pie & Beyond Rows 4 and 5

Today I'll share rows 4 and 5 of my Easier Than Pie & Beyond hexagon quilt; it is coming together. All of the block designs are available in five books that are available in my Craftsty Store.

This is the fourth row. I love the red rosette that is second from the left. I call it Jack in the Pulpit and it is in Book 3.


And this is the fifth row.


What next? Add these two rows to the three that I've already stitched together and stitch the final two rows.


Sadly I forgot to take a picture of the five rows stitched together. In addition I had to make half rosettes to fill in the sides and guess what? Forgot to take pictures of those as well! I used a blue/gold and taupe diamond print along with a creamy subtle print. Needles to say the middle hexagon is the same as that in all of the blocks in my quilt. It gives the whole quilt a more cohesive look. Using the same fabric for the middle hexagon in every rosette is a subtle way to make a bunch of very different blocks look like they belong together.


I know that many of you have commented on how complicated the Easier Than Pie & Beyond hexagons appear but I can honestly tell you that if you can sew a straight line and do a simply whip stitch you can make any or all of these designs!

Want another peek at the 2016 Quilt Along? Well want no more because here it is! I've added a round of white hexagons to frame the bird. There is more to come so stay tuned for pictures and instructions!


Until I post again, happy sewing!

Karen H

Sunday, February 14, 2016

Valentine's Day hexagons

Happy Valentine's Day everyone! It is cold here today but my heart has been warmed because I recently received some sewing gifts in the mail. I thought I would share this hexagon heart that I made as part of The Hexie Blog's 2014 quilt along.


This lovely little pincushion was made for me by my friend Paula in California. She hand pieced this little gem which sits in an antique tart tin. The whole thing is made with lovely little fussy cuts. I love birds and so does Paula. Thanks Paula, I will treasure (and use) this little pincushion.


I also received a wonderful red pincushion from Tubakk of Norway who blogs at Den Syende Himmel. Tubakk is making the La Passion hexagon quilt which was designed by Grit Kovacs. You can see the original hexagon quilt made by Grit (along with the free instructions) here and Tubakk's version done in greens is here. Tubakk put out a call for bright green fabrics and I had some in my stash so I sent them off to her. As I watched the progress on her quilt I could see bits and pieces of those fabrics in the quilt. So exciting! As a thank you Tubakk mad a red pincushion for me. How perfect is that for Valentine's Day? She also made me a lovely little card from fabric scraps and I can seen a bit of one of the green fabrics in the card!


A quilt maker can never have too many pincushion. I have oodles of them and I use and enjoy every one of them!

Carli of Good Earth Quilting asked a question about the fabric requirements for my 2016 Quilt Along (QAL). I will be sharing the fabric requirement very soon. What I can tell you is that the quilt is mostly made from scraps but there will be three fabrics for which you will require specific amounts of fabric. The three fabrics I chose are a solid white, solid Empire green and a slightly darker Empire green print. I would like to get the quilt top put together so I can calculate the amounts of fabric needed and you can make the decision about your fabric choices. The good news is that I am making really good progress and should have a quilt top to share with you very soon. Just to keep you interested here is a picture of the centre medallion now surrounded by the solid Empire green. Unfortunately the green looks a little washed out.There are another two steps before the medallion is complete.


That's it for today. It is still very cold so I'm going to make a nice hot cup of tea and then work on my QAL quilt top. Until I post again, happy sewing!

Karen H


Friday, February 12, 2016

Easier Than Pie is in rows and an expanded sneak peek

It is cold today and it is only going to get colder; I do love this kind of weather because it is perfect for sewing! The forecast for tonight is -23C and I expect there will be some wind which will only make it feel colder. Brrrr! As a result of the cold temperatures frost/ice quake warnings have been issued. Frost quakes are caused by ground water freezing and expanding until the pressure is to great. The the earth cracks and there is a loud explosion caused by the release of the build up pressure. We had several last winter but there was no damage. They are a very strange phenomenon.

Back to sewing matters. This is the third row made of my Easier Than Pie & Beyond quilt made with hexagon rosettes from my booklets. For those who are interested the patterns are available in my Craftsy Store.


The first three rows are stitched together and I think that the effect is quite pleasing and there was a little unexpected surprise! More on that it a minute. You will notice that there are voids on the sides. My plan is to fill those with half rosettes and I will use the same rosette pattern and fabrics for each of them. What those fabrics will be will be decided after the rows are all stitched together. I will want to use something subtle to keep the eye in the body of the quilt. If I use a dramatic fabric/design my worry would be that the eye would be drawn to the edges.


So what was the little surprise that I mentioned? When I was cutting my two fabrics for the hexagons that surround the pieced blocks I used the print to line up my paper hexagons. This rosette is called Barn Swallows and it is from Book 5. If you look at the hexagons in the 12, 2, 4, 6, 8, and 10 o'clock positions you will notice that there are little brown circles at the outside edges. When I was cutting I was more focused on the brown "crowns" that are along the inside edges so I didn't realize that those little brown dots would create a secondary design when they were stitched to the beige triangles in the path.


Below is a picture of what happened. It isn't a big deal but it is a little detail that adds some extra visual interest as well as another design feature. The point I want to make here is that no matter how much you plan you never really know what a quilt will look like until you start stitching it together! There are always little surprises that emerge as you stitch it all together.


Thank you for all of the positive feedback on the sneak peek of my 2016 Quilt Along. I showed you the head of one of the applique birds in the quilt. Want to see what the birdie looks like? Well here she is, my little strawberry thief! I showed her to someone and he his comment was "a strawberry tree?" Listen buddy, it is my quilt, my bird, my strawberries and I'll do them my way! If I want a strawberry tree or strawberries clustered like grapes, that is what I will have. It is artistic license!


Time to make a nice warm drink and settle down for some cold weather sewing on my QAL quilt top. Until I post again keep warm, happy sewing and listen for those frost quakes!
Karen H

Tuesday, February 9, 2016

Mixing the ingredients for my Easier Than Pie Quilt and a sneak peek

Thank you to everyone who has purchased my Easier Than Pie & Beyond hexagon booklets. I hope you are having fun making beautiful hexagon rosettes. I've made open donuts of twelve hexagons from two fabrics and surrounded each rosette with these rounds. This rosette is called Chubby Star and it is in Booklet 4.


So now it is time to assemble the rosetted into a quilt top and I'm pretty excited about how it is looking. The rosettes need to be joined with a path (think of the path as a sashing). I could have used whole hexagons between the rosettes but instead I decided to use diamonds and triangles. I just think that they look more elegant. I have a soft beige fabric in my stash and the print looks like a linen. That is the fabric I will use for the diamonds and triangles.

To make the diamonds I cut hexagons into diamonds which are one third of a hexagon.


To make the triangles I cut hexagons into triangles which are one sixth of a hexagon.

Each rosette will need six diamonds and two triangles. I baste a goodly amount of diamonds and triangles and then attach them to each rosette. This keeps the project portable and manageable. I will also need to add two extra diamonds and one triangle at the left side of the first rosette in each row but I do that after I've decided how to lay out the rosettes. There will also be diamonds and triangles added to the bottom edge of the bottom row. This rosette is called Ground Floor and it is in Booklet 1.


This is the first row stitched together.The path fabric is very subtle but that is the look I am going for and I think it will work just fine.


This is row 2. You can see how it will attach to row 1.


Also I am working on my 2016 QAL. I still haven't come up with a name for it but I am SUPER excited about how it is looking. I've remade one block and have two more to make for the outer border. Then it is filler bits and I can sew it all together. I think it is going to be a stunner of a quilt! Want a sneak peek? Well here it is! This little guy will be in the centre block. He is appliqued but if applique isn't your thing then a lovely large fussy cut print will make a great substitute. My plan is to show you the entire quilt top put together before we start the QAL so that you know what you are getting into.


I'm linking up with Val's Quilting Studio where the Tuesday's Archives theme is butterflies! Pop on over if you have time and see what other bloggers are sharing.

Time for me to do some more sewing. Stay tuned for more updates on my Easier Than Pie & Beyond quilt top. Until I post again, happy sewing!

Karen H