Friday, March 18, 2016

Cutting stripes for hexagons

Angie in SoCal saw the striped prints I used in the hexagon blocks I showed in this post and she asked "do you cut them in order?".  There are many things in life I don't like and cutting fabric slowly is one of them! I use my rapid fire cutting technique when I need to cut multiple patches from a single fabric. In the following block there are stripes (white and beige) and a directional prints (the beige crosshatch) both of which were cut from a single strip of fabric. I cut all of the hexagons for that block at one time. I have a large sheet of cardboard covered with a scrap of batting so that I can arrange the hexagons on it to get a feel for how they look. Once they are all cut out and I am satisfied with the arrangement I take a picture to help with sewing the hexagons together. The hexagons go in a little bag so that I can baste them at my leisure! 


In the example above the stripes are all running from a straight edge to a straight edge so that made the cutting easy (I just cut them all from a single strip of fabric).  You will notice that the rosette in the middle is also made with a stripe fabric and again the stripes are all running from a straight edge to a straight edge. Let me demonstrate with one of my Road 66 blocks. The centre hexagon is fussy cut and then the first round of hexagons that make the rosette are cut from a directional chevron striped fabric. In this example the stripes all radiate out from the centre.


Notice how the stripe runs from a straight edge to a straight edge. I use regular printer paper to make my hexagons. The beauty of paper is that you can write on it. If you are a beginner draw an arrow on the wrong side of your paper so that once it is basted you can use the arrow to position the stripe.


The second round of hexagons were also cut from a directional fabric. There are twelve hexagons in this round. Notice how the six hexagons that are attached to the straight edge of the previous round have the stripe running from straight edge to straight edge.


The remaining six hexagons that fit in the "V" are cut so that the stripe runs from point to point. Again drawing an arrow on the paper will help orient the hexagons once they are basted.


If the stripes were to circle the central hexagon the placement of the hexagon on the striped fabric will be reversed. Take a look at this Road 66 block.  The fabric that surrounds the central hexagon is a border print.

The hexagons cut from the border print are placed point to point.


The second round is cut from an ombred stripe fabric. The six hexagons whose straight edge connects to the straight edge of the first round will be cut from point to point.


The remaining six hexagons that fit in the "V" are cut so that the stripe runs from straight edge to straight edge.


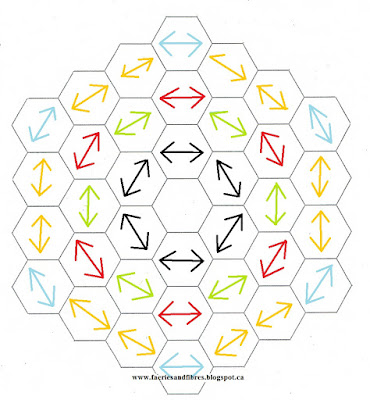
With each subsequent round the number of hexagons needed will increase by six so the third round would require eighteen hexagons. A fourth round would require twenty-four hexagons. In each round there will be six hexagons cut exactly the same way as those in the first round and any remaining hexagons would be cut the other. Let me demonstratre.

If the stripes were radiating outwards, six hexagons would be cut from straight edge to straight edge.


In round 2 which is made of twelve hexagons, six would be cut from straight edge to straight edge (red arrows) and the remaining six from point to point (green arrows).


In round 3 which is made of eighteen hexagons, six would be cut from straight edge to straight edge (blue arrows) and the remaining twelve from point to point (gold arrows).


A fourth round (not demonstrated here) would be made of twenty four hexagons, six of which would be cut from straight edge to straight edge and eighteen from point to point.

If the stripes were circling the central hexagon, round 2 would be made of six cut from point to point (red arrows) and six cut from straight edge to straight edge(green arrows). In round 3 there would be six hexagons cut from point to point (blue arrows) and twelve cut from straight edge to straight edge (gold arrows).


When I construct my rosettes I make each round an open donut and add it to what I've already stitched. It makes for fast and accurate sewing!

Was this helpful? I sure hope so! Until I post again, happy sewing.

Karen H

Tuesday, March 15, 2016

More blocks for The Empire Quilt

I've got three more blocks from  my next QAL design, The Empire Quilt to share with you today. I've started writing the pattern and once it is done will have to have it scanned commercially so that the patterns are to size. Unfortunately my HP scanner reduces the size of documents and that's no good! I've found a place where I can have them scanned at a more reasonable price. I know this is taking longer than expected but I want to make sure my measurements are accurate and that you see the finished quilt top before I start posting the instructions.

This first block makes good use of stripes/directional prints and some fussy cutting. Stripes create so much visual interest and I just can't resist using them!


This is a fun block. While most of my fabric choices have been older style prints I've combined some modern prints in this one and they work. The dark brown in the border is a Brandon Mably print. I figured that if it didn't work out the basted hexagons would go in the box of leftovers and eventually be used in another project. Fortunately for me they did work!


I had mentioned that I was searching for a blue fabric I have in my stash. I eventually found it and used it in the rosette in the lower left corner. I must have about a zillion blues in my stash but I had my heart set on this one. I also had a couple of small scraps of Japanese fabric with owls so I fussy cut them for the centres of the rosettes at the bottom.


So far you've seen eight hexagon blocks that will form part of the border. There are four more to go and they will be quite different from the other eight. If like me you have leftover hexagons this will be the place to use them!

Until I post again, happy sewing!
Karen H

Thursday, March 10, 2016

More Empire hexagon blocks and The Trent Evening Quilters Guild

I had a great time in Peterborough sharing my quilts and teaching. I taught my techniques for English paper piecing at Alice Williams studio in Curve Lake and it was fabulous. She has a huge room with windows on three of the four walls so that the space is flooded with natural light and large work spaces. This is just one section of the workspace.


Here is a part of the other side of the work space.


I think that the students enjoyed themselves and that the came away inspired to create something really beautiful. Alice is a really warm and welcoming individual and her home is fascinating. Everywhere you look there is something to see. She has created little vignettes made up of things she loves and collects.


There were beautiful examples of beadwork on a large display board when you first walk in the door and her studio was filled with displays of apples of all sorts and hearts. Alice told me she loves hearts; must be because she has a big, warm heart! If you have a moment be sure to visit Alice's website Pimaatiswin Quilts. Thank you very much to Alice and the Trent Evening Quilters. I hope that you enjoyed yourselves as much as I enjoyed myself!

Today I thought I would share two more blocks from my upcoming QAL, The Empire Quilt. There will be eight hexagon units it total and then there will be four "partial" hexagon units. The first block is just a simple collection of rosettes in honey colours. I do love the warmth of this grouping.


The shape of the design within the next block reminds me of a flower vase! I've still got some of those lovely honey tones in the block. 


The colours/fabrics I've been using are cut from existing strips and scraps. I think the colours will work well with the greens that I've used in the centre panel If you are new to my blog this is the centre panel. The greens will be repeated in the outside edge of the quilt.


Last night I had the opportunity to see a trunk show by Debra Anger of Patchwork Sanity - A Woman's Piece of Mind. I came home just itching to sew. Debra loves scrap quilts and demonstrated how to make all fabrics work together in a single quilt. She also talked about fabric and block swaps. I was asked to help show the quilts so I didn't get a chance to take many pictures but will share those that I was able to take in a future post. Until then, happy sewing!

Karen H

Wednesday, March 2, 2016

Two more hexagon blocks for the Empire Quilt

Tomorrow I leave for Peterborough, Ontario where I will be doing a trunk show and teaching. I can't wait to share my work with others. My hope is that they go home and want to sew, sew, sew!

Before I go I thought I would share two more hexagon blocks from The Empire Quilt which will be the subject of my 2016 Quilt Along. Both were made primarily of leftover bits and pieces from other projects. I love the first block made up of four hexagons. They look like lazy diamonds laying on their sides! I think it would be fun to make an entire quilt of these guys! Right now I am searching for the blue paisley in the bottom middle. I have a fat quarter that I putt somewhere safe but where that is I just can't say at the moment. I've torn the place apart searching for it and have no doubt that it will eventually turn up!


I wasn't crazy about this second hexagon block but as you will soon see it looks good in the finished quilt top! I love the green bubble fabric and have only a tiny piece left. I do have plans for it in the near future.


That's it for today. I must get back to my packing. Until I post again, happy sewing!

Karen H