In the example above the stripes are all running from a straight edge to a straight edge so that made the cutting easy (I just cut them all from a single strip of fabric). You will notice that the rosette in the middle is also made with a stripe fabric and again the stripes are all running from a straight edge to a straight edge. Let me demonstrate with one of my Road 66 blocks. The centre hexagon is fussy cut and then the first round of hexagons that make the rosette are cut from a directional chevron striped fabric. In this example the stripes all radiate out from the centre.
Notice how the stripe runs from a straight edge to a straight edge. I use regular printer paper to make my hexagons. The beauty of paper is that you can write on it. If you are a beginner draw an arrow on the wrong side of your paper so that once it is basted you can use the arrow to position the stripe.
The second round of hexagons were also cut from a directional fabric. There are twelve hexagons in this round. Notice how the six hexagons that are attached to the straight edge of the previous round have the stripe running from straight edge to straight edge.
If the stripes were to circle the central hexagon the placement of the hexagon on the striped fabric will be reversed. Take a look at this Road 66 block. The fabric that surrounds the central hexagon is a border print.
The hexagons cut from the border print are placed point to point.
The second round is cut from an ombred stripe fabric. The six hexagons whose straight edge connects to the straight edge of the first round will be cut from point to point.
The remaining six hexagons that fit in the "V" are cut so that the stripe runs from straight edge to straight edge.
With each subsequent round the number of hexagons needed will increase by six so the third round would require eighteen hexagons. A fourth round would require twenty-four hexagons. In each round there will be six hexagons cut exactly the same way as those in the first round and any remaining hexagons would be cut the other. Let me demonstratre.
If the stripes were radiating outwards, six hexagons would be cut from straight edge to straight edge.
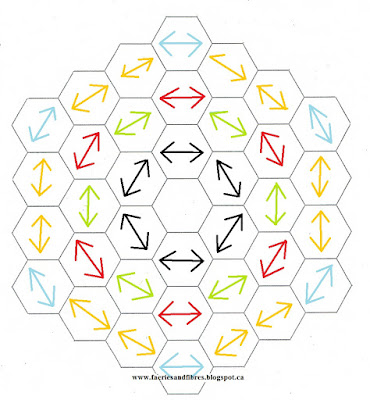
In round 2 which is made of twelve hexagons, six would be cut from straight edge to straight edge (red arrows) and the remaining six from point to point (green arrows).
In round 3 which is made of eighteen hexagons, six would be cut from straight edge to straight edge (blue arrows) and the remaining twelve from point to point (gold arrows).
A fourth round (not demonstrated here) would be made of twenty four hexagons, six of which would be cut from straight edge to straight edge and eighteen from point to point.
If the stripes were circling the central hexagon, round 2 would be made of six cut from point to point (red arrows) and six cut from straight edge to straight edge(green arrows). In round 3 there would be six hexagons cut from point to point (blue arrows) and twelve cut from straight edge to straight edge (gold arrows).
When I construct my rosettes I make each round an open donut and add it to what I've already stitched. It makes for fast and accurate sewing!
Was this helpful? I sure hope so! Until I post again, happy sewing.
Karen H


there is a lot to think about in terms of the direction of fabrics!
ReplyDeletevery logical and very systematic
ReplyDeletejust the kind of thing that gets my mojo going
thanks for taking the time to illustrate this
Wow, so much logic and yet how creative.
ReplyDeleteI've started using your open donut method and find the rings much easier to construct. I still have a lot to learn.
Great tutorial Karen. I am anxious to get back to my hexagon's. CWB is ready to go - now to applique (evening work). This post is great information with ideas and ways to apply in-depth fussy cutting for EPP!
ReplyDeleteLucid and logical. Thank you.
ReplyDeleteYes this is very helpful. I also watched the video tutorial about the open donut and that was helpful as well. Thank you for both.
ReplyDeleteGreat advice again thankyou. Just reposted your blog link on the Facebook UK Quilt group, someone asking hexi questions and I figure your the Font ( of hexi knowledge!) lol Hope you don't mind ..
ReplyDeleteI'm so inspired on your use of stripes in your hexies. I've started a collection of striped fabrics and hope I can be at least half as creative with them as you are!
ReplyDeleteThis was very helpful Karen. Thanks for all the diagrams as well!
ReplyDeleteWow - excellent answer to my question. I'll read it several times and try it with some strips real soon, and it will help with all kinds of fussy cutting.
ReplyDeleteVery helpful!!
ReplyDeleteYou have such a knack of finding the perfect way to cut your fabrics to achieve their full potential. These rosettes have an almost 3D appearance. Inspiring :)
ReplyDeletegreat tutorial very helfull Karen!
ReplyDeleteThat is so interesting! I haven't done any stripes on a second round, but I loved seeing what you are doing there.
ReplyDelete