

The first step is fabric selection. I decided to make the top and bottom identical so to begin I selected an orange print for the rosette centers. Then I decided that the three full rosettes would be made from the same fabric and the four half rosettes along the top edge would be made from four different fabrics.
I made 3 full rosettes for the top and 3 for the bottom. Each will be partially surrounded with seven hexagons. I chose and yellow check fabric. It is a directional fabric so I paid particular attention to the placement of the hexagons. I never stitch hexagons one at a time; instead I look for the most efficient way to sew them and in this case I sewed the seven hexagons together into a semicircle and this will be stitched to the rosette.

And here you have the rosette with the yellow check hexagons. I made six units like this.

The next step was the construction of the section that will fit the bottom edge of the rosette and it will also connect to the quilt. There are three little yellow tentacles that come off the rosette so I chose another yellow check for all three and then there are small filler pieces made up of the turquoise background fabric. I sewed three units made up of of four yellow check hexagons (again notice I paid particular attention to the direction of the check) and I sewed two units of three turquoise hexagons. For the turquoise hexagons I used turquoise thread. The rest of the unit was stitched with pale yellow thread.
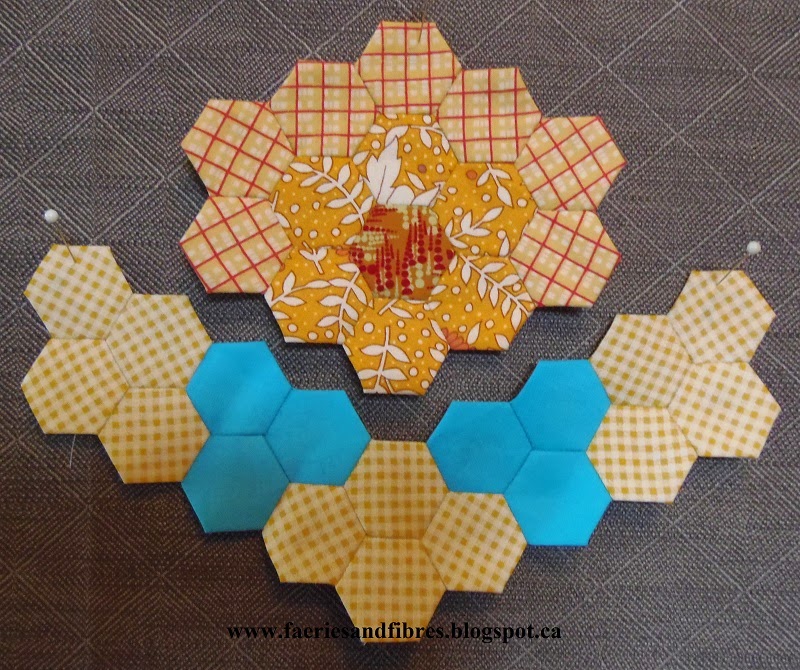
Here it is stitched together. Five more to go!

The eight half rosettes went together very quickly! Here is one of the eight!

The final step will be to construct the turquoise filler units that will fill the spaces between these yellow rosettes so that they can be connected to the body of the quilt.
Until I post again, happy sewing!
Karen H
Looking good! The finish line is in site! love your "map" you've made to help you place the colors correctly!
ReplyDeletewhat a lovely piece this will be- I like the two yellow plaids a lot-you did it the right way--planning it out for yourself--my Monet's City is difficult to sew because I had no graphed plan--yikers...well, next time, right?? hugs, Julierose
ReplyDeleteLove all your beautiful fabrics! Each one is a jewel in itself :)
ReplyDeleteYour hexies are very pretty. I love how you have them graphed for color placement. Did you draw that chart or is there a clever app that prints out the blank hexie shapes and you fill in the colors and design you are creating? Just curious.
ReplyDeleteYou have to think ahead as you sew these units together---I try to sew as many seams continuously with one thread as possible. I have not tried your "noodle" idea, because you only sew one seam on each to make the shape----but in the long run---you would have continuous seams when putting large sections together. It is hard to change things---but this may need to be an experiment for me.
ReplyDeleteYour Lozagons are gorgeous. Am planning my own version of this vintage quilt but don't have your "whatever the female equivalent of balls is" to work so small:) Not to mention your skill! So inspiring...
ReplyDelete