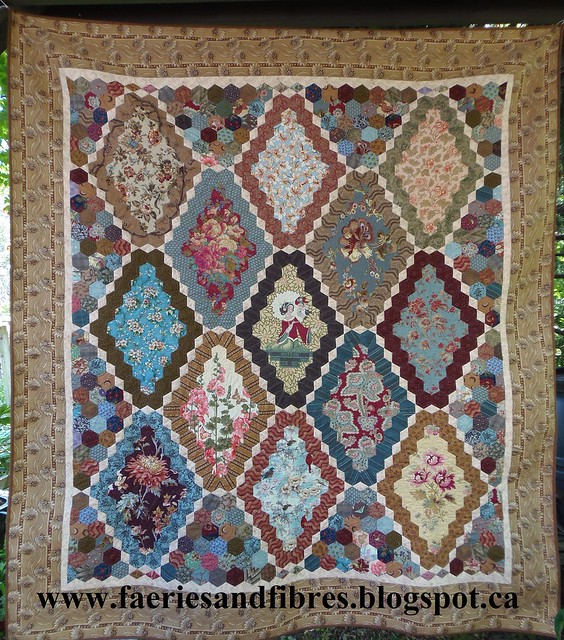
Butterscotch Ripple by Karen H 2013
The pattern instructs one to make a ring of hexagons and then applique them to a square of fabric. I'm sure that this works for many but I do things a little differently and today I'll share how I am going to make the seven framed prints!
The first step was to cut out paper hexagons that are the size of the fabric that will be surrounded by a ring of hexagons. I traced around this shape on a blank piece of paper. My goal was to create a window template that I could move around on my fabric to locate the part of the print I wanted to use and to make sure that the print was correctly positioned. I put some small pieces of double-sided tape on the wrong side of the window template.
I moved the window around on my fabric until I was happy with what I saw and then applied some pressure so that the tape would stick to the fabric. I used a Frixion pen to trace inside the window (you could use any fabric safe marker that you like).
The fabric was cut out with scissors leaving a generous 1/2" seam allowance all around.
I placed my ring of hexagons on the fabric lining up the inner edges of the ring with the lines that I drew with my Frixion pen. I used applique pins to hold the ring in place and then I thread basted it to the fabric but glue basting with a product such as Roxanne Glue Baste-It would work equally well.
I'll cut out the remaining six motifs, make the rings and thread baste them to the motifs. Then I'll have a little pile of hand sewing at the ready. But of course I had to sew just one to see how it will look! I've also added the background hexagons (I'll attach the same arrangement of background hexagons to each framed picture).
I love the idea of framing large prints with hexagons. It makes for a quilt that is much faster and easier to make and it is a wonderful way to use fabulous, large prints!
Also I've reached a decision about Birds in the Loft. I am removing two rows from the top section and two rows from the bottom section. The top section rows have been removed and the quilt stitched back together. I'm working on the bottom section. I always sew my rosettes, rows and sections in the same manner so if I have to do any amount of reverse sewing I know exactly how to do it! I'll post pictures of the edited Birds in the Loft when it is finished!
Until I post again, happy sewing!
Karen H


I'm really looking forward to seeing this one come together! Especially like the bird fabric.
ReplyDeleteExcellent tute Karen. I wish I had time to make one of these quilts, and I think I would also need to buy fabric especially for it. It is definitely on the Like to do list. :-)
ReplyDeleteWhat a great way to get the most from a large design but all using EPP. l love this idea, and will look at some of my fabrics differently. Thankyou for showing this. Happy Stitching.
ReplyDeleteGreat minds think alike! I've recently got the Quiltmania pattern for Brinton Hall too to make 'one day' so I'm really going to enjoy following how you will make this quilt. As you say it is just perfect for those large scale prints. Must get on with Value Proposition first - it was lovely to see yours getting the borders in your last post.
ReplyDeleteI have that bird print, too!!
ReplyDeletelove this method....thanks for the tutorial very interesting to show a nice fabric
ReplyDeleteI have Brinton Hall bookmarked and will make a note of your method--brilliant (as always)!
ReplyDeleteI saw that quilt in the Quiltmania magazine and had thought how wonderful it was must admit. Love that central motif fabric, complete with its own buzzy bee if Im not mistaken too lol
ReplyDeleteGood idea to shorten the length of Birds in order that its a useable size lol it is too beautiful for a carpet!!
Love this idea. I will try it out and link up with this post. My goodness girl. Its a good thing we live so far apart otherwise I'd spend all my time drooling over your quilts. Focused on getting g flimsey's machine quilted today. I can't find my pretty petals quilt. Uhm, which bin? Lol, Carli
ReplyDeleteHow clever!
ReplyDeleteVery good tutorial, Karen. Another winner in the making.
ReplyDeleteKaren do you mind telling me the size of your x gons ,i would like to give this a try.
ReplyDeleteKaren do you mind telling me the size of your x gons ,i would like to give this a try.
ReplyDeleteWhat did you use to make the sheet of hexies for your window? Is it software? I bought this issue of Quiltmania and want to start it soon. Just didn't know where to begin on those large prints. Yours look so wonderful. I may need to hit the quilt shop for a few more pieces of fabric for my center panel.
ReplyDeleteWhat did you use to make the sheet of hexies for your window? Is it software? I bought this issue of Quiltmania and want to start it soon. Just didn't know where to begin on those large prints. Yours look so wonderful. I may need to hit the quilt shop for a few more pieces of fabric for my center panel.
ReplyDeleteI like your explanation. Thankx. Since this afternoon I'm back home. France was fantastic. Groetjes, Dientje.
ReplyDeletesoo beautiful so far....i am loving this project and your version is gorgeous!
ReplyDeleteIt is a beautiful quilt and the original that inspired it is really something to behold. Sorry I couldn't email you but you are a no reply blogger! :-(
Delete