Showing posts with label Rewind. Show all posts

Friday, July 31, 2015

REWIND: Back Basting Applique

Welcome back to REWIND! Every now and then I "rewind" and republish one of my older posts that you may have missed! Today I'm going to share a post from November 2014  in which I write about back basting applique.


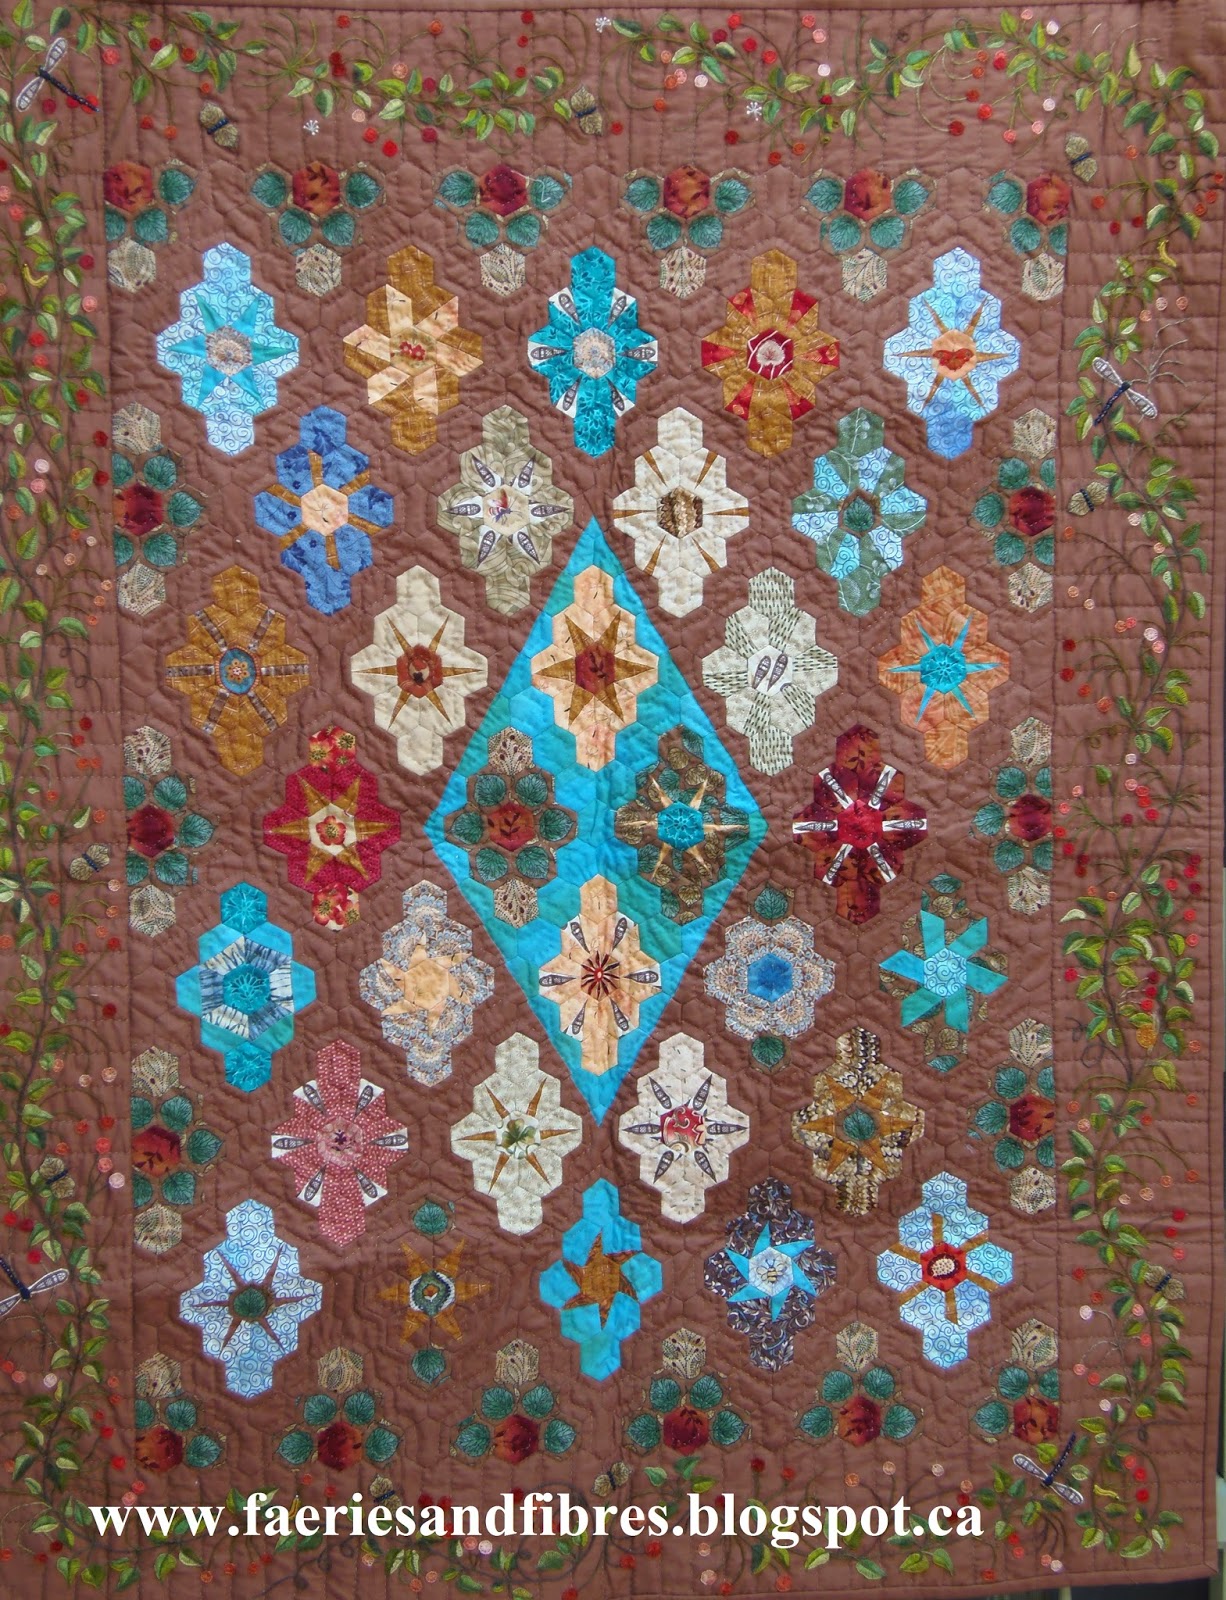
I used this applique method to make fruit and flower blocks in the border in my Gardens of a King quilt designed by Missie Carpenter of Traditional Primitives. It is a great technique to add to your skills set so why not give it a try? You'll be surprised at how easy it is and the great results that you will achieve.

Gardens of a King by Karen H
Pattern by Missie Carpenter of Traditional Primitives

* * * * * * *

TUTORIAL: Back basting applique

I am not an expert when it comes to applique but I enjoy doing it and I think that sometimes just a little bit of applique can add so much to a quilt. There are lots of different ways of doing applique and each has its own place. One of the methods I like is back basting applique. There are small applique blocks in Gardens of a King quilt that lend themselves perfectly to back basting applique.
So what is back basting applique? Simply put you baste your applique fabric to the background but you baste it from the wrong side. Once it is basted you do needle turn applique that is surprisingly easy!

The first step is to draw the shape on the wrong side of your background fabric. I will use a fleur de lis shape. I place my design on a light box or tape it to a window. I place my fabric over the pattern  with the wrong facing side up and I trace the shape with a fabric safe marker that makes a fine line. I like to use a mechanical pencil or a Frixion pen.


Cut a piece of applique fabric that is large enough to cover the entire shape.


I place the the applique fabric on the right side of my background fabric and hold it up to the light to make sure that it is correctly positioned which means that the applique fabric extends beyond my drawing on all sides. Depending on the size of the applique I may place a few pins to hold it in place. I then take a needle and thread and run basting stitches on the lines.


I turn the fabric over and on the right side I draw on the lines of the basting thread with a fabric safe marking tool. I like to use my mechanical pencil or a Frixion pen. If you use a pencil be sure that you can see the line but you don't want it do dark that it will show after the applique is finished. A chalk pencil would work equally well. Use the marking tool you have in your tool box that you like and that works for you!


Trim the excess fabric leaving a narrow seam allowance. I like to leave somewhere between 1/8" and 1/4". If there are inner points or curves you will need to clip them to make it easy to turn the seam allowance. In fact I like to clip all the way around the shape. I find that it makes turning the seam allowance much easier. I do not clip right to the line; I stop a few threads short of the line because I can always clip more but I can't clip less!


Now it is time to applique. Remove a few basting stitches and tuck the seam allowance under on the drawn line with the tip of your needle. Stitch until you reach the point where you need to remove another couple of basting stitches. Continue in this manner until the applique is completed removing only a basting stitch or two at a time. I like to use Superior's The Bottom Line thread for my applique. A soft taupe colour seems to work on virtually all colours!


This is the fleur de lis from the front.


This is the fleur de lis from the wrong side. When I press the piece all of the Frixion pen marks will disappear!


This method works well for simple shapes like the fleur de lis but it is even better for more complex, layered designs and small pieces! As with any applique work you have to give thought to the order of sewing pieces. For example in the picture below I stitched cherries before the stems because the stems sit on top of the cherries. The leaves were stitched before the branches. I'll often write the order of sewing pieces on the wrong side of the fabric so I know what to do next. I marked all of the leaves and most of the cherries as "1" because there were stems and branches that had to go on top of them. I back basted all of the pieces marked "1" at the same time and then I appliqued them in place. At the bottom of the picture you can see there is a cherry that is on top of another so the top cherry was marked "2". I continue numbering all of the shapes in this way. The back basted piece in the picture is the last stem that I need to applique and then the piece will be finished.


HELPFUL TIP: One of the tools I keep in my sewing kit is an orange stick (just below the scissors in the picture). It is great for turning applique edges especially if there is an inner point or inner curve to be turned. The wood just grabs the fabric and tucks it neatly into place! And it does it the first time so if the seam allowance is narrow there is little or no fraying. A needle is slippery so if I have to poke the fabric a few times it might start to fray and that will make the applique more difficult!

An important consideration is if your pattern is oriented the way it should look when it's finished your will need to create a reverse image for tracing on the wrong side of the background fabric. If you just trace it onto the wrong side of your fabric the final applique will be a mirror image of the pattern. To eliminate this problem I trace my pattern on the wrong side of the pattern with a fine Sharpie marker and that is what I use to trace the design on the wrong side of my fabric. Problem solved! Another option is to use your printer to print a mirror image.

* * * * * * *
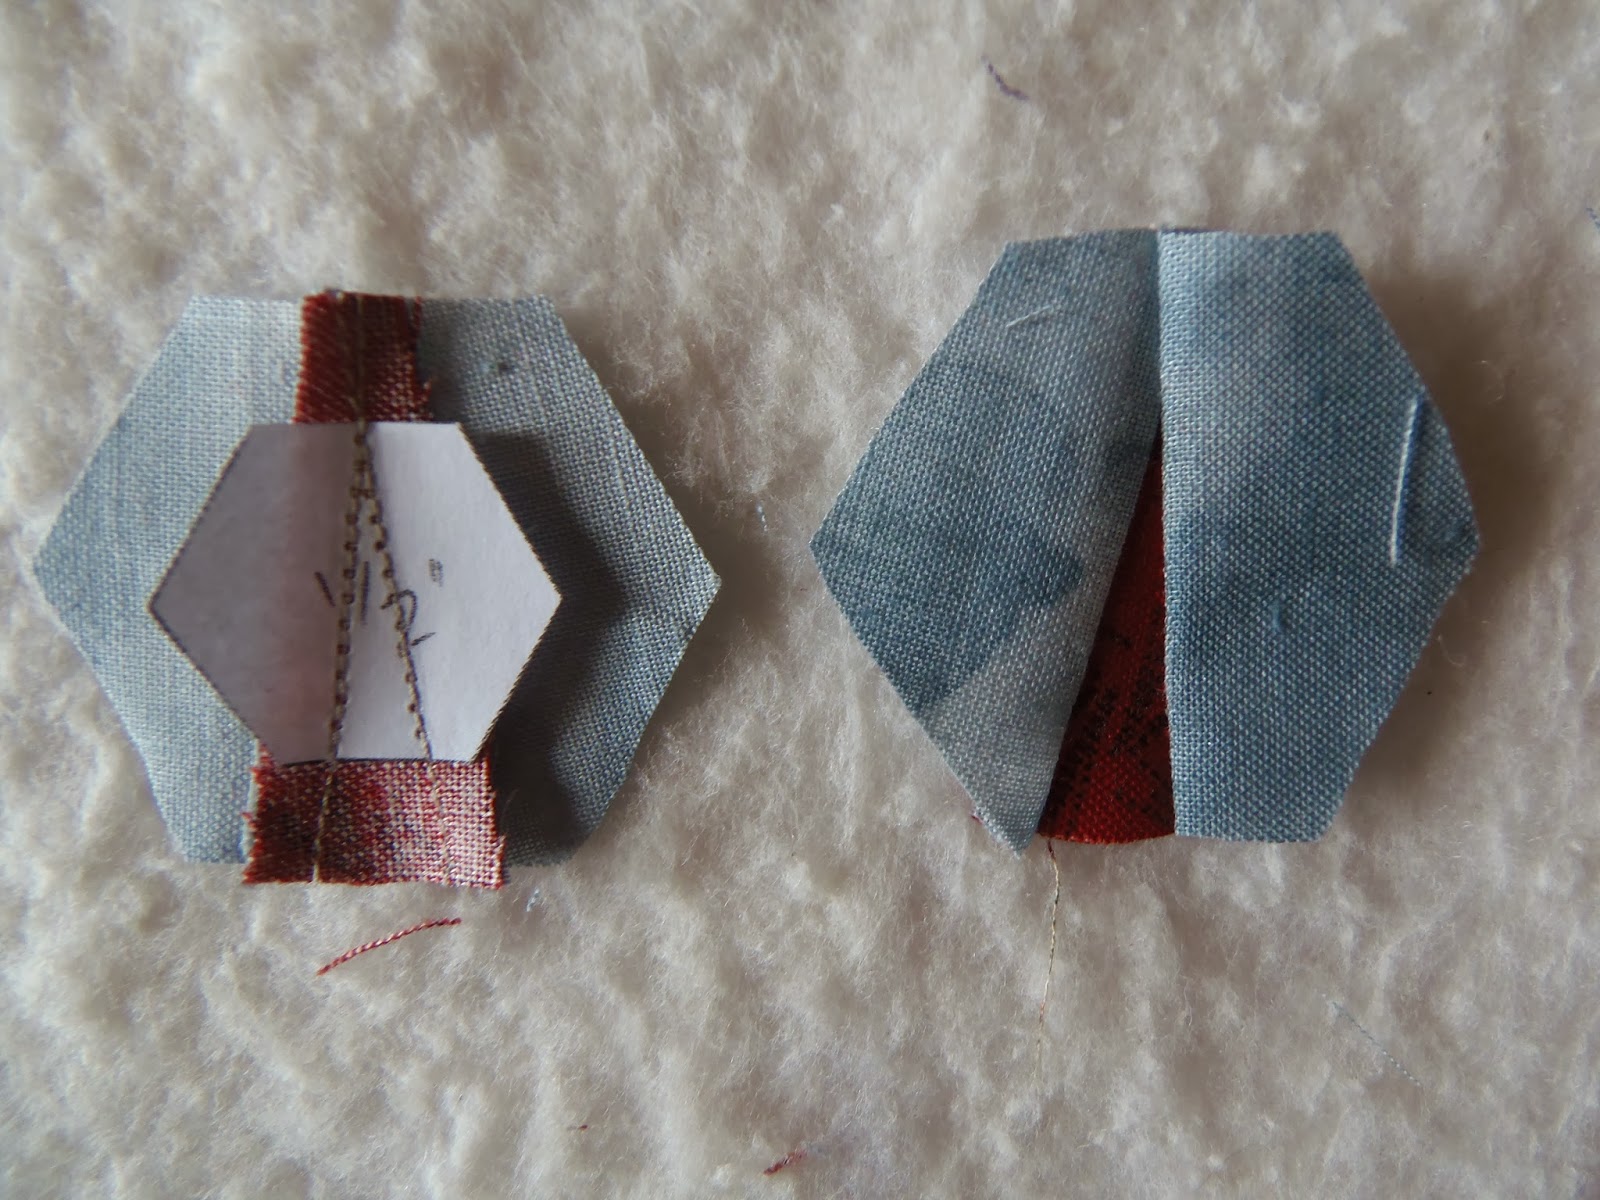
I adore the Gardens of a King pattern by Missie Carpenter of Traditional Primitives. In fact I like it so much that I am seriously considering making another. At first glance you wouldn't think so but it is English paper pieced just like my hexagon quilts! These blocks measure about 6" across and they were a great way to use up some really small scraps.


Look at this block with the tiny little hexagon in the middle! Love it! I used Missie's starch basting method to prepare all of the pieces.


When I made the Gardens of a King quilt I made it exactly as per the pattern because I was testing the pattern for Missie. I don't get any compensation for testing or promoting this pattern nor do I have a commercial interest in the pattern - Missie just asked me if I would be willing to test the pattern for her and I thought that it would be a fun thing to do. I enjoyed making Gardens of a King and am so proud of my quilt top that I can't resist sharing it with you!


Some of the applique blocks are challenging and if applique is not your thing you may think that this isn't a quilt you could make. My applique work is far from perfect and I had to work really carefully on this block; the purple flowers were very difficult because I used cotton fabrics but the pattern is based on wool applique which I understand is fast, fun and easy. When you are making a quilt from a pattern you can change it up to suit your skill level or design sense. I think that if you had a large pretty print you could just skip the applique and frame the fabric with the oval. How quick and pretty would that be? Very quick and pretty and it can be just as effective as the applique!


I would like the next Gardens quilt to have more a Canadian flavour to it! I'm already jotting down ideas about how I might do that. I also bought a fabric challenge kit so I may combine the challenge with this quilt pattern and come up with something similar but uniquely my own.

I know that some readers have purchased the Gardens of a King pattern and have had some questions. I'm always happy to answer/help and I know that Missie too is always available. What you may not know is that she has set up a help page on her blog and I encourage you to visit Missie's help page on her blog. She has developed some very unique approaches to piecing that you will find helpful and worth adding to your skill set. She is also working on a new quilt design that has fleurs-de-lis! It looks very interesting and I can't wait to see the finished quilt!

Well people, I've got stuff to do so I had better get on with the doing. Until I post again, happy sewing!
Karen H

Wednesday, July 8, 2015

REWIND: Tiny World Demi Tasse Pincushion


Welcome back to REWIND! Every now and then I "rewind" and republish one of my older posts that you may have missed! Today I'm going to share a post from July 2013 in which I write about quilting diamonds made of hexagons and a tiny Tiny World Pincushion. 

When I wrote this post I was seeing lots of straight line quilting and figured I would give it a try. I drew the lines on my quilt and used my free motion quilting foot to quilt them and it worked out quite well. The thread I used was Superior's Monopoly Invisible Thread and it helps to mask uneven stitches. For anyone who is working on the Brinton Hall quilt this post might give you ideas for quilting!

The pincushions in this post are so much fun to make. They are based on a pattern by Mimi Kirchner. You can get yourself a copy of this fun pattern in Mimi's Etsy shop.  The pdf pattern is roughly $10 Canadian and it is probably the best $10 I've ever spent! I should mention that the trees with trunks are my own creation and not part of the pattern.

* * * * * * * * *

Tiny World Demi Tasse Pincushion

I've been sewing bits and pieces for Tiny World Pincushions and I managed to finish yet another. I have two little gold demi tasses and here is the first of the two. The other will be finished another day!


To give you an idea of the size here it is next to the Farmer's Home - Winter Pincushion. I really adding tree trunks! And they are both working pincushions! Can a quilter have too many pincushions? I think not!


I'm still working on the feathers in diamonds in Butterscotch Ripple - there are two or three to go. This quilt is going a little slower than I would like but hopefully I'll pick up steam tomorrow. I've been doodling away like crazy trying to decide how to fill the diamonds after the initial feather border. My doodling isn't perfect or even accurate but that isn't the point. The purpose is to help develop ideas. I might not be able to quilt what I draw but it gets the creative juices flowing! And it did just that!


The outer feather is quilted in the example below and I drew two inner diamonds that are 1/2" apart to create channels. I used my blue water soluble fabric marker.


Close-up of the blue markings.


I stitched two diamonds inside the feather to create the channels and then filled the outer channel with circles. I'll leave the inner channel empty. I've tested this on the first block and I am happy with it. The next step will be to decide what to put inside the centre diamond. I may use a couple of designs to fill the diamonds. (Note: in my original post I didn't mention that I used my free motion foot to quilt the straight lines. I just worked slowly and the lines were quilted relatively straight. Once the fillers were added any wobbles disappeared.)


This is a close-up of the channels and the circles.


Now about those two rabbits I've been seeing in the garden. They were back again. They sure like the pond! Isn't he's a snappy dresser - blue plaid pants and a leopard print vest!


I was able to get fairly close - they didn't seem too bothered to have their picture taken but then in the blink of an eye they were gone!


Was it me or was it this??? The dreaded Grey Panther from two doors down!


* * * * * * * * *
So there you have it! I sure hope that you enjoyed this edition of Rewind. Until I post again, happy sewing!
Karen H

Wednesday, May 13, 2015

REWIND: Twinkle, twinkle, little star


Welcome back to REWIND! Every now and then I "rewind" and republish one of my older posts that you may have missed! Today I'm going to share a post from February 2014 in which I write about making REALLY small hexagon stars! I made stars with 1" hexagons for the border of my Birds in the Loft hexagon quilt. 

The quilt is turning out to be larger than I expected and I wrote that I probably could have got away with 3/4" hexagons. Eloidastiches asked if I could have made the stars with 3/4" hexagons and the answer is yes! I've made stars of all different sizes, the smallest being about 1/2".  In fact I did a little tutorial on making small stars. I used one in the middle of my hexagon heart which had a large open space just begging for something to be tucked inside! Making small stars is the subject of this edition of REWIND!


There are also lots of small stars (and other motifs) in my quilt There's a Snail in Grandma's Flower Garden.
There's a Snail in Grandma's Flower Garden by Karen H 2004

So without further ado here is the tutorial. I hope you enjoy it and if there are any questions please do not hesitate to ask!

* * * * *

Tutorial: Twinkle, twinkle little star!

I thought today I would demonstrate how I made a little star using my technique for foundation pieced English paper pieced hexagons. I worked with 1/2" hexagons! You can find a master template for the hexagons here.

The first step is to draft the star points. I make marks at the top and bottom edge of a pair of hexagons. These marks will be the width of the base of the star point. You can make the base of the star points as wide or narrow as you want however I would not make it as wide as the hexagon itself because there is just too much seam allowance for a little piece. It is much easier to baste with a narrower base.


I connect the marks on the diagonal.


I repeat on the other diagonal.


I make two more pairs and then cut them out.


If you are new here my foundation piecing method is explained in my January 19, 2014 post. It is really important to shorten your stitch length! The basting is explained in my January 20, 2014 post.

Here you see a foundation pieced star point on the hexagon. When trimming the excess be sure to leave at least 1/4" seam allowance but 3/8" is even better. I just trim with my scissors. If the seam allowance is too large when I come to baste it I can trim a little bit.


NOTE: This was not in the original post but I suggest that you use the blunt end of a darning needle or a toothpick to break the bond between the paper and the fabric before you baste the hexagon. This will make the removal of the paper much easier! You can see how I did it with a larger star point here.

Here you can see a basted hexagon from the front and the back. The paper is still in place. Notice how the fabric is folded and basted at the base of the star point. Normally the folds would all be in the same direction but in this instance the fold in the lower right corner has changed direction. It makes for a sharp corner.


The basted hexagons are arranged and ready to be stitched together.


Once basted they can be stitched together and a center is added. I'll do a little video in the near future to show you how I set in the center hexagon.

The little star is complete and it measures a dainty 2 1/2" square.


I used one of these stars to make my miniature quilt Bony Fingers.

Bony Fingers by Karen H 2009

I plan to use the star I made in this tutorial as an embellishment on another quilt so it will be appliqued in place. I gave the star a good press with a hot iron and spray starch. I pressed the front and the back. The basting threads were removed and then the paper was removed. To remove the papers I gently opened the seam allowances that were basted under.


I remove the papers from the sides of the star point. My stitch length was shorted so the paper comes out effortlessly.

The last step is to remove  the paper that was the star point from the center. I neatly folded the seam allowances back into place.


And here you see the finished star ready to be appliqued to my quilt!


While this small star looks difficult it is actually quite easy. Just take your time and have fun! If it doesn't turn out it doesn't take much fabric so it isn't a huge loss! If you do make a little star I would love to hear how you made out!

* * * * *

That's it for REWIND today! I hope you enjoyed seeing how I made my little stars. All you need to do is make one and use it as an embellishment. It won't take long and your friends will be amazed by your work!

Until I post again, happy sewing!
Karen H

Wednesday, April 29, 2015

REWIND: Fussy cut options for hexagon quilts when you don't have enough fabric


Welcome back to REWIND! Every now and then I "rewind" and republish one of my older posts that you may have missed! Today I'm going to share a post from January 2014 in which I wrote about combining fabrics when fussy cutting. All of the hexagon rosettes and stars in this post are in my quilt 81 The Giant Monstrosity (I wrote a free pattern and you can find it under the tab Patterns by Karen H). Enjoy!
81 The Giant Monstrosity by Karen H 2014

* * * * *

Fussy cuts are great for any block but they are particularly well suited to hexagons and diamonds.  I love to fussy cut to produce kaleidoscopic effects such as this one.


The hexagon above is six identical hexagons surrounding a seventh different hexagon. I love the blue star that emerged. I cut this hexagon from a strip of fabric that was part of a jelly roll. 

Sometimes I can only cut three hexagons from my fabric. What's the solution? Add a second fabric! In the two examples below I only had enough fabric to be able to cut three hexagons for each so I added a second fabric for the outside ring and a third fabric for the center. In the pink hexagon the alternating white and red hexagons were not fussy cut, nor was the center hexagon.


In this example I only had enough pale blue brown for three hexagons so I fussy cut three blue and yellow to go with them. The center was also fussy cut.


Another way to deal with a shortage of fabric is to use two different fussy cuts from the same fabric; if your aren't confident working with multiple fabrics and colour make cut your fussy cuts from a single fabric. That way you know that they will work together. In the star below I did have enough fabric but I wanted some variety so I fussy cut three diamonds with blueberries and three diamonds with red flowers. The colours work together since they come from the same fabric and the two different fussy cuts add some interest. A diamond is a derivative of a hexagon (three diamonds make a hexagon).


This is a second example of six patches cut from a single fabric. I cut three with red flowers and three with white leafs.


Here I've used two different fabrics. The colours are close but not the same and they don't have to be a perfect match. In fact sometimes it is more interesting if the colours are slightly off.


Here I only had enough blue to fussy cut three so I alternated with a red print which was not fussy cut. Even with only three fussy cuts it is still interesting. This star isn't a bobby dazzler but it would work in the Soupçon Quilt Along because it can be dressed up!


Again I fussy cut three hexagons (and a fourth and different for the center) and three plain hexagons.


This is yet another example of combining entirely different fabrics. What is consistent in all three is that I've looked for complimentary prints/colours. The red print in the first picks up the red flowers on the blue. The yellow hexagons in the second pick up on the background of the fussy cut hexagons and in the one below the gold basket weave picks up on the gold in the fussy cut leafs.


Experiment with your fabrics and see what you can come up with! Here are some examples of what I came up with. I LOVE the orange star with the striped fabric in the lower right corner! Stripes are our friend!


Lots of possibilities here! The star in the center of the bottom row features a fussy cut print and a fussy cut stripe.


Look at how the striped fabric was used in the hexagon flower in the middle of the bottom row. Pretty, no? Pretty, yes!!!


And here's one final idea. Sometimes the fabric is right but not quite right so how do you make it right? I took some pens to it! The triangular bits were very pale so I outlined them with my brown fabric markers. I still thought they needed some depth so I took another marker and I shaded the left side of the inside of blade on the light blue. And I am ashamed to say that it wasn't a fabric marker that I used but it was a permanent marker. Actually I'm not at all ashamed! I just did it and I like it! Feel free to alter your fabrics however you chose. 


All of the hexagons and stars above are part of my quilt top 81 (The Giant Monstrosity). It is on my "to be quilted" list. It is a big quilt so it is going to be challenging. Oh well, I think I'm up for the challenge!


* * * * * 

I hope you enjoyed this edition of Rewind. lf you have any questions or comments I would love to hear from you! I'm always happy to share what I do and how I do it! I reply to every comment so if you don't hear back from me it means you are a no reply blogger! Until I post again happy sewing!

Karen H