Monday, March 30, 2015

Something is bugging me!

And it is a new pincushion! Can a quilt maker have too many of them? I think not! I found a little ceramic cicada (?) at a thrift shop. I believe it is a tea light holder but I thought it would make a better pincushion and it does!


I'm so pleased to hear from so many of you that you enjoyed the tutorial on my open donut method of constructing hexagon rosettes. I had written about it many times but finally decided to write a post with detailed photographs. I used this same method to construct the ring of hexagons that surrounds the medallion in my Birds in The Loft hexagon quilt. I made a large open donut of the rosettes (it looked like a long noodle).


It was then stitched to the medallion in the same way that I stitched a rosette. As each hexagon is surrounded by others the paper is removed; it reduces the bulk and makes the manipulation of the fabric and the sewing so much easier (and faster).


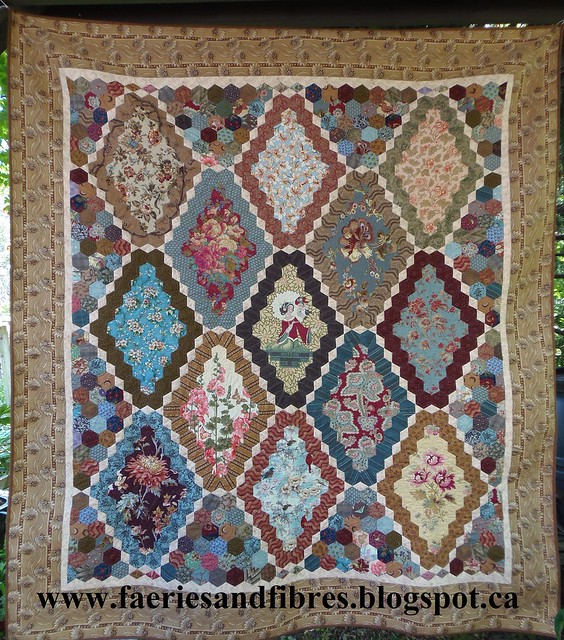
When I was making my hexagon quilt Lozagons I used the open donut method to construct the multi-round rosettes. I made the centre rosette and then made open donuts for the remaining round. I tacked them together with needle and thread until I was ready to sew them together.


I made a pile of blocks, tacked the pieces together and stored them in a pretty box. Everything is kept together and there are no lost pieces!


I've completed five more pairs of hexagon rosettes for my Birds in the Loft quilt. Here they are!

Both of these fabrics have been in my stash for some time now so it was time to start chopping them up!


I used the leftover green bits for the centre hexagon in this rosette.


The outer fabric is a scrap I snagged from my friend. I was helping her cut fabrics for her quilt top and she told me if there was anything I wanted I should help myself and help myself I did. I cut a 2 1/2" strip and this is the block. I love the chevron movement - it makes for an exciting block!


I used the outer turquoise in my Gardens of a King quilt top and the centre fabric is a treasured scrap. There isn't much left and the selvage is long gone. I wish I had more of it!


The centre hexagon is another leftover from another rosette. It was the outer ring of the rosette but in this block it is the centre hexagon. Repeating your scraps in this way is a terrific way to make your scrap quilt more cohesive!


That's all for today! I've got more sewing to do if I'm going to keep you entertained and get this quilt top finished so until I post again, happy sewing!
Karen H

Saturday, March 28, 2015

Tutorial: Pieced hexagons and open dounts

Earlier this month I showed you one of the rosette designs that I will use in the border of my Birds in The Loft hexagon quilt. I will need 36 of these rosettes for the border.


There are many ways to make these "pieced" hexagons. I could cut the paper hexagon in half, cut fabric for that half hexagons &thread baste and then stitch the two halves together to make a the hexagon. That's a lot of work, too much work given that I need 36 rosettes. I could use my foundation paper piecing technique to make the hexagons but then I have to remove the paper in pieces. Instead I decided that the fastest and easiest method would be to use my "made fabric" method. Today I thought I would demonstrate how I am making the hexagons in a manner that is efficient for me!

To start I cut a 1 1/2" strip across the width of the fabric from each of the two fabrics. I placed the two strips right sides together. The stitch length on my machine was shortened and the strips were sewn together with a 1/4" seam allowance. If you do not shorten your stitch length your seams will open when you cut your hexagons from the "made fabric". I pressed the seam allowance open.


I use my Elmer's Washable Glue Stick - Disappearing Purple to affix the paper to the fabric. It is more of a starch than a glue. It holds the paper to the fabric but the bond is not strong so when I'm ready to remove my hexagon papers they just pop out!


I find the most efficient method to cut the strip set is to trim the selvages, fold the strip in half and then cut 2 5/8" squares of fabric.  From each strip set I get 16 squares. I apply the glue to the paper (in the picture I've drawn the glue with purple to demonstrate where it goes but I don't need to apply the glue this heavily). I apply it in a circle (I drew this on with a purple marker - I don't need so much glue) making sure it is close to the corners that will line up with the centre seam. I place the paper on the square lining up the seam with the points. Give the glue a moment to set and the trim the corners with scissors being sure to leave a generous (roughly 3/8" or more). This makes the process of basting much easier.


I baste with thread in the usual manner. In the following diagrams I've just folded over the edges so you can see what I am doing. The dark fabric is coarser than the light fabric so I fold the darker fabric first and then fold down the lighter fabric. This will reduce some of the bulk at the corner. Before I baste this corner with needle and thread I turn over my hexagon to make sure that the point is on the seam. If it isn't I adjust and if it is then I start basting with thread.


I generally fold all of my seam allowances in the same direction however at the seams I've folded both so that the light fabric is folded over the dark fabric because the dark is coarse. I find it makes the sewing together of the hexagons much easier!


And now for the math! Six hexagons will make one rosette. I need 36 rosettes so that's 216 hexagons. I can cut 16 hexagons from one strip set so I'll need 14 strip sets. Each strip set is made of 1 1/2" strips of two different fabrics so 1 1/2" multiplied by 14 equals 21". I'll need 21" of each fabric! I'll cut the strips, sew them together, press the seam allowances open, cut the squares, glue the hexagon papers and trim the corners. I'll toss all of them in a zip lock bag with basting thread, scissors and needles. If I need to take some sewing with me they will be ready and waiting!

I'll sew six hexagons together into an open donut and then I'll set in the centre hexagon. A reader asked why I stitch my rosettes in this way. I find that it makes it much easier to set in the centre hexagon rather than stitching it into a closed ring and I can use one length of thread for the sewing. If the ring is closed it is much more difficult to line up the edges of the centre hexagon with the outer hexagons because you are dealing with a lot of paper which adds bulk and makes things shift. Sewing the outer hexagons to the centre hexagon one at a time is tedious - there is too much stopping and starting. Also there is the risk of losing hexagons if you set the project aside! Well at least I tend to lose them OR my teenager cat Jinx will steal them!

Here's how I set the centre hexagon into an open donut. I place the centre hexagon on the open donut with the opening to my right. I start sewing at the green arrow and sew across to the red arrow. I always take one extra stitch at the end of a seam. It keeps the seam closed tight for the next step.


I fold down the hexagon on the right; that extra stitch I took at the corner keeps the seam from opening up so I can move the centre hexagon making sure to line up the seam. I sew to the corner on the left taking an extra stitch at the corner.

I fold down the hexagon on the right and sew across to the corner on the left again taking the extra stitch at the corner. I continue in this manner until I've stitched all six sides of the centre hexagon to the open donut.


Again I took an extra stitch at the end of the seam which is in the red circle. The centre hexagon paper is removed to make the folding of the rosette a snap!


I fold down the rosette for the final time and stitch the seam closed!


I can stitch a bunch of open donuts and that keeps them together until I'm ready for the middle (sometimes I don't know what I want to use in the middle so I can audition fabrics with the open donut). 

I suppose that in the end how you sew your hexagons together is a matter of personal preference but I find that stitching the open donut make the most efficient use of my time and thread and I can be more organized & efficient with my sewing!

Wow - that was a long post. Sure hope you enjoyed seeing how I construct my rosettes! Until I post again, happy sewing!
Karen H

Thursday, March 26, 2015

Half rosettes for the Birds

I'm going to add an interesting hexagon border to my Birds in the Loft quilt. I try to create relatively straight lines for sewing so the first step in the construction of my border is to make side filler pieces. They will be half rosettes and I will need twenty of them. They will be inserted at the beginning and end of the even rows.  The second row begins with rosette 14 and ends with rosette 25 so that row will get the half hexagons and then the next even row begins with 39 and ends with 50, then 64 and 73. You get the idea!


While I could make multi-coloured half  rosettes my plan is to make all twenty half rosettes from the same fabric. This will create a visual stop so that the border is separate and distinct from the body of the quilt. I've selected the fabric I will use will use to make the half rosettes. It is a toasty beige and works well with the colours in the medallion.


While it may not look like it at first blush it is a directional print so placement of the hexagons will be important. I will orient all of the hexagons like the one on the right. If I just stitch them any which way the effect may be a little jarring. I want the border to have a matte, smooth finish.


The centre hexagon in the half rosette will be a fussy cut bee on a cream background; it is the same bee fabric that I used for the hexagons that are above and below the framed birds.


I like to make a test block to make sure that what I have in mind will translate well. This is the first half rosette and I am pleased with it! That's one down and nineteen to go!


There will be a row of these same toasty hexagons across the top and bottom of the quilt. I've got some basting to do today!

I've also stitched some more rosettes (I've got the bloody fingers to prove it)! The first one is a bubblegum pink. It looks very bright in the picture but in reality the colour is a little softer. Notice it is a directional print.


I love the navy fabric and wish I had bought more of it. I only needed a little for a quilt I was making and so bought only 1/4 yard! Should have bought a yard!


The olive green is a directional print and the centre is yet another loved and cherished fabric! Such a great print with loads of visual interest!


Well that's it for me today. If you love hexagons don't forget to visit Help for Hexi-Aholics at Sarah Did It. I've linked up and if you have a hexagon project I encourage you to link up too! Until I post again, happy sewing!
Karen H

Tuesday, March 24, 2015

Am I blue?

I'm not but my hexagon rosettes for my Birds in the Loft quilt are! Today  it's all about the blues!

None of the rosettes are particularly exciting but that's fine with me. Some plain rosettes are needed to make the fancy rosettes shine!


I've ordered a treat for myself. I love little sewing treasures. I saw an adorable magnetic needle holder on a blog I follow, QuiltBee. She received hers as gift from England. A quick search (you just have to love the Google) and I found a place where I can order them, The Cross Stitch Guild! They aren't cheap but I find I enjoy my sewing so much more when I have pretty tools and storage boxes. One of these adorable little critters will be winging its way to my sewing kit very soon!


I have to recount my hexagon rosettes because I need 200 in total. They are now all cut out and it various states of sewing. I was very careful to count them as I cut them however a quick count yesterday afternoon and I am two rosettes short. How the heck did that happen? I'll do one more careful stock take and if I'm still short two rosettes it will be back to the cutting board!

Until I post again, happy sewing!
Karen H

Sunday, March 22, 2015

World Wide Quilting Day

Yesterday was World Wide Quilting Day. One of my Guild members organized a fun day of sewing, games and eating! Some members worked on their own projects while others worked on lap quilts for the Guild's community outreach project. We make flannel backed lap quilts for those in long-term care homes who are wheel chair bound. There tables loaded with outdate fabrics, scraps and orphan blocks which could be used to make the quilts.

I worked with my friends Barbara and Margaret. We had two boxes of 5" so we got started making half square triangles (HSTs). We figured we could knock out quilts  quickly but the HSTs took a lot longer than we anticipated. So I headed to the scrap table and found two orphan blocks. We added borders to the blocks while we continue to make our HSTs.

This was the first lap quilt we completed and it was made with an orphan block. We added the cream border and the blue outer border. Fast and easy!


This is the second quilt which was also made from an orphan block. We added the blue border and the wavy print outer border (the strips were already cut so that made for fast sewing)!


We finally got our HSTs stitched together and made this quilt top.


We weren't counting our HSTs and had a pile of them leftover so we started yet another lap quilt in the final 45 minutes. There will be one more border added to get this lap quilt to the desired size but then it will be done.


It was a fun day but I was exhausted last night! Today I'm still a little still (I stood all day) but I'll limber up with some hexagon sewing I think!

Until I post again, happy sewing!
Karen H

Friday, March 20, 2015

It is Spring!

It is Spring....or so they say! With the temperature sitting at freezing it doesn't feel that way but the arrival of the robins and red-wing blackbirds is a sure fire indication that Spring is indeed here.

This is a little Spring time quilt that I made as part of my Guild's Paint Pot Challenge. The organizers got a bunch of paint chips from the home improvement store and put them in an empty paint pot. We each reached into the pot and pulled out a chip. The challenge was to make a small quilt that featured the paint chip colour and the name of our quilt had to be the name of the paint chip! It was great fun and challenged us to work with colours we might not have ordinarily used. That was the case for me but imagine my surprise when I discovered I did had that colour in my stash! The name of my paint chip and my quilt is Rosy Outlook!

Rosy Outlook by Karen H  2012
14 1/2" x 17 1/2"

I used my Sakura Pigma pens to add details to the birch tree trunks, veins to the leaves and  feathers to the fabrics that I used to make the bird. It's legs were drawn on the quilt after the bird was attached.


Today I thought I would answer a reader question about the path and share a few more rosettes for my Birds in the Loft quilt. I love both of these rosettes! The green middle in the first is another treasured fabric; there isn't much left!


The blue fabric has been in my stash a long time and I think I have enough for a couple of individual hexagons and then it will be gone, gone, gone!


Now for the reader question/ I was asked why I am adding path hexagons to only one side of the rosette and not the other.


I want the hexagons to fit together with a single round of path hexagons. If I add them on both sides there will be a double row of path hexagons. Think of it like sashing between square blocks. There is only one sash between two blocks and this holds true with hexagon rosettes (and diamonds). It is important to understand that if you have two hexagons between rosettes they will not line up. Instead a slope will develop. I wrote about it here. If there is a full round of path hexagons around each rosette they would look like the rosettes on the left.


A picture speaks a thousand words so here are a few pictures to explain what happens. In this picture two rosettes have the five path hexagons stitched to them. When I put them together notice how they fit nicely and will stay in a nice straight line.


If I add path hexagons to both sides this is what would happen when I try to put them together. Notice the slope has developed!


If you want your blocks to be in a straight line the path must be an odd number. Birds in the Loft will have a single path. My Value Proposition quilt has a triple path.


Another way to straighten rosettes is to add a small diamond between. The diamond is simply on third of a hexagon. I wrote about constructing, deconstruction and reconstructing hexagons here.


I used the diamond method of connecting the units in my quilt Butterscotch Ripple. It is another option for joining hexagon units!


I hope you enjoyed this blog entry. Until I post again, happy sewing!
Karen H