

Persian Tiles by Karen H 1998
I used the method I described here to make the blocks. The pieces for the smaller blocks started a little larger. I made the HSTs and I trimmed them down to size. I just love these little churn dash blocks because they are a terrific way to use small scraps. One thing I've learned over the years is that even the ugliest of fabrics become beautiful if you cut them small!
Time to get back to my Birds in the Loft hexagon quilt. I've selected seven red fabrics that I will use to make 34 stars for the border of the quilt and I've made seven sample hexagon star rosettes.

I've done other tutorials on making them but thought I would do a refresher today.
I start with a sheet of hexagons. I draw a line from the upper left corner of a hexagon and extend it to the lower right corner of the hexagon below. I repeat by drawing a line from the upper right corner of a hexagon and extend it to the lower left corner of the hexagon below. I cut the hexagons out.

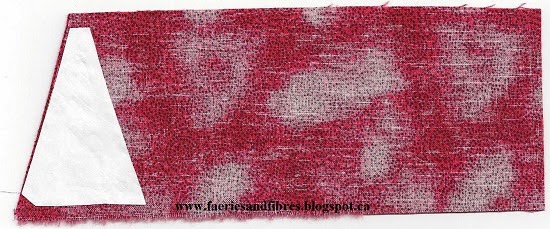
I trace around a triangle star point and add a 1/4" seam allowance all around. I cut out the paper template. From my fabric I cut a 2 1/2" strip of fabric. I lay the paper template on the strip of fabric and start cutting the star points. I use my rotary cutter to do this - it is a short cut so I don't use a ruler. If I accidentally cut the paper template I just make myself a new one! I need six star points for each rosette.

Place a tiny dab of glue on the wrong side of the hexagon in the area that will form the star point. I place the hexagon on the star point (Fig. 1). The lines of the star points are the sewing lines; I make sure that there is a narrow seam allowance (slightly less than 1/4") beyond the sewing lines. If I place the hexagon closer to the bottom the seam allowance will be larger and if I move it to the top it will be narrower. I clip the point of the star fabric so that it is 1/4" beyond the paper (Fig. 2).

I shorten the stitch length on my sewing machine. I place my hexagon with the star point fabric on the background fabric as indicated in Fig. 3 and I sew from the top to the bottom. It is important that the first seam start at the star point because it will make sewing the next piece of fabric easier. In Fig. 4 I've folded back the paper and I'll trim the seam allowance with scissors to tidy it up. I then fold the paper back, the background fabric is pressed away from the star point (Fig. 5) and I trim the excess fabric away (Fig. 6) leaving a generous seam allowance of about 3/8". This will make the basting much easier. I repeat these steps with the fabric on the other side of the star point.

I use a knitting needle, crochet hook or orange stick and slide it between the paper and the star fabric to break the glue bond.

The final step is to baste the star point. I find it easier to fold fabric over the paper so that I don't have bulky corners. Notice in the hexagon on the left that the bottom edge of the star is folded up and the sides are folder over. This makes for nice flat corner with minimal bulk.

I like to use Elmer's School Glue to tack the paper to my fabric because it is washable, fabric safe and does not create a strong bond (that makes breaking the bond between the fabric and paper very easy). I only need to tack the fabric temporarily to hold it in place.

Once I've made six star points I'll stitch them together to make an open donut and then I'll set in the centre hexagon. Once the star is completely surrounded by other hexagons I can remove the papers. I may need a pair of tweezers to grab the smaller pieces on the sides however they tend to come out very easily provided that I shorten my stitch length on the sewing machine.

I've also made some more hexagon rosettes for the quilt.


Don't forget to drop by The Needle and Thread Network for WIP Wednesday. It's where Canadian quilters share what they are working on!
Time for me to get sewing. Sure hope you enjoyed what I shared with you today. Until I post again happy sewing!
Karen H
I did not realize that you sewed these right on the hexagon paper! That's how you get them so perfect. Thank you, food for thought!
ReplyDeleteWow, you make so beautiful quilts !
ReplyDeleteThanks Patricia! You are a no reply blogger so I couldn't send you a personal note! :-(
DeleteWoW, the hexies with the stars. IT is a great idea. I' ve never done it in that way. I'll remember. Groeten van Dientje.
ReplyDeleteI also love your miniature. Nice. Gr. Dientje
ReplyDeleteFantastic! I love your how-to's -- so helpful!
ReplyDeleteThose stars are wonderful! I have a mini churn dash that I need to sandwich and quilt. I love making minis once in a while, so much fun!
ReplyDeletethose stars are darn cute
ReplyDeleteVery interesting work...love the hexies
ReplyDeleteFabulous tute.....thèse stars are so perfect with this methode...lovely hexies!
ReplyDeleteThat is a beautiful weeny quilt and I really like the red stars, they will pop right out and look wonderful.
ReplyDeleteI have enjoyed the glue basting process I have learnt with Millefiori and find it does give me a tighter bond initially and sharper edges but I am thread basting my pieces as a back up. Otherwise I find the papers pop out with manhandling in the stitching together stages which is annoying lol
I love how you've combined EPP and foundation paper piecing to make your stars!
ReplyDeleteYour first mini is very cute, incredible size of those mini minis!! I like the use of that border fabric,too. Gorgeous stars, I remember you doing this technique before and loved it - still haven't gotten around to trying it though! And your rosettes - very lovely too :-)
ReplyDeleteYou definitely have the most informative and inspiring blog about quilting, that I have found. Your work and your tutorials, make even those of us who are fairly new to this type of ART, feel that we could do it.
ReplyDeleteThank you for all the work it takes to share your passion.
JP
Thanks so much JP. I wanted to send you an email but you are a no reply blogger so I have no way to contact you.
DeleteI honestly believe anyone CAN do it - it just takes patience and practice and some helpful tips! It is kind of like when we learned to write!
For me one of the best things about quilt making is sharing what I've learned with others and learning from others. Thanks for taking the time to leave a comment letting me know you enjoy what I do!