Saturday, September 24, 2016

Rowdy Flat Library Quilt Block 2 (The Beekeeper) and a reader makes a quilt from one of my patterns

I'm sick of renovations because one thing just leads to another. The attic space has been cleaned, repaired and new insulation installed. In the process some electrical work was done up there and as a result it was necessary to knock two holes in my bedroom wall to run electrical cable. That would not have been so bad but for the fact that there is wallpaper on the walls so this means I have to pack up my bedroom, strip the wallpaper, repair the walls, repaint and so on. I had planned on putting my sewing room back together and will do so but once that is done, all of the bedroom stuff including furniture will have to be packed up and stored in my sewing room. Oh well, I had best stop my moaning and just get on with it!

During all of the commotion I've finished block 2 of the Rowdy Flat Library Quilt designed by Susan Smith. She calls this block "The Beekeeper" because as you will see it is loaded with bees! Here is my start.


At the base of the wreath the pattern called for the quilt maker's initial but I just loved the bees sooooo much that I added a bee instead.


Susan's quilt design calls for a variety of fabrics for the bee bodies but I plan to use the same fabric for all of my bees. I like the warm honey colour and think it works well. All the little details such as the legs and antennae are done with a pen.


The flowers in the three corners were appliqued in place. The pattern calls for flower centres made up of two circles with one being smaller than the other.


I have this fabric in my stash and thought it would make perfect centres for the flowers so I cut them out and positioned them on my flowers. They really sparkled so I didn't need to go the two circle route.


I love the effect of this fabric. for the flower centres!


Finally, here is my finished block....The Beekeeper! Notice the honeycomb in the upper left corner.


I recently heard from a reader, Gretchen, that she had made a quilt from one of my patterns, Cherry Blossom. The pattern is available in my Craftsy store.


Gretchen made her Cherry Blossom quilt larger than the pattern and she added a pieced border. All I can say is WOWIE! Cherry Blossom is one of my favourite quilts and I love her version. Isn't it interesting to see how a border can change the look of a quilt? You can read about Gretchen's quilt on her blog Gretchen's Little Corner.


Gretchen added her own personal touch (I love doing that myself and am really pleased to know that Gretchen did her own thing too) by adding the pieced border!


I've procrastinated long enough. Time for me to start packing up the bedroom and think about stripping wallpaper. Until I post again, happy sewing.

Karen H

Friday, September 9, 2016

Rowdy Flat Library Quilt Block 1 is Finished!

We've had more house problems. In the most recent heavy rain the roof started leaking so getting that addressed has been my priority. We now have a new roof (I would rather have had new fabric) and the next step is to have someone go up into the attic to check the state of the wood, the insulation and the ventilation. There is some damage to the ceiling in one room so it will have to be repaired so I think that when that happens the entire room will get a fresh coat of paint. I see more dollars being spent in the near future and they won't be spent on sewing stuff.

I finished Block 1 of the Rowdy Flat Library Quilt designed by Susan Smith.


The block measures 22" finished. Some of the pieces, like the butterfly bodies are quite tiny but I simply focused on the one I was working on rather than think about the entire quilt. It is a little mind game that I play with myself but it makes the project less daunting!


This is the fabric I used for the body.


I drew the body with a fabric safe marking tool.


I cut out the body leaving a 1/8" seam allowance and on the sides and bottom I left a generous seam allowance.

I carefully needle-turn appliqued the top edge of the butterfly's body and then trimmed down the rest of the fabric and finished the needle-turn applique. It made it possible to use a pin to hold the body in place while I appliqued the top edge.

Work is now underway on Block 2. The toile skeleton fabric is tinted with my markers and embroidered details added. This is one of the blocks that I first saw that REALLY appealed to me because it had oodles of bees, one large and 18 small! Here is the large bee.


And here is the block with the toile and the big bee.


Next step is the wreath with lots of green leafs. There are flowers in the corners and the last step with be the 18 little bees! I will use the same gold and brown striped fabric for all of the bee bodies.

I have been working on the pattern for The Empire Quilt. It is taking much longer than expected but I'm hoping to get it to you soon.

Until I post again, happy sewing!
Karen H

Friday, August 26, 2016

Block 1 of the Rowdy Flat Library Quilt and Barbara Brackman

My quilt Stars in The Loft was recently shown on Barbara Brackman's blog Material Culture. You can read the post here.  What an honour and a thrill that was! This quilt remains one of my favourites!


I continue to work on my Rowdy Flat Library Quilt designed by Susan Smith. The yellow petals are stitched down and the raw edges covered with bias binding. I used a very lightweight cotton. It is like a lawn or a batiste and it was very easy to work with.


I used the same fabric for the next component which is four bows and a small heart.


Once the bows were stitched down I was able to proceed to the next step which was to add a wreath. The stem is made of bias tape and once again I chose to use my lightweight cotton. The pattern calls for scraps of all colours for the leafs but as much as I like scrap quilts I found it difficult to use random scraps so I chose to make the leafs with green fabrics. The lighter greens are at the top and the darker greens toward the bottom.


There are flower pots in each corner. The pot in the lower right is stitched down as are the little stems which are 1/8"! I thought that they would be difficult but in the end they were so fast and easy to do. I had considered using different fabrics for each pot so you can see that the pot on the left is a different fabric. In the end I decided to use a single print but cut out the pot from different parts of the print. The flowers will all be cut from different parts of the same fabric. The method I used to make the circles is not unique but it works for me. You can read my tutorial here.  I like to cut out all of my circles at once. In this case I needed 20 of them. In the evening I basted them so the edges could be gathered and I just left a long tail of thread so that I could draw it up when I pressed the circles.  There are butterflies to be added to this block and their bodies are small and I thought they would be REALLY difficult but I had an idea about a method that might made it easier so I tried it out and it worked like a charm. I plan on showing you what I did in an upcoming post.

I'll leave you with a close-up of the ink and embroidery details in the toile fabric.


Until I post again, happy sewing!
Karen H


Friday, August 12, 2016

Making large circles for my Rowdy Flat Library Quilt

Do you ever have to draw a large circle of a specific size? I needed to make circles of varying sizes for my Rowdy Flat Library quilt. There are tools that you can purchase to draw circles of different sizes but why spend money when you can make the tool yourself for nothing?

The first step is to understand the circle. Most often patterns will call for a circle of a particular measurement. That measurement is the diameter of the circle. The diameter of a circle is the measurement through the middle of the circle from one side of the circle to the opposite side. If your pattern calls for a 5" circle the distance from one side of the circle to the other through the middle of the circle is 5".

Diameter of a circle

To make your circle maker tool you will need to know the radius of the circle. The radius is the measurement from the midpoint of the circle to the side. You simply divide the diameter by 2 to come up with the measurement. If you need a 5" circle the radius is 2 1/2".

Radius of a circle

To make your circle maker tool you need only a few supplies: a strip of lightweight cardboard, a ruler, a slim darning needle and a mechanical pencil. The glossy bookmarks used to advertise businesses or quilt shows work really well!


I was lucky enough to get a bookmark that has a little ruler printed on it. If I didn't have this I would just cut a strip of lightweight cardboard that is roughly 1 1/2" wide.  Along the length of the strip of cardboard I would draw a line that is 1/4" in from the long edge. Starting roughly 1/2" in from the end I would make marks in 1/2" increments.


To finish my circle maker tool I take my slim darning needle and pierce the cardboard where the 0" mark intersects with the line that is 1/4" in from the long edge of the tool. If I want to make a 5" I will pierce the cardboard at the measurement that equals the radius, 2 1/2". That's it! The tool is made and ready for use!

How do you use it? Simple! Take your square of fabric. Make sure it is pressed flat and smooth. If you press it with a little starch or sizing it will ensure a nice flat finish. Find the middle of the square by folding it in half in both directions and make a soft crease at the centre point to create a little cross.

Place your fabric on your cutting board. Take a pin and slide it through the hole at the 0" mark on your circle maker tool. Place the pin on the middle point of your fabric. Hold the pin in position so that it is perpendicular to the fabric and place the tip of your mechanical pencil through the hole at the 2 1/2" mark.


Slowly and gently begin drawing the circle.


I like to draw half the circle and then reposition my hands and the circle maker tool in order to draw the other half of the circle. When you do this be sure to check that the lead of the pencil is lining up with the line you've already draw. If they don't line up your pin at the midpoint may have moved in which case you will need to be reposition the pin.

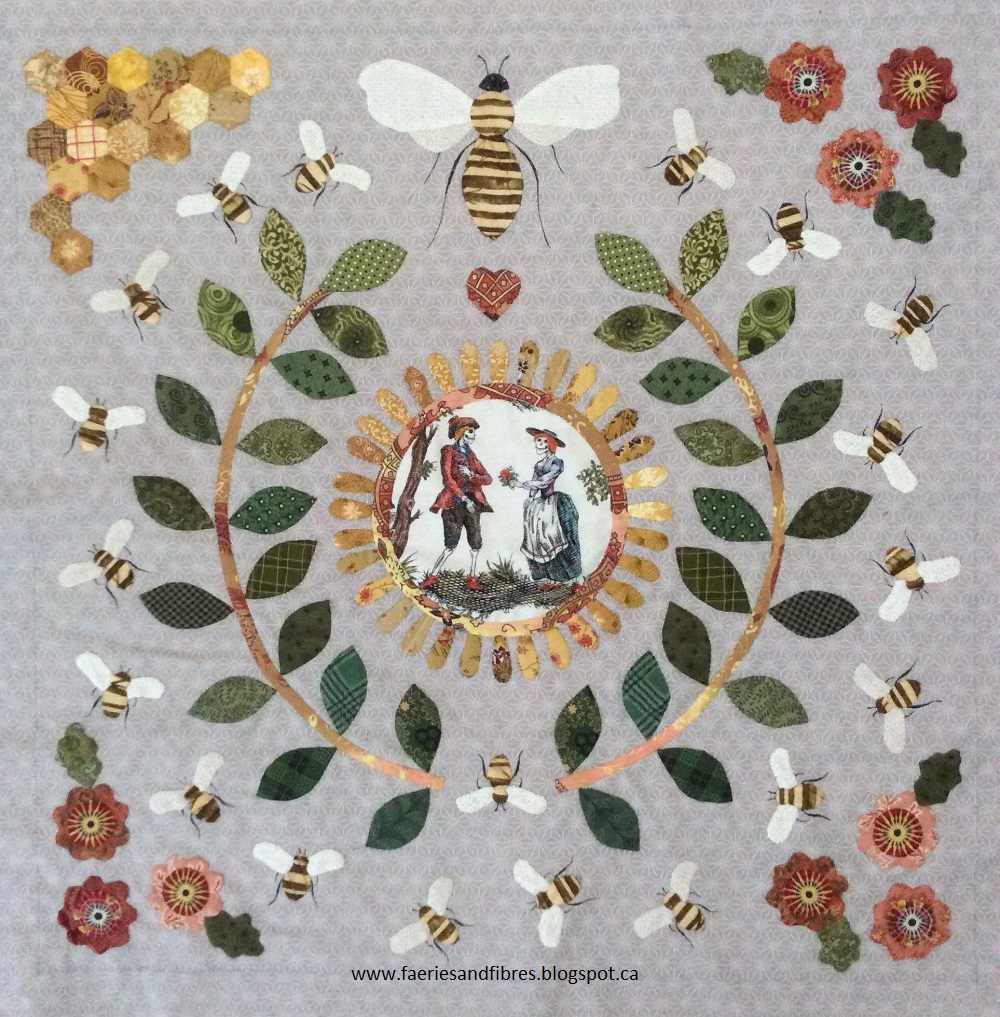
I used this method to make the circles on the toile fabric I plan to use for my Rowdy Flat Library Quilt designed by Susan Smith of Patchwork on Stoneleigh.  I showed you the skeleton toile in my previous post. It is a great print but it was black and white and so I added colour with ink pens and then I added some embroider details! I should have taken the picture with my camera rather than my tablet. Oh well, at least you get the idea. I won't need to use all of the circles but I had so much fun making them that I just couldn't stop.


Here is a close up of one of the coloured circles!


Once the toile circle is placed on the background fabric and a surrounded with little petals - 32 of them!


The next step will be to make 1/4" bias binding that will be appliqued over the edges of the petals. Stay tuned because there are more pictures to come.

I'll leave you with a close up of my pretty little pincushion that was made for me by my friend Paula.


Until I post again, happy sewing.

Karen H

Monday, July 25, 2016

Rowdy Flat Library Quilt and a Tutorial for straightening the edge of a hexagon quilt top

Once again I'm sorry for the silence. All is well but I've been distracted by a variety of happy events and captivating projects. I recently saw some blocks that really caught my attention. There were made by an Australian quilt maker, Susan Smith of Patchwork on Stoneleigh and she is offering the patterns as a block of the month. The blocks will be made into a quilt (which is yet to be revealed). The name of the quilt is the Rowdy Flat Library Quilt and when I saw the bees I was hooked.

The pattern calls for toile and I have been saving some scraps of a toile that I used to make my Lazy Punk quilt.

Lazy Punk

The toile looks like a typical toile until you have an up close look. It is skeletons! I've been saving this scrap waiting for the perfect opportunity to use it and this is just the quilt! But my plan was to transform the fabric to add my personal touch and transform it I did. More to come on the transformation in the coming days.


For now I thought I would do a little mini tutorial about another way to finish the edge of a hexagon quilt. There are so many ways to finish the edge of an English paper pieced hexagon quilt top and today I thought I would share one of the methods that I like to use to create a straight edge.

There are two different edges on a hexagon quilt top. The first is an edge of "Vs".


This one is easy to straighten because you just trim the points with a rotary cutter and ruler and the result will be a nice straight edge. The other important factor is that in trimming this edge you will not be cutting through your stitching so the seams will be intact. I leave the papers in my quilt top until I am ready to trim the points. This prevents stretching.


The other edge looks like dentil molding.


You could simply trim the hexagons 1/4" beyond the mid-point (the red circles) to give you a nice straight edge.


When you open up the seam of the lower hexagon the problem is that the 1/4" seam allowance area is not stitched closed (see inside the red circle). I like my seams stitched right to the end of the seam because I know it will be secure. If it is not stitched to the end my fear is that eventually the seam may open.

A second option is to open the seam allowance at the top of the innermost hexagons (at the red arrows) and then trim the them on the red dashed line. What I don't like about this method is that when you add a border or binding the seam will be 1/4" in from the edge (the black line) and so the outermost hexagon will be less than a half hexagon. This just looks wrong to my eye.


My preferred approach is to add half hexagons to fill the space. Normally I baste my hexagons from the back so that the basting will remain in the quilt however when I make half hexagons to fill the dentil edge I prefer to baste through the paper.


I like to work with a larger seam allowance because it makes the basting process so much easier. I dislike cutting fabric slowly, especially if I need to cut lots of fabric for the path between the hexagon rosettes. I wrote about my rapid fire cutting method here. When making half hexagons I will trim the raw edge after I've basted it to the paper. There is a precise 1/4" seam allowance that will allow all raw edges to line up.

My next step is to clip the basting basting threads at the top edge of the outermost hexagons and trim the outer edge so that there is a precise 1/4" seam allowance.


Once the outermost edge is trimmed I can set in the half hexagons.Notice that I've used some tiny applique pins to hold the papers in position. This is optional but I find that retaining the papers helps maintain nice, crisp edges for sewing.


The finished product is a nice straight edge that makes it easy to add borders or binding.


Until I post again, happy sewing!
Karen H