Friday, February 27, 2015

The New Hexagon Millefiori QAL - the beginning of Rosette 2

I am so far behind in this month's The New Hexagon Millefiori Quilt Along by Katja Marek but there was a good reason! I couldn't make my mind up about fabric choices and the colour in particular. I've been back and forth about working with a strong colour emphasis versus making each rosette different. This was my version of Rosette #1. It is a big piece and measures roughly 36" across!

My Rosette #1 in The New Hexagon Millefiori QAL

The second pattern in the QAL was released at the beginning of February but I haven't been able to decide what to do. Time is passing and the next Rosette will be available soon so I have to get going. I just started searching for a fabric that would work well for the hexagon in the middle of Rosette #2. Going through my stash I came across this fabric and decided to use it as the jumping off point for my Rosette #2.

I selected a little wren for the centre hexagon and framed her with the grey-blue fabric with gold and olive. It was a perfect fit! The sides of this hexagon measure 3".


Now I have to pull more fabric to make the six hexagons that will surround this one! I think I want this quilt to have a warm feel so I'll be looking for fabrics with rust, caramel, toffee and crimson.

Until I post again, happy sewing!
Karen H

Wednesday, February 25, 2015

A path for Birds

On Monday I wrote about making the round of rosettes that will frame the medallion in my Birds in the Loft hexagon quilt. I neglected to mention that the units made of three caramel prints will also need to have a path fabric added in order to fit everything together. There are eight of these units so the sewing will go quickly.


In the past I've written about constructing the path for a hexagon quilt. Hexagon rosettes will surround the medallion in my Birds in the Loft hexagon quilt and they will be separated by an off-white path. The easiest method of constructing the path is to sew together five hexagons and then these hexagon unit is stitched to the rosette. My thread colour will match the path hexagons.


I'll need to cut and baste 900 hexagons. The cutting will be fast and easy. I'll start by cutting 2 1/2" strips of path fabric and then I'll quick cut the fabric using the method I wrote about here.  So how many strips will I need? I can cut 18 hexagons from each strip so I'll need fifty strips which translates into 3.25 meters or 3.5 yards of fabric. I sure hope I have enough but if not I'll pull something similar and add it to the mix! I will need to prepare more path hexagons to finish the outer edges of the rows of rosettes but I'll write about it when I get to the point where I need them.

I will attach the path units of five hexagons to 180 of the rosettes. The remaining 20 rosettes will surround the medallion and many will require a different number of path hexagons. They are attached to the caramel connector units that go around the medallion will also need the path hexagons attached to them but they will need different numbers of hexagons depending on their position in the ring around the medallion. In the following diagram you can see the medallion with the rosettes. Inside each rosette I've indicated the number; it corresponds to the diagram that shows the placement of the 100 pairs of rosettes. Beside the rosette I have placed a number and it tells me the number of path hexagons that need to be stitched to the rosette. From this point on the rosettes with the path of five hexagons shown above will fit perfectly around the medallion. I'll explain how in an upcoming post.


For now how about another rosette or two? Well your wish is my command so here we go! I struggled with selecting a centre for this rosette. I just set it aside and every now and then I auditioned it on different fabrics until I found a good fit!


The dragonfly in the middle is cut from the same piece of fabric that I used for the four bees in the medallion. I really think it is a good idea to repeat fabrics in this way to control the scrappiness of the quilt.

Time for me to do some cutting and basting so until I post again, happy sewing!
Karen H

Monday, February 23, 2015

Birds in the Loft layout of plan for the rosettes

I sketched the layout of the hexagon rosettes that will surround the medallion in my Birds in the Loft quilt. I will need a total of 100 pairs of hexagon rosettes for a total of 200 rosettes. If you look closely at my diagram you can see I've numbered the rosettes from 1 to 100 starting in the upper left corner moving left to right. When I got to 100 I moved to the bottom of the quilt and started in the lower right corner and numbered the rosettes from 1 to 100 moving from right to left. By mirroring the hexagon rosettes in this way I hope to add symmetry to the quilt (or that's the plan).


In the following diagram you can see the rosettes that will frame the medallion. The number 57s are opposite one another at the top and bottom. Number 100s are opposite on another on the side.


I think the red star hexagon rosette is dramatic so it will be number 57 which means it will be positioned at the top and bottom of the medallion.


Number 100 will be this brown hexagon which is also dramatic.


There will be a caramel filler piece between each of the coloured circles in the diagram above. Before sewing them to the rosettes they will need to have background fabric added to them so I will sew three background hexagons together and then add them to each of the eight caramel strips.


Here you can see the four hexagon caramel pieces with the background fabric added to my diagram.


The last thing I will share is a pair of rosettes. Sometimes I don't have enough fabric for two complete pairs as was the case with the following two rosettes. I had nine hexagons in total so I made one rosette with six of them and I added a second fabric to the remaining three hexagons and it works. I'm sure that there will be  others where I run short so I'll add something similar to complete the block!


The next step will to develop the plan to divide the background of rosettes into manageable sections to make the sewing easier.

If you are in need of more hexagon eye candy I encourage you to visit Hilda at Every Stitch. She has just posted pictures of her finished quilt Stars Meet Hexagons. It is a real beauty and exactly the kind of quilt that makes me want to sew, sew, sew!

Until I post again, happy sewing!
Karen H

Saturday, February 21, 2015

Working on the final medallion pieces for my Birds in the Loft hexagon quilt

The beast (Jinxie) is sleeping but not on my sewing table so I was finally able to cut the strips of caramel fabric for the next sets of hexagons on my Birds in the Loft hexagon quilt. This is the diagram of the quilt with the caramel hexagons.


If you look closely at the diagram you can see I will need twelve strips made of four hexagons and eight curved units made of three hexagons. This is what they will look like. I've given careful consideration to the placement of the hexagons so that there is some flow to the red vines. For the post part they move horizontally. Taking this extra time has produced better results.


I will sew these units and then I plan to add to them. They will eventually become the final  border but I am making it off the quilt. Once it is constructed I will sew it to the medallion. This final round will include some of the hexagon rosettes I've made. I'll need ten pairs of rosettes and they are ready and waiting!

I've stitched more hexagon rosettes for the area that surrounds the medallion. Many of those I've already made are reds and here is yet another. I adore this Malvern Hill print because it allows me to create stars so easily. It is the same fabric that I used for the olive border in the medallion.


I had mentioned that there are a lot of red rosettes in the pile and I'm trying to expand the colour palette to give more variety. This one still has some reds and pinks but the aqua will be a nice addition. I love fussy cuts, even if they are just the middle of the rosette. They add pizzazz!


In the next few days I will have to work on the overall design of the quilt and break it down into manageable sewing sections. I've also got the beginnings of a border design in mind and will have to work on those ideas to be able to finalize the plan for this quilt. That's lots of work for me but so much fun.

Time to get going so until I post again, happy sewing!
Karen H

Thursday, February 19, 2015

Girl interrupted

I had planned on cutting more hexagons so I could make rosettes but this girl has been interrupted by you know who......Jinxie! He is about 8 months old and I'm hoping he'll settle down soon and that I'll be able to reclaim my sewing table.


So the cutting may have to wait for another day. Instead I stitched together the pieces of the medallion for Birds in the Loft. I also added to my diagram for the next round. There will be a round of off-white hexagons all around the medallion. I already had them cut and basted so I stitched them together and added them to the medallion too.


This is the Birds in the Loft medallion stitched together. It is now larger than my design wall so I'll have to start taking pictures outside but it is way too cold and there is far too much snow for that! For now this picture will have to do!


The next round will involve one final print but it will not completely surround the medallion AND best of all I can start adding some hexagon rosettes to the quilt. I've been through my fabrics and have pulled so many different colours and prints. What I finally settled on is a toffee coloured print that looks like a woodblock print. There is nothing on the selvage so I can't tell you anything about the fabric other than I've had it for several years and I quite like the look of it.


The caramel tones and deep crimson will work well with what I've already got in the quilt. I'll cut some 2 1/2" strips so I can make the hexagons if you-know-who wakes up and gets off my sewing table!


Until I post again, I hope your sewing is uninterrupted!
Karen H

Tuesday, February 17, 2015

A mess and the culprit!

Cute? Perhaps but then again perhaps not!


I had arranged the pieces of Birds in the Loft on the floor and then went to get the camera. When I came back this is what I saw!


When questioned Jinx about the Picasso-like rearrangement of my quilt pieces he just turned his head and made out like he had not idea what I was talking about! Clearly he isn't in the least bit sorry! He is a really nice little guy but I have to say I love him best when he is sleeping!


The pieces have been constructed for the centre medallion so they are ready to be stitched together. This is my diagram of the medallion for Birds in the Loft. Picture taking of my quilt doesn't appear to be an option today because Jinx is right in the thick of things!


Once stitched together the medallion will be pretty close to being done. While stitching it I'm also working on the hexagon rosettes.

This pair of rosettes are made from a striped fabric but I oriented the stripes in different directions to give the blocks a different look. I started by cutting a 2 1/2" strip across the width of the fabric. I placed the hexagon paper so that the stripe ran from point to point and cut six pieces to make the first rosette. For the second rosette I placed the paper so that the stripes ran from straight edge to straight edge making sure to centre three orange stripes on each hexagon.


I love the fabrics I used in this rosette. The gold fabric is an old fabric that I've had in my stash for years and I use it sparingly. The turquoise is a more recent addition. I think that the two together are a lovely combination!


Lia of Lia's Handmades has just launched her sixth Secret Tote Bag Swap. The theme of this one is black & white plus one colour. Sign up is open until February 27th. You will make a bag in black and white plus one colour? What will that colour be - the person who is assigned to you will give you three colours from which you will choose one. You can use multiple shades of the colour. You'll have no idea who got your name and your partner will have no idea who got her name until the bag is delivered. Most swappers include some lovely treats in the bad so it is a lovely surprise to get the bag in the mail. This sounds like a really fun swap. I've participated before and have been so happy with every tote bag I've received and I hope that my partners were equally happy with theirs. If you are interested in participating you'll find all of the information here.

That's it for today! I've got loads of hexagon rosettes to make so until I post again, happy sewing!
Karen H

Sunday, February 15, 2015

The Winner and some reverse sewing is required


Thank you to everyone who took the time to leave a comment on my blog for the Grow Your Blog event. I read and replied to every single comment (except for those who are no-reply bloggers). All of the names went in a hat and one was pulled out.

The prize!

The winner is Wendy. She wrote "I have been following you for a couple of yrs now and I love your blog and all the inspiration on here. I am actually going to make my rendition of your 81 Giant Monstrosity quilt this coming year. I am gathering fabrics now."  I've emailed Wendy to let her know that she won the draw! I also would like to extend a very special thank you to Vicki of 2 Bags Full for organizing this terrific event!

I really appreciate the comments you leave on my blog post. A reader asked a question about my Birds in the Loft quilt that is in the works right now. She wanted to know if I planned on repeating the teal colour elsewhere in the medallion. This is the diagram of the medallion with the blue fabric at the top and bottom. The little black dots represent a fussy cut bee.


The fabric I used is actually an aqua colour with bees. This is the medallion with the aqua bees in place.


On the sides I fussy cut bees from an off white fabric and I was quite happy with the look until the question of the fabric colour was raised.


That got me thinking - what would happen if I replaced the off white bees on the side with aqua bees. I got up this morning, cut and basted two aqua bees and took before and after pictures.

Birds in the Loft medallion "before"

This is the after picture with the aqua bees pinned in place on the medallion and the medallion is much improved with this small change. I  have some reverse sewing to do today! I construct all of my hexagons in the same way; I create an "open donut" and then sew in the middle hexagon using a thread colour than matches the "donut". It makes for fast sewing and equally fast reverse sewing!

Birds in the Loft medallion "after"

I'm going to need 270 hexagon rosettes for this quilt so I've been cutting and sewing. Here's today's installment of what I've managed to create. Love, love, love the fabric in the middle. See how just one fussy cut combined with a tone-on-tone print can create a lovely effect?


This rosette is made from an old scrap of Christmas fabric. Although I'm not usually a fan of holiday prints I thought I would give this scrap a try to see what happens and I was pleased with the result. I will likely use it in the quilt but if not it will just go in a box of hexagons to be used at a later time!


Before I sign off I want to once again mention that I reply to every comment so if you don't hear back from me it means you are a no reply blogger and as such I have no way to contact you. Kathyinozarks published an explanation about how you can update your profile so that your email address is available. You will find it here.

It is time for me to get out the seam ripper so until I post again, happy sewing!
Karen H

Friday, February 13, 2015

Spicing up a quilt with a little paprika

If you are visiting for my Grow Your Blog & Giveaway post please click here. The winner will be announced on the morning of February 15!

The next round of hexagons in Birds in the Loft will be a lighter paprika print that I used for the backing of my hexagon quilt Good Golly Miss Mollie. I save the backing fabric that was trimmed away after the quilting was done because I knew those scraps would come in handy. The print is a warm colour which is what I had settled on for Birds and the value is I think appropriate for what will come next.


This is my diagram of Birds in the Loft. I haven't got the medallion ready to show because the olive, gold and paprika hexagons are being constructed off the quilt.


Here you can see the first of the four units under construction. Three more to go and then they will be almost ready to be attached to the medallion. The one pictured below will go in the upper left corner and there will be an identical unit that will fit the lower right corner. I will need to make two more, one for the upper right and the other the lower left, and they will be a mirror image of this one.


By now you can see there are voids on the top, bottom and sides of the quilt design and after reading my tutorial on making a hexagon frame you know that these framed birds will fill those spaces! This one will go on the right side of the medallion. There will be another for the left side but it will be a mirror image with the bird facing toward the centre. The top and bottom frames will be more ovoid in shape. On all four the darker brown fabric will be on the inside edge and the diamond print on the outside edge.


I've also made another pair of identical hexagon rosettes and there are several more cut out and ready to be basted and stitched! I like the star in the middle - so lacy!


I've looked through the rosettes I've made and there are lots of reds. I think I need to start working with some other colours! So my plan for the weekend is do cut, cut, cut!

Until I post again, happy sewing!
Karen H

Wednesday, February 11, 2015

TUTORIAL: Creating a hexagon frame

If you are visiting for my Grow Your Blog post & Giveaway please click here.

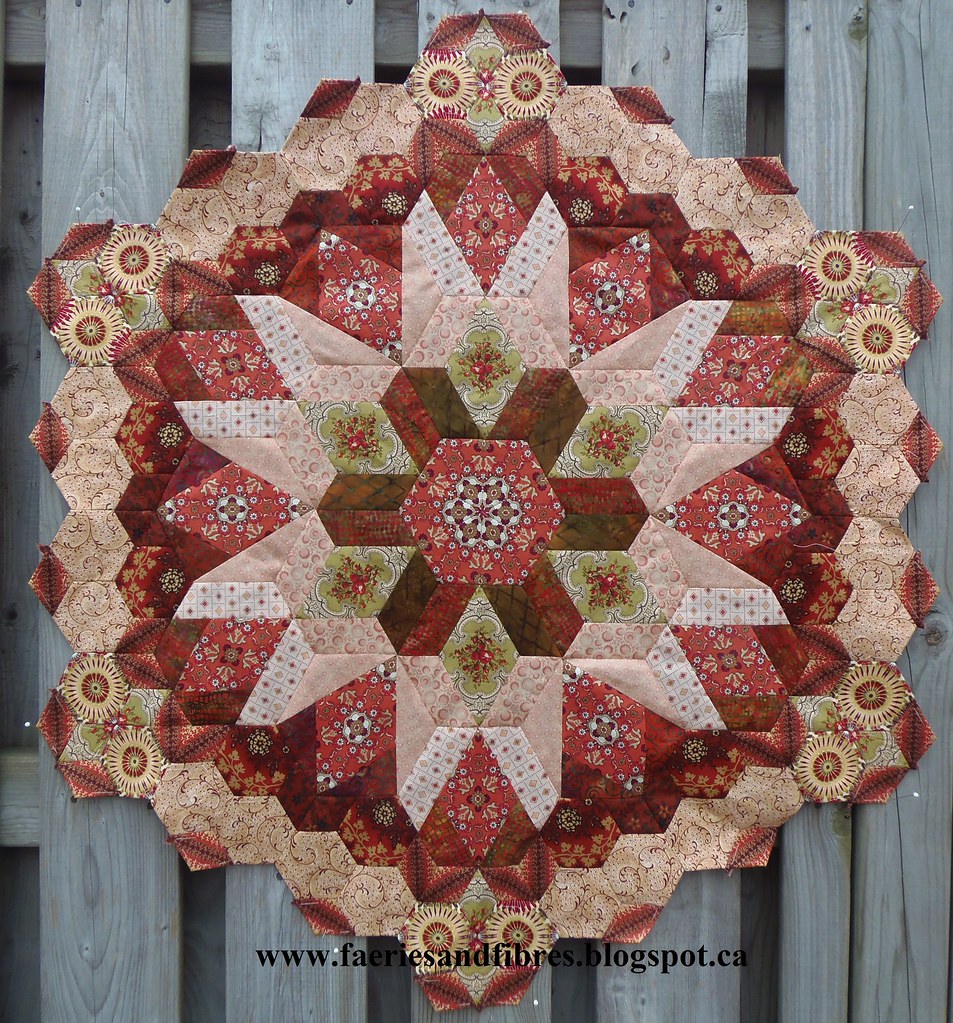
I've started the four filler pieces for the top, bottom and sides of the medallion for my hexagon quilt Birds in the Loft. I decided I want to repeat the bird fabric that I used in the centre. I didn't want to make oval frames like I did for the birds in the middle.

Birds in an oval frame in the centre of the medallion for Birds in the Loft

The reason is that the way I've designed the medallion calls for hexagon frames but I wanted to soften the inner edges of these frames to mimic the centre birds. Let me show you what I mean!

I started by making the frame with hexagons.


I want a nice soft curve on the inside of the oval so I folded the points of the hexagons under on the inner edge. I basted with thread and pressed the whole thing with a hot, dry iron. This is what the frame looks like from the front. Now if you're wondering why I didn't modify the shape of the paper templates rather than turning under the points it is because I found that the inner edge where the hexagons meet is not as smooth. If you prefer to modify your individual paper hexagons by cutting off the points rather than making basted hexagons and folding under the points by all means do so!


This is what the frame looks like from the back.


The next step was to rough cut the bird that will fit inside the frame. I did this by laying the frame on the fabric and tracing around the inside edge with a chalk pencil. I cut out the bird leaving a generous allowance of 3/4" to 1" beyond the chalk line.


The final step was to position the hexagon frame on the bird and glue baste it in place with my Roxanne Glue Baste-It. You only need tiny dots of that glue to hold the frame to the fabric.


I appliqued the frame to the bird with Superior's The Bottom Line in a taupe colour. A fine applique needle was used and when I was doing the applique I was careful to catch just a few of the hexagon threads without catching the paper. Once the applique was completed the basting thread that was used to hold the folded hexagon edges in place was removed. Notice that the brown and white diamond print on the right is a directional print. I made sure that the diamonds radiated out from the centre. The brown on the left is also a directional print but it is such a tiny print that I didn't worry about the fabric placement because it reads as a solid.


The excess red fabric was trimmed from the back to roughly 1/4 - 3/8".


I leave the papers in place until the hexagon is surrounded with other hexagons. I stitched three background hexagons to the right side so that I could demonstrate the piece with some papers removed.


Two of the hexagon papers were removed. Because I was careful not to catch the papers in my applique stitches the papers popped out easily. If you happen to catch a bit of the paper just take extra care in removing the paper. At the orange circles you can see the points of the hexagons that were folded under. They can be trimmed or they can be left as they are; the decision should be based on the on the weight of the fabric. If the fabric is heavier/coarser I would trim. If it is lighter then I would leave the points in place.


That is one frame completed and there are three to go. If you are wondering why I used two browns the answer is simply that I was using up my scrap 2 1/2" strips of fabric! In so doing it adds another design element and it is thrifty because I'm making do!

So there you have it! This is a great way to use your hexagons with beautiful large prints that you don't want to chop up into small pieces. Wouldn't it be great to make a quilt out of framed birds or flowers and you could separate your blocks with a hexagon path? Another option would be to applique these framed pictures to a background square of fabric; the square blocks can be easily stitched together with or without sashing. Just think how quickly you could stitch a hexagon quilt!

I'm linking up with several blogs where you will find tons of creative inspiration:


Until I post again, happy hexagoning!
Karen H