Showing posts with label feathers. Show all posts

Monday, September 1, 2014

More about basting hexagons and more about quilting Good Golly Miss Mollie

Chantal left a comment in which she asked if the basting method I wrote about yesterday would work with 2" hexagons. I think that it would provided that the seam allowances were turned and finger pressed before basting but I'm just guessing as I've never worked with 2" hexagons. What would work is Missie Carpenter's method which uses freezer paper and starch. You can read about it here. I've tried it and it works beautifully so be sure to check it out!


James P left a comment and asked "when you're turning over your fabric edge to baste, how can you tell you are against the paper piece? Using normal paper I would think it is too thin to feel an edge". I'm answering the question here because James is a no-reply blogger. I reply to every comment so if you don't hear from me that would be the reason. Now as for the paper I use regular 20lb bond printer paper and I can feel the edge. If I am unsure I will pinch the fabric between my fingers to press in the fold and then lift the seam allowance to ensure that the fold is against the paper. Sometimes however the weight or texture of the fabric is more challenging so what I'll do is finger press all of the seam allowances before I baste. This is what it looks like once it has been finger pressed.  The basting goes easily and smoothly when the fabric is prepared in this way.


When I finger press I work in a counter clockwise position. For demonstration purposes I`ve pressed the seam allowances with my Dritz Petite Press so that there will be a nice sharp fold for the pictures but it isn't necessary to do this - a good pinch with your fingers is sufficient. To start I fold down the top seam allowance and finger press.


Working counterclockwise I'll turn over the seam allowance to the left and I'll finger press.


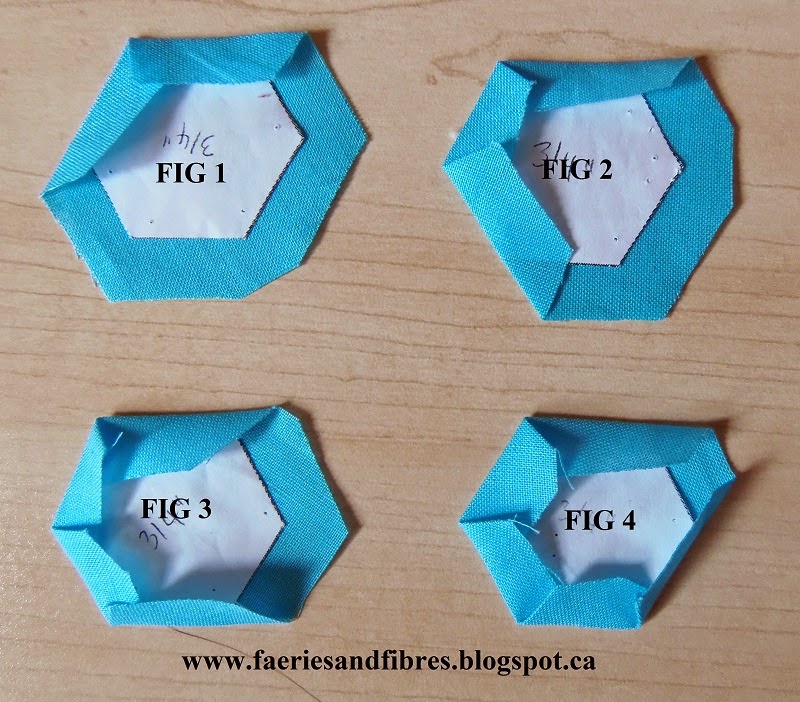
It will look like the hexagon in FIG 1. I turn the seam allowance at the bottom left (FIG 2) and finger press. I repeat these steps as shown in FIG 3 and FIG 4. At this point there is only one seam allowance to turn.

I fold the last seam allowance tucking it under the top edge and finger press.


Eventually you will get to know the feel of the fabric against the paper and you'll likely just skip the finger pressing!

I continue to machine quilt Good Golly Miss Mollie (my version of the Godstone Grannies coverlet) on my domestic sewing machine. There have been several comments about the small feathers in the 3/4" hexagons. I find the smaller shapes less challenging than the larger feathers. Try drawing a perfect circle that is 8" in diameter. Tough, isn't it? Now try drawing a circle that is the size of a small coin. Much easier! A wobble in a big circle is much more noticeable than a wobble in a small circle whether it is drawn or quilted. When quilting small I don't have to reposition my hands when I'm in the middle of quilting a shape makes for smoother quilting lines. Enough about this - how about some of the quilting in the hexagons?

I filled the following block with feathers, figure 8s, melon wedges and teardrops. To quilt the feathers in the pale yellow and those above and below the centre cross I drew lines for the spine.


In the following picture you can see a teardrop, melon wedges, figure 8 quilting and the feathers. The lines I drew for the spine have not yet been removed.


I prefer not to do any marking so I gave some thought to quilting designs that would not require marking. If the spine of the feather was going to be straight I would need a line but if I went for a curvy spine I could use the shape of my hexagons as a guide. So I quilted a curvy spine in the white round of hexagons and added the feathers. I start at the top of the spine and quilt down to the base. When I get to the base I quilted the plumes all the way back to the top. When I get there I come back down parallel to the spine to create a vein. I think it adds depth and dimension. I then started again at the top and quilted the feathers on the opposite side.


Here is a close-up of how I filled the centre four hexagons! I really like the texture that is created with this simple motif!


I used this same approach to quilt the odd shape in the taupe hexagons in this block.


Here's another example of an odd shape filled with feathers. I didn't quilt the other side of the spine and I think that it is needed so I will go back and add it to the quilting.


Phew! Lots of words and lots of pictures. Time for me to do some sewing so until I post again, happy sewing!
Karen H

Sunday, March 16, 2014

Quilting Feathers in Setting Triangles

Before I get started I wanted to once again mention that there was a typographical error in the measurement of the narrow border in Step 6 of Soupcon. I have corrected the error in the post.

As I was working away quilting the setting triangles on my Mom's Lazy Punk quilt I thought you might be interested in how I do it. I am quilting feathers in each one and I want them to look similar. I don't care if they are identical. I figure if I get the spine of the feather in close to the same position in each block the feathers will "appear" uniform.

To start I don't want the tips of the feathers to be cut off by the binding so I marked a line that is 1/2" away from the edge of the quilt. I won't quilt beyond that mark. To mark the spine I made  paper template. I like making templates from regular paper because it is very inexpensive, I can make a new one whenever I want and when I wear one out I can recycle it. To start I cut a piece of paper that was the shape of my setting triangle. The bottom edge lined up with the 1/2" mark on my quilt. I drew the spine on the paper and then cut out the inside curve. At the right side of the spine I left some of the paper on the bottom edge. My spine will stop at the corner so that I'll have room to fit in a few feathers for the tip that runs between the spine and the edge of the quilt. I marked that point "STOP" on my template so you can see what I mean.


I traced the along the edge of my template. I marked a circle on the photo so you can see the STOP point on my quilt.

I started at the left of the feather and worked the outer curve of the feather until I got to the STOP. I made a few more feathers to get me to the edge of the quilt and then I followed the inner edge of the plumes until I got back to where I started. I then quilted the feathers on the inner curve of the spine. The feathers don't have to be identical and they don't have to be perfect. The eye will see the whole and not individual components. And I can assure you that my feathers are not perfect but I don't sweat it and they do get better with practice! I'm still learning and finding that the faster my machine and the slower my hands the smoother the curves!


Before I set up my machine for quilting I decided to make one more fabric basket. Someone who is near and dear to me commented that she liked the basket that I made for my secret tote bag partner so I made one for her. I had bought a bag of scraps at a quilt store. They were taupes, greys, dark browns and black. There were also some linen scraps in the bag. I was able to make this little basket entirely from those scraps! I might tuck some chocolates and other little treats inside to sweeten it up just a bit! The basket measures 4" tall (excluding the handles), 6" wide and 2" deep. It is made from a free pattern that you will fine at Pink Penguin.


I simply must get back to quilting so until I post again, happy sewing!
Karen H

Monday, May 20, 2013

Barbara’s quilt, quilting feathers and my fast and easy way of joining the binding!


The last quilted stitch!
 
Barbara’s quilt is done! Well the quilting is done and the binding attached but it has to be turned over and stitched down. Then I’ll give it a quick wash and it will be done. I think my friend Babs will be very pleased with the finished quilt. She’ll pick it up on Thursday but until then I’ll tease her with a couple of pictures!


I quilted feathers in the border.


I really like what she did with that quilt, especially the feathers.
I wonder how she did it?


I always hoped that one day I would be able to quilt feathers but doubted that it would ever happen. They looked far too technical and challenging…well beyond my skill set. Two things changed that; a book and a Craftsy class. The book is Peggy Holt’s “Crete Your Own Dream Feathers”. It provides all the information, inspiration and courage you need to get started. The second thing that changed my view of feathers is Angela Walter’s Craftsy class “Free Motion Quilting with Feathers”. These classes go on sale fairly regularly.

 
Of course you need to develop your basic machine quilting knowledge and skills. I got everything I needed from two books, Heirloom Machine Quilting by Harriet Hargrave followed by Guide to Machine Quilting by Diane Gaudynski.
 

Harriet’s book is an excellent resource that provides all the basic information. I refer to it often. Diane’s book provides information about actual designs and how-tos. One thing I learned from Diane is using the darning foot to do everything, including stitch in the ditch. Barbara’s quilt was done entirely with a darning foot.

As I was attaching the binding it occurred to me that I have developed my own way of joining the beginning and end of the binding. I’m always looking for simple ways of doing things in the moment. What I mean by this is that I don’t want to have to stop, set up new equipment, measure, cut, press and sew. My sewing room is very small so if I need a cutting surface it involves a major rearrangement of the sewing room to make space! Also I want what I’m working on done quickly and neatly. So this is how I stitch down the last bit of binding.
 
I like to stitch down the edge of the quilt with a needle and thread. I stitch about 1/8" away from the edge. Then I trim the excess batting and backing fabric away.
 
 
The first step is to pin the beginning of the binding to the quilt like this. Leave these pins in place. I start stitching the binding about 2" in from  the beginning of the binding. Stitch down the binding all around the quilt as usual.


When I’m a couple of inches away from the beginning of the binding I stop sewing; leave the needle in the down position. I trim the binding so that it extends just short of where I started stitching the binding.


I tuck the end neatly inside the fold of the beginning of the binding.


Make sure the binding is nice and smooth and then pin it in place.


Continue sewing the last bit to stitch down of the binding.
 

 With a thread that matches the binding I stitch the join closed.
 
View from the front of the quilt

I sew through all layers of the join starting at the edge closest to the quilt and sew out to the folded edge. Don’t cut the thread! Once the join it is stitched closed I fold the binding to the back of the quilt and I continue stitching the binding down.
 

View from the back of the quilt
 
This is what it will look like from the front of the quilt! Fast, neat and easy!


One final tip, when stitching down the binding I used my nine patch pile and ended up with one more nine patch for the stash!


Until I post again, happy sewing!