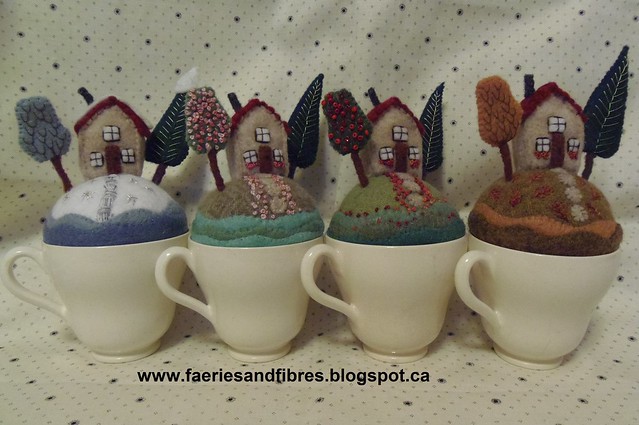
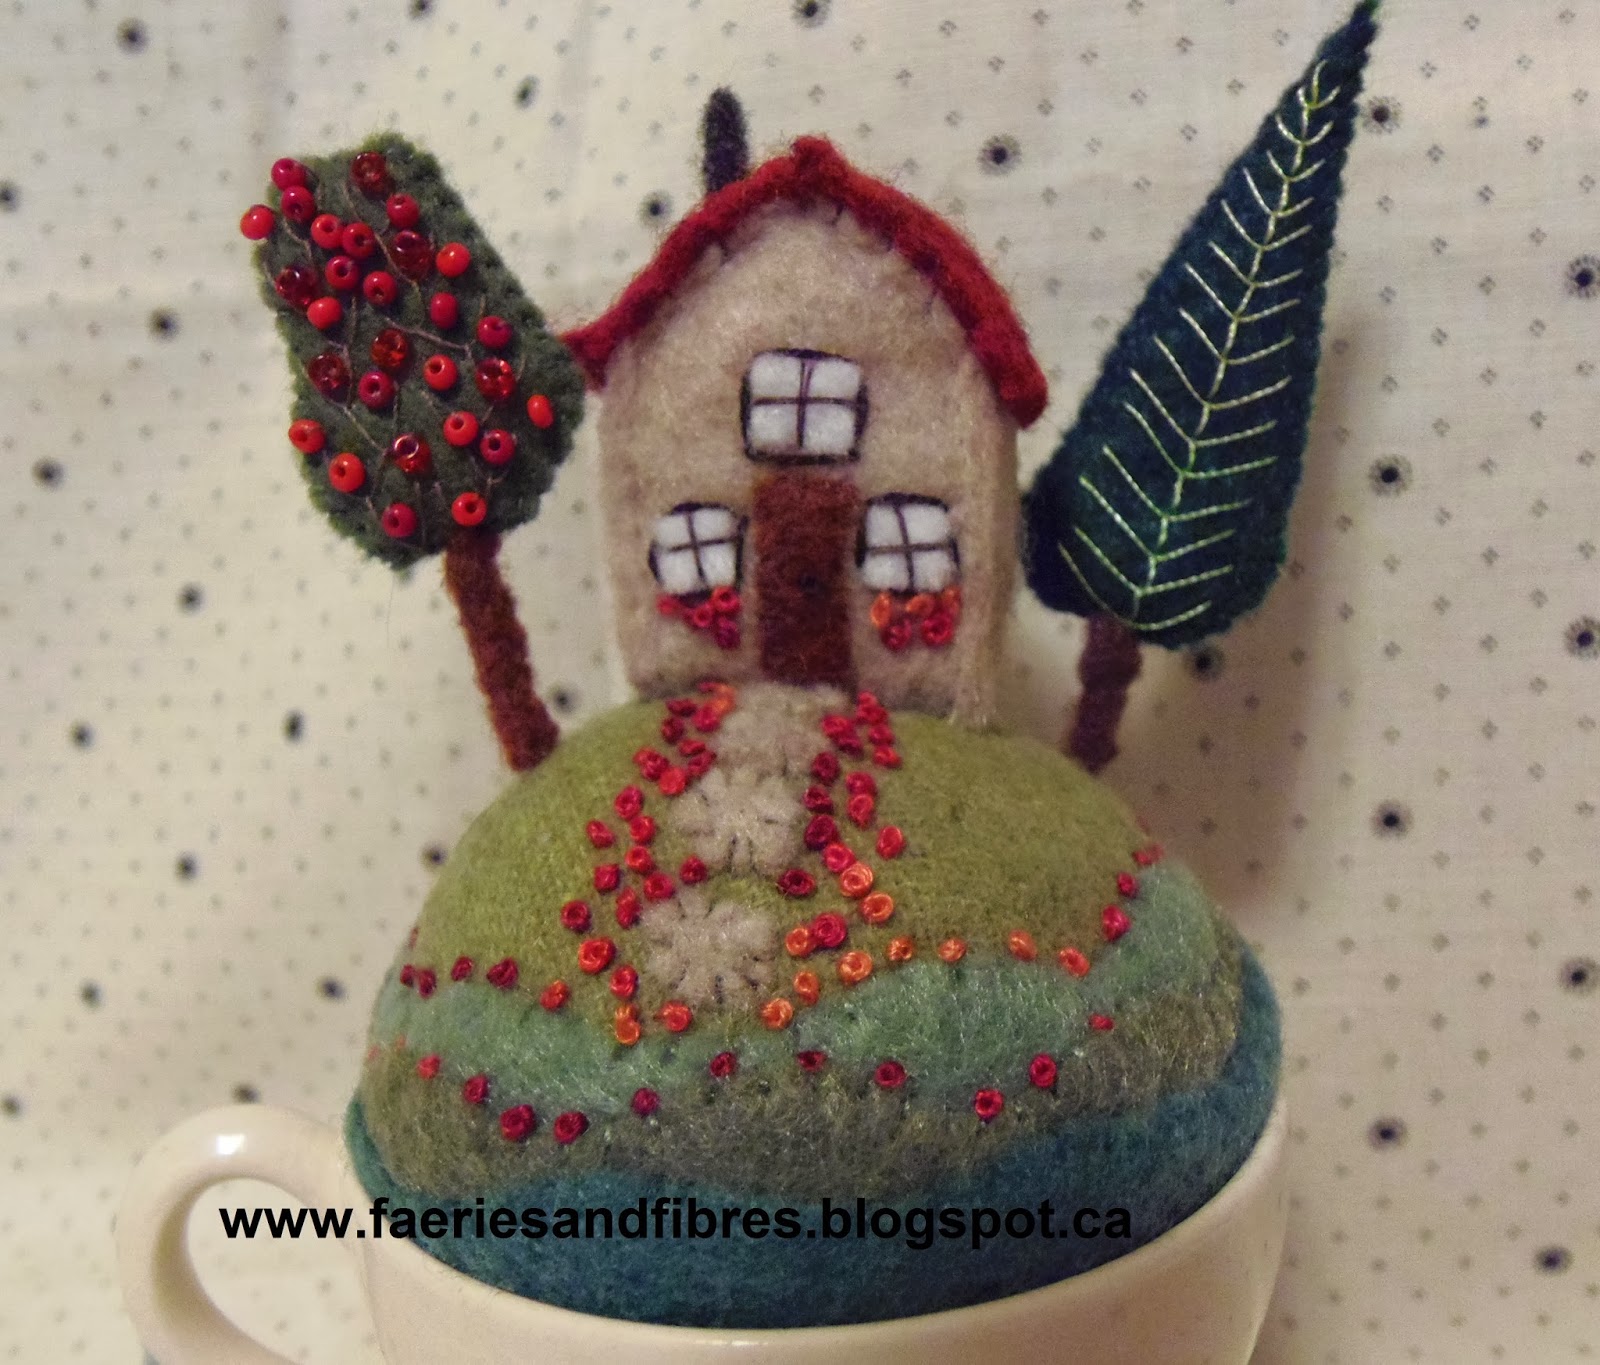
There were several comments on the pincushion I showed on Sunday. My starting point was the Tiny World Make Do Pincushion pattern by Mimi Kirchner. I've adapted the instructions to suit my methods and the materials I had on hand. I also created some of my own design elements. The instructions in the pattern are well written and very easy to follow and I've had so much fun making Tiny World Pincushions. The pattern is available here. Yesterday's pincushion is part of a series of four. I found four demitasses at the local thrift shop and made four identical scenes however they changed with the seasons.
I've finished two more blocks in the Gardens of a King quilt pattern that I am testing for Missie. This is another one that I thought would be tricky but I spent some time thinking about the block construction and it paid off. The blocks came together very nicely!
Today I'm going to spend some time with a friend learning how to make coil baskets! I saw a couple that she made and they were beautiful so I'll be sure to take pictures and share the results of our labours!
Until I post again, happy sewing!
Karen H
Showing posts with label tiny world. Show all posts
Tuesday, October 14, 2014
Friday, December 20, 2013
Holiday treats for your sewing friends
I had lunch with some lovely quilting friends this week and look at what I got! These are lovely little Christmas ornaments that are perfect for a quilter! I've already got them hanging in my sewing room.
Red and green was a very common colour combination in antique quilts so these little gems are perfect for display all year long.
They come from a lovely little florist shop in Toronto, Canada. The name is Sweetpea's and she has all sorts of lovely little treats and gift items including Grinch Christmas trees. I didn't have my camera with me so I could take a picture but they are gorgeous little table centre pieces!
While I've been busy working on my 2014 QAL I also managed to finish two more Tiny World Make-Do Pincushions. The e-pattern comes from Mimi Kirchner. If you need to make a last minute gift for a sewing friend these would be perfect. You'll have the pattern in your inbox in a matter of minutes and then the fun will begin!
Here I go again extolling the virtues of variegated floss....I only used two colours for this pincushion. I used a variegated green for the French knots in the garden path and a rosey pink/tangerine for the French knots in the path and the window boxes!
And lastly here are a few little crazy hearts that I made for the Christmas tree several years ago! They would make great small pincushions!
This hearts measure roughly 3" by 3".
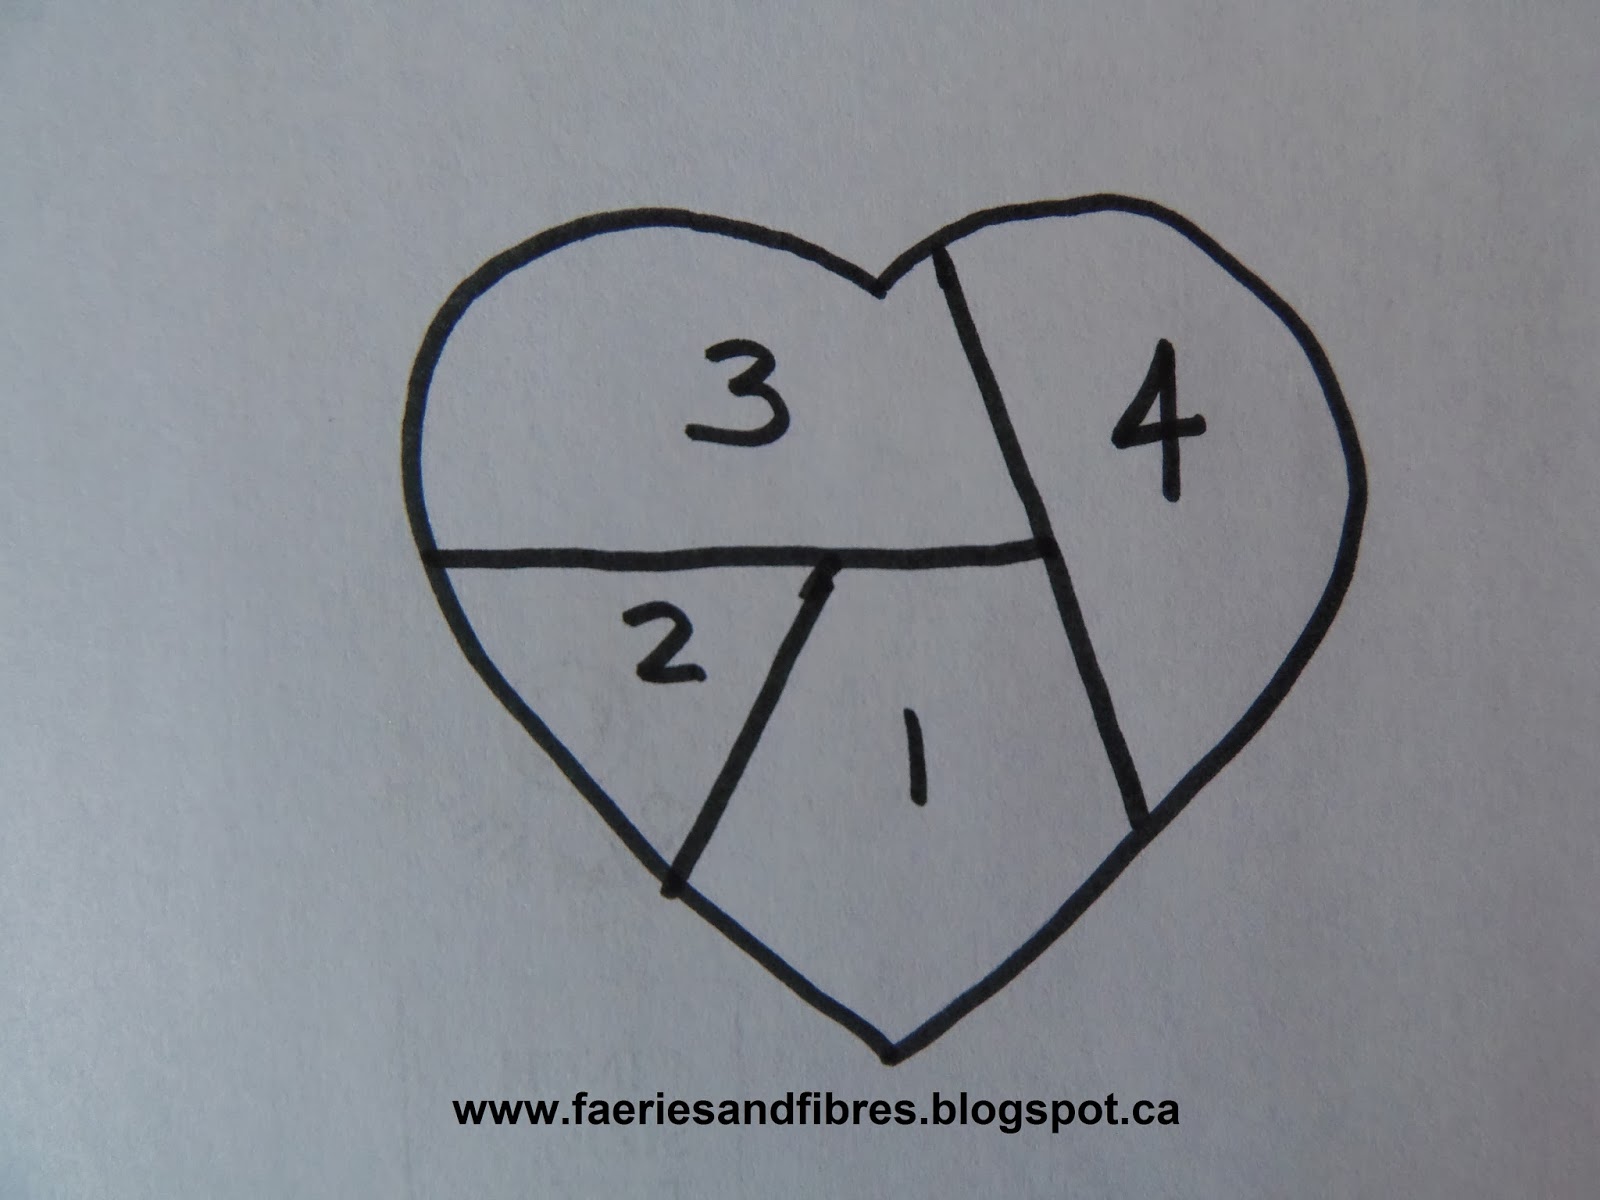
I cut a piece of scrap fabric that was roughly 4" square. I traced this pattern on the fabric and then foundation pieced in the order indicated. The next step was to embellish with embroidery stitches. The beading was NOT done at this point.
I then placed the right side of a 4" square of fabric that would be the back of the heart against the right side of the pieced heart. I machine stitched on the outside line of the heart leaving an opening for turning. I trimmed the excess fabric, clipped where necessary and turned the heart right side out. The heart was stuffed with fiberfill and the little opening was hand stitched closed. The final step was to bead the heart, make a tassel and voila....you're done!
Hope you enjoyed this little holiday treats! Until I post again, happy sewing!
Red and green was a very common colour combination in antique quilts so these little gems are perfect for display all year long.
They come from a lovely little florist shop in Toronto, Canada. The name is Sweetpea's and she has all sorts of lovely little treats and gift items including Grinch Christmas trees. I didn't have my camera with me so I could take a picture but they are gorgeous little table centre pieces!
While I've been busy working on my 2014 QAL I also managed to finish two more Tiny World Make-Do Pincushions. The e-pattern comes from Mimi Kirchner. If you need to make a last minute gift for a sewing friend these would be perfect. You'll have the pattern in your inbox in a matter of minutes and then the fun will begin!
Here I go again extolling the virtues of variegated floss....I only used two colours for this pincushion. I used a variegated green for the French knots in the garden path and a rosey pink/tangerine for the French knots in the path and the window boxes!
And lastly here are a few little crazy hearts that I made for the Christmas tree several years ago! They would make great small pincushions!
This hearts measure roughly 3" by 3".
I cut a piece of scrap fabric that was roughly 4" square. I traced this pattern on the fabric and then foundation pieced in the order indicated. The next step was to embellish with embroidery stitches. The beading was NOT done at this point.
I then placed the right side of a 4" square of fabric that would be the back of the heart against the right side of the pieced heart. I machine stitched on the outside line of the heart leaving an opening for turning. I trimmed the excess fabric, clipped where necessary and turned the heart right side out. The heart was stuffed with fiberfill and the little opening was hand stitched closed. The final step was to bead the heart, make a tassel and voila....you're done!
Hope you enjoyed this little holiday treats! Until I post again, happy sewing!
Monday, December 2, 2013
It is summer in the winter!
A Challenging Year
I've finished the fourth Tiny World Pincushion in my series of the Four Seasons. I found these cute little creamy coloured Wedgewood cups at the thrift shop and decided to make four identical houses but each would illustrate a different season. I drew my inspiration from my quilt A Challenging Year which is a year in the life of a cherry tree.
Here is the fourth and final teacup, Summer! A friend suggested that the little shrubs should be trees. Upon reflection I agreed with her since they were intended to be cherry trees. So all four now have tree trunks!
Summer
I used a variety of red beads for the cherries!
Summer close-up
Here are the four seasons together.
Close-ups of the other three seasons for your viewing pleasure!
Autumn close-up (before the trunk was added to the cherry tree)
Winter close-up (before the trunk was added to the cherry tree)
Summer (before the trunk was added to the cherry tree)
This is the cherry tree through the seasons in A Challenging Year.
The Tiny World Pincushions were made from a pattern by Mimi Kirchner. The instructions tell you all you need to make your own unique creations. You can see Mimi's latest pincushions including a castle here!
Now I've got a craving for cherries so hurry up summer! Until I post again, happy sewing!
Labels:
Autumn,
Mimi Kirchner,
pincushion,
spring,
summer,
tiny world,
winter
Wednesday, November 27, 2013
And the winner is.......
It snowed last night - how pretty!
Another big thank you goes to Mimi Kirchner. Mimi very generously donated one of her Tiny World Make-Do Pincushion patterns for my give-away. This is a terrific pattern, well written and well illustrated. You will be surprised how easy it is to make a Tiny World Make-Do Pincushion. But I warn you, they are addictive and I'll bet you won't be able to make just one!
Finally thank everyone who visited my blog and left a comment on the November 23rd post. Everyone with an email address was entered my give-away for the. Those who follow me by Bloglovin received an additional entry. Your kind comments are very much appreciated! And now the moment you've been waiting for! The winner of the pattern is Allierae! Allie wrote "So adorable - I love those little pincushions". She is going to have so much fun with this pattern.
Here is my latest Tiny World Make-Do Pincushion creation. Although it is winter outside, it is Spring inside. This is the third in my series of the Four Seasons. Each season is set it a little white Wedgewood teacup!
I used variegated pink thread for the cherry blossoms and the little flowers bordering the path.
So now I've completed Autumn, Winter and Spring. All that's left is summer and it is already underway.
Until I post again, happy sewing!
Saturday, November 23, 2013
A new tiny world teacup pincushion and a New Tutorial: Hop to it!
I recently purchased four tiny Wedgewood cups at the local thrift shop and I though they would be perfect for more tiny world make-do pincushions. But what comes in fours? The seasons of course!
Here is the first season, Autumn!
I embroidered leaves on the ground with some lovely variegated floss.
The other three seasons are in the works. If you would like to win a free copy of the Mimi Kirchner Make-Do Tiny World Pincushion pattern so you can make your own scroll down to the bottom of this post to find out how to enter.
It is nice to hide surprises in quilts. My Mom will hide a coin in the quilt sandwich (the year on the coin is the year the quilt was made). I like hiding things like initials or grasshoppers! They are a little surprise for the recipient of the quilt. And my favourite surprise is a grasshopper like this little fellow or a cricket!
I made quilts for two children and told them I hid a grasshopper in each quilt. They had loads of fun searching for their grasshoppers! Do you remember my Lazy Girl quilt top? I thought it would benefit from a hidden grasshopper so today I'll demonstrate how I make them!
I love this fabric because it is loaded with all sorts of interesting flowers and leaves that can easily be converted into "bugs" - a veritable metamorphosis!
I pin the body where it will be stitched being sure the tip the back end down a little. I often for a colour that is similar to the grasshopper so it is camouflaged!
I needle-turn appliqué the body in place. I'll use two strands of two colours of floss to embroider the legs and antennae. I like red and green but you can use whatever colours tickle your fancy!
First step is to use two strands of red floss to stitch a line for the thigh.
Next I use two strands of green floss to stitch all around the red line to make a nice chubby thigh!
For the last part of the hind leg I stitch the shin and a little foot pointing backwards. I weave my floss through the stitches on the wrong side and bring my needle up through the fabric just a little ahead of the thigh.
I stitch the next little leg and then weave my floss through the stitches on the wrong side and bring my needle up near the front where I will stitch the third and final leg.
I stitch the antenna and then weave my floss through the stitches on the wrong side and bring my needle up just a little in front of the first antenna right at the edge of the applique.
Here is the first season, Autumn!
I embroidered leaves on the ground with some lovely variegated floss.
The other three seasons are in the works. If you would like to win a free copy of the Mimi Kirchner Make-Do Tiny World Pincushion pattern so you can make your own scroll down to the bottom of this post to find out how to enter.
It is nice to hide surprises in quilts. My Mom will hide a coin in the quilt sandwich (the year on the coin is the year the quilt was made). I like hiding things like initials or grasshoppers! They are a little surprise for the recipient of the quilt. And my favourite surprise is a grasshopper like this little fellow or a cricket!
I made quilts for two children and told them I hid a grasshopper in each quilt. They had loads of fun searching for their grasshoppers! Do you remember my Lazy Girl quilt top? I thought it would benefit from a hidden grasshopper so today I'll demonstrate how I make them!
I love this fabric because it is loaded with all sorts of interesting flowers and leaves that can easily be converted into "bugs" - a veritable metamorphosis!
I cut out the portion of the fabric I want to use for he body making sure to leave a seam allowance of roughly 1/8" all around.
I pin the body where it will be stitched being sure the tip the back end down a little. I often for a colour that is similar to the grasshopper so it is camouflaged!
I needle-turn appliqué the body in place. I'll use two strands of two colours of floss to embroider the legs and antennae. I like red and green but you can use whatever colours tickle your fancy!
First step is to use two strands of red floss to stitch a line for the thigh.
Next I use two strands of green floss to stitch all around the red line to make a nice chubby thigh!
For the last part of the hind leg I stitch the shin and a little foot pointing backwards. I weave my floss through the stitches on the wrong side and bring my needle up through the fabric just a little ahead of the thigh.
I stitch the next little leg and then weave my floss through the stitches on the wrong side and bring my needle up near the front where I will stitch the third and final leg.
Once the leg is stitched I weave my floss through the stitches on the wrong side and bring my needle up through the head just below the edge.
I stitch the antenna and then weave my floss through the stitches on the wrong side and bring my needle up just a little in front of the first antenna right at the edge of the applique.
I stitch the last antenna and I am done!
You can always use your Sakura Pigma pens to add details such as an eye or shading or you could add a little bead for an eye!
Here are some examples of the grasshoppers that I've added to quilts and other projects.
There was a little knick in the backing fabric of my quilt Centre Ice so I covered it up with a grasshopper. So little hidden appliqués can be used to cover mistakes! Read about how my Mom used killer bees to camouflage some problems.
This one was hidden in Orange Crush. If you visit my Patterns by Karen H tab you will find a free pattern for this quilt.
This critter is hiding in a tote bag. I used variegated thread for the antennae!
This one is hiding in my Lazy Punk quilt.
And one last grasshopper with and inchworm and a bee and from my quilt Flora and Fauna, Parts of the Garden. Want to make a bee? Read all about it here!
And now here's the info about my give-away! You could win a Tiny World Make-Do Pincushion pattern from Mimi Kirchner. Mimi posted pictures of her newest teacup pincushions on her blog. To enter the draw for the pattern go my November 21 post and leave a comment! I will reply to each comment so if you don't hear back from me it is likely because you are a no reply/anonymous blogger so you'll need to provide an email address in your comment in a format such as name(at)emailhost(dot)com. The winner will be announced on November 27th!
For now I want to get back to my Love Entwined quilt so until I post again, happy sewing!
Subscribe to:
Posts (Atom)

.jpg)
.jpg)