Time for a new tutorial! I made a little scissor fob/pincushion and many of you were interested in detailed instructions so you could make one for yourself so I am pleased to share with you how I made mine!
Hexagon Scissor Fob Pincushion Tutorial
Basic Supplies:
2 - 1 1/4" paper hexagons (use larger if you prefer)
2 - pieces of fabric, one for front and one for back
12" cording
Assorted beads (2 larger beads for cord, seed beads and 5 pony beads for corners)
Fiberfill stuffing
All the usual sewing necessaries (needle, thread and scissors)
Construction Method:
Baste your fabric to the paper hexagons in the usual manner.
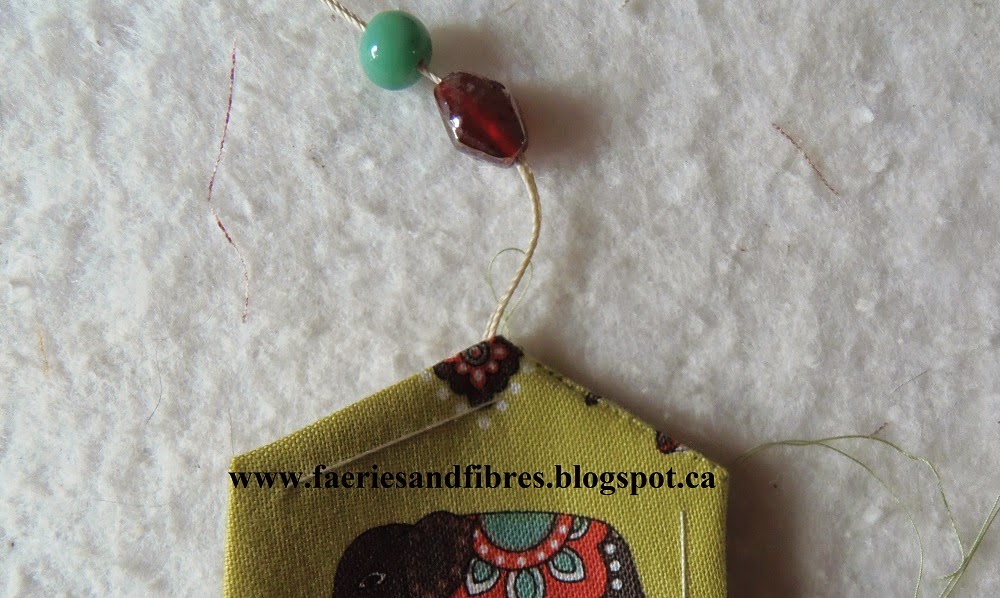
Thread both ends of your cord through the two larger beads. I like to place the larger bead close to the hexagon fob so it will be closest to the cut ends of the cord. Tie the loose ends making a good double or triple knot.
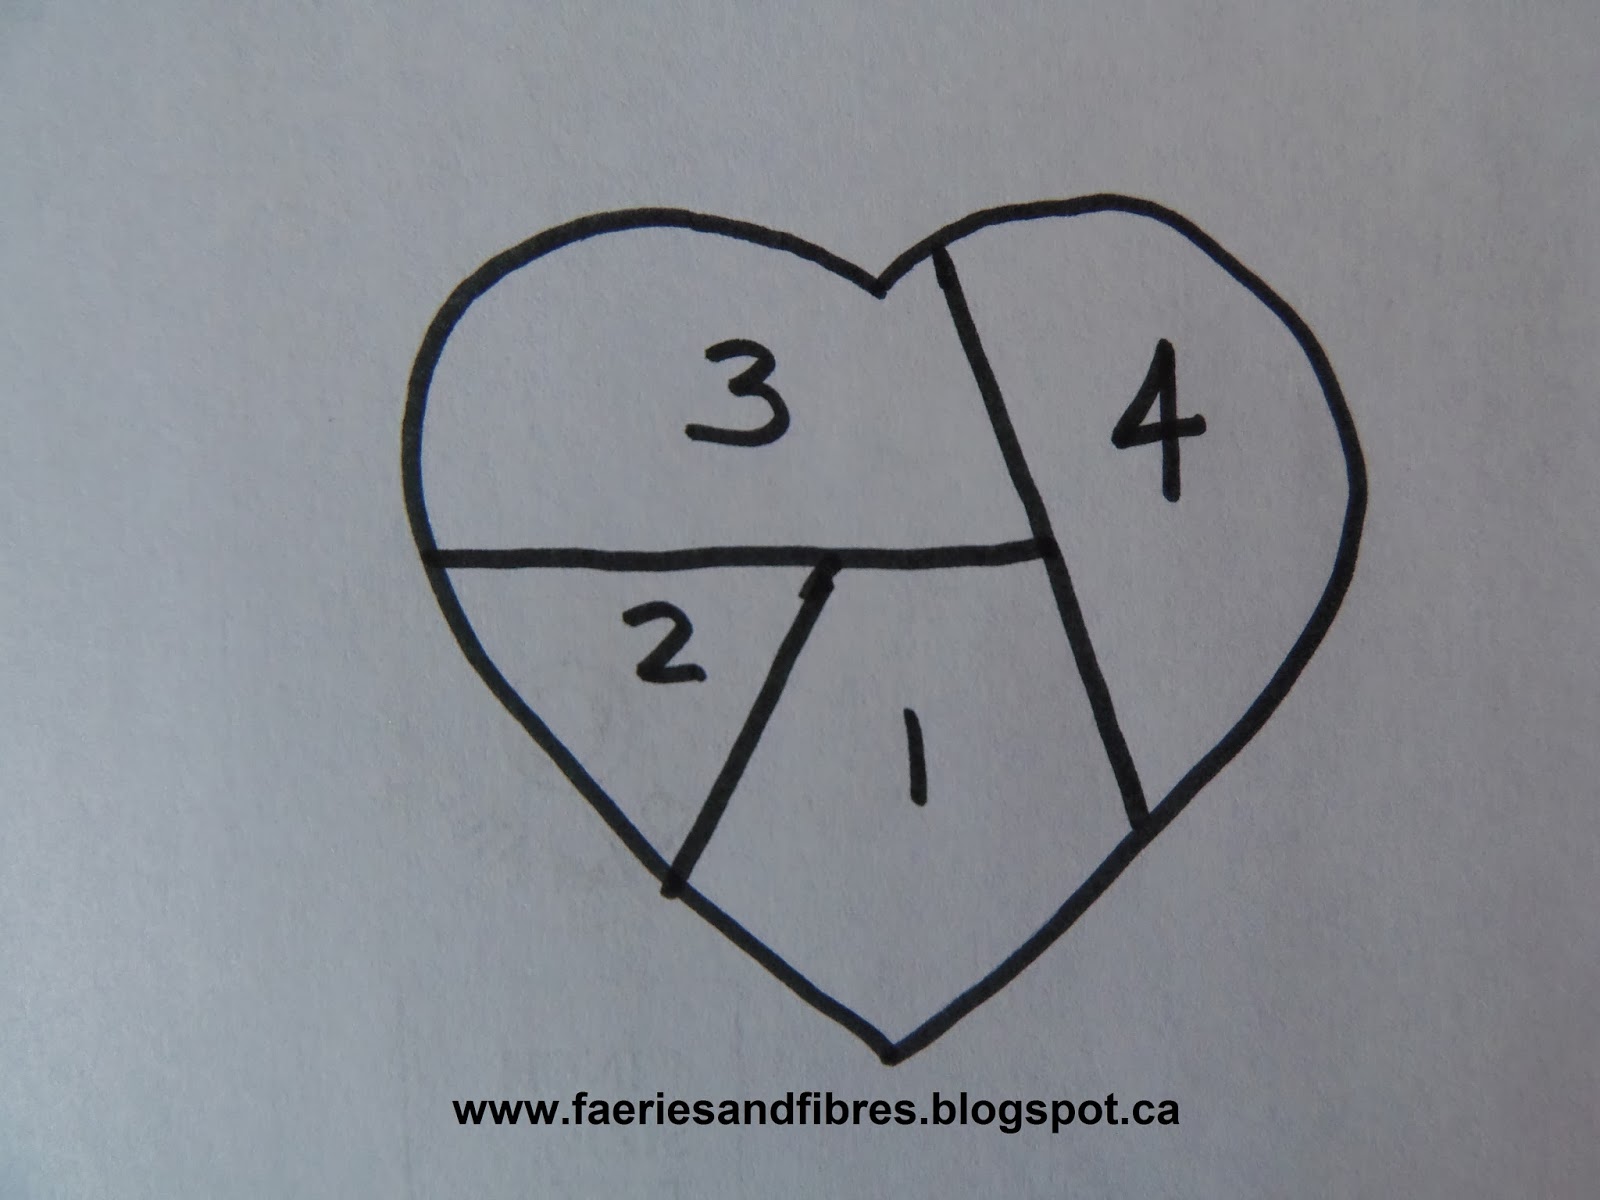
Place your two hexagons with
wrong sides together. Use a thread that matches your hexagon and begin sewing at the right hand corner as indicated by the red circle.
Sew until you get one stitch short of the top corner. At this point you will want to insert the cord. Do so by tucking the knot between the hexagons. Take tiny stitches on either side of the cord and also through the cord.
Continue stitching the hexagons together for another 1/4" and stop for a moment. At this point you will want to make a knot in the cord so that the beads don't slip off. I don't make this knot beforehand because it makes it more challenging to stitch in the cord.
Continue sewing the hexagons together until there is one side still open. If you squeeze the sides gently it will pop open making it easier to stuff! Stuff it so it is nice and firm making sure to get the filling right into the corners.
HELPFUL TIP: I like to use a bamboo skewer or and orange stick to tuck the stuffing inside because the wood "grabs" the stuffing.
Once it is stuffed stitch the opening closed. Do not tie off the thread - you will use it for the beading. At this point you can remove the basting threads or you can wait until you've finished beading. The papers will remain inside the the fob. To bead the edge take a pony bead (the red one) and a seed bead (the green one) on your needle and slide them onto the thread.

Take your needle through just the pony bead and into the hexagon. Bring up your needle a few threads over; this is the point where the next bead will be attached. Draw up your thread to snug the beads up to your hexagon. The green seed bead will appear to sit on top of the red pony bead. Continue adding beads in the following manner all around the hexagon: slide a seed bead on your needle, take a stitch into the hexagon through the same spot as your thread and bring the point of your needle up a few threads over. Draw up the thread to snug the bead up against the hexagon. When you get to each corner you will pick up a pony bead
and a seed bead and you will take your needle through just the pony bead.
At some point you may run short of thread. When this happens take a few small stitches as though you were sewing the hexagons together. Take a stitch in the same spot to make a loop and run your needle through the loop two or three times. Draw up the thread and a tiny knot will form on the sewing line. Take your needle through the same hole and draw it up on the back. Clip the thread.
To start a new thread make a knot in your thread. Bring the needle up through the back hexagon and up on the sewing line where the next bead will be stitched. Give your thread a tug to bury the knot. Take a stitch to anchor your thread and continue beading.
When you get to the last bead you will want to take a few tiny stitches to anchor your thread. Take one last stitch in the same spot to make a loop and run your thread through it two or three times. When you draw up your thread a tiny knot will form on the sewing line.
Take your needle down through this knot on the sewing line and draw it up on the back hexagon. Clip your thread. If you haven't already done so, remove your basting stitches and you are done! The paper templates will remain inside the fob.
And here is the finished scissor fob!
I hope you've enjoyed my little tutorial for making a
Hexagon Scissor Fob Pincushion! You can make them so pretty with a piece of fabric that is fussy cut and some gorgeous beads. My Guild has a quilt show coming up in September and there will be a members' boutique where we can sell our wares. I plan on making some of these fobs to sell! I hope that they will be a hit!
Speaking of beads, I am addicted to them and can never resist adding to my collection. One of the shops I really like is
BeadFX. If you are like me you'll be drooling over all of the gorgeous beads that are available! A girl can never have too many sparkly bits!
Until I post again, happy sewing!
Karen H


.jpg)
.jpg)
.jpg)