Showing posts with label diamond. Show all posts

Sunday, November 15, 2015

Teaching and sewing

My mantra is "less talking and more sewing" however as of late I've been doing the reverse. I've been to London (Canada, not England) to do a trunk show of my work and to teach my English paper piecing techniques. The London Friendship Quilters' Guild is a great bunch of quilt makers. They were warm, friendly and inviting. If you live in the area and are looking for a Guild to join, you won't be disappointed. One of the unique things that they do is invite area quilt shops to most of their meetings so that they can talk about their shop and share their wares. What a great service, especially for those who don't drive. This month they had Laurie and Robin from Stitcharie in Wyoming (a small town in Canada, not a state in the US).

They had such interesting fabrics and they also carry Tulip Hiroshima needles and they were very well priced. We made a special trip to the shop after the workshop and I picked up a few pieces of fabric to add to the stash. The women who run the shop are friendly and they clearly love what they do. It was a real treat to visit such a lovely little shop.

I think the members of the London Friendship Quilters' Guild enjoyed my trunk show and the workshop. There was certainly lots of excitement when I started sharing my techniques for made fabric. I think they would have enjoyed having more time spent on fussy cutting so I think I will make some revisions to my course so that I can give more instruction in that area. I didn't take pictures but I know that others did and if and when they forward them to me I'll be sure to share with you.

All this teaching and talking hasn't left much time for sewing but I have completed my Road 66 hexagon blocks and here they are!

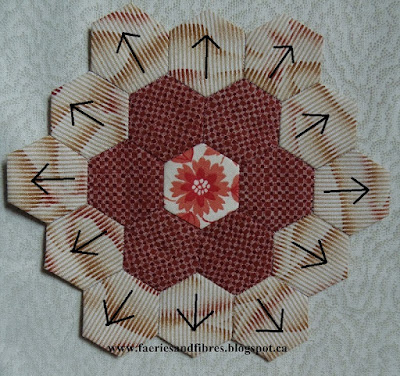
I love the wavy red and blue print. There is so much visual interest in a wavy print. I just wish there were more of them on the market. I especially like those that would fall into the reproduction category.

I was sent some pink ombre print by my cyber friend Paula and I used it to make the six hexagons swirling around the middle. It is such a great print. It also comes in yellow and green. I've managed to find an online shop and have purchased some more of it to add to the old stash.


I didn't quite get the white print lines matched up when I was making this block but a little touch up with a brown Sakura pigma pen and you can't even tell. If it isn't right there is usually a way to make it right!


This is the final block. I'm not thrilled with it but I can live with it. I do really like the red flower in the middle and I suppose the yellow round works well. There is a bit of a black print at the outside edges of the yellow hexagons and it softens the corners so that the yellow hexagons actually look rounded. Maybe it is growing on me!


All of these rosettes will be connected with a path made of diamonds rather than hexagons. If full hexagons were used it would result in a much larger quilt. My quilt Butterscotch Ripple was joined with diamonds. It creates a different look to the quilt, one which I really like!

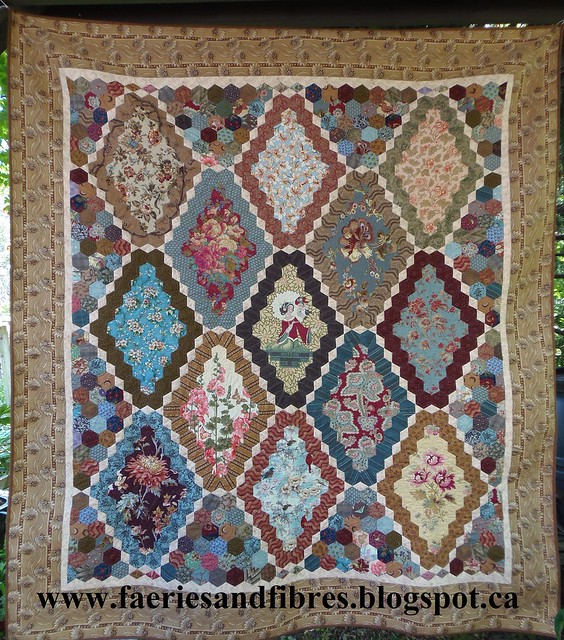
Butterscotch Ripple by Karen H 2013

So where will I get the diamonds? Easy peasy! A diamond is simply one third of a hexagon. In the following picture you can see that I've dissected a hexagon into three diamonds. I already have a master sheet of hexagons that I used for my Road 66 blocks so I'll simply make a copy, dissect the hexagons, make copies of the dissected hexagons and then cut them out.


These diamonds will be relatively small given that the hexagons are 1 1/4" so what I will do before basting is to fold the seam allowances over the paper and give them a finger press; this makes it very easy to ensure that the diamonds have lovely sharp points. In addition I plan on basting through the paper rather than basting from the back. Why you ask? Simply because it will be faster, easier and I don't plan on reusing the papers so if they have needle holes it won't matter.

Before I sign of I want to remind you that diamonds aren't just for connectors. Three diamonds can be fussy cut and then sewn back together to create this sort of effect.


Or how about this one?


If the fabrics aren't fussy cut but instead you use a one dark, one medium and one light fabric you have a tumbling block. Here you can see they are joined with triangles. Where do the triangles come from? Six triangles make the same hexagon so you just divide a diamond in half and voila....magic!


Want to have even more fun? Twelve diamonds make a hexagon star. You need six for the star and six for the background. What I particularly like about this star is that it is the background that is fussy cut and the star is cut from two tone-on-tone fabrics. The fussy cut background was intended to be made into a star but it just didn't work so I hung on to the diamonds until I figured out another way to use them. Never toss those basted hexagons or diamonds because at some point they may come in handy!


If you are interested in reading more about constructing, deconstructing and reconstructing hexagons you can read my blog post here.

I've got almost 30 quilts to unpack, refold and store away until my next trunk show. But first I'm going to make myself a nice cup of tea.

I'm linking up with on Help for Hexie-aholics at Sarah Did It.

Until I post again, happy sewing!
Karen H

Wednesday, September 9, 2015

Going round and round

I've added another round to my diamonds that will flank the medallion on my quilt The Meadery.


There are lots of hexagons to baste for this round and for the next round. I always have a small bag of hexagons for basting in my purse. Every time I have a few spare minutes I haul it out and baste. You would be amazed how quickly the job gets done when you make use of those minutes. Here you can see some of the hexagons for the next round basted.


Those little sewing scissors stay in my sewing bag (upper left corner) as does a small spool of thread. I save my empty spools of Gutermann thread and wind my inexpensive polyester basting thread on them. You can see that the spool above is almost empty so it is time to fill another with basting thread!  I like to baste from the back  and that means the basting thread will remain in my quilt. For this reason I prefer to use a light colour basting thread because it works on all colours of fabric whereas a dark thread may show through a light colour fabric.


As to how many hexagons I need for the next round of the diamond, each round increases the number of hexagons needed by eight. I chose to use a piece of fabric in the middle of the diamond rather than hexagons but had I used hexagons there would have been 8 of them (excluding the hexagon in the middle). The first round of hexagons is made up of 16 hexagons. The pale cream is 24, the yellow is 32, the dot fabric round is 40 and the latest round of grey blue is 48. The next round is going to be a deep honey gold and I'll need 56. There are two diamonds so that is a total of 112 hexagons to baste!

If I were making a traditional flower or rosette of hexagons I would start off with 6 hexagons (excluding the middle hexagon). The number of hexagons required increases by 6 for each additional round so there are 12 hexagons in the second round.


If you are using a directional print as in the block above here's a bit of helpful information. It is the flat edge of a hexagon that radiates out in the first round of hexagons. In the second round the flat edge of the six hexagons radiate out and the second six radiate out from point to point. This means that you will have to cut the hexagons differently to ensure that the print is always moving in the same direction.


If there were a third round of 18 hexagons, the flat edge of six would radiate out and the pointy bits of the remaining 12 would radiate out.

Enough talking. Time for me to brew a cuppa and do some basting/sewing! Until I post again, happy sewing!

Karen H

Thursday, June 26, 2014

More progress on Godstone Grannies

I've now stitched more of the Godstone Grannies (GG) diamonds together into larger units and with each stitch I am getting more and more excited to see the GG quilt coming together. As I previously told you I have a plan for stitching the blocks together and I do that to give me nice long continuous seams to sew. It just makes the sewing much more efficient. The picture below is the unit that will be the lower left corner of the quilt and it will be attached to the large center diamond.


This is the large center diamond to which it will be attached.


This is the unit that will be the upper right corner of the quilt and it too can now be stitched to the diamond.


I always find it interesting how some blocks might not seem so attractive on their own but once they are joined together with the others it all seems to work just fine! That's why I don't worry so much about blocks that are less than beautiful! That being said if something really bothers me I'll fix it but sometimes it is good to take a wait and see approach!

Tomorrow I'll be publishing Block 6 in my Value Proposition Hexagon Quilt Along (QAL) and I'll try to get it up first thing so you'll have some fun sewing for the weekend! If you missed the previous blocks you'll find links to each under the tab Quilt Alongs by Karen H.

Until tomorrow, happy sewing!
Karen H

Monday, October 21, 2013

Do I really need another project? and measuring hexagons

Need another project, no. But want is an entirely different matter! In perusing the pages of my copy of Country Living's Country Quilts I came across this picture.


Here is a close-up of the quilt in the picture.


The picture in the book inspired my quilt Chop's Pick.
 

I used the same gold fabric in the centre of each diamond and I used a striped fabric for the border. However unlike the original I set my diamonds on point whereas they are horizontal in the original. I think this gives a very different look to the quilt. I am sorely tempted to make another but with the diamonds set horizontally!

If you are making a hexagon quilt from a photograph you will have to decide the size of hexagon to be used so that the finished size of the quilt is what you want. To make the decision you need to know the diameter of the hexagon (the measurement from corner to corner) and the height. 

The height, width and size of a hexagon are three different measurements. A hexagon is a six sided shape and the length of each side is the same. When we talk about the size of a hexagon we are referring to the measurement of the sides. Thus a 1" hexagon has six sides each of which measure 1".

Size of hexagon indicated by pink arrow

The diameter is an easy calculation because you simply multiply the side length of the hexagon by 2. The diameter of a 1" hexagon is therefore 2", a 3/4" hexagon is 1 1/2" and a 1/2" hexagon is 1".

Diameter indicated by pink arrow

To calculate the height of a hexagon there is a formula and it is more complex than is necessary for my purposes. So I simply pull out a ruler and measure the height of my hexagons. What I've come up with is that the height of a 1" hexagon is 1 5/8", a 3/4" hexagon is 1 1/4" and a 1/2" hexagon is 7/8".

Height

The measurement of a diamond set on point which is made of eight 1" hexagons (as indicated by the pink arrow) would be the sum of the diameter of three hexagons (top, middle and centre) plus the size of two hexagons so the formula is (3 x 2") + (2 x 1") = 8". The measurement of the width of this diamond (as indicated by the blue arrow) would be the sum of the height of three hexagons so the formula is 3 x 1 5/8" = 4 7/8".


The measurement of a flower made of seven 1" hexagons (as indicated by the pink arrow) would be the sum of the height of three hexagons so the formula is 3 x 1 5/8" = 4 7/8".  The measurement of the width of this flower (as indicated by the blue arrow) would be the size of two hexagons (outer hexagons) plus the diameter of the centre hexagon so the formula is (2 x 1") + (1 x 2") = 4".


If you plan on using a path between your hexagons be sure to include the measurement of the path when calculating the size of your quilt.

I came across an interesting quilt called the Vignette Hexagon Quilt by Leanne Beasley. There is a blog, The Vignette Hexagon Quilt where members post stories and pictures about their progress on this quilt. The quilt combines flowers made of hexagons with little white hexagons that have flowers that are hand embroidered. A few of the members have also posted pictures of other hexagon quilts that they are working on so if you are addicted to hexagons, this is a lovely little blog to peruse!


Time for me to make a cuppa and then decide what I will do today!  One project is a super cute tiny world pincushion which I will finish today and show you tomorrow! So until I post again, happy sewing!

Wednesday, September 4, 2013

The diamond border is done!

My shortest post ever...I think! Last night I completed the diamond applique border for my quilt "81".


They will be the final border on the quilt.


The final step will be to cut the cornerstones and applique something to them....maybe butterflies since there are lots of them flying around the baskets!

And if you need a little hexagon inspiration check out Cathy's Hexagon Mandala Quilt on her blog Cabbage Quilts!


Doesn't it make you want to make your own mandala quilt?

Until I post again, happy sewing!

Thursday, August 29, 2013

Edyta Sitar lecture and my new fabric for fussy cutting

Yesterday we went to a quilt shop to hear Edyta Sitar speak. She did a wonderful trunk show and we got so see more than 60 of her quilts, many of which are featured in her 2013 calendar. She entertained us for more than an hour with her stories and ideas! I love trunk shows and show and share at the Guild because I always come away excited, inspired and itching to create! Edyta's trunk show delivered on all counts!


Edyta has a natural colour sense and it is evidenced in her scrap quilts. I don't subscribe to the notion that all fabrics go together in a scrap quilt and sometimes there are bits that just have to be left out or altered in some way, tea staining for example. Or as Edyta said she can't help it if a patch drops in her coffee!


There are secrets to making a successful scrap quilt and one of those tips that I've blogged about in my previous posts and that Edyta talked about is the use of a single colour to "control" your quilt. Using a particular colour can tame down the scraps and add cohesiveness to anchor the quilt. Think of the many log cabin quilts we've all seen each of which has a red centre but not necessarily the same red.

Edyta talked about the five colours that she likes to use to pull together the large variety of scraps in her scrap quilts. They are navy (notice the navy flowers in the corners),


or brown (the tree trunks),


or barn red (notice how the reds are all pushed out toward the border),


or olive/drab green,


or black (the centres of the pineapples are black).


You can use a little of an anchoring colour as with the pineapple quilt above or you can use more as with the tiny baskets and the olive green. The strategic use of a single colour or colourway can make the difference between a nice scrap quilt and a spectacular scrap quilt!

After the trunk show there was a question and answer period. She was asked what type of sewing machine she has and she replied "You aren't going to like this". Of course we all figured she would say a top of the line machine that cost thousands of dollars but boy, were we wrong! She uses a $200 Kenmore machine! I assume that that was for the piecing only and that the quilts are sent out for quilting. Nonetheless it is nice to hear that you don't have to spend thousands of dollars on a machine in order to make beautiful quilts!

last week I found this great fabric and even better, it was on sale! I thought it would be perfect for fussy cutting diamonds and hexagons.


I placed a window template on the fabric to get an idea as to what it would look like. I prepared a tutorial to explain how I make and use window templates and clear templates. You can read it here. There are two motifs that repeat in the print.


I cut some diamonds and basted them to paper so I could include them in the diamonds for the border of my quilt "81".  And here is one of them sewn into a large diamond!

 
This is a great fabric with all kinds of possibilities. If I get back to the shop and they still have the fabric I might buy some more! And I'll be sure to take my window template with me so that I can audition other fabrics too because you just never know what surprises could be in store for you!
 
Until I post again, happy sewing! 


Thursday, August 15, 2013

New Tutorial - Basting Diamonds for English Paper Piecing

I've been working on my quilt "81" and now have the quilt top together. It is big! It measures 85" x 90". I had thought that once I got the pieces stitched together that I would be done but I've since decided to add one more border. The hexagons and stars in the outside border are just a little too close to the edge and I am concerned that this will make the quilting difficult. An extra border will take care of that problem.


The border in the original quilt is made up of appliqued diamonds and so it is back to
making more diamonds!


I'll cut out papers and fabric and baste them. Then I'll give them a good press with a little starch before removing the basting threads and papers. I'll use Roxanne Glue Baste-It to glue the diamonds to the border strips which will be made off the quilt. When the applique work is completed the borders will be stitched to the quilt.

All this got me thinking about my method for basting diamonds. I've seen them basted so that there are little "wings" sticking out at the two points and I tired that method in the past but I found the piecing was a little difficult. I baste mine so that there are no "wings" and I so I thought that today I would  share with you how I do it! In the picture below my method is the diamond on the left. With my method appliqueing the diamonds to the border will be much easier because there are no "wings" to tuck in.


I start out as usual by cutting papers and fabric. The first step is to tack the paper to the fabric with a little fabric safe glue.

I place my thumb at the tip of the point of the diamond.

I fold down the top of the fabric right at the point of the diamond. I just hold it in place but if you prefer you can place a little dab of fabric glue on the paper to hold the fabric securely. If you decide to use glue do both points at this time to save time and use very little glue. You only want it to hold for the moment!

Fold the right side of the fabric over the paper and hold it at the tip. If it is more comfortable for you to fold the left side first that will work just as well.

Fold the other side of the fabric over the paper to make a nice sharp diamond tip and pinch the folds with your fingers. I bring my basting thread up from the right side of the fabric just below the edge of the fabric that was folded over and then I go down through the folds near the point. This will tack down the folds.

I bring my thread up on the side at about the mid point.

 I fold over the fabric and take my needle down through the fold.

 I bring my thread up on at the mid point of the side heading towards the second point.

Again I fold over the tip of the fabric as in the first step.

I fold the right side of the fabric over and hold it at the tip.

Fold the left side over and bring the needle down through the folds near the tip.

Continue stitching the remaining two sides as described in the previous steps, coming up at the mid point of the side and going down through the folds.

The basted diamond on the wrong side. I do not knot off my thread; instead I just take a few more smaller stitches and the thread will stay put!

The basted diamond from the right side.

And that's how I do it! You may prefer the other method which is a little less fiddly at the points but I find my finished product looks a little neater with my method and more importantly the diamonds stitch together much better.

Until I post again, happy sewing!