Showing posts with label GG. Show all posts

Saturday, August 30, 2014

Quilting the centre hexagon diamond in Good Golly Miss Mollie

I've started to quilt the hexagon diamond block that is in the middle of the quilt. This is the block before it was stitched into my quilt Good Golly Miss Mollie which is my version of the Godstone Grannies coverlet. Each hexagon is 3/4" and I'm doing the quilting on my domestic sewing machine, a Juki TL2010Q.


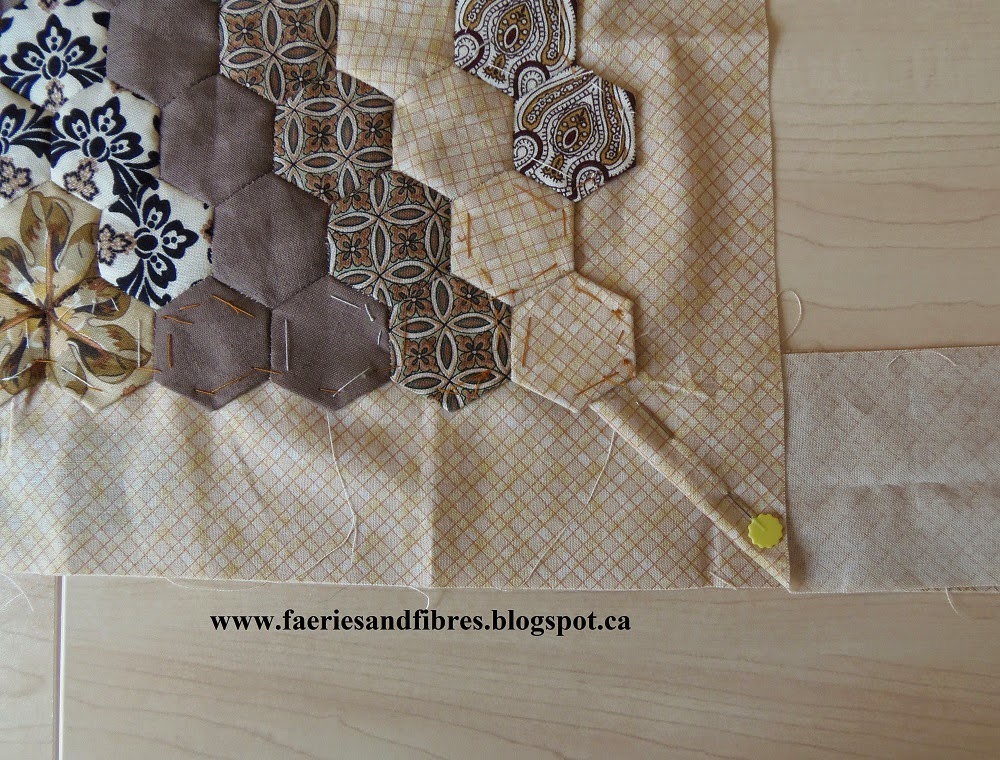
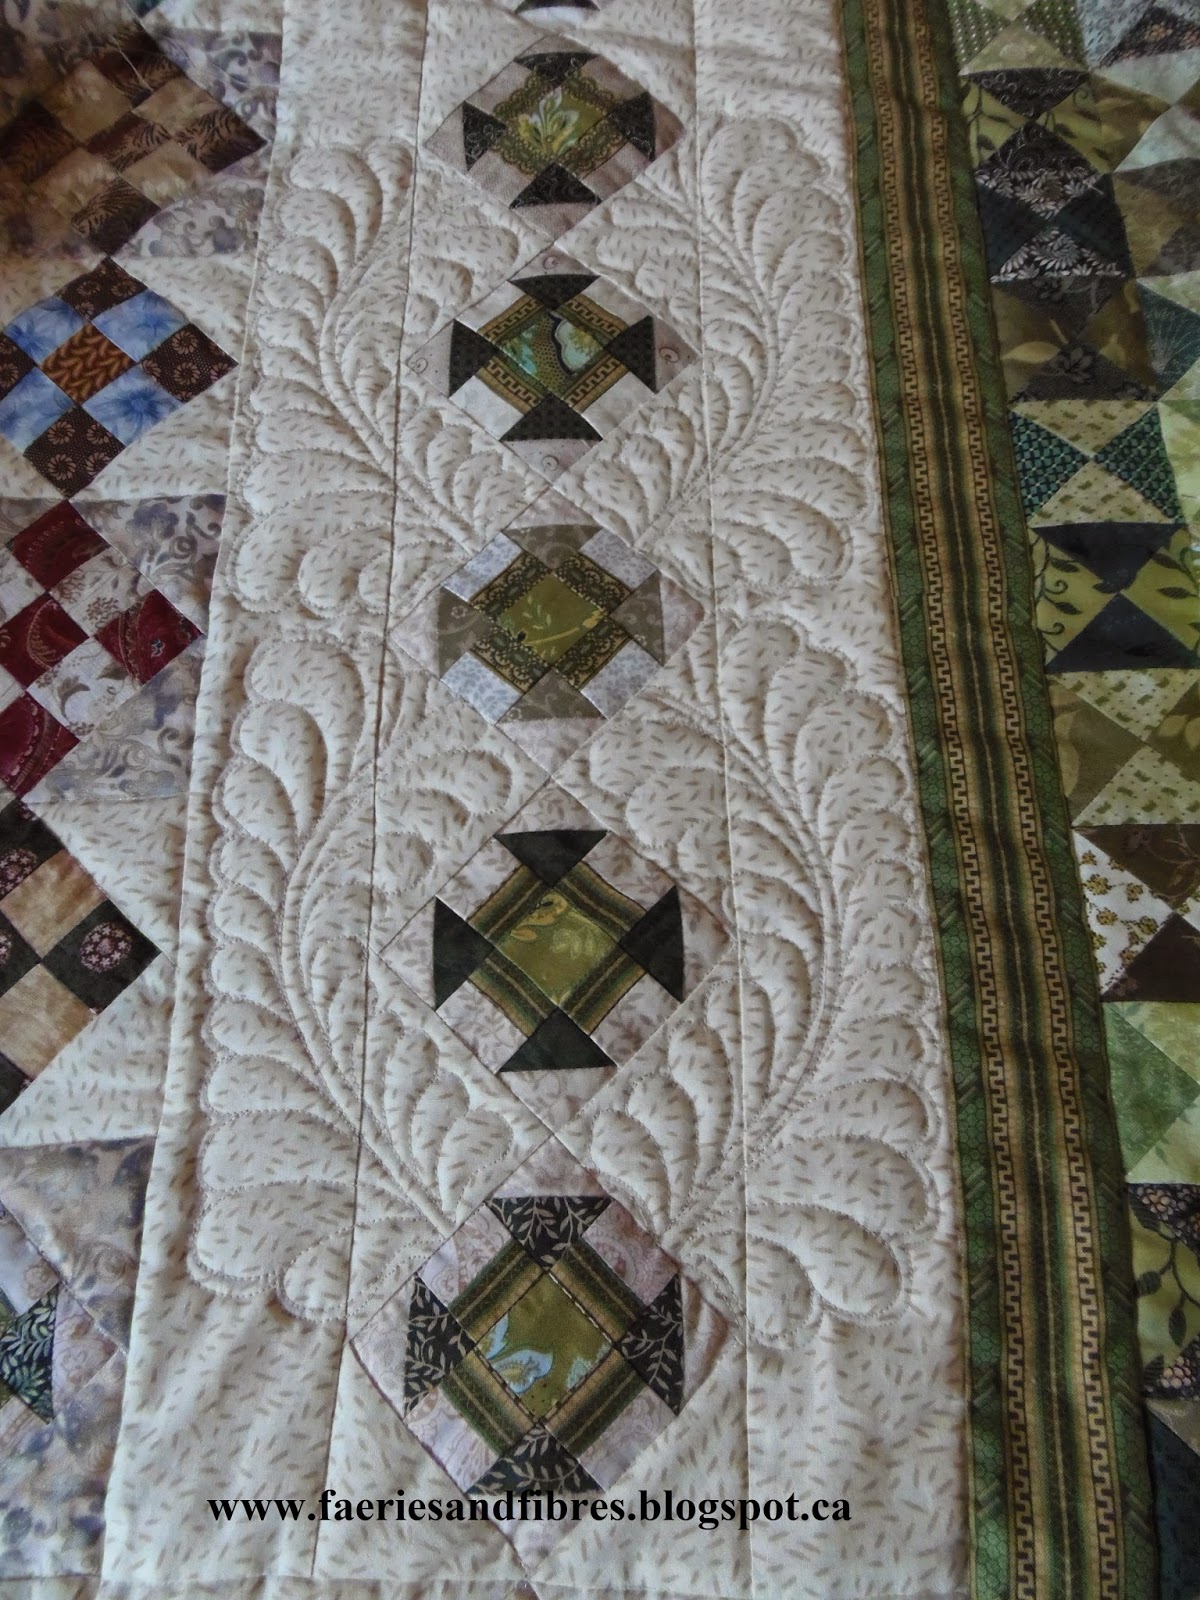
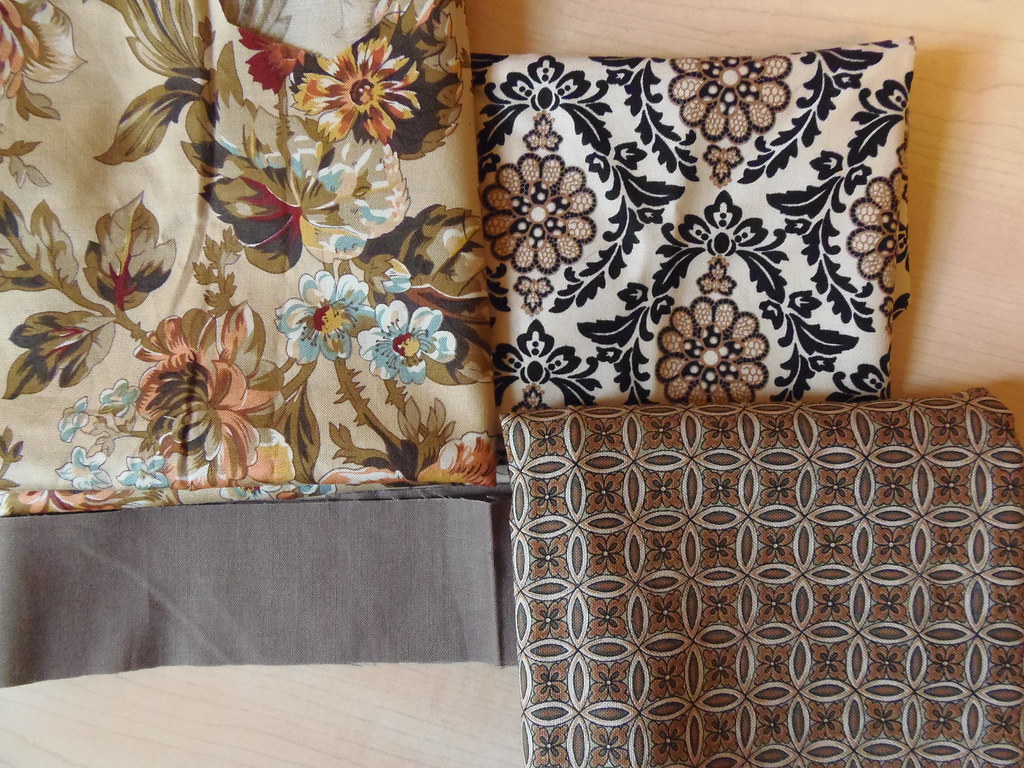
I've quilted the pale yellow round with feathers and I'll show that to you but first I want to talk about the dark rust outer round of hexagons. I used my darning foot and free motion quilted straight lines. I didn't need to use the walking foot because the distance to quilt on each hexagon was short. The trick was to find spots to stop so that I could reposition my hands and that point was the inner point where two hexagons join.


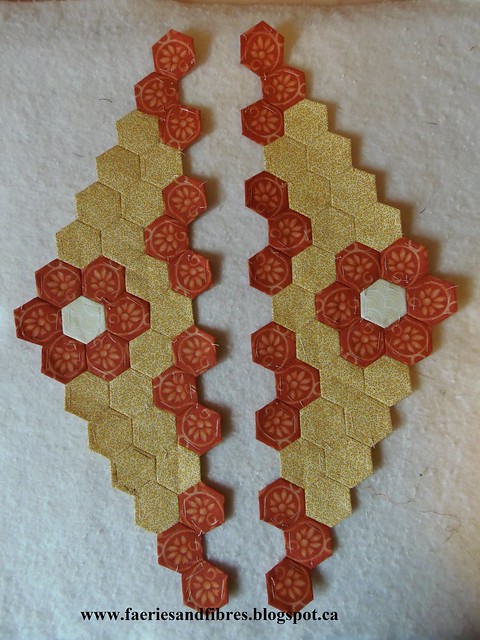
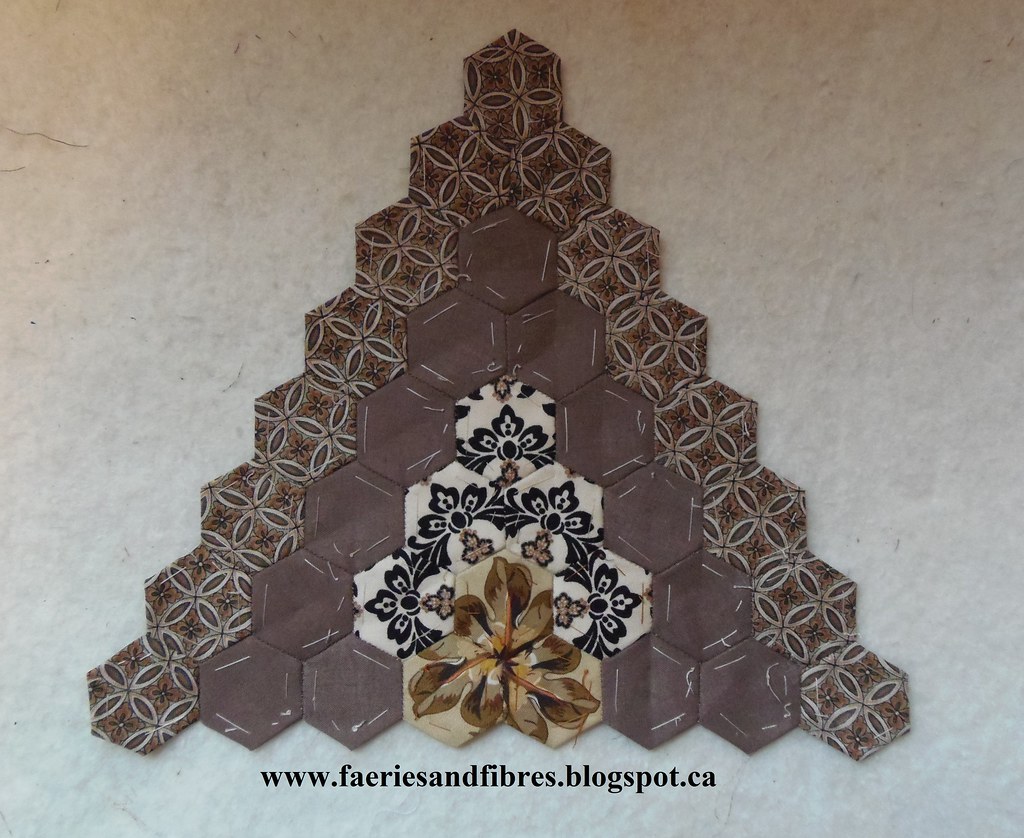
I left this for several days before deciding what next. Because this is the centre of the quilt I want the quilting to be interesting. I finally decided on a simple feather motif. I started at the lower left and worked my way to the top. I them moved to the lower right and worked my way to the top. You can also see some quilting in the pale yellow hexagons. Notice that I again used the fiddlehead motif at the top.


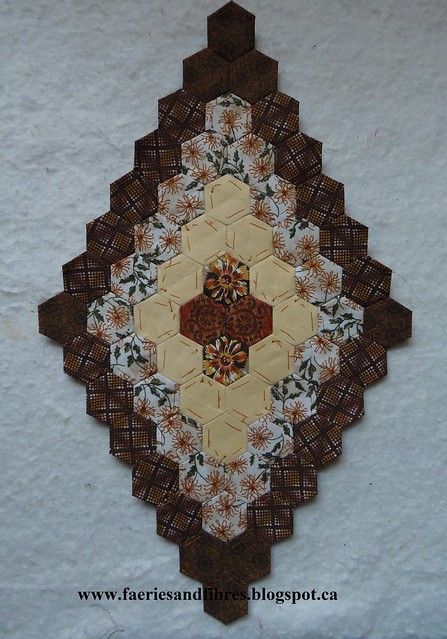
Here you can see the difference this bit of quilting made to the rust round of hexagons. The left side is filled in with the feathers and the right side is not.


I quilted some feather motifs in the pale yellow. I haven't decided how I will quilt the taupe hexagons or the four in the centre. For now I'll just move on and quilt another area. Eventually the quilting solution will come to me!


Here is the block with the feathers quilted all the way around on the rust hexagons.


I hope I've given you some ideas for quilting hexagons! Until I post again, happy sewing!
Karen H

Monday, August 25, 2014

Quilting Godstone Grannies AKA Good Golly Miss Mollie

The quilting of Good Golly Miss Mollie is well underway. This quilt is my interpretation of the Godstone Grannies quilt which is at the Quilt Museum in York, England. You can see the original and read about it here. The name of my version of the quilt comes from Mollie Simmonds who was the leader of the group that made the original quilt in the early 1960s.

I've made oodles of hexagon quilts and usually have a pretty good idea as to how to quilt them on my domestic sewing machine (a Juki TL2010Q) but this one was a bit of a challenge because there is a variety of blocks and they can be quite different from one another. There are 31 whole diamonds in the quilt one of which is unique (the block in the centre) and the rest are pairs of blocks. There are also 4 pairs of half diamonds on the sides and 5 pairs of partial diamonds at the top and bottom. The colour is not right in this picture - it looks quite grey but in fact it is more buttery and peachy.


Normally I ditch quilt first, then quilt the border, bind the quilt and then go back and quilt the blocks. So what are the challenges? This quilt is entirely hand pieced using the English paper piecing method so ditch quilting isn't my preferred option. The second challenge is that the border is very narrow which means I'll have to quilt the partial blocks all around the quilt before I can bind it.

My solution was to quilt melon wedges in each of the path hexagons. I like this method because it creates a nice little start and there are relatively few starts an stops. This is a little bit of what it looks like. It isn't perfect - far from it but I'm not at all bothered because I know that once the whole thing is quilted the little imperfections will disappear! It also works the same as ditch quilting which stabilizes the quilt so that I can quilt the border and bind the quilt before quilting the diamond blocks.


What to do with the rest of the blocks? I don't like marking so I want to do as little of it as possible. I decided to work with the shapes created within the diamonds and use them as my inspiration for the quilting! Here is the same side block quilted! I quilted the orange rosette and its centre and then the four partial orange rosettes along the bottom edge. Then it was onto the feather swags on the side followed by the small swag below the orange rosette! I'm a happy quilt maker. I'll quilt the second partial block that is the same as this one in the same manner! That's two done and lots more to go!


Now that I have an idea about how to quilt the blocks I will ditch quilt the outside edge of the quilt where the hexagons were appliqued to the border strips and I'll quilt the border. I like close straight lines so I think that's what I'll do! When I've got it done I'll share pictures of the border quilting!

Until I post again happy sewing!
Karen H

Wednesday, July 2, 2014

The Godstone Grannies hexagon quilt - attaching a border to a hexagon quilt

So how do you finish the edges of a hexagon quilt? There are loads of ways. Kath left a comment and she wrote the following: I made enough hexies in my chosen border colour to go right round my quilt, but I adapt the shape with sides 4,5 and 6 forming a square.When I baste them to the papers, I left side 6, the outer edge 1/4" un-basted. I attached them all round my quilt as , then used my machine to attach the matching border. The unbasted, unsewn edge is what lines up with the edge of my border. 

Thanks Kath! This is a great technique and I used it on my quilt Mom's Flower Bed.


Mom's Flower Bed, 2011

Karen (not me) also left a comment. This is what she wrote: I am half way through a baby sized hexie quilt and I've decided to do a shaped border by stitching the last row of hexies and flipping them to the back over the top of the backing material before completing the hexies. They will be top stitched down giving a hexie shaped border. This article explains it better. 

Thanks Karen! I've seen that post by Amy of Badskirt but I haven't tried the technique! Please let us know how it works out when you finish your baby quilt!

My Godstone Grannies (GG) was entirely hand sewn so once the diamonds were stitched together I just wanted to get the border attached and be done with it! So my plan was to applique the quilt top to a narrow border. I used that method to make my Stars in the Loft quilt and it worked perfectly.

Stars in the Loft, 2002

Before we get started a little bit of advice in the form of a helpful tip!

HELPFUL TIP: I remove all of the hexagon papers and basting threads except for those all around the outside edge of the quilt. This will keep the edge stable until after it has been appliqued to the border.

Border strips have to be cut accurately or the border will be ruffled or puckered and it won't lay flat when it comes time to quilt. Believe me, I know this because I am speaking from experience! How do I determine the length of the strips? I could measure the length and width of the quilt through the middle but I don't like doing this because I can measure three times and come up with three different measurements. Instead I measure my blocks and then do a little math to calculate what I will need.

I've decided that I want to applique my quilt to 2 1/2"  border strips and I want to miter the corners so this will have to be taken into account when I do my calculations. 

The Side Strips for the Border
I measured the length of a diamond block from the top point of the path fabric to the bottom of path where there is a pair of path hexagons touching (I've excluded the last path hexagon at the bottom that completes the diamond shape) and the measurement is 20 1/8". I've placed small orange circles on the right and left to show where I stared measuring and where I stopped.


There are four diamonds in the length of the quilt so I will need strips that are:
  • four diamond lengths (20 1/8" X 4) plus one hexagon for the bottom of the path plus the last hexagon that was excluded from my diamond measurement. That hexagon is 1 1/2".
  •  5" which is two times the strip width of 2 1/2". 
The measurement I come up with is 87". I want to have a little wiggle room so that the strip is slightly longer than I need so I'll add another 4" so my strip length is 91". Once I've done the applique and mitered the corners the extra fabric will be trimmed.

ALTERNATE METHOD OF MEASURING: Sometimes you don't have blocks right out to the edge as does my GG quilt. For those quilts I simply measure ten hexagons and use that measurement to make the registration marks on my border strips. 

The Top and Bottom Strips for the Border
Next I calculate the strip length for the borders on the top and bottom. The diamond block width is 11 3/4" from the edge of the path on one side of the block to the edge of the block (excluding the path on the other side) . 


There are five partial diamonds at the top and bottom so I will need strips that are:
  • five half diamond lengths (11 3/4" X 5) plus the last hexagon that was excluded from my diamond measurement. That hexagon is 1 1/4"
  • 5" which is two times the strip width of 2 1/2"
The measurement I come up with is 65". I want to have a little wiggle room so that the strip is slightly longer than I need so I'll add another 4" so my strip length is 69". Once I've done the applique and mitered the corners the extra fabric will be trimmed.

Attaching the Side Strips for the Border
I start with the side strips. I make a mark on the wrong side that is about 4" from the end and them I make marks that are 20 1/8" apart. I place the border on my quilt top with wrong sides up and I line up the marks on the border with the diamonds making sure that the border overlaps the innermost hexagon on the seam allowance. I pin well. 


I like to thread baste the border to the quilt top but you could just pin with applique pins or you could use applique glue if you prefer. In the next picture is a view of the wrong side of the quilt with the border basted to the quilt top. Notice that the papers and basting thread are still in the quilt top. They can be removed after the quilt has been appliqued to the border. When I thread baste I like to start and stop one hexagon in from the ends. This will make mitering the corners easier.


In this picture you see the quilt top from the front; it is basted to the border. I baste the border to the opposite side. If I were hand quilting I would trim the excess border fabric after I had completed the applique but this quilt will be machine quilted so the extra fabric won't present a problem.


Attaching the Top and Bottom Strips for the Border
The next step is to prepare and baste the top and bottom borders. Once again I make a mark on the wrong side that is about 4" from the end and them I make marks that are 11 3/4" apart. I place the border on my quilt top with wrong sides up and I line up the marks on the border with the diamonds making sure that the border overlaps the innermost hexagon on the seam allowance. I pin well. and thread baste starting and stopping one hexagon from the ends. The corners will look like this.


Mitering the Corners
I fold one strip in the following diagram and pin. I can now thread baste that seam and the hexagons at the ends that were not basted to the borders. The quilt top is now read to be appliqued to the border. I used a thread that matched the border fabric. I also stitch the miter by hand with tiny stitches and then trim away the excess fabric.


The borders are appliqued and the corner is mitered, stitched and trimmed.


So there you have it....one more method of finishing the edge of a hexagon quilt. This one works for me and I hope it will work for you too! I stitched my border down by hand but there's no reason why you couldn't do  machine applique for a fast and perfect finish!

The finished  GG hexagon quilt top!

This is the backing I've selected for the GG quilt. It will be a very tight squeeze. I've got 4 1/2 yds. but could do with an extra 4". You can see I've also made the binding from the path fabric. I'll keep it with the quilt until I'm ready to use it!

For more hexagon inspiration pop over to A Quilting Reader's Garden for Hexie Weekend!

Until I post again, happy sewing!
Karen H

Monday, June 30, 2014

Godstone Grannies - the top is together

The last sections of hexagons for my Godstone Grannies (GG) quilt top are stitched together! I'm going to drag this out just a little bit! Silvana left a comment on my last post and she asked how I combined the colours so I thought I would share some of the things I do or think about when I make a scrap quilt.
  • I don't spend a lot of time thinking about fabric choices. I try to work quickly. If I like something I will go with it and if I'm not sure I will either set it aside and think about it or discard the combination right way.
  • I like to play with my fabric. I will put oodles of fabrics on a big table. I move them around and sometimes I’ll see a colour or print combination that really works and it is often a combination that I wouldn't have thought about. 
  • I try to use fabrics that are the same style. For example I wouldn’t combine children’s prints with Civil War prints.
  • I think about the "tone" of my quilt. I am fond of muddy or earthy tones. A little bit of bright thrown in with earthy or muddy tones will make a quilt sparkle but a lot of brights will mute the effect of the earthy tones/muddy tones. If I want a bright quilt then a little bit of muddy colours will make the brights really shine. If I use equal amounts it just doesn't work because neither stands out.
  • I think about what the overall colour of my quilt will be. The more of that colour I use the more likely the quilt will read that colour even though other colours are used.
  • I don’t match fabrics when I am buying. I just buy fabrics that I like; I figure that my tastes don't really change so the new fabric will probably work with what I've already got in my stash.
  • Colour is important but value is more important. Value is the lightness or darkness of a fabric when compared to another fabric. I try to make sure that there are lights, mediums and darks in most blocks. The eye sees value first and colour second.
  • When I make a scrap quilt I try to repeat some of fabrics in more than one block. This makes the quilt look more cohesive. In this way I don't have to worry that each fabric goes with all of the others. As long as some of them are repeated they will all work together!  
  • Using a single fabric for the path in a hexagon quilt will separate the blocks and it also makes the quilt look more polished because it is a fabric that flows throughout the quilt.
  • I like to make little 3” nine patches with my scraps. It is a great way to learn about colour and value. When I do this I think of colour combinations I would never have considered. If the block doesn’t look beautiful it will still work in a quilt because it is small but if it works, I have a good idea for combining colours for another quilt! If the block looks really bad I can take it apart and make something different or I can just throw it out!
The lecture is over so it is back to my GG quilt top! In this picture you can see that I've attached the lower right corner to the center strip. Looking good!


The last step was to attach the upper left corner....just one long seam and GG would be a hexagon quilt top! I am so pleased with how this quilt has turned out. The path fabric appears grey but in fact it is a very dull, faded pale peach.


The final step is to add narrow border strips around the quilt top. If I were to just place border strips on the quilt with the right sides together and stitch the border to the quilt top by machine I would have to cut through the hexagons at the edges and that would change the look of my partial diamonds, many of which were fussy cut for effect. I don't want to do that so I am going to add a narrow border to give the quilt straight edges. My plan is to applique the quilt to the borders. I want to do it this way for three reasons:
  • I do not want to cut through my hexagons,
  • a narrow border will make quilting the hexagons at the edge easier (it gives me something to hold when I quilt) and
  • I want flat, smooth, straight edges to make it easier to attach the binding when the quilting is done.
I'll explain how I'll  attache the border in an upcoming post!

Until I post again, happy sewing!
Karen H

Saturday, June 28, 2014

Godstone Grannies......the final stretch!

I've stitched all five units of my Godstone Grannies (GG) hexagon quilt so now it is a matter of assembling the five units! This was my construction plan, one large center diamond and the four corners.


The lower left corners have been stitched to the large diamond in the middle. All of the papers have been removed except for those all around the outside edge.


In the following picture the upper right corner has been stitched to this unit!


The next step is to stitch the two remaining corners to the quilt.


I think that once they are all sewn together I am going to add a narrow border to give the quilt a straight edge. I've worked out a plan for how I will add the border and will share with you in an upcoming post!

I'm linking up with Angie's Hexie Weekend at A Quilting Reader's Garden. If you've shared a hexagon project on your blog why head over to Angie's blog and share with others? It is fast and easy and it is also a great way to get inspired by others. Angie is particularly interested in seeing replica's of old hexagon quilts that you've made or are working on. She has a picture of a very different hexagon quilt that is a replica of one made in 1920! Be sure to go take a look here!

Until I post again, happy sewing!
Karen H

Thursday, June 26, 2014

More progress on Godstone Grannies

I've now stitched more of the Godstone Grannies (GG) diamonds together into larger units and with each stitch I am getting more and more excited to see the GG quilt coming together. As I previously told you I have a plan for stitching the blocks together and I do that to give me nice long continuous seams to sew. It just makes the sewing much more efficient. The picture below is the unit that will be the lower left corner of the quilt and it will be attached to the large center diamond.


This is the large center diamond to which it will be attached.


This is the unit that will be the upper right corner of the quilt and it too can now be stitched to the diamond.


I always find it interesting how some blocks might not seem so attractive on their own but once they are joined together with the others it all seems to work just fine! That's why I don't worry so much about blocks that are less than beautiful! That being said if something really bothers me I'll fix it but sometimes it is good to take a wait and see approach!

Tomorrow I'll be publishing Block 6 in my Value Proposition Hexagon Quilt Along (QAL) and I'll try to get it up first thing so you'll have some fun sewing for the weekend! If you missed the previous blocks you'll find links to each under the tab Quilt Alongs by Karen H.

Until tomorrow, happy sewing!
Karen H

Wednesday, April 30, 2014

Godstone Grannies, border quilting and one more Soupcon

Yesterday I had a nice day of sewing with friends. One of them decided to do a purge in her sewing room and she had a variety of UFOs up for grabs. Some were hers and some were given to her by others. I have one of them and will share it with you in an upcoming post. It is a bit of a puzzle and a bit of a mystery so I might need some help to figure it out!  While others hand quilted and bound quilts I worked on my Godstone Grannies (GG) blocks and this is what I got done!

The two are partial blocks that will be used to fill the sides. The orange hexagons are all fussy cut. I used the orange fabric in these two partial blocks and also in the next GG block.

The next block was cut from a solid brown, a brown print and three rust and orange fabrics some of which were fussy cut. I just couldn't get a good picture of the fabrics to show the colours to their best advantage but at least you can see the prints. The orange print in the middle on the right was also used for the two side blocks shown above.


The colours in the picture of my block are much better. I just realized that the four orange circles in the center are stitched together wrong! Oh drat. I've told you before I fix mistakes that will bother me and those that won't I leave as they are. I think that this is one that will bother me so I might just have to do some reverse sewing! Did I say DRAT!!!


It looks like Chantal likes my GG blocks and she is making her own quilt! How exciting. You can see Chantal's blocks here! Is anyone else out there also making the GG blocks? If so I would LOVE to hear from you!

I want to send a lovely big thank you to Eileen. I was struggling with what to do in the hourglass border on Piccadilly to the Nines and she suggested melon wedges. I had been considering this option so Eileen's suggestion just cemented the deal. I quilted this shape in my Baskets and Nine Patches quilt and it is fast and easy. I did it with my free motion (darning) foot. It is one continuous motion; I stitched an "s" curve starting at the top of the border and I stitched the curve in the little triangle to the left and then the triangle below on the right followed by the triangle below it to the left. When I got to the bottom I stitched the "s" curve on the opposite side. When I got to the top I quilted the curve inside the triangle on the top edge to get me over to where the next "s" curve would start.


I leave you with one more Soupcon quilt in progress. This one is being made by Raewyn. She posted a picture of her Soupcon quilt at Step 3. I think the fussy cutting is amazing and the embroidery complements it perfectly. I wonder what colour choices Raewyn will make for Step 4. Keep sewing and keep posting pictures on the Flickr group Raewyn so that we can enjoy watching your progress!


Until I post again, happy sewing!
Karen H

Saturday, April 26, 2014

Festival purchases, Piccadilly to the Nines and another GG block

Yesterday I went to the Creative Festival with some friends. We each came away with some lovely purchases. Some bought backings for quilts and other just bought bits and pieces of fabric. I bought a few fat quarters from one vendor.....at $2 each who could resist? Certainly not me. Before you ask what will I make with them, the answer is I don't know, I just thought they were nice! I expect I might do some fussy cutting with them!


I bought the four fabrics in the next picture for the same reason.....I just liked them. The fabric on top was $4/yard so I finished the bolt. It will be perfect for a backing! I like the striped fabric with the little waves - directional prints are so versatile and they add visual interest. I was looking for some larger wavy Smithsonian/Civil War type prints but had no success. Still I am happy with what I found! The bottom two fabrics will be great for delicate little fussy cut hexagons!


And I thought these two were pretty so I picked them up as well!


I did some more quilting on my Piccadilly to the Nines. One side is now quilted with feathers and I am on to the second. I hope to get the other three done this weekend so I can move on to the hourglass border. Here you can see two of the arrangements quilted; there are four in total on each side.


In the picture below you can see the four sets of feathers quilted in the border. It has some issues and it isn't perfect but I'm not bothered. I like how it looks, warts and all! There are a few little empty spots that may get filled in with stippling. For those who are interested I work on my domestic sewing machine.....it can be done!


One of my readers said she liked seeing the fabric I used for my Godstone Grannies (GG) hexagon diamond blocks because she has a hard time picturing what kind of print my hexies originated from and what to look for when she shops for fabric for hexagons. One of the things I do if I am going through my stash or shopping for fabric for hexagons is to make a little window template that I keep in my wallet. I can pull it out and slide it around on fabric to see what the print would look like as a hexagon. I took one with me to the Festival today! Anyway, here are four fabrics that I pulled to make the latest GG block. The print on the upper left has all sorts of interesting bits that can be cut out. Same with the fabric on the upper right.


And here is the block that I made. It is one of the filler bits that go on the top and bottom of the quilt. It still has the basting threads and papers and I'll leave them in until I've got all of my blocks ready to be sewn together.


Well I think that's it for today. Tomorrow I'll be working on the second block for the Value Proposition QAL but I'll be back on Monday. I hope you enjoy your weekend and happy sewing!
Karen H

Thursday, April 17, 2014

Value Finder, Chinese Coins and Another GG Block

Kathy asked a great question. She saw a green value finder and asked when it would be used. The simple answer is that a red value finder doesn't work particularly well on red fabrics so that is when the green tool would be used. And the green doesn't work well on green fabrics but the red does. Green neutralizes red and red neutralizes green. If you have both a red and green value finder you can use them together to determine the value. The view will be brownish (remember my post yesterday about mixing complementary colours to make brown) but it will give you the value. This can be helpful if you have a multi-colour fabric. Thanks for the great question Kathy!

A friend made a Chinese Coins quilt. I was having an overwhelming urge to quilt feathers so I asked if I could quilt it and she said yes!I love all the bright colours in the columns!


The first thing I did was stitch in the ditch on either side of the columns. I used Superior Monopoly on top and Superior The Bottom Line in the bobbin.


I marked the spine of the vine and was off to the races! I used a brown Frixion pen that has a super fine point; it makes a very fine line that can barely be seen and when I quilted the spine it just disappeared!

I started at the top of the column and quilted the spine working towards the bottom of the quilt. When I got there I started quilting the feather. When I got to the top I quilted back down about 1/4" away from the spine. I'm still using The Bottom Line in the bobbin but on top I switched to Superior So Fine! I'm really loving this thread because it is soft and light weight so there is no heavy build-up where I backtrack. In addition it doesn't produce lint and that makes my sewing machine very happy! It also makes me very happy because it is very affordable and it has the look of a lovely cotton thread!


When I got to the bottom I quilted the right side of the feather. From the top I echo quilted back down along the right side of the feather. I still have to do the left side.


There are four beige columns. Once they are quilted I'll fill in the background and then figure out what to do with the pieced columns. My open toe metal FMQ foot does not like quilting near seams as is the case with the echo quilting. I've got a few other FMQ feet so I'm going to try them out and see if they do a better job for me.

I've got another GG (Godstone Grannies) block finished! That outer round of hexagons took a lot of fussy cutting. There are 28 hexies in that border so that's a lot of fabric. Fortunately I had quite a bit of yardage of the fabric and had only paid $3/meter for it so I didn't mind turning it into Swiss cheese!


Tomorrow will be the launch of my next quilt along, Value Proposition! All of the blocks are made of 1" hexies and they stitch up quite quickly. I hope you'll read along and if you have time sew along with me!


Until tomorrow, happy sewing!
Karen H

Tuesday, April 15, 2014

Value Proposition - value and colour

I'm not an expert on colour of value but I know what I like and what sits well with me based upon my colour preferences. I like muddy, earthy colours. I tend to avoid brights and whites not because I dislike them but rather I have difficulty working with them. I've started a few quilts with the idea that they would be bright and they end up back in the earth tone spectrum . It is just what I like! My latest GG (Godstone Grannies) block is an example of that preference!


Heather Stewart, an award winning quilt teacher, spoke at my quilt Guild last week. Her talk focused on colour and value. According to Heather the secret to a successful quilt is the use of a minimum of 7 values. Now not all of those seven values will be the same colour but rather there should be a good mix of lights, mediums and darks. Value and colour are not the same thing!

Value is the first thing that the eye sees, even before colour, so it is an important factor to consider when making a quilt.For a quilter value is the relative lightness or darkness of a fabric compared to another. Heather had a large colour wheel on which she demonstrated value on a scale of 1 to 10 with 1 being black, 10 being white and 2 through 9 were the grey shades in between. That is not to say that there are only ten values but rather that this is the scale that was used to demonstrate value. Between each value there are of course many other values, particularly in the lighter range.


We are all familiar with the colour wheel. The primary colours (red, yellow and blue) are in the 12, 4 and 8 o'clock positions on the wheel below. You cannot make a primary colour. The secondary colours are made by combining two primary colours and the colours that are created are orange, green and violet  which are in the 2, 6 and 10 o'clock positions. Tertiary colours are a combination of a primary colour and a secondary colour. The tertiary colours are red-orange, yellow-orange, yellow-green, blue-green, blue-violet and red-violet. The tertiary colours are in the 1, 3, 5, 7, 9 and 11 o'clock positions.


The colours on a colour wheel are described as "pure colours". This term is related to the physical spectrum but for our purposes lets just say nothing has been added to them. When black, white or grey is added the terms shade, tint and tone are used respectively to describe the resultant colours. I'll bet you have a natural preference for one of these. I've often said I am drawn the the muddier colours and those are tones (colours that have had grey added to them). What about you? I'll bet a quick look at your stash will give you the answer!

Complementary colours are those that are opposite one another on the colour wheel (e.g. red and green, blue and orange, yellow and violet). Do you know how to make brown? Easy - you combine complementary colours. Depending upon the quantity of colour used the brown could be a warm brown (it would have more red, orange or yellow) or it could be a cool brown (it would have more blue, green or violet). When you make a quilt it can be very effective to use a complementary colour scheme however one colour would be used simply as an accent. A blue quilt with a little bit of orange will sparkle!

Heather spoke about the concepts of base and tone. The eye sees white-base colours first and brown-base colours second. When a white-base colour is used it appears to advance because the eye sees it first. Try a simple experiment - place white fabric next to cream fabric of the same size and the white fabric will appear larger because the eye sees it first!  You can repeat this experiment with any colour and the results will be the same. If you make a scrap quilt and use both white an brown base fabrics the white-base fabrics will appear to jump out at you. This is fine if that is the effect you want but if not the white may detract from the overall appearance of your quilt. A quilt made entirely with white-base colours will be vibrant and lively whereas a quilt made with brown-base colours will be softer, more muted and very much like an antique quilt.

One final bit of information Heather shared was four colour recipes for successful quilts. They are:
  • neutral and colour;
  • light and dark (the most common recipe in quilts);
  • warm and cool (a very effective combination) and
  • colour and colour (e.g. yellow and red)
So why am I telling you all this? It to help you think about my Value Proposition QAL. I will not be showing you colour pictures of the hexagon blocks I made. Instead I will provide the block pattern and what I will show is the value rather than the colour. Work with the colours and prints that you have in your stash. The trick to making effective blocks will be to select dark fabrics where I show the darkest value(s), mid-value fabrics where I show mid-value and light where I show light. Just remember the term "dark" is relative which is to say the darkest patch must be the darkest of the fabrics you use in that block - it does not mean black or the deepest darkest of fabrics.

Finally it can be difficult to determine value when you are looking at two fabrics in different colours. If you have a red value finder this will be the time to use it! If you don't have one read my April 3, 2014 post for instructions on making your own value finder.


Tomorrow I'll talk about my fabric choices for the path in my Value Proposition quilt and fabric requirements for the path. I'll also talk a little about my fabric choices for the blocks. Until then, happy sewing!
Karen H