Showing posts with label hexagon quilt. Show all posts

Monday, October 26, 2015

Congratulations Mom

I'm sorry for the long silence. Why have I been so quiet? I've been working like crazy to get my Mom's (Anne) quilt machine quilted on my sewing machine so that she could bind it and show it at our Guild meeting. As usual Mom went and got her hair done so she was looking very nice for the meeting. The president announced that we were having a birthday celebration for a long time member and the oldest member of the Guild, Mom! There was a huge cake and she had help from Barbara and Klara when it came time to blow out the candles. Mom was very surprised that the executive had gone to the trouble to get her not one but two cakes!


The president went on to say that the executive had decided to recognize Mom's long membership by granting her an honourary membership. Was she surprised? You bet she was! It was such a special night for her and I can't say how grateful I am to the Guild executive for honouring her in this way. She is still on cloud 9!


After the main part of the meeting we had sew and share and that was Mom's chance to show off her newly completed A Little Bit of Africa. Unfortunately you can't see the quilting but you can see the finished quilt.


The members were very interested in her quilt and there was a lovely round of applause for her work! Way to go Mummsie!

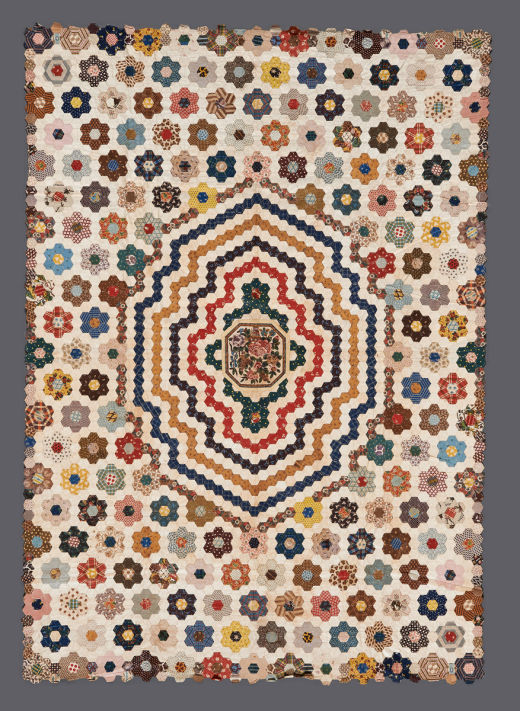
Want to see another of Mom's quilts? We had friends visiting at the end of the week so we pulled out Mom's quilts and had a little trunk show. I managed to snap a few pictures. She made this quilt more than ten years ago and she reckons that there are more than 14,000 hexagons in it. It is huge but it is beautiful! It is entirely hand pieced and hand quilted.


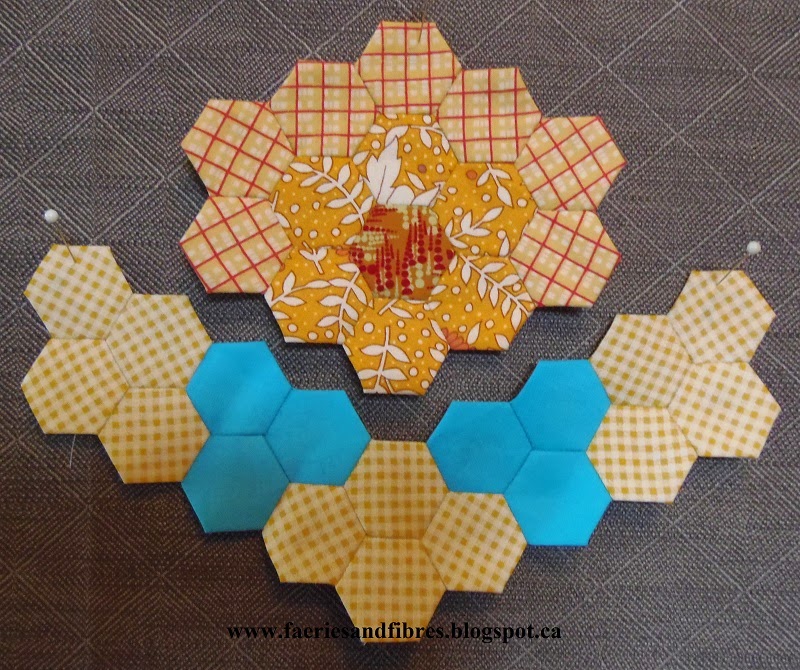
Amidst all the excitement and entertaining I managed to finish two more Road 66 hexagon rosettes. I love the floral print in the middle. It is called Sophia Pearce from the Winterthur Collection. I stumbled across it at a local warehouse type store and bought all they had with was a few yards. There are some wonderful flowers in the print that will be perfect for broderie perse and fussy cut hexagons.

The pink ombre fabric was sent to me by a cyber friend in California. I had seen a picture of the Mount Mellick quilt she is working on and I commented on the fabric. Next thing I knew she sent me a chunk of it in the mail! In return I sent her a chunk of my Sophia Pearce fabric!


Tonight I am doing a trunk show on English Paper Piecing for the Rouge Valley Quilt Guild. Time for me to finish packing up the quilts and sort out my speaking notes!

Once again I apologize for the silence. One final reason for the silence is that I have been sketching and pulling fabrics for my next quilt along. It will of course involve English paper piecing, some traditional piecing and a little bit of applique. I think it will be a fun and hopefully educational quilt. Stay tuned for more details!

Until I post again, happy sewing!
Karen H

Monday, July 27, 2015

Green Parrot is a top!

My Green Parrot hexagon quilt is finally a quilt top! It came together very quickly because most of the hexagon rosettes were already made and stitched together. You will recall that I removed four rows of hexagon rosettes  from my gargantuan quilt Birds in the Loft and I used them to make this quilt! Even the four stars came out of Birds so although there was some basting and sewing most of the work had already been done.


I had considered adding to the corners to square them off but Lyn suggested leaving them angled. I had never considered that option but now that the top is together I quite like the corners as they are!

I've got a few projects to finish but I'm also starting to pull fabrics for the next quilt. I'm going to need oodles of golds, yellows, honey and soft orange fabrics for this one! My plan is to work with 3/4" hexagons.

I thought I would share another picture of my little "helper". What I mean by "helper" is that he continues to help himself to my hexagons! He got it in his mouth, paused for a second and then was off like a shot!


Pink goes well with his complexion. I wonder what he would look like if his cheeks would blush. This is what he would look like! Pretty darned cute!


It is a short post today because I've got fabrics to pull and things to do. On Wednesday I've planned some fast, fun and easy hexagon fun! You'll want to save those narrow strips for this one.

Until I post again, happy sewing!
Karen H

Wednesday, March 18, 2015

Birds in the Loft - breaking it down into sections

Today I thought I would write my plan for sewing the rosettes together. I had previously shared my diagram for the layout of the rosettes. There are 200 of them in total and they were made in pairs. In the diagram you can see that I numbered the rosettes from 1 to 100 starting in the upper left corner moving left to right. When I got to 100 I started to number the second group of 100 with number 1 in the lower right corner and I continued numbering the  rosettes from 1 to 100 moving from right to left. Arranging the hexagon rosettes in this way will balance the quilt.


To make the construction easier I've divided the quilt diagram in half horizontally - there are 100 rosettes in each half.


The red circles in the following diagram identify the rosettes that have already been stitched to the medallion.


I wrote about sewing together the rosettes to make a "noodle" that would surround the medallion here. I just realized that I never shared a picture of the medallion with the first rosettes attached so here it is! Notice how each rosette is one of a pair and its mate is directly opposite.


The medallion will be completely surrounded by the remaining rosettes and I want to sew them together in sections to make the sewing easier and to keep the quilt as portable as possible for as long as possible. I've divided my diagram to show how I will sew the rosettes together into sections. I'll construct the four middle sections first but won't sew them to the medallion because there is still a border to be made (and I'm still working on the 200 rosettes). I'll write about how I will organize and sew these four sections soon.


I plan to  divide the top and bottom sections in half vertically for easy sewing.


Now it is time to share a few more rosettes.

This one is quite dramatic so I will place it close to the medallion because I think if it is near an outer edge the eye will be drawn to it rather than the medallion.


I hadn't added any green rosettes around the medallion so this one should also be relatively close to it.


This one reminds me of cotton candy!


For the most part these three rosettes are not colour combinations that immediately leap to mind so how did I come up with them? I make my open donut and then audition different fabrics for the centre. If  I like what I see I go with it. If nothing tickles my fancy I set the open donut aside for another day. Eventually I will find the right centre and I'll go with it! The centre doesn't have to match but it does have to "go". If you look for fabrics that match you will miss all kinds of wonderful combinations so try your open donut on fabrics that you would never have considered because that's when the magic will happen!

I've almost made all of the hexagon path units that will connect the rosettes; they have to be stitched to the rosettes. The path can be tedious so I like to work on it throughout the making of the rosettes.


I'm making really good progress and am looking forward to seeing the quilt come together in the coming weeks (or months)!

Until I post again, happy sewing!
Karen H

Tuesday, March 3, 2015

A noodle for the birds and a eureka fabric!

I shared my diagram of the first round of hexagon rosettes for my Birds in the Loft hexagon quilt. This is it and you can read my post here.


Since that time I stitched the hexagons and backgrounds together into one long "noodle". Here you can see the round of rosettes pinned to the design wall.


I stitched the "noodle" but didn't stitch it into a ring because it would make it more difficult to attach to the medallion. The "noodle" was sewn to centre medallion and here it is! At this point it is measuring roughly 51" by 69". If you are new to my blog I'm using 1" hexagons to make my quilt.

Birds in the Loft Medallion by Karen H

The next step is to finish sewing the remaining 180 pairs of hexagons and add five backgrounds to each. All of the rosettes are cut out and in various stages of basting and sewing but the background hexagons have to be cut and basted so I've got lots of work to do. Where I thought I had enough fabric I'm now not so sure so I might have to add a third background fabric!

Once all of the rosettes are all made I'll be sewing them into larger chunks that can be stitched to the medallion. When I have my diagram ready I'll share it with you. Until then I thought I would share my latest completed rosettes!

The design of Birds in the Loft calls for pairs of rosettes but sometimes you just don't have enough fabric to make a pair. I had only enough taupe fabric to make the top rosette and the hexagon in the middle was a 2 1/2" charm square so what I did was make a second hexagon rosette from similar fabrics. The hexagons will be in opposite sections of the quilt so the slightly different rosettes will work just fine! You can see the layout plan for the rosette pairs here.


I have a small piece of fabric that I've had for years. I put it somewhere safe but for the life of me couldn't remember where that safe spot was. I had a pretty good idea but couldn't find it and I've been searching for weeks. Finally the other day I was looking for something else and there it was....neatly folded and tucked away in the general area of where I thought I had stashed it! Eureka!!! I just love this print and wish I knew who made it. I have long since lost the selvage and have only a small piece of fabric left. If anyone knows what it is called and who made please do tell!

My eureka fabric - who manufactured it and what is it called?

I carefully cut out two of the rosehips and used them for centres in the following pair of rosettes. Once again I didn't have enough fabric to make two rosettes so I added a second fabric to make the second one.


There's snow in the forecast today so it will be a good day for sewing and I've got lots to do so it is time for one more cup of tea and the I shall sew, sew, sew!

If you are looking for some inspiration check out The Needle and Thread Network where Canadian bloggers share with others.

Until I post again, happy sewing!
Karen H
p.s. I reply to every comment so if you don't hear back from me it means you are a no reply blogger and I have no way to contact you.

Wednesday, February 11, 2015

TUTORIAL: Creating a hexagon frame

If you are visiting for my Grow Your Blog post & Giveaway please click here.

I've started the four filler pieces for the top, bottom and sides of the medallion for my hexagon quilt Birds in the Loft. I decided I want to repeat the bird fabric that I used in the centre. I didn't want to make oval frames like I did for the birds in the middle.

Birds in an oval frame in the centre of the medallion for Birds in the Loft

The reason is that the way I've designed the medallion calls for hexagon frames but I wanted to soften the inner edges of these frames to mimic the centre birds. Let me show you what I mean!

I started by making the frame with hexagons.


I want a nice soft curve on the inside of the oval so I folded the points of the hexagons under on the inner edge. I basted with thread and pressed the whole thing with a hot, dry iron. This is what the frame looks like from the front. Now if you're wondering why I didn't modify the shape of the paper templates rather than turning under the points it is because I found that the inner edge where the hexagons meet is not as smooth. If you prefer to modify your individual paper hexagons by cutting off the points rather than making basted hexagons and folding under the points by all means do so!


This is what the frame looks like from the back.


The next step was to rough cut the bird that will fit inside the frame. I did this by laying the frame on the fabric and tracing around the inside edge with a chalk pencil. I cut out the bird leaving a generous allowance of 3/4" to 1" beyond the chalk line.


The final step was to position the hexagon frame on the bird and glue baste it in place with my Roxanne Glue Baste-It. You only need tiny dots of that glue to hold the frame to the fabric.


I appliqued the frame to the bird with Superior's The Bottom Line in a taupe colour. A fine applique needle was used and when I was doing the applique I was careful to catch just a few of the hexagon threads without catching the paper. Once the applique was completed the basting thread that was used to hold the folded hexagon edges in place was removed. Notice that the brown and white diamond print on the right is a directional print. I made sure that the diamonds radiated out from the centre. The brown on the left is also a directional print but it is such a tiny print that I didn't worry about the fabric placement because it reads as a solid.


The excess red fabric was trimmed from the back to roughly 1/4 - 3/8".


I leave the papers in place until the hexagon is surrounded with other hexagons. I stitched three background hexagons to the right side so that I could demonstrate the piece with some papers removed.


Two of the hexagon papers were removed. Because I was careful not to catch the papers in my applique stitches the papers popped out easily. If you happen to catch a bit of the paper just take extra care in removing the paper. At the orange circles you can see the points of the hexagons that were folded under. They can be trimmed or they can be left as they are; the decision should be based on the on the weight of the fabric. If the fabric is heavier/coarser I would trim. If it is lighter then I would leave the points in place.


That is one frame completed and there are three to go. If you are wondering why I used two browns the answer is simply that I was using up my scrap 2 1/2" strips of fabric! In so doing it adds another design element and it is thrifty because I'm making do!

So there you have it! This is a great way to use your hexagons with beautiful large prints that you don't want to chop up into small pieces. Wouldn't it be great to make a quilt out of framed birds or flowers and you could separate your blocks with a hexagon path? Another option would be to applique these framed pictures to a background square of fabric; the square blocks can be easily stitched together with or without sashing. Just think how quickly you could stitch a hexagon quilt!

I'm linking up with several blogs where you will find tons of creative inspiration:


Until I post again, happy hexagoning!
Karen H

Friday, January 23, 2015

Back in the middle again

My Birds in the Loft hexagon quilt is growing under my fingers! I've now stitched together the first couple of rounds that will form the centre panel.


I've been pondering the filling in of the opening with my bird fabric. The simplest option would simply be to cut a circle from the fabric, place it under the opening and applique it in place. Nice but it is a little bland for my taste and rather on the small side. I think that a larger piece is required for the centre.


Another option would be to make a rosette of larger hexagons and applique in on top of the centre panel. Very pretty and interesting but I want to use the birdie fabric. I'll save this rosette for another project.


At this point my plan is to work with an oval shape. I've made a paper template and pinned it to the quilt. I'll modify the shape just a little but of the three options this is by far my favourite. I think it has an elegant look and feel....like an antique mirror! It also complements the shape of my panel.


Today I'll cut the red hexagons for the next round and time permitting manipulate the centre oval until I get it just right!

This Saturday is GROW YOUR BLOG Day organized by Vicki at 2 Bags Full. There will be lots of interesting blogs to discover, many of which will have giveaways! I'll be participating and I'll have a little giveaway planned!

Until I post again, happy sewing!
Karen H

Wednesday, January 21, 2015

Birds in the Loft goes under the needle!

I've started cutting, basting (love basting) and sewing my Birds in the Loft hexagon quilt! The medallion is now started and this is how it is looking pinned to the design wall. These are 1" hexagons and the papers were recycled from my Value Proposition quilt. Although I've taken several steps forward in the making of Birds I'm going to have to take a few steps back and do some reverse sewing.


My plan is to remove the pieces marked with the red circles and replace them with fussy cut bees. I hate to have to rip out stitches and only do so when I can't live with what I've done. In this instance I think the addition of the bees will be subtle but well work the effort! Here's a little close up sneak peek at the bee! Much better, don't you agree?


I've also made two hexagon rosettes with fussy cut bees. These rosettes will be stitched to the top and bottom of the medallion. The brown print is a directional print so when cutting and sewing I paid particular attention so that the print radiates out from the centre.


Today I'll head back to my design sheet and start sketching some possibilities for what comes next! I have a few ideas but am not sure if they will translate well so I'll sketch them in pencil and if I'm not happy I'll do some reverse drawing with an eraser!

I've got some sketching and sewing to do so until I post again, happy sewing!
Karen H

Monday, January 19, 2015

Birds in the Loft - the beginning

I'm ready to get going with the making of my Birds in the Loft hexagon quilt. I have a rough idea of where I am headed with this quilt but it may change as I start cutting and sewing. There are a number of inspirations for this quilt. The first is my Stars in the Loft quilt. I love all of the rosettes in this quilt so I will have rosettes in the new quilt. I will also incorporate my foundation paper pieced English paper pieced rosettes in this new quilt.


I want to feature this beautiful print in a quilt. It is from Moda's Dominique II line. I plan on using the birds in a centre medallion and perhaps elsewhere in the quilt. The ideas are still percolating!


Medallion quilts really speak to me. Since I've already done a round medallion in Stars in the Loft I wanted to use a different shape. This one really spoke to me. The quilt is dated 1800-1820 and it is in the Quilt Museum and Gallery. You can read more about this quilt here.


There will be rosettes and lots of them. I start by pulling fabrics that I think will work with the birdie fabric. They don't have to match but they should complement the starting fabric. What I focus on is the scale of the print (the size of the print), the value (the relative lightness or darkness of the fabric compared to others) and the colour. I am using 1" hexagons for this project.


I cut 2 1/2" strips of fabric and then quick cut my hexagons in no time flat. You can read how I do this here. I am cutting 12 hexagons which is enough for two rosettes but I'll also need one more for the centre of each rosette. If I have a fabric that I like for the middle I cut it at this time and if not I'll look for something later. I tack these hexagons together with thread and toss them in a bag so if I have a few spare moments I can do some basting. I can always find a few spare moments for basting especially in my helper (the little stinker) is sleeping!


I want a light fabric for the background and did a rough calculation about the fabric requirement. I  reckon I will need five yards. There are plenty of lights in my stash but I don't have a five yard length so I've selected two fabrics, one of which will be used for most of the medallion (the middle fabric) and the other will be used for the path between the rosettes (top fabric). I pulled a third fabric and will fussy cut some bees to be used although I'm not sure where they will be used. I have several other fabrics with bees which I will likely incorporated in my quilt!


I've sketched out the middle of the quilt and am ready to get started. I'm thinking I will use fussy cut bee prints where there are dots but that could change. The red in the middle will be the birdie fabric but I want to do more than just reverse applique it in place so I'll work on that component of my design later. For now all I need to know is the size of the opening. Now I am ready to get sewing! So exciting!


Until I post again, happy sewing!
Karen H

Sunday, January 4, 2015

Lozagon's filler bits

I've been working on the filler bits for the top and bottom edges of Lozagons. This is my working sketch that I shared with you.


The first step is fabric selection. I decided to make the top and bottom identical so to begin I selected an orange print for the rosette centers. Then I decided that the three full rosettes would be made from the same fabric and the four half rosettes along the top edge would be made from four different fabrics.

I made 3 full rosettes for the top and 3 for the bottom. Each will be partially surrounded with seven hexagons. I chose and yellow check fabric. It is a directional fabric so I paid particular attention to the placement of the hexagons. I never stitch hexagons one at a time; instead I look for the most efficient way to sew them and in this case I sewed the seven hexagons together into a semicircle and this will be stitched to the rosette.


And here you have the rosette with the yellow check hexagons. I made six units like this.


The next step was the construction of the section that will fit the bottom edge of the rosette and it will also connect to the quilt. There are three little yellow tentacles that come off the rosette so I chose another yellow check for all three and then there are small filler pieces made up of the turquoise background fabric. I sewed three units made up of of four yellow check hexagons (again notice I paid particular attention to the direction of the check) and I sewed two units of three turquoise hexagons. For the turquoise hexagons I used turquoise thread. The rest of the unit was stitched with pale yellow thread.


Here it is stitched together. Five more to go!


The eight half rosettes went together very quickly! Here is one of the eight!


The final step will be to construct the turquoise filler units that will fill the spaces between these yellow rosettes so that they can be connected to the body of the quilt.

Until I post again, happy sewing!
Karen H