Showing posts with label diamonds. Show all posts

Thursday, January 28, 2016

Setting triangles and diamonds for Road 66

Anne in South Wales (sorry I couldn't reply to your message Anne but you are a no reply blogger) asked about the size of the little triangles which form part of the path in my Road 66 quilt top.The path is made up of little triangles and diamonds.


The hexagons used in Road 66 are 1 1/4". A hexagon has six sides each of which is the same length. When we talk about the size of a hexagon we are referring to the length of each of the six sides.  Thus a 1 1/4" hexagon’s sides each measure 1 1/4"”.


The measurement from point to point of a hexagon is simply two times the size of a hexagon. This means that the point to point measurement of a 1/14" hexagon is 2 1/2".

A hexagon can be subdivided into three diamonds each of which has four sides. In the case of a 1 1/4" hexagon each of those four sides will measure 1 1/4". This is the size of the diamonds that I used in the path for my Road 66 quilt.

The triangles in the path (where the blocks intersect) are simply a hexagon divided into six segments. In the case of a 1 1/4" hexagon each of those three sides will measure 1 1/4". This is the size of triangles that I used in the path for my Road 66 quilt.


You can also fussy cut your diamonds or triangles and then sew them together to make some fun and interesting blocks. Three fussy cut diamonds sewn together make this interesting block.

You could use three different fabrics, one dark, one medium and one light to make a classic tumbling block.


Six triangles fussy cut and sewn together make one big happy hexagon like this!
All of these blocks are part of my quilt Hexagreens.

Hexagreens by Karen H 2009

To read more about constructing, deconstructing and reconstructing hexagons you may want to read a post that I wrote back in 2013!

There's be no sewing for me today because I'm going to a party to celebrate a special occasion with some friends. Hopefully I'll be back at it tomorrow!

Until I post again, happy sewing.
Karen H

Thursday, November 26, 2015

Road 66 - the second row

I had a lovely comment from Katie. She wrote "I noticed some half hexagons along the upper edge. I assume that the tails are left out as in diamond construction. But how do you keep the longer edge tucked under. Mine always wants to pop out. Is there a trick to this?" I was unable to email my answer because Katie is a no-reply blogger. This simply means her email address isn't linked to her blogger profile. For those of you who are new to blogging it also means that if you enter contests or giveaways by leaving a comment, you won't be entered because there is no way to contact you should you win. If you are looking to fix this there was an excellent tutorial on Quiltville's Quips & Snips. But I digress! Katie is asking about the construction of my Road 66 quilt which is named after the quilt in Di Ford's book Primarily Quilts.

The answer to Katie's question is that the tails are sticking out of the half hexagons (inside the red circles) for two reasons: the first is the shape of the paper and the second is to accommodate the border that will be added. The half hexagon has a "diamond" point and that is a sharp angle (30 degrees) and the tail is created because the point is narrower than the seam allowance This is not the case with a hexagon which is a 60 degree angle which is wider than the seam allowance. I could have basted my diamond and half hexagons so that all of the seam allowances are folded in such a way that there are no tails.


I wrote about that basting method here. The diamond would look like this from the right side. Notice there are no tails.

This is what it would look like from the wrong side. I generally use this method because it gives me a sharp point which makes joining the pieces much easier. Having to deal with that tail and move it out of the way is fiddly work so if the seam allowances are neatly folded in they aren't a problem.


However, I've left the tails when I prepped the diamonds and half hexagons of my Road 66 quilt because I want a straight outside edge on my quilt so that I can add two borders, one narrow and one wide. When I remove the papers and fold out the seam allowance I'll have a nice straight edge to which I can attach my borders. If the seam allowance are tuck away neatly on the wrong side as in the pictures above I run the risk of catching the edge of the fabric so that there is a little pucker and the seam allowance won't open properly.

So row 2 of my quilt is now stitched and ready to be added to row 1. Three more rows to go and I still have to make filler half hexagons for the top edge! Sew, sew, sew!


So one final comment: I reply to every comment left on my blog although as of late I've been slow in replying due to other commitments. However, if you don't hear back from me it means you are a no-reply blogger. Unless you update your profile or send me your email address I will have no way to contact you. Rest assured I do read and appreciate every comment left!

That is it for today; until I post again, happy sewing!
Karen H

Monday, November 23, 2015

Row 1 of Road 66

Sorry for the silence but I have been busy working away testing my pattern idea for my 2016 quilt along. It is going well! I can't show you what I'm doing just yet but be patient my friends and all will be revealed. There will be hexagons, traditional piecing and applique! So far I've only used fabrics in my stash and my plan is to use what I have. I am working with 1" hexagons to make the blocks.

I've also managed to make diamonds and triangles to connect my Road 66 hexagon blocks. The first row is now stitched together. I need to cut and add the half hexagons to fill in the top edge and I need to make the corner units too! It isn't a very exciting picture but you get the general idea of what the quilt is going to look like!


The diamond fabric is a coral/brick print that I got from Connecting Threads. It is a fine weave cotton with a lovely silky feel. I used a different print in a slightly darker shade for the little triangles, I basted through the papers because I don't plan on using them again.


I normally would fold & baste my fabric so that there are no dog ears when I make diamonds for English paper piecing but in this instance the diamonds are on the small side so I decided to leave the dog ears. They will be trimmed off when the border is added. I'm a firm believer in doing what works best for you!

Until I post again, happy sewing!
Karen H

Monday, August 4, 2014

Reader questions about making 81

There have been several questions about how I made my quilt 81 The Giant Monstrosity. Some were from no-reply bloggers which means I can't reply to the comment or question. I reply to every comment so if you don't hear from me it means you are a no-reply blogger and I have no way to contact you unless you provide me with your email address. Anyhoooo, I thought I would answer the questions here!

Where did I get the pattern for 81 The Giant Monstrosity?
I made my own pattern. I saw pictures of the original quilt  (below) which was made in the 1800s. I fell in love with it (what lover of hexagons wouldn't) and I drafted my own pattern. This is the original quilt.


This is my version before I added my final diamond border. I made mine in brighter colours. The grey fabric in the centre panel is different from the grey in the border and that's just fine.


I started with the centre panel for my quilt. It is a single piece of fabric with 81 hexagon rosettes and stars. I determined the measurements for the borders as I went along. I did make some changes to my version of the quilt. For example I swapped out the pieced blocks in the corners for appliqued baskets and I added a slightly different diamond border. While I drafted my own pattern there is a commercial pattern available for this quilt from Threadbear. The Threadbear pattern is by Corliss Searcey and her version of the quilt measures 72" x 82". My quilt measures 92" by 97". I believe the title of her pattern is English Basket Quilt.

What size are the hexagons and diamonds?
I used 3/4" hexagons. You will find the template I used for my hexagons here. Each side of the diamond measures 1 1/4". I drafted my own diamond master template, made copies and cut them up as I needed them. I explained how I draft them here.


Are the hexagon rosettes and stars appliqued?
Yes. After the stars and rosettes were stitched I gave them a spritz of starch and pressed with a hot dry iron. The basting threads and papers were removed and I used Roxanne Glue-Baste-It to affix them to the background for applique.

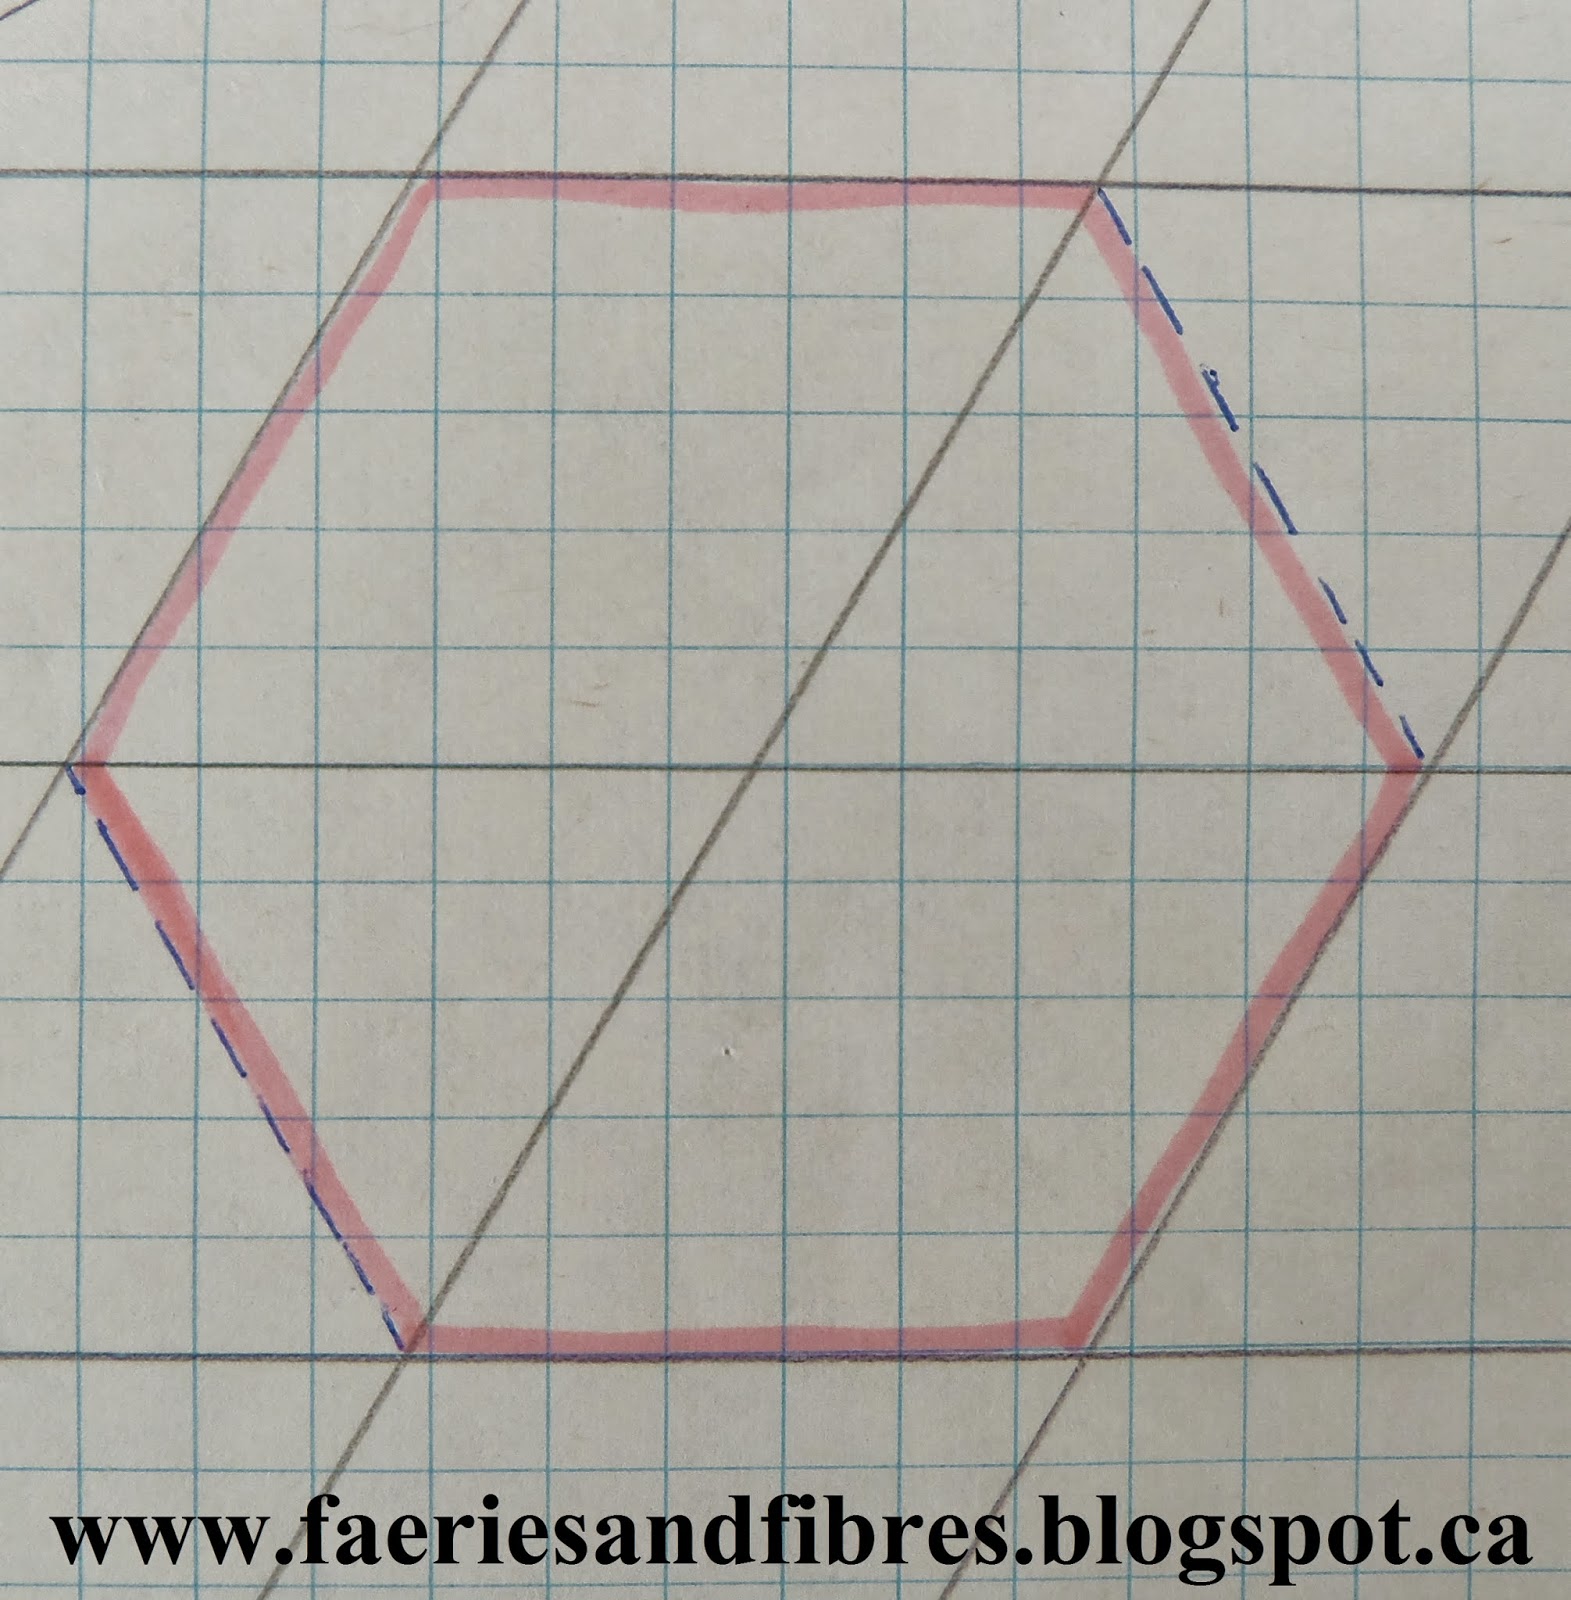
When I thread baste my diamonds I do the corners a little differently. The method I use results in diamonds that look like the diamond on the left in this picture. You can read how I do this here. I makes the applique much easier because there are no dog ears to be tucked in!


What kind of paper do I use for the hexagons?
I just use regular 20lb bond printer paper and don't seem to have problems. You can get printer paper that is a little heavier but not quite as heavy as cardstock and that might be a better option for you or you can use cardstock. I use a glue stick to tack my papers to my fabric (a tiny dab of glue is applied to the paper never the fabric) and I use only enough glue to hold the paper in place on the fabric so when it comes time to remove the paper the bond is very weak and in most instances the paper just pops out. If you prefer not to use a glue stick another option (which I've used for 1/2" hexagons) is to use applique pins. They are very tiny and unobtrusive so your thread won't get tangled around them when you baste.

Are the papers reusable?
Sometimes. If the paper is in good shape I will reuse it. Otherwise it goes in the recycling box. In order to be reusable I want nice sharp corners so if the paper is chewed up at the corners I get rid of it!

What basting method do I use?
In the past I basted through the fabric (the brown hexagons in the picture below) and will continue to do so when making my foundation paper pieced English paper piecing hexagons. However when as of late I've been basting only the fabric at each corner fold without piercing the paper (the turquoise hexagons in the picture below). With this method the basting thread remains in the quilt and the papers just pop out quite easily. The bonus is that the papers remain relatively intact which means most of them can be reused. Let me know if you would like a little tutorial!


There is an alternative to thread basting and it involves the use of starch and freezer paper. Missie of Traditional Primitives explained her method and you can read about it here. I've tried this method and it works really well. There are no threads or papers to removed however you will need a little iron such as Clover's Mini Iron or Dritz's Petite Press for this method.

If you have questions about the making of 81 please feel free to send me an email or leave me a comment and I'll be more than happy to reply. It's time for me to get back to quilting 81. Until I post again, happy sewing!
Karen H

Wednesday, September 25, 2013

Tutorial: Draft your own diamonds, hexagons and triangles for English paper piecing

I like to draft my own master templates of diamonds, equilateral triangles and hexagons. A hexagon is made up of three diamonds and half a diamond makes an equilateral triangle. So if you can draft a sheet of diamonds all of the other shapes are at your disposal.

Why bother drafting master templates when there are free templates available? I find that they often have space between each shape so that means more cutting and wasted paper. I want my diamonds, triangles and hexagons butted up one next to the other because it makes the cutting faster and there is less scrap paper left over. Another reason is that I might want to customize the size of the diamond, hexagon or triangle.

Once I've created a master template I name the template and write it at the top in coloured ink. That way I know it is a master template and all copies are made from the master. The name of the master template could be the project, the size of the diamond or the date. I do whatever works best for me at that moment. I put each of my master templates in a sheet protector and then store them in a binder of hexagon templates and projects. When I need papers for English paper piecing I just pull out the master and make copies!

To draft your own templates you will need the following:
  • graph paper,
  • mechanical pencil (you need something that will make a thin, sharp line and
  • ruler with a 60 degree angle.
To start you will draw a horizontal line on the graph paper.


Decide on the distance "height" of the diamond. This is the distance between two parallel lines. I am using a height of 1 1/2". Draw a line at the 1 1/2" mark. I would now draw all of the horizontal lines however for demonstration purposes I'll work with two.
 
Line up the 60 degree mark on your ruler on a horizontal line on the graph paper. You can use any horizontal line on the graph paper.


Draw a diagonal line.


Line up the 1 1/2" mark on the ruler on the 60 degree line that was just drawn. Draw a line. Move the ruler over 1 1/2" and draw another line. Repeat this process until the sheet is full of the 60 degree lines.

And there you have it - a sheet of diamonds!

This sheet of diamonds can be used to create hexagons and equilateral triangles. You can combine all of these shapes to create a motif and they will fit together like a charm! I used this method to make Mom's Flower Bed.


To create a hexagon you will have to dissect two of the diamonds. The pink lines show how to draw the hexagon.


Notice how the dissected diamond now creates an equilateral triangle.


To create an entire sheet of hexagons I would draft the diamonds and then dissect the diamonds to create the hexagons and then erase all unnecessary lines. Alternatively you can dissect the diamonds using a different colour of pencil/pen.


Before I go I thought I would share the next five Lazy Punk blocks.


Until I post again, happy sewing!

Tuesday, September 24, 2013

Sewing the diamonds together

I thought I would start off with a little hexagon block that I came across in my scrap book of things I like. This little hexagon block is so charming and I wonder what the quilt must have looked like!


So today I thought I would talk about sewing the diamond hexagons together. The first step is to lay out your diamonds.


My natural tendency is to place the darks in the centre.


I always try the other arrangement to see what happens and in this case I prefer the alternate arrangement so that the centre is open and airy.


I will sew the diamonds together in set of three.

I start my stitches at the outside edge on the left side.


I sew towards the centre at which point I take one extra stitch.


I open up the two diamonds and place the third diamond on top. I put the needle through the point of the new diamond and go through the point of the diamond on the left. Once I've taken that stitch I continue sewing the remaining side.


This is what the three diamonds look like when sewn together.

I repeat these steps with the remaining three diamonds.


I place the two halves of the star with right sides together and sew from the outside edge toward the middle. I take my stitch through the matching points being sure to pull the thread snug.

I then take a stitch through the next two points again being sure to pull the thread snug.

I go back to the first two points and take one more stitch being sure to pull the thread snug. This is the step that will ensure that the centre points are sharp and tight.

I now continue stitching to the outside edge. And here is the finished star! 
 

In an upcoming post I will show you how I fill in the outside edges with more diamonds to create a hexagon! The post on drafting diamonds is also in the works.

I'll leave you with three more Lazy Punk blocks!


Until I post again, happy sewing!