Saturday, January 10, 2015

REWIND: Fabrics (and their fibre content) that I've used in my quilts

Welcome back to REWIND! Every now and then I "rewind" and republish one of my older posts that you may have missed! Today I'm going to share a post from July 2013. In this issue I talk about some of the fabrics I've used to make my quilts!


Fabrics (and their fibre content) that I've used in my quilts
Let me preface with the following: I make quilts because I like them, I plan to use them AND I will not be entering them in a juried show.


I was taught to make hexagons by my Grandmother when I was a girl but that was about all I knew about patchwork for many years. When I started quilting as an adult in the late 1970s I was living in a very small town in the far north. There were no shops where I could buy fabric or quilt guilds where I could learn. My only source of information was the odd quilters' magazine. I would see a picture and draft my own pattern. The first lesson I learned, and I learned it the hard way, was that the 1/4" seam allowance is added all around the patch! That's a mistake you only make once!

As far as fabric goes I would order it mail order from a Sears catalogue OR there was mail order business in Alaska that sold bags of scraps for quilting and they were cheap. But they were not 100% cotton. And I had no idea at that time that I was expected to use only 100% cotton. Well in that scrap bag was a lovely piece of turquoise with white polka dots and another small turquoise and white print. I loved both because they were kind of quirky and different (this was back in the days when brown calico was the rage). I used both in my quilts and this is one of the quilts that contains both fabrics. This was made back I my draft-your-own-pattern and figure-things-out days! I had no idea how to go about making a quilt like this but I did remember the hexagon lessons from my Grandma so this quilt was English paper pieced! Even the larger squares!


And I also snuck some of the turquoise into a block where it didn't belong - it was a thinking patch. I wanted people to think "did she mean to put that patch in there or was it a mistake that she didn't catch until AFTER the quilt was made"?


I used these two fabrics in many of my quilts because my plan was that they would be my "signature" fabric and I would put a small piece in every quilt I made.  That plan sort of fell by the wayside when I learned I should only use 100% cotton top quality designer fabrics and I think that is sad because looking at my quilt now I realize that I lost some of my spontaneity and creativity.
And here's another block made with who-knows-what but I'm pretty sure that there's some poly cotton in there!


I also used leftovers from the clothes that I made for myself. The blue points were from a mat dress.


And then one of the first true 100% quilting cottons was purchased. My brother sent me money as a gift and a visiting sewing store came to town. I purchase the blue fabric in the centre of this star - I loved it and bought as much as I could afford which was probably about 2 yards (I still have some of that fabric). 


Not only was I using blends but I was also using polyester thread....white polyester thread!!! It never occurred to me that you should match the thread to the fabric but then I didn't have much to chose from in the way of thread and white seemed like a good universal colour to use!


For a number of years I adhered to these rules - 100% cotton designer fabrics. But the trouble was that I was seeing some really nice fabrics that weren't designer fabrics OR fabrics that were poly-cotton blends. So what did I do? If it was a patch of fabric that I really liked and really needed it in a quilt I used it! I still try to use 100% cotton but it doesn't have to be designer fabric and if I run into the odd piece of 80/20 poly cotton that works in my quilt I use it. Why not? My quilts are to be used. And as for the notion that they won't last, neither will I so what's the problem? I made this quilt 30 years ago and it has been used like crazy.


I did stop using polyester thread for piecing and switched to 100% cotton. I still like it but am rethinking this because there are some really lovely soft polyester threads made for piecing and they work well, produce little to no lint and are much more economical. And if my scrappy star quilt has survived with 30 year old polyester thread......

Today I went to Fabricland for the 50% off everything sale. I had plenty of time so I went to the home dec section to browse. What did I see? Some fabulous cotton fabrics that are 104" wide.....and they were on sale at $12/metre. There is nothing wrong with these fabrics. They have a beautiful hand and are the same weight as quilting cottons. Can you say "cut me some of that"? I can and did! This one will make a beautify quilt backing! 


And the other fabric I purchased is a grey-beige which will be fabulous in something but I'm not sure what just yet! The print has a bit of a woven look to it like a linen.


My point here is that if you are committed to 100% designer cotton and you have the wallet for it, by all means continue. But if like me you want to make quilts that will be loved and used and the perfect fabric is a home dec fabric or an  odd bit of poly cotton blend I say go for it! It is your quilt after all and the quilt police will not come knocking at your door! And that's my two penneth worth for today!

Since I published this post I've begun using more polyester threads. I love Superior's So Fine! for piecing. It is soft and very affordable. I also use it for machine quilting! The quilt featured in this post is called A Pound of StarsWhen I made it many years ago I was inexperienced and didn't have access to classes or quilt shops. I knew how to English paper piece so that is how I constructed my quilt. You can read how it got its name here!

I hope you've enjoyed this edition of REWIND. Until I post again, happy sewing!

Karen H

Thursday, January 8, 2015

Round 2 of the First Rosette in the New Hexagon Quilt Along

The work continues on The New Hexagon Millefiori Quilt Along and my fingers are sore but I just can't help myself! This is what my Rosette #1 looked like the last time I shared it with you.


For the next round I'll need twelve hexagons from two different hexagons patterns. I decided to do the first six and then I'll make my fabric selection for the second six . I decided to repeat the fabric I used in the centre and to it I added a pale print with pale peach overtones and the same batik I used in Round 1. I just can't get the colours in the batik to photograph accurately. The green is actually more olive and is not as bright as it appears.


These are the six hexagons stitched together but not stitched to the centre. I'll select my fabric for the next six hexagons, make them and the sew everything together into one big happy rosette! You'll notice that I fussy cut the coral diamonds so that there is a dark motif in the centre. I think I'll fussy cut this same fabric but centre a light motif in each.


Just a little bit of hexagon sewing to go on Lozagons and then it will be finished aside from the border. I'll try to take a picture when the wind dies down!

Until I post again, happy sewing!
Karen H

Tuesday, January 6, 2015

Round 1 of the First Rosette in The New Hexagon Quilt Along

I did my fabric pull for the first round of Rosette 1 in Katja's New Hexagon Millefiori Quilt Along. The colours are more saturated than they appear in the picture.


I cut the pieces out and prepped them. So far so good.


When placed next to the centre hexagon it still looks good. However I worry than when the other units are made and put together the rusty batik patches will just look like a rusty batik blobs. Not exactly the look I am going for!


So I pulled a second batik that is a little darker and arranged my hexagons on it to see how it would look and I think that it is better so I replaced one side of each hexagon with the darker batik.


The addition of the darker fabric gives a more dimensional effect to the cogs and I am much happier with it! These hexagons are really big - I've been told that this rosette will finish at 36" across. I think If I were to do it again I would reduce the patterns just a little because smaller hexagons would work better with the scale of fabrics in my stash. But I've already started so I will continue on with the large hexagons!


Now I have to pull fabrics for the next round. I'm considering repeating the coral fabric from the middle.

A number of readers have asked about the design sheets that I use to help with the planning and/or construction of my quilts.


PaperPieces.com had free design sheets on its site but I don't seem to be able to fin them. They may still be there and if they are please let me know. I did a quick search for hexagon design sheets and found a link to printable hexagon design sheet that you can find here. There are lots of them out there so if this one doesn't suit you can look around and I'm sure that you'll find one that works for you!


I just use a pencil to draw my shapes on the graph paper. In this picture you can see I've done my pencil sketch of the quilt top. The pink lines were made using a Frixion pen and their purpose is to identify the units that will be constructed. If I want to remove the pink lines I can just take an iron to the sheet and they will disappear but the pencil sketch will remain!


When I want to colouri the design I make a black and white copy. If I'm not happy with the colours or I make a mistake I still have the original with the pencil lines. I can just make another copy and start again!

Later this month it will be the 2015 GROW YOUR BLOG event organized by Vicki at 2 Bags Full. This is a great way to promote your blog and it is also a great way to find new and interesting blogs. If you would like to sign-up your blog you will find the details here. Many of the bloggers have giveaways and last year I was lucky enough to win two prizes! If you don't have a blog it doesn't matter - you can still visit the blogs and enter to win lovely prizes!


Until I post again, happy sewing!
Karen H

Monday, January 5, 2015

Playing with my hexagons

I've been playing with the filler bits of Lozagons am happy with the arrangement. I ran short of the turquoise so I had to substitute a slightly darker blue. I carefully placed them on either side of the middle unit and am satisfied with the effect. I'll order more of the blue so that I can add a wide border. I think it will finish the quilt nicely. Now I've got so stitch the turquoise hexagons into units for easy stitching to the rest of the quilt top.


I've done my fabric pull for the next round of The New Hexagon Millefiori Quilt Along by Katja Marek. The sun is shining on my fabrics so they are looking a little washed out. I think they will work but I won't know for sure until I cut them out and start sewing. Stay tuned and I'll have an update for you tomorrow!


Several people have asked about the paper pieces to make this block. I am making copies of the hexagons from Katja's book and then cutting them apart to make my hexagons. I'm using regular printer paper and it works just fine for me. For those who are less experienced with English paper piecing you may be more comfortable using a heavier weight paper stock because it is easier to feel the edge of the paper when folding over the seam allowance. You can buy it in the stationary store where you buy your printer paper. It is often used for professional reports (and hexagons)!

Until I post again, happy sewing!
Karen H

Sunday, January 4, 2015

Lozagon's filler bits

I've been working on the filler bits for the top and bottom edges of Lozagons. This is my working sketch that I shared with you.


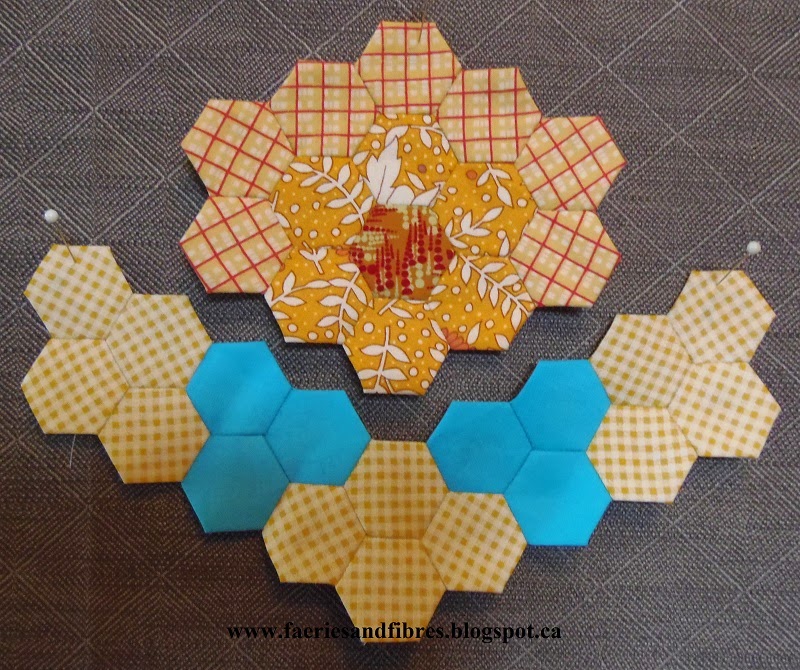
The first step is fabric selection. I decided to make the top and bottom identical so to begin I selected an orange print for the rosette centers. Then I decided that the three full rosettes would be made from the same fabric and the four half rosettes along the top edge would be made from four different fabrics.

I made 3 full rosettes for the top and 3 for the bottom. Each will be partially surrounded with seven hexagons. I chose and yellow check fabric. It is a directional fabric so I paid particular attention to the placement of the hexagons. I never stitch hexagons one at a time; instead I look for the most efficient way to sew them and in this case I sewed the seven hexagons together into a semicircle and this will be stitched to the rosette.


And here you have the rosette with the yellow check hexagons. I made six units like this.


The next step was the construction of the section that will fit the bottom edge of the rosette and it will also connect to the quilt. There are three little yellow tentacles that come off the rosette so I chose another yellow check for all three and then there are small filler pieces made up of the turquoise background fabric. I sewed three units made up of of four yellow check hexagons (again notice I paid particular attention to the direction of the check) and I sewed two units of three turquoise hexagons. For the turquoise hexagons I used turquoise thread. The rest of the unit was stitched with pale yellow thread.


Here it is stitched together. Five more to go!


The eight half rosettes went together very quickly! Here is one of the eight!


The final step will be to construct the turquoise filler units that will fill the spaces between these yellow rosettes so that they can be connected to the body of the quilt.

Until I post again, happy sewing!
Karen H

Friday, January 2, 2015

My first hexagon in The New Hexagon Millefiori Quilt Along

I've picked my fabric for the centre hexagon in the January rosette in Katja Marek's The New Hexagon Millefiori Quilt Along. The toughest part is picking the fabric. I chose this print is called Kensington by Quilting Treasures.


I originally bought this fabric because I thought it would be perfect for fussy cutting. I love the rich coral colour. I made myself a little window template and moved it around until I was happy with what I was seeing. These are the patches I cut out; they are ready to be basted and stitched together.


I tacked the paper templates to the back of the fabric with a tiny dab of water soluble glue and then I used my Dritz Petite Press to turn under all the edges to give a nice sharp fold for stitching. I thread basted only the two outer edges on each template. This is the finished block! I'm pretty happy with how it turned out! It is a fairly large hexagon - each side measures 3" so the pieces are large and easy to work with.


The next round is six hexagons and I'll need to pull 3 fabrics for each hexagon. That will take some time but once I decide they blocks should go together quickly!

Until I post again, happy sewing!
Karen H

Thursday, January 1, 2015

Happy New Year, Happy Lozagons and Happy QALs!

Happy New Year people and welcome to 2015! I had a lovely week off but still have more entertaining over the next few days and this is really cutting into my sewing time. There has been plenty of visiting and good food and I just had to squeeze in some time for hand sewing too!

I've been working away on Lozagons and it is staring to look like a quilt! When I last showed it to you I had stitched together the middle section with the rose medallion and I was working on stitching together the rest of the snowflake blocks into strips that could be attached to the centre.


Since then I've stitched all of the strips that will be sewn to the centre panel. In this picture everything is just pinned together on the design wall. I now have some long seams to sew.


I also shared the drawing of how I would assemble the quilt. It it you can see my first draft of the filler bits for the corners (H and I) and the top centre which isn't labelled.


I was struggling with colour and couldn't decide what to do. So I printed a copy of my drawing and coloured it in to get ideas. Yellow and orange always work well with blue so this is what I finally settled on.


The three large yellow motifs will be identical and then I think the four partial rosettes along the top will be made with four different fabrics. I'll use only one orange print for the centres of all seven. The bottom of the quilt will be identical. I do have one small problem - I'm almost out of the turquoise fabric. It was only $4/m so why I didn't buy more of it is beyond me. I've found something similar so I'll have to use it strategically to make sure it looks like it was part of the design rather that a solution to a fabric shortage!

So what have you got planned in the way of projects for 2015? It is always fun to start something new (at least that's what I think). If you are looking for an English paper piecing project for 2015 I've got a few suggestions for your consideration.

The New Hexagon Millefiori Quilt Along by Katja Marek
It's free and the first pattern was just released! You will find Rosette 1 here.  The designs are from Katja's book The New Hexagon. You will need the book in order to participate; it includes 52 interesting 3" block designs that will be used to make the quilt. Each of the hexagons shown on the cover is one 3" block. Fussy cutting your fabric will make these blocks really spectacular!


One very important point I would like to clarify is that Katja's QAL should not be confused with Willyne Hammerstein's gorgeous book Millefiori Quilts published by Quiltmania. This is a book that has been on my wishlist for some time. If you love English paper piecing and hexagons add this one to your wishlist ! It is difficult to find but I know you can order it from Quiltmania in France.


Elizabeth E's Circles English Paper Piecing Block of the Month
This is another free QAL and it comes from Elizabeth E of www.OccaisonalPiece-Quilt.com Elizabeth just published the pattern for Block 7 and you will find it here. Links the the previous 6 blocks are available on her blog. In the Block 7 post she provides great information about printing patterns from a pdf, cutting the patches and sewing them together.

2015 Hexie Block of the Month from The Hexie Blog by Julia Wood
I know that there are a few of you out there who love hexagons (really people, what's not to love?)!! This is a great QAL for beginners! Julia has just launch the first pattern and you will find it here. The pattern calls for 3/4" hexagons but really you can use any size you want. These will be geometric designs that are stitched together and then appliqued to a background.  Julia is using Kaffe fabrics but you can use whatever tickles your fancy! You can find the general information for this QAL here.


Also sometime this month Julia will be launching her new emagazine Hexie Love. It will be published six times a year and the first issue will come out in the second week of January. A single issue will be $5.99 and a one year subscription will be $26.99 so that's a pretty good savings!

That's it for me for today! Time to get dressed, get cooking and get entertaining. Maybe even get sewing a little! Until I post again, HAPPY NEW YEAR!
Karen H