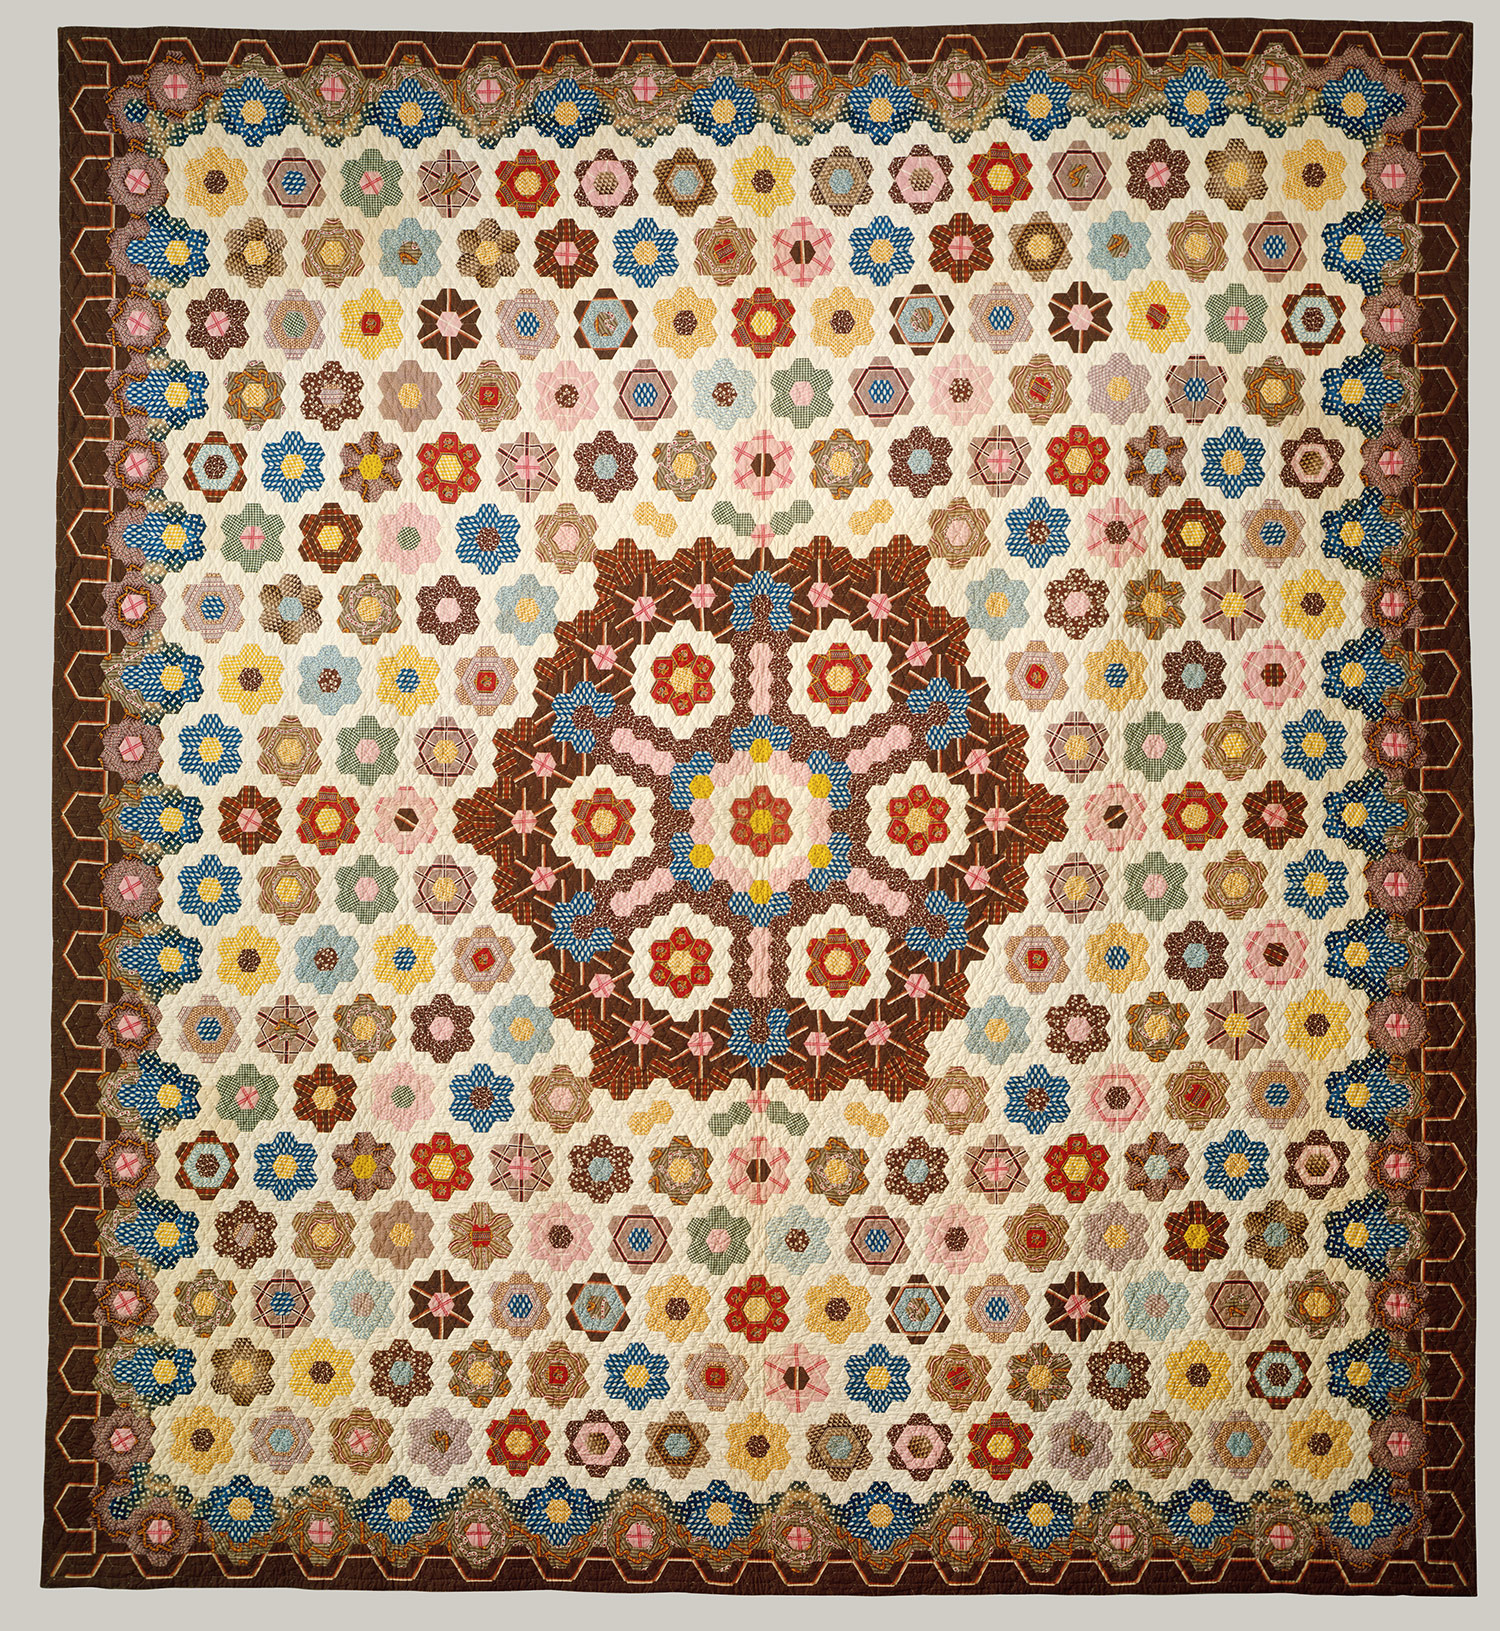
My quilt Stars in The Loft was recently shown on Barbara Brackman's blog Material Culture. You can read the post here. What an honour and a thrill that was! This quilt remains one of my favourites!
I continue to work on my Rowdy Flat Library Quilt designed by Susan Smith. The yellow petals are stitched down and the raw edges covered with bias binding. I used a very lightweight cotton. It is like a lawn or a batiste and it was very easy to work with.
I used the same fabric for the next component which is four bows and a small heart.
Once the bows were stitched down I was able to proceed to the next step which was to add a wreath. The stem is made of bias tape and once again I chose to use my lightweight cotton. The pattern calls for scraps of all colours for the leafs but as much as I like scrap quilts I found it difficult to use random scraps so I chose to make the leafs with green fabrics. The lighter greens are at the top and the darker greens toward the bottom.
There are flower pots in each corner. The pot in the lower right is stitched down as are the little stems which are 1/8"! I thought that they would be difficult but in the end they were so fast and easy to do. I had considered using different fabrics for each pot so you can see that the pot on the left is a different fabric. In the end I decided to use a single print but cut out the pot from different parts of the print. The flowers will all be cut from different parts of the same fabric. The method I used to make the circles is not unique but it works for me. You can read my tutorial here. I like to cut out all of my circles at once. In this case I needed 20 of them. In the evening I basted them so the edges could be gathered and I just left a long tail of thread so that I could draw it up when I pressed the circles. There are butterflies to be added to this block and their bodies are small and I thought they would be REALLY difficult but I had an idea about a method that might made it easier so I tried it out and it worked like a charm. I plan on showing you what I did in an upcoming post.
I'll leave you with a close-up of the ink and embroidery details in the toile fabric.
Until I post again, happy sewing!
Karen H
Showing posts with label Stars in the Loft. Show all posts
Friday, August 26, 2016
Wednesday, July 29, 2015
TUTORIAL: Fun with half and half hexagons
Good morning people! I've done several tutorials about how I like to have fun with hexagons, more fun than just using one fabric basted to a paper hexagon. When I made my Stars in the Loft hexagon quilt I didn't have enough fabrics or the right fabrics to cut the kinds of designs that I wanted to create so I developed a technique in which I paper foundation pieced with my sewing machine on my paper hexagon and once that was done I continued in the usual English paper piecing method. The reason I pieced on the paper is that if the seams of two fabrics extend into the corner I wanted to make sure that everything lined up perfectly. This is a great technique but in sewing on the paper it is sacrificed. I have other techniques that I developed for fancy hexagons such as made fabric. So I gave it some thought and figured that there was no reason why I couldn't use the "made fabric" for half and half hexagons.
Today I'll to share my simplified method to make the half and half hexagons rosette designs from my quilt. I call the hexagon half and half because one half is made with one fabric and the other a different fabric. This refined technique is faster and easier than my previous method and it is gentle on your hexagon papers.
TIP: You can purchase precut papers or if you are like me you can cut them out yourself. You will find templates with various sizes of hexagons under the tab English Paper Piecing Instructions & Hexagon Fun at the top of this page. If your printer doesn't print them the exact size you may need to enlarger or reduce the template. If you are gentle with the paper you will get many uses out of them. I use regular 20lb bond paper to print my hexagons and I cut them when I don't feel like sewing!
I start out by sewing two strips of fabric together using a 1/4" seam allowance. I shortened my stitch length because I will be cutting up the strip and I don't want the seams to come undone at the end. For a 1" hexagon I used two strips that measure 1 1/2" by 20". When the strip was sewn I pressed the seam allowance open.
I placed my hexagon on the strip being sure to line up the points of the hexagon on the seam. I used my children's washable glue stick to hold the paper template in place. Make sure that there is glue near the points of the hexagon that line up on the seam line.
I cut around the hexagon with my scissors leaving a generous seam allowance. I find that 3/8" works well. You don't have to fuss around with a ruler and rotary cutter - just use your scissors. The seam allowance doesn't have to be the same all the way around because you are going to baste the fabric to the paper and whip stitch your hexagons together unlike traditional patchwork where you must sew your patches together on the 1/4" seam allowance line.
I thread baste my hexagon from the back. To begin I start at one of the corners that is lined up with the seam. I fold over the seam allowance on the right side.
I fold over the seam allowance on the other side making sure I have a nice sharp point.
I turn over the hexagon to make sure that the point is lined up on the seam. If it isn't I lift the seam allowances to make sure the point is lined up and repeat the folds until it is correct.
I then start thread basting from the back and work around the hexagon until I get to the second point that lines up on the seam allowance. I repeat the process described above to line up the point on the seam allowance and continue basting.
This is what the hexagon will look like from the front and the back. Because I've basted from the back there are no holes in my paper and when it is removed it will be in great shape and ready to be used again and again. I use a washable children's glue stick to hold the fabric in place so the bond is very weak which means the paper comes out easily! When do I take the paper out? As soon as a hexagon is completely surrounded by other hexagons I remove the paper.
I fussy cut one hexagon for the centre of my rosette (or flower if you prefer) and then arrange the half and half hexagons around the centre. Following are four arrangements.
Another option that would be interesting would be to alternate three solid hexagons with three half and half hexagons! Play around and see what you can come up with!
For a little more fun here are some close-ups of the half and half hexagon rosettes in my Stars in the Loft hexagon quilt.
This is just one of countless designs that I have. It is fun, it is easy and it is a great way to use up strips of fabric. Although all of the examples above use only two fabrics for the half and half hexagons there is no reason why you couldn't use an variety of colours. Wouldn't it be fun to use the same light colour for all six hexagons but different jelly colours for the other half and then sew them into a pinwheel design like the block show above? It sure would be fun!
For those of you who are interested in the Brinton Hall quilt pattern in Quiltmania (pattern designed by Leigh Lattimore) I have found another quilt maker who is working on it. Kelly of Always Applique hasn't been blogging for several moths but on Monday she posted with oodles of pretty pictures of the projects she is working on including her Brinton Hall quilt which you can see here.
I hope you enjoy this little tutorial. Time for me to do some sewing so until I post again, happy sewing to you!
Karen H
Stars in the Loft by Karen H
Today I'll to share my simplified method to make the half and half hexagons rosette designs from my quilt. I call the hexagon half and half because one half is made with one fabric and the other a different fabric. This refined technique is faster and easier than my previous method and it is gentle on your hexagon papers.
TIP: You can purchase precut papers or if you are like me you can cut them out yourself. You will find templates with various sizes of hexagons under the tab English Paper Piecing Instructions & Hexagon Fun at the top of this page. If your printer doesn't print them the exact size you may need to enlarger or reduce the template. If you are gentle with the paper you will get many uses out of them. I use regular 20lb bond paper to print my hexagons and I cut them when I don't feel like sewing!
I start out by sewing two strips of fabric together using a 1/4" seam allowance. I shortened my stitch length because I will be cutting up the strip and I don't want the seams to come undone at the end. For a 1" hexagon I used two strips that measure 1 1/2" by 20". When the strip was sewn I pressed the seam allowance open.
I placed my hexagon on the strip being sure to line up the points of the hexagon on the seam. I used my children's washable glue stick to hold the paper template in place. Make sure that there is glue near the points of the hexagon that line up on the seam line.
I cut around the hexagon with my scissors leaving a generous seam allowance. I find that 3/8" works well. You don't have to fuss around with a ruler and rotary cutter - just use your scissors. The seam allowance doesn't have to be the same all the way around because you are going to baste the fabric to the paper and whip stitch your hexagons together unlike traditional patchwork where you must sew your patches together on the 1/4" seam allowance line.
I thread baste my hexagon from the back. To begin I start at one of the corners that is lined up with the seam. I fold over the seam allowance on the right side.
I fold over the seam allowance on the other side making sure I have a nice sharp point.
I turn over the hexagon to make sure that the point is lined up on the seam. If it isn't I lift the seam allowances to make sure the point is lined up and repeat the folds until it is correct.
I then start thread basting from the back and work around the hexagon until I get to the second point that lines up on the seam allowance. I repeat the process described above to line up the point on the seam allowance and continue basting.
This is what the hexagon will look like from the front and the back. Because I've basted from the back there are no holes in my paper and when it is removed it will be in great shape and ready to be used again and again. I use a washable children's glue stick to hold the fabric in place so the bond is very weak which means the paper comes out easily! When do I take the paper out? As soon as a hexagon is completely surrounded by other hexagons I remove the paper.
I fussy cut one hexagon for the centre of my rosette (or flower if you prefer) and then arrange the half and half hexagons around the centre. Following are four arrangements.
Another option that would be interesting would be to alternate three solid hexagons with three half and half hexagons! Play around and see what you can come up with!
For a little more fun here are some close-ups of the half and half hexagon rosettes in my Stars in the Loft hexagon quilt.
This is just one of countless designs that I have. It is fun, it is easy and it is a great way to use up strips of fabric. Although all of the examples above use only two fabrics for the half and half hexagons there is no reason why you couldn't use an variety of colours. Wouldn't it be fun to use the same light colour for all six hexagons but different jelly colours for the other half and then sew them into a pinwheel design like the block show above? It sure would be fun!
For those of you who are interested in the Brinton Hall quilt pattern in Quiltmania (pattern designed by Leigh Lattimore) I have found another quilt maker who is working on it. Kelly of Always Applique hasn't been blogging for several moths but on Monday she posted with oodles of pretty pictures of the projects she is working on including her Brinton Hall quilt which you can see here.
I hope you enjoy this little tutorial. Time for me to do some sewing so until I post again, happy sewing to you!
Karen H
Wednesday, May 21, 2014
Bloggers Quilt Festival - Stars in the Loft
It is time for me to decide what quilt I will show at Amy's Bloggers Quilt Festival. Each person is permitted to register a maximum of two quilts in one of several categories (mini, small, large, applique, art, hand quilted, home machine quilted, modern, original design, rainbow and scrappy). If you have a blog and a quilt why not register a quilt or two? Go here to read more about the event! Then on May 24 through to May 29 go back and enjoy the quilt show and vote for your favourite quilts! There are prizes to be won by those who have quilts registered and for readers too!
Yesterday I registered my small quilt Flora and Fauna, Parts of the Garden in the small quilt category (quilt measures more than 80" but less than 240"). I wanted to enter a second quilt and with your input I have decided to enter Stars in the Loft in the scrappy category. I didn't buy any fabric for this quilt. Instead I worked with the scraps in my stash. When I ran out of one fabric I added a second, third, fourth and so on! There are at least five fabrics in the background. While the navy border looks like a single fabric there are more than a dozen navy blues.
This quilt was inspired by an antique quilt. I saw black & white picture in a book but there was no information about the quilt maker nor was there a pattern. Many years after I made the quilt I came across the original which was made in 1830. I subsequently found a second quilt that was made more than 100 years after the original. And mine was made more than 170 years after the original! If you would like to see the other two quilts I wrote about them on June 1, 2013.
I wanted to make some beautiful hexagons for Stars in the Loft and although I didn't mind fussy cutting the centers I wasn't about to fussy cut the six surrounding hexagons. Also I was working with scraps so in many cases I didn't have enough fabric to fussy cut six patches. My solution was to developed a technique to quickly and easily piece the interesting hexagons so that I could create all sorts of interesting shapes.
The navy and off white patches are foundation pieced on the paper hexagon before English paper piecing. These patches remind me of fireworks because they seem to sparkle!
The border on this quilt is similar to the original but the stars and hexagons with gold centers are my own design. When making the border blocks I ran out of fabrics and again had to insert similar fabrics to make the required number.
I loved the rusty red fabric for the star points but soon realized I would only have enough to make about half of the stars. They are surprising easy to make! I wrote a tutorial on February 7, 2014.
For the other half of the stars I added a similar fabric and I alternated it with the rusty-red.
The same thing happened with the making of the gold centered hexagons in the border. I had a blue stripe fabric for the outer half of the hexagon but there was only enough to make have of the blocks.
I substituted a similar grey-blue print for the remaining half and then alternated the blocks so that the border would be balanced.
I thought I would share some close-ups of the blocks in my quilt!
Not all of the hexagons are made using this piecing technique. Some had just a fussy cut center or the six surrounding hexagons were fussy cut.
For more information about English paper piecing have a look under the tab English Paper Piecing & Hexagon Fun just under the banner at the top of this page!
Thanks for dropping by for a visit. Tomorrow I'll have an update on my Godstone Grannies hexagon quilt and I'll show you the most recent African themed quilt my Mom is working on. Until then, happy sewing!
Karen H
Yesterday I registered my small quilt Flora and Fauna, Parts of the Garden in the small quilt category (quilt measures more than 80" but less than 240"). I wanted to enter a second quilt and with your input I have decided to enter Stars in the Loft in the scrappy category. I didn't buy any fabric for this quilt. Instead I worked with the scraps in my stash. When I ran out of one fabric I added a second, third, fourth and so on! There are at least five fabrics in the background. While the navy border looks like a single fabric there are more than a dozen navy blues.
Stars in the Loft. Karen H
This quilt was inspired by an antique quilt. I saw black & white picture in a book but there was no information about the quilt maker nor was there a pattern. Many years after I made the quilt I came across the original which was made in 1830. I subsequently found a second quilt that was made more than 100 years after the original. And mine was made more than 170 years after the original! If you would like to see the other two quilts I wrote about them on June 1, 2013.
I wanted to make some beautiful hexagons for Stars in the Loft and although I didn't mind fussy cutting the centers I wasn't about to fussy cut the six surrounding hexagons. Also I was working with scraps so in many cases I didn't have enough fabric to fussy cut six patches. My solution was to developed a technique to quickly and easily piece the interesting hexagons so that I could create all sorts of interesting shapes.
Center medallion in Stars in the Loft
The navy and off white patches are foundation pieced on the paper hexagon before English paper piecing. These patches remind me of fireworks because they seem to sparkle!
The border on this quilt is similar to the original but the stars and hexagons with gold centers are my own design. When making the border blocks I ran out of fabrics and again had to insert similar fabrics to make the required number.
I loved the rusty red fabric for the star points but soon realized I would only have enough to make about half of the stars. They are surprising easy to make! I wrote a tutorial on February 7, 2014.
For the other half of the stars I added a similar fabric and I alternated it with the rusty-red.
The same thing happened with the making of the gold centered hexagons in the border. I had a blue stripe fabric for the outer half of the hexagon but there was only enough to make have of the blocks.
I substituted a similar grey-blue print for the remaining half and then alternated the blocks so that the border would be balanced.
I thought I would share some close-ups of the blocks in my quilt!
Not all of the hexagons are made using this piecing technique. Some had just a fussy cut center or the six surrounding hexagons were fussy cut.
For more information about English paper piecing have a look under the tab English Paper Piecing & Hexagon Fun just under the banner at the top of this page!
Thanks for dropping by for a visit. Tomorrow I'll have an update on my Godstone Grannies hexagon quilt and I'll show you the most recent African themed quilt my Mom is working on. Until then, happy sewing!
Karen H
Sunday, February 9, 2014
A question about basting and another version of Stars in the Loft
Bunny asked me if I baste through the paper when I make foundation pieced hexagons and my answer is "yes". In fact I generally baste through the paper whether or not the hexagon is foundation pieced because I get nice sharp corners. When the hexagon is foundation pieced it also helps keep the bulk of the seams nice and flat. Tomorrow I'll do a demonstration of how I baste my hexagons.
UPDATE June 2016: Since I wrote this post I've switched to basting from the back. It is fast, easy and it protects the paper hexagons so that I can get multiple uses from each one. An added plus is that the seam allowances are kept flat and smooth! I wrote a tutorial on basting from the back and you will find it here.
Many of you read about the making of my quilt Stars in the Loft in May 2013. I had found a quilt book in a hayloft in an old barn in the later 1990s.
There was a black and white picture of a beautiful quilt and knew I had to make the quilt. There was no information about the history of the quilt, the maker nor was there a pattern. It was simply described as a "mosaic quilt" and the pattern was called "honeycomb". Drafting a pattern was fairly straight forward. I loved the center medallion, especially the dark fabric with light coloured stripes but had no idea where I could find fabric to achieve that effect so that was the genesis of my foundation pieced English paper piecing technique.
I liked the idea that the picture was black & white because I wasn't influenced by the colours of the original. So here is my version of the quilt. I also took some liberties and put my own touches on the quilt one of which was the stars in the border.
This is a close-up of the center medallion.
I frequently searched for the original quilt and in 2013 I found it in the Metropolitan Museum of Art. It was made by Elizabeth Van Horne Clarkson around 1830! a very different colour scheme from the one that I made.
When it rains it pours and I subsequently found another quilt, this one made in 1945 by Bertha Sheramsky Stenge (1891-1957). Bertha's quilt now resides is the Illinois State Museum. When I first found Bertha's quilt there was no information about her or the making of this quilt but I recently visited the Museum site and I was pleased to learn that the story about the making of this quilt parallel's my own story. In addition her biography is now available. You can read about Bertha here. In 1929 Ruth Finley published a book Old Patchwork Quilts and it included a picture of the original quilt from the Metropolitan! Bertha replicated the original including the use of striped fabric in the medallion and the meandering border whereas I made my own striped fabric by piecing my hexagons! This led to a variety of other designs using the technique that I developed, foundation pieced English paper piecing.
So why am I telling you all of this? Well I recently came across yet another version of this quilt on The Quilt Index. This one is a smaller simpler version but the medallion is every bit as exciting. There is no information about the maker but the quilt is dated 1930-1949 and the record comes from the West Virginia Department of Archives and History.
I imagine there are more quilts out there that were inspired by the original made by Elizabeth Van Horne Clarkson. If you come across them I would appreciate hearing where you saw them so I can add the details to my history file!
Until I post tomorrow, happy sewing!
Karen H
UPDATE June 2016: Since I wrote this post I've switched to basting from the back. It is fast, easy and it protects the paper hexagons so that I can get multiple uses from each one. An added plus is that the seam allowances are kept flat and smooth! I wrote a tutorial on basting from the back and you will find it here.
Many of you read about the making of my quilt Stars in the Loft in May 2013. I had found a quilt book in a hayloft in an old barn in the later 1990s.
There was a black and white picture of a beautiful quilt and knew I had to make the quilt. There was no information about the history of the quilt, the maker nor was there a pattern. It was simply described as a "mosaic quilt" and the pattern was called "honeycomb". Drafting a pattern was fairly straight forward. I loved the center medallion, especially the dark fabric with light coloured stripes but had no idea where I could find fabric to achieve that effect so that was the genesis of my foundation pieced English paper piecing technique.
I liked the idea that the picture was black & white because I wasn't influenced by the colours of the original. So here is my version of the quilt. I also took some liberties and put my own touches on the quilt one of which was the stars in the border.
This is a close-up of the center medallion.
I frequently searched for the original quilt and in 2013 I found it in the Metropolitan Museum of Art. It was made by Elizabeth Van Horne Clarkson around 1830! a very different colour scheme from the one that I made.
When it rains it pours and I subsequently found another quilt, this one made in 1945 by Bertha Sheramsky Stenge (1891-1957). Bertha's quilt now resides is the Illinois State Museum. When I first found Bertha's quilt there was no information about her or the making of this quilt but I recently visited the Museum site and I was pleased to learn that the story about the making of this quilt parallel's my own story. In addition her biography is now available. You can read about Bertha here. In 1929 Ruth Finley published a book Old Patchwork Quilts and it included a picture of the original quilt from the Metropolitan! Bertha replicated the original including the use of striped fabric in the medallion and the meandering border whereas I made my own striped fabric by piecing my hexagons! This led to a variety of other designs using the technique that I developed, foundation pieced English paper piecing.
So why am I telling you all of this? Well I recently came across yet another version of this quilt on The Quilt Index. This one is a smaller simpler version but the medallion is every bit as exciting. There is no information about the maker but the quilt is dated 1930-1949 and the record comes from the West Virginia Department of Archives and History.
I imagine there are more quilts out there that were inspired by the original made by Elizabeth Van Horne Clarkson. If you come across them I would appreciate hearing where you saw them so I can add the details to my history file!
Until I post tomorrow, happy sewing!
Karen H
Tuesday, November 26, 2013
Last day to enter, oodles of tiny circles and Stars in the Loft
Today is the last day to enter the draw for a copy of Mimi Kirchner's Tiny World Make-Do Pincushion. It is a great pattern and I've been having loads of fun making pincushions like this one! To enter go here and just leave a comment! For an extra chance to win follow me on Bloglovin!
So here is where I'm at with Love Entwined. The plumes are almost all stitched down.
I spent a couple of hours cutting and making oodles of tiny circles....48 of them!
They will be appliquéd to the red plumes. Here you can see the circles positioned on the plumes. I'm thinking the gold looks a little drab and lacking.
How about if I put another little circle in the centre of each gold oak leaf? I think that looks a little better but what do you think?
Once that is done I've got sixteen fussy little hearts to stitch down. I'm considering back basting appliqué rather than freezer paper or needle turn.
Finally Hancock's of Paducah is having a show and tell where you can vote for your favourite quilt. I've entered Stars in the Loft. If you would like to vote for it or just see all of the lovely quilts go here. You don't need a Facebook account to see the quilts or to vote. To view the quilts click on the "Vote" button. There are quilts with hundreds of votes and mine is nowhere near that number and that's okay. I just wanted to find a way to share my quilt with more people.
If you would like to read a bit more about the story of Stars in the Loft you can read it here, here and here! It took me years to find out who made the quilt. In fact the quilt had been finished for many years before I found the original. I also found other versions of the quilt!
That's it for today. It is time to sew down some little circles I think! Until I post again, happy sewing!
So here is where I'm at with Love Entwined. The plumes are almost all stitched down.
I spent a couple of hours cutting and making oodles of tiny circles....48 of them!
They will be appliquéd to the red plumes. Here you can see the circles positioned on the plumes. I'm thinking the gold looks a little drab and lacking.
How about if I put another little circle in the centre of each gold oak leaf? I think that looks a little better but what do you think?
Once that is done I've got sixteen fussy little hearts to stitch down. I'm considering back basting appliqué rather than freezer paper or needle turn.
Finally Hancock's of Paducah is having a show and tell where you can vote for your favourite quilt. I've entered Stars in the Loft. If you would like to vote for it or just see all of the lovely quilts go here. You don't need a Facebook account to see the quilts or to vote. To view the quilts click on the "Vote" button. There are quilts with hundreds of votes and mine is nowhere near that number and that's okay. I just wanted to find a way to share my quilt with more people.
If you would like to read a bit more about the story of Stars in the Loft you can read it here, here and here! It took me years to find out who made the quilt. In fact the quilt had been finished for many years before I found the original. I also found other versions of the quilt!
That's it for today. It is time to sew down some little circles I think! Until I post again, happy sewing!
Subscribe to:
Posts (Atom)