Tomorrow is March 31 and it is a special day for me! It is my blog's one year anniversary. I've very much enjoyed meeting and getting to know so many wonderful people. As you know I love working with Superior Threads. It is a great company with great products and wonderful customer service ad it shares loads of information that is helpful to quilters. Check out the long list of Superior reference guides here. Superior has agreed to help me celebrate my anniversary! How you ask? Come back tomorrow to find out!
I really enjoyed quilting the open spaces, also known as negative space, in my Lazy Girl quilt. I used Superior So Fine! on top and as always The Bottom Line in the bobbin. I wanted to try out a few more ideas but most of my quilts consist of many small pieces. So I asked my friend if she had a small quilt top I could play around with and she did! She made a lovely Chinese coins quilt from a bag of scraps. She pin basted the quilt so I could play around with it. As always step one is stitch in the ditch! I'll try quilting this one with some nice loopy designs including feathers in the beige columns!
The scraps are leftover from another quilter's project. There's always a home for scraps no matter the size or shape! This is such a bright and happy quilt. I've just about finished the stitch in the ditch and time permitting I'll get cracking on the quilting today or tomorrow!
I had shown you a little cardboard suitcase I found and I plan to use it to store the bits and pieces for my next project. So what am I going to make? You can see the clue on the right hand side! It's going to be another hexagon quilt!
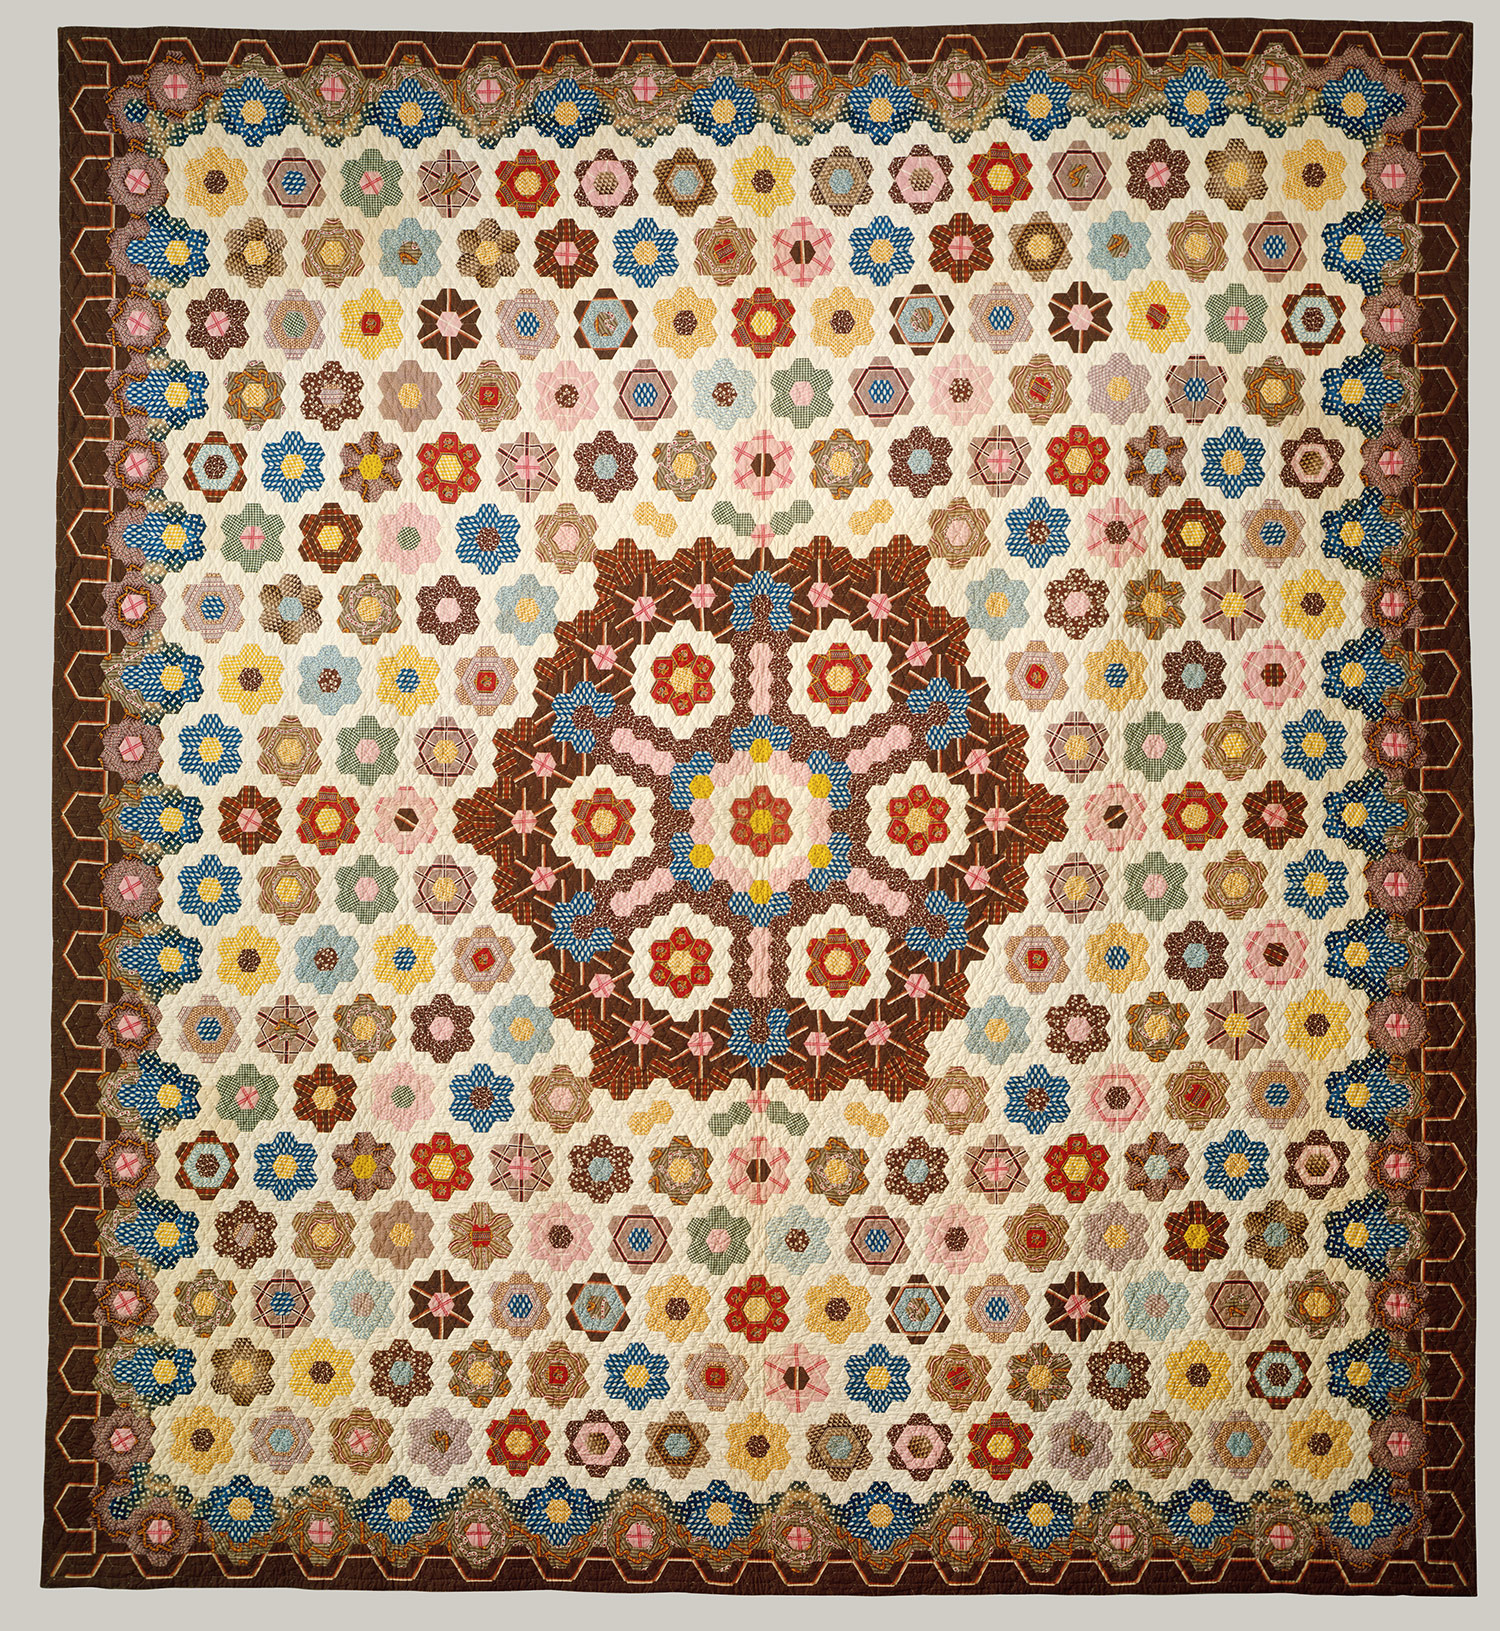
While travelling around the interweb I came across a picture of a hexagon quilt that I just fell in love with so it is the inspiration for my next hexagon quilt. The quilt is at the Quilt Museum and Gallery in York, England. It is a museum dedicated to quilting and textile arts. I encourage you to have a visit and a look around the Gallery.The quilt I am in love with is called the Godstone Grannies Coverlet and is dated 1960-1965. It was made at the WI Denman College by a group of women from several Women's Institutes. The description reads "materials for the patchwork were largely supplied by dressmaking friends". You can read about the quilt here.
Aside from the fact that the blocks are diamond shaped, I love how colour and print is used to create visual interest and secondly patterns. What you can't see clearly in this picture is that most of the patches are fussy cut. I'm not sure that I'll fussy cut all of the patches but I will certainly fussy cut many of them. The first thing I did was sketch out some of the blocks to be able to calculate the number of hexagons I would need for the path and the amount of fabric. I determined that I will need 17 hexies to make the "V" shape that is shaded in my diagram and I'll need 31 V's in total. I'm using a subtle rosey buttery print for the path. My diagram is sitting on top of my path fabric.
I've cut out all of my path fabrics and glue basted my 3/4" hexagons to the so that they can be thread basted.
Here is the first V completed!
Earlier this year I saw some 100% cotton napkins on sale and I was able to get a package of four for $3 so I snapped them up because I thought that they would be great for fussy cutting! This just might be the project that they go into!
I'll keep you posted on my Godstone Grannies hexagon quilt progress and my machine quilting progress!
And now a little Soupcon update and trunk show. I've been asked if I will share what I do with my two Soupcons as far as making them larger, quilting and binding. So I think I'll do just that (I need more hours in the day!). I'll get started as quickly as possible and I'll share with you what I do! And now for the mini trunk show!
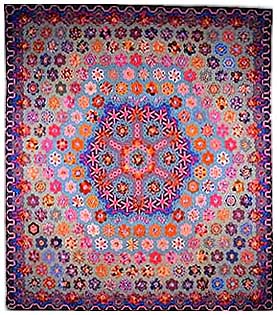
Jean's been busy embellishing her Step 5 border on her pink and purple Soupcon. She had added lots of little details including some embroidered embellishments. I love the combination of diamonds with little hexagons on either side of the large hexagons. So very effective!
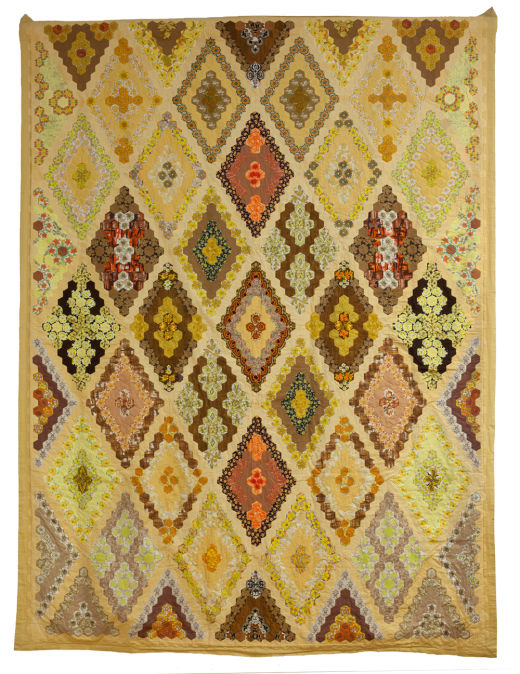
Cissa K has completed her Step 6 and this quilt is and absolute treat for the eye. There are lovely embellishments, fussy cutting and her fabric choices are making me drool. The little blue stars on the red hexagons are lovely! Well done Cissa!
Until I post again tomorrow, happy sewing!
Karen H
Showing posts with label hexi. Show all posts
Sunday, March 30, 2014
Tuesday, February 25, 2014
Cutting lots of hexagons for a path and I'm still a lucky girl
I am working on another hexagon quilt but I can't show it to you just yet! What I can tell you is that it will have a path between the hexagons. The picture below is an example of a quilt with a path. The pink hexagons are the path.
In my view the path serves two purposes - it separates the hexagons so that they can shine and secondly it keeps the quilt square. If the hexagons are the same size (i.e. they have the same number of rounds) and butted one up to the next a gentle slope develops. This was the case with my quilt Ausiegons which is my version of an antique quilt in an Australian quilt registry. There is no path in this quilt.
If you look closely at the left hand side you can see this slope. I dealt with it by adding filler bits which straightened it enough that I could applique the entire quilt to border strips so that the quilt would be square. If you are a beginner this might be a little challenging so the use of a path is highly recommended.
If you decide to add a path to a hexagon quilt it will act exactly the same way as a sashing on a quilt made of square blocks. This means you have only one path between two hexagons. You do not sew the path around each hexagon because you will end up with a slope when the blocks are stitched together.
If you add a path you will need lots of hexagons made from the same fabric. I don't mind cutting fabric for the hexagons that will form the block because it is part of the creative process but I don't like to spend a lot of time cutting a single fabric for the hexagon path. I want that part done quickly so I can get to the really fun part, the basting and sewing. In this post I'm going to show you how I cut and prepare my path hexies quickly and painlessly!
To get started I cut strips of fabric and I want to cut strips in the most economical manner so that there is little waste and if there are any leftover strips they will be of a usable size. I am working with 1" hexagons so I determined that I would need 2 1/2" strips. I cut my strips from my fabric using the method I described on February 2, 2014.
I line up the selvage edges of two strips so that I'll be cutting through four layers. I trim off the selvages and then cut 2 1/4" sections.
I take a stack of four patches and set a paper hexagon on top.
I use my scissors to trim off the corners being sure to leave at least 1/4" seam allowance. It doesn't need to be an exact 1/4" all around (more is better) because when basted to the paper the finished hexagon will be the exact size needed.
Paper can be slippery so after the first cut I often make a fabric template which will stick to my fabric. I use it as a pattern to trim the corners.
In no time flat I had a pile of fabric hexagons.
I use a tiny dab of fabric-safe glue to hold the papers to the hexagons and again I want it done fast! To start I lay out a bunch of hexagons with the wrong side facing up.
A little dab of glue on the paper is all it takes to hold the paper to the fabric. And when I'm done it will release easily! In the past I've been asked about the little marks you see on the hexagons; I use a master template and I mark the size on the master sheet so the marks you see are the size of the hexagons which is 1". I always make sure that I place the glue on the blank side of the hexagon.
To speed up the gluing process I apply a dab of glue to a paper hexagon, pick it up and then I apply the glue to a second hexagon but I leave it stuck to the glue stick. I place the first hexagon on the fabric and then grab the second and place it on the hexagon. The glue sets fairly quickly since I'm only using a little bit so I work quickly.
In less than thirty minutes I had a pile of almost 200 hexagons ready for basting!
And now for something entirely different. I'm still a lucky girl. Look what I got in the mail: the threads that I won from Lorraine at Colour Complements! These threads are simply gorgeous! The colours are rich and vibrant and they have a glorious sheen. You can get your own from her etsy shop. All four threads are hand dyed and the package included knitted tubular ribbon, #8 DMC perle cotton, twisted rayon and #5 DMC perle cotton.
Now that I have a pile of hexagons ready to baste I had better get cracking! So until I post again, happy sewing!
Karen H
Sunday, February 9, 2014
A question about basting and another version of Stars in the Loft
Bunny asked me if I baste through the paper when I make foundation pieced hexagons and my answer is "yes". In fact I generally baste through the paper whether or not the hexagon is foundation pieced because I get nice sharp corners. When the hexagon is foundation pieced it also helps keep the bulk of the seams nice and flat. Tomorrow I'll do a demonstration of how I baste my hexagons.
UPDATE June 2016: Since I wrote this post I've switched to basting from the back. It is fast, easy and it protects the paper hexagons so that I can get multiple uses from each one. An added plus is that the seam allowances are kept flat and smooth! I wrote a tutorial on basting from the back and you will find it here.
Many of you read about the making of my quilt Stars in the Loft in May 2013. I had found a quilt book in a hayloft in an old barn in the later 1990s.
There was a black and white picture of a beautiful quilt and knew I had to make the quilt. There was no information about the history of the quilt, the maker nor was there a pattern. It was simply described as a "mosaic quilt" and the pattern was called "honeycomb". Drafting a pattern was fairly straight forward. I loved the center medallion, especially the dark fabric with light coloured stripes but had no idea where I could find fabric to achieve that effect so that was the genesis of my foundation pieced English paper piecing technique.
I liked the idea that the picture was black & white because I wasn't influenced by the colours of the original. So here is my version of the quilt. I also took some liberties and put my own touches on the quilt one of which was the stars in the border.
This is a close-up of the center medallion.
I frequently searched for the original quilt and in 2013 I found it in the Metropolitan Museum of Art. It was made by Elizabeth Van Horne Clarkson around 1830! a very different colour scheme from the one that I made.
When it rains it pours and I subsequently found another quilt, this one made in 1945 by Bertha Sheramsky Stenge (1891-1957). Bertha's quilt now resides is the Illinois State Museum. When I first found Bertha's quilt there was no information about her or the making of this quilt but I recently visited the Museum site and I was pleased to learn that the story about the making of this quilt parallel's my own story. In addition her biography is now available. You can read about Bertha here. In 1929 Ruth Finley published a book Old Patchwork Quilts and it included a picture of the original quilt from the Metropolitan! Bertha replicated the original including the use of striped fabric in the medallion and the meandering border whereas I made my own striped fabric by piecing my hexagons! This led to a variety of other designs using the technique that I developed, foundation pieced English paper piecing.
So why am I telling you all of this? Well I recently came across yet another version of this quilt on The Quilt Index. This one is a smaller simpler version but the medallion is every bit as exciting. There is no information about the maker but the quilt is dated 1930-1949 and the record comes from the West Virginia Department of Archives and History.
I imagine there are more quilts out there that were inspired by the original made by Elizabeth Van Horne Clarkson. If you come across them I would appreciate hearing where you saw them so I can add the details to my history file!
Until I post tomorrow, happy sewing!
Karen H
Subscribe to:
Posts (Atom)