

Soupcon Quilt Along (QAL)
Part 5 of 6
Welcome to the 5th installment of my Soupcon QAL. If you are just joining in you will find Part 1 here, Part 2 here, Part 3 here and Part 4 here. Part 6 will be released on March 14th. So mark your calendars or follow me on Bloglovin so you don't miss a thing! And don't forget to join the Soupcon FLICKR Group and post picture of your quilt!
In this step we add a border and embellish it with applique. My blue Soupcon has a border of appliqued 1/2" hexagons. The border was added to the quilt after the hexagons were appliqued in place with the exception of the corner units which were appliqued after the borders were attached. I didn't miter the corners. I repeated some of my fabrics used in previous steps in the hexagons to add a cohesive look to the quilt. You can repeat fabrics or not - it is up to you!

I think that the little hexagon stars in the center of each border are a nice detail. I published a tutorial for making these little gems on February 16, 2014. They are optional so if you prefer you can omit the stars and just use solid hexagons feel free to do so!
I used a diamond motif for my red Soupcon. There are actually three sizes: the grey diamond in the center of each border is the largest, the red diamonds in the corners the smallest and the red diamonds (which are made of four small diamonds) are medium sized. I chose to sew four of the small diamonds in the corners together to make the medium red diamonds however you could simply make the red diamonds from a single fabric. This would be less challenging than the blue version. The border was attached to the quilt and then the diamonds were appliqued in place.Unlike the blue Soupcon above I mitered the corners on my red Soupcon quilt.

I chose to embellish my diamonds; I appliqued circles in the center of the diamonds. They were cut from the same fabric that was used in the border of Step 4. This made the quilt more cohesive while still maintaining the fact that it is a scrap quilt. It is yet another example of how a little embellishment can make a difference to the overall look of the quilt. Give some thought to embellishing your quilt to make it uniquely yours! You could fussy cut the diamonds to create something special!
If you don't want diamonds or hexagons choose another shape or simply add a complementary print fabric and perhaps add some embellishment. Another option I could have considered for the red Soupcon was to leave the border with no embellishment and simply use the space to showcase some lovely quilting.
IMPORTANT: Step 6 will be a pieced border so keep that it mind if you chose to do your own thing.
The border in Step 5 will finish at 3 1/2" so this means you will cut strips that measure 4". Some of you have mentioned that your quilt top measured 17 1/2" after Step 4 rather than 17". Regardless of the measurement of your quilt you are going to want to cut your border strips at 4" wide so that they will finish at 3 1/2". There will a narrow border added in Step 6 and it is there that adjustments can be made to bring your quilt to the needed size for the final step. If your start measurement is 17", at the end of Step 5 it will measure 24" with seam allowance. If your start measurement is 17 1/2", at the end of Step 5 it will measure 24 1/2".
YOU WILL FIND ALL OF THE TEMPLATES FOR HEXAGONS (INCLUDING THE STAR HEXAGON) AND DIAMONDS HERE.
Making a hexagon border
My blue Soupcon did not have mitered corners so I cut 4 strips that measured 4" by 17" and four squares that were 4" square. (NOTE: If your starting measurement is 17 1/2" then you will still cut your four strips at 4" but they will be 17 1/2" in length).
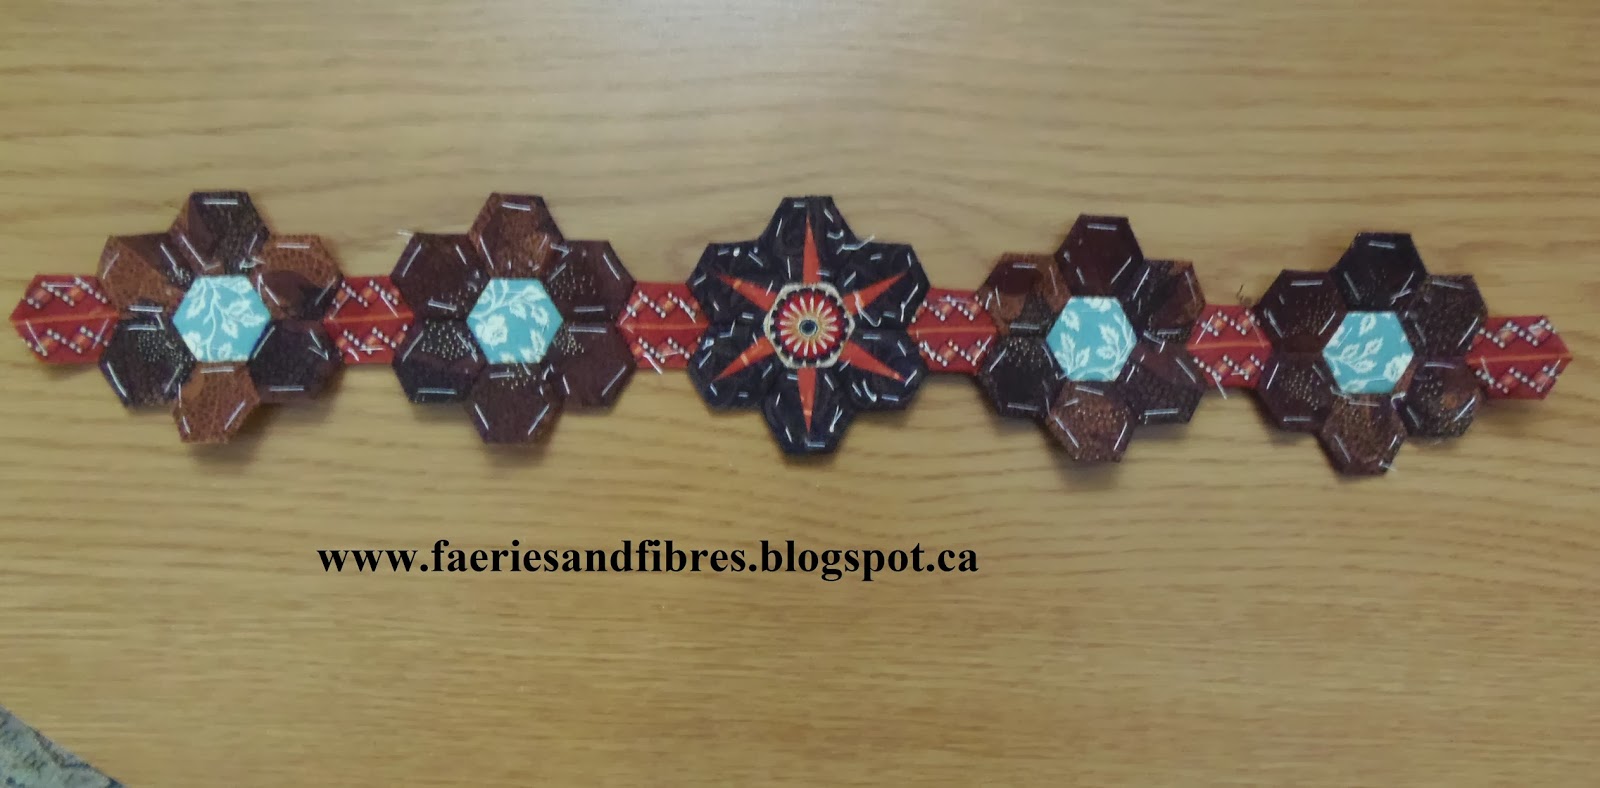
The border hexagons are made from 1/2" hexagons. You will find the master template for 1/2" hexagons here. I English paper pieced the corner units as per the following picture. Once they were stitched together I gave them a good press with a hot, dry iron and then a generous spritz of starch before pressing once again with a hot, dry iron.

I made foundation pieced English paper pieced stars. The tutorial for these stars is here. If you prefer not to make these stars you could fussy cut fabric to make an interesting center piece for each border or you could make it scrappy. How about making a simple unit with a fussy cut center? There are all sorts of possibilities.


They are stitched together to create four strips like this.

Once the hexagons are sewn into four strips I gave them a good press with a hot, dry iron followed by a spritz of starch and another good press with a hot, dry iron. At this point the basting threads and papers can be removed.
Take the four17" borders, fold them in half along the length and then along the width to find the middle. Center the hexagon strip on the border and applique it in place. A border strip is then stitched to either side of the quilt.

Stitch a 4" square to either end of the border and then stitch these borders to the quilt top and bottom.

Place the corner hexagon units at each corner and applique them in place.

Making the diamond border
Cut 4" strips of fabric for the border. My starting measurement was 17" including seam allowance so I cut my borders 24" long. (NOTE: If your starting measurement is 17 1/2" you will cut strips that are 4" but the length will be cut at 24 1/2".) Mark a line with a fabric safe marker (or you can press a fold and if need be run a long basting stitch along this line) along the middle of the length of each border strip. This will be used to align your diamonds. Stitch the border strips to the quilt and miter the corners.


There are three different sized diamonds in the quilt and all were basted to paper in the English paper piecing method. You will find the diamond templates here. I pressed them with a hot, dry iron followed by a spritz of starch and another press with the hot, dry iron. In the picture below you will see the three sizes of diamonds. The middle diamond is equal to four of the small diamonds. You will need 4 large diamonds, 16 medium diamonds and 4 small diamonds.

You could use one fabric to made the middle diamonds or you can use scraps of fabric and piece the medium diamond.

Find the center of each border and stitch the large diamond in place. Be sure that you've removed the basting threads and paper before doing so.

Here you can see all four large diamonds in position.

The next step is to position the four small diamonds at the corners.

The last step is to position the medium diamonds.

I decided that my diamonds needed a little boost so I decided to applique circles in the middle. If your points don't match this is a great way to cover them up and at the same time add interest to your quilt! Once I had appliqued the circles to the medium and larger diamonds they were appliqued to the quilt.

I am a great fan of playing around to see what happens. If you decide to use diamonds why not make a few and try out some different arrangements. I like to take pictures so that I can look at the various options and evaluate which I like best.


How about sewing three diamonds together to make half of a six pointed star and then stitch them down as an embellishment? Or maybe you enjoyed embroidery so why not add some embroidery details? I hope that I've planted a few ideas and that you'll be inspired to take what I've shown you to get creative and really personalize your quilt!
HELPFUL READER TIP: Before I call it a day I wanted to mention an alternative to thread basting when doing English paper piecing. Missie of Traditional Primitives recently posted about her method of preparing hexagons without thread basting - all you need is freezer paper, starch and an iron. To learn more go Traditional Primitives and you will see a link in the post that will take you to Missie's old blog where you will find step by step detailed instructions and photographs. It is a great alternative to thread basting!
So there you have it - Step 5 is done! In two weeks I'll post the final step; we will add one final border. I called the QAL Soupcon because it involves a little bit of many different techniques and methods that I like so in Step 6 we will use a technique not yet used! This will be another opportunity to use scraps and leftovers! Don't forget to publish pictures of your work on the Soupcon FLICKR Group!
Until I post again, happy sewing!
Karen H
Lovely Karen! Oh, my mind is churning with possibilities- which will I choose? Or maybe some embroidery! Happy Friday t all the Soupçon stitchers!
ReplyDeleteThis looks great. Karen I like both versions very much. Its going to fun playing with possiblities. Now I know i said i wanted to try out your star hexies... but at 1/2 inch , now thats a challenge. Following your hint yesterday, i cut a few 1/2 inch hexies to give me a head start. This one might take most of the next two weeks to complete.
ReplyDeleteLovely! I love to make hexies and I do need hand work this week. Thank you.
ReplyDeleteBoth the diamonds and hexies look fantastic and "frame" the quilts. Those hexies are growing on me!
ReplyDeleteHoly Toledo! Gets better and better! I'm doing the diamonds - just don't have time for the hexies although they are my first choice. I already know I want to make another maybe this summer - Soupçon is tops!
ReplyDeleteWOW Karen -- talk about a wonderful tutorial! You've done an outstanding job on this QAL - I only wish I had time to join in. It's book marked for future! Thank you for sharing such detailed information and for the stunning design. Hugs, Karen
ReplyDeleteBeautiful piecework! It was nice to meet you thru the GYB hop.
ReplyDeleteBoth versions are fabulous... A little preference goes to the borders with hexies !
ReplyDeleteHugs Karen
You little "honey". You definitely know how to challenge us. 1/2 inch hexies only 24 of them and you think we can get them done in 2 weeks time? well, we'll see. Looks like fun and I'd better get on the stick. I'm loving your quilt along with a surprise around every turn. Off to the fabric bin. Thanks Susan
ReplyDeleteIt's nice to see the different options. Thanks for making it seem easy....well maybe not easy, but definitely possible.
ReplyDeleteWoo Boy! Those half inch hexies are small! Four down, twenty to go plus the joining ones. Woo Boy!
ReplyDeletei have one done! LOL
ReplyDeleteStill pondering after a week -- did make a little 1/2" hexie flower and that is as cute as can be, but my first pick for this next border is the print I used for the center motif -- will look great in the mitered corners if I go with it, but not so good with the hexie flowers -- audition, audition, audition!
ReplyDelete