
GROUND RULE #1: Relax and enjoy the rhythm of what you are doing.
GROUND RULE # 2: It isn't a race. It will be done when it is done and not a minute sooner..
GROUND RULE #3: If you get bored mix it up....baste, cut or stitch.
GROUND RULE #4: Admire our work and take pride in it. We are our own worst critics and we shouldn't be. You know how hard you worked so be your biggest cheerleader!!!
GROUND RULE #5: Fix mistakes that will drive you crazy and leave alone those that won't. I find that left long enough there isn't very much that bothers me and I expect you will find the same! This will dramatically reduce the amount of fixing that you need to do!
GROUND RULE #6: I rarely layout my blocks to see how many I have yet to make because it can be overwhelming and disappointing to realize after hours and hours of sewing that I might not have made as much progress as I had hoped. Once a block is completed I put it in the bottom of the box and there it stays until my project is close to completion.
I like to have a nice project box to store the bits and pieces of my project. This is the cardboard suitcase I found for my Godstone Grannies (GG) quilt! I'll use it to store bits and pieces of blocks, completed blocks, cut strips and my pattern but at the beginning I just used it to hold fabrics I thought I might use to make my blocks. In this picture I pulled a bunch of fabrics that I thought I would use. Some were used in the blocks and some were not - it was a "first draft" of fabric choices!

If my quilt is an original design the first thing I do is draft my quilt on hexagon paper. This is a design for a quilt that I saw in a magazine. I drafted it on paper first because I wanted to make some changes. I have since made the quilt top but I've not yet showed it to you. I will when I am ready to quilt it! In this quilt I used pink highlighter to identify the path that was going to be made from a particular fabric.

If the inspiration is from an antique quilt as was the case with my GG quilt I print a picture of the quilt. The arrangement of the diamonds in some of the blocks is unusual so I printed a second picture of the quilt. I cut up the second picture and the diamond I cut out is kept with the fabric patches for that diamond block.

My GG quilt is just large diamonds so I only needed to draft patterns for the few of the blocks (on the right). I also sketched a plan that shows all of the diamonds (on the left). I numbered each of the blocks so I'll know where to place the completed diamonds. I use the plan to make notes to tell me what I've cut out, what I need to cut or special fabric choices. Once an entire block is cut out I outlined it with green on the plan. If I've started cutting the block but did not cut all the patches I just make a dot at the top of the diamond. I can tell at a glance where I am with my quilt and what is done and what needs to be done.

I also cut make a window template in case I want to fussy cut some patches. I keep everything clipped together and I store it in the project box.

The first thing I do is calculate how much fabric I need for the path between the hexagons. I wrote about it here. I cut the required number of strips and then cut them down into hexagons. The papers are tacked to the back with a little bit of glue stick and they are all tossed in a bag. I wrote about how I do here. With my method I can cut and prepare hundreds of hexagons for basting in no time flat! I store the hexagons in a bag with basting thread, needles and a pair of small sewing scissor so I can grab the bag and baste any time I want.


HELPFUL TIP: If I have a small piece of thread in my needle rather than toss it I'll use it to baste one hexagon. You'll be surprised how quickly the hexagons will pile up.
I like to do most of the fabric cutting at the outset for a couple of reasons. I don't particularly enjoy cutting so I want to get it out of the way so that I can sew but more importantly if I do most of the cutting at the beginning I can repeat some of the fabrics in several blocks and the gives a scrap quilt a more cohesive appearance. I love these little snack bags for storing cut patches. I use one bag per block.

I cut out my patches for each block and put them in a little bag with a tag that has the block number from my plan and I glue the picture of the diamond to the tag so I'll know how it goes together. Most of the GG blocks are duplicated so I put one block in each little bag and I pin the two bags together. The bag at the top is cut and has the papers attached but I've not started basting. In the pair of bags at the bottom I've basted but not yet stitched. I wrote about this process here.

Repeating a few fabrics in different blocks gives a quilt a more controlled appearance. It will still be scrappy but not wildly so. What I do to repeat fabrics is analyze the picture of the quilt to decide which fabrics I will repeat. One such fabric was the solid pale yellow in the block shown below. For that round I needed 12 hexagons. I decided which other blocks would have that fabric and the number of patches that would be needed. I cut them all out at the same time and the patches were put in the bag with the tag that has the block number and block picture. I keep the remaining fabric in the project box so that if I need more of it I don't have to go searching.

Some of my hexagon sewing supplies for my bag
Knots are not fun so I like to sew so that I have to make as few knots as possible. In the picture below you can see one of the filler pieces that will be at the top or bottom of the quilt. I've stitched the hexagons together into rounds starting with the center three at the bottom and working out.

If I don't feel like sewing I just pin them all together and toss them in the project box and do something else!

When I am ready to sew them together I'll sew the three beige units at the bottom in the center to the first round. Then I'll attach the second round followed by the third.

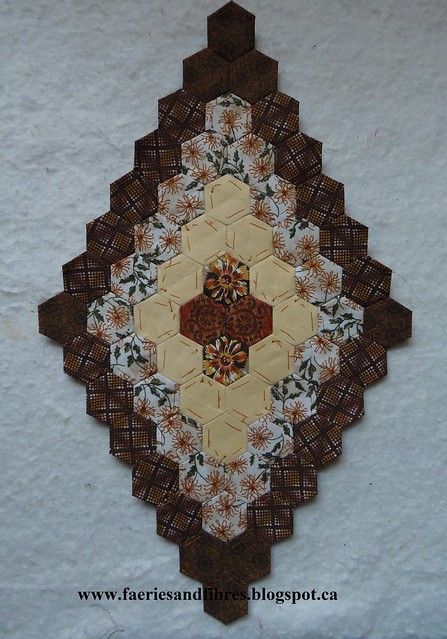
Here is a block set out on my sandpaper board. I've sewed the middle four orange flowers together. The next round is the pale yellow and the hexies are stitched together; notice that it isn't stitched closed. This makes it easier to stitch around the center orange flowers. Ditto the next round with yellow print. I'll stitch the yellow round to the orange center with yellow thread. Once I've got all the way around I'll then be able to stitch the opening closed. The final round is in various states of assembly. I like laying the block out this way; it ensures that the pieces go together correctly.

Once the rounds are stitched I pin them together with their identification tag and toss them in the project box. These make good portable projects for sewing when I'm out and about. When I see a block that tickles my fancy at that moment I pull it out and work on it!


Completed blocks always go to the bottom of the project box where they can pile up. In no time flat I've got a quilt!
So there you have it - a few of my tips for how I get organized! Any questions? Fire away because I'm always willing to share! I reply to every comment by email so if you don't hear back from me it is because you are a no reply blogger which means your email address isn't available to me.
Here is my latest GG block!

Happy sewing!
Karen H
great post Karen, I always have a project bag or box too-really keeps it all together nice
ReplyDeleteThanks for sharing your process, Karen!
ReplyDeleteThat was a lot of great tips. It also helps me to understand how you get so much done. You've very well organized. I've not been following a long time, but so far, GG is my favourite quilt.
ReplyDeleteI love seeing how other people organize projects, especially oddball ones like hexies. You do yours in a completely different order than I do mine. I sew each round to the previous round first, because I hate wrestling with the papers, and it seems I do less of that in that order. :)
ReplyDeleteMore great tips. I really do enjoy making hexies....very relaxing for sure.
ReplyDeleteLOL -- my computer really, really didn't want to let me type 'hexies.'
ReplyDeleteI admire your patience. I love to have the pattern done for me. I could never draft a pattern like that... Thanks for all the hard work you do in creating your beautiful quilts.
ReplyDeleteBunny
Such a wonderful description of your process, Karen! Thanks for sharing.
ReplyDeleteThanks for all the clear directions and pictures of each organizing step. Always interesting to see how other quilters work!! It is amazing how many ideas I have picked up by looking at pictures & having people describe their own process. Even a small idea that saves time, really helps if you are making hundreds of hexies!! I have to say that GG is getting very fun to see the next block. They are always different. I have had a lot of personal family health problems in this year & have enjoyed escaping to your blog to see what your nimble fingers have created. I am starting to sketch some ideas---hoping that I will soon get back to stitching. Thanks for keeping the hexies bouncing around in my brain!!
ReplyDeleteOh wow that last hexagon diamond is stunning!
ReplyDeleteI really enjoyed this post too. The colours you have chosen are beautiful! I really enjoyed seeing the fabric yardage at the beginning of the post as well, b/c I still have a hard time picturing what kind of print your hexies originated from, and this is slowly helping me to know what to look for in a fabric print when I am shopping. Thanks so much!
ReplyDeleteKaren, thank you for sharing so much! If I can get that Fiskars hexie cutter, I'll be in business. :)
ReplyDeleteIn your pic of your travel kit, there's a green felt piece with a leaf on top-what is that?
Thanks!
Hi Eileen - it is a hardcover needle book. I cut the leaf out of acrylic felt. It was embellished with embroidery and then stitched to the panel that would become the outside of the needle book. The free pattern for the needle book can be found here: http://studioloblog.wordpress.com/2013/04/13/tutorial-hardcover-needlebooks/
Delete