
If you are new to English paper piecing (EPP) and have made the 22 blocks that make up the Value Proposition Hexagon Quilt you might be wondering how they are put together into the quilt top and then once you've got them together, how you finish the quilt. That's what today's post is all about!
This is my quilt top put together without any borders! I designed the quilt with a triple light coloured path. In today's post I'll write about:
- Constructing the path;
- Sewing the blocks without a path;
- Two methods of adding borders and
- Finishing the quilt without a border.

Value Proposition Hexagon Quilt by Karen H 2014 approx. 62" x 71"
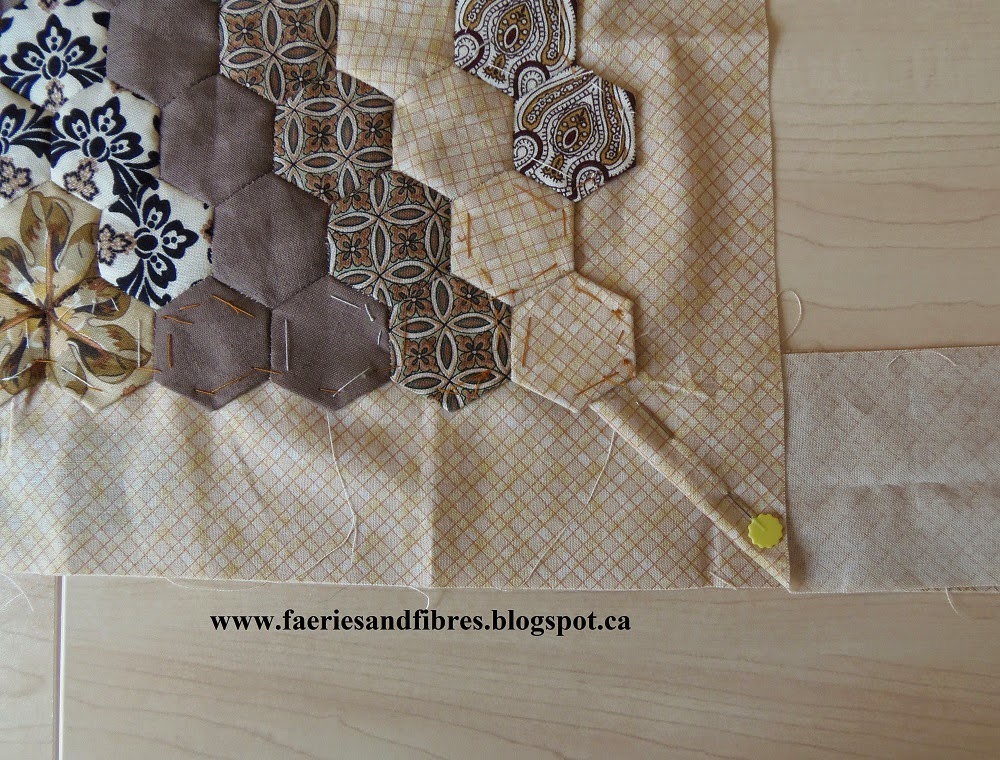
Constructing the Path
If you haven't already done so now it is time to decide on the path fabric! I designed the quilt with a triple path. I chose two light fabrics but you should select fabrics that appeal to you and that suit your blocks! The outer path surrounds each block and the middle path which is marked in pink is between the blocks after the outer path is sewn to them. As I look at this picture I realize I didn't colour in the pink in the lower right hand corner! Good thing I'm cute; otherwise I would be fired!
You will need 24 hexagons of outer path fabric for each of the 18 blocks. In addition to the 18 full blocks there are 4 side setting block and they will each have 13 hexagons stitched to them.
You will need 24 hexagons of outer path fabric for each of the 18 blocks. In addition to the 18 full blocks there are 4 side setting block and they will each have 13 hexagons stitched to them.

You will also need to construct units made of outer path fabric for the corners (see Outer Edges of Path Fillers in diagram below) as well as the Vs for the top and bottom (see Top and Bottom Fillers in diagram below) . These units will be sewn to the quilt after the middle path has been attached.


Middle Path Colour Key
The following diagram shows where these units will be placed. Notice that there are 18 pink units. Each one will be attached to each of your 18 full hexagon blocks. The units coloured in blue, green, gold, red and grey will be used to fill the remaining spaces.

Sew the middle path to the blocks in the first row and then stitch them together. Add the filler pieces at the top and corner. Repeat the process for the second row and then stitch the two rows together. Continue in this way until the top is assembled.
No everyone will want to go to the effort of making a triple path so there is an alternative option that is available to those of you in that boat. Consider the following possibilities:
- applique the hexagon blocks to a piece of wide backing fabric or
- applique the hexagon blocks to background squares set on point.
The applique can be done by hand or by machine with a tiny zigzag stitch and invisible thread.
If you want to use a wide backing fabric it should measure at least 62" x 71". Fold the fabric vertically and horizontally and lightly press. Next fold the sides and line up the outer edges with the vertical fold and lightly press. Finally fold the top and bottom and line up the edges with the horizontal fold. These folds will serve as registration lines to help you line up your Value Proposition blocks. This is a fast easy and effective way to finish and you'll have nice straight outer edges so you can add borders!
The second option is to applique the blocks to background squares. You will need a 15 1/2" square for each of the 18 blocks. The square will finish at 15". You will also need side setting triangles for the partial blocks and to fill the spaces at the top and bottom. For the side setting triangles cut 2 squares that measure 22 1/2". Cut each of them on both diagonals (each square will yield 4 side setting triangles). The last pieces you will need to cut are the four corners and for those you will cut 2 squares that are 11 1/2" and cut on the diagonal (each square will yield 2 triangles). This will produce a larger quilt that that with a path but it is a quick and easy way to finish your blocks!
Once your blocks are appliqued you can add borders (if you want them) in the usual manner.
Adding border(s) to a hexagon quilt
Once you've sewn the middle path and filler pieces you've got your Value Proposition quilt top put together! You might be asking "now what?" It is time to decide how to finish your quilt top. Here are some options for your consideration:
- applique the quilt top to a border fabric or
- create a straight edge by trimming the top then add a border.
When I was designing the quilt one of the options I considered is appliqueing the top and bottom edges of the quilt to a chintz print and then straighten the sides of the quilt and leave them without borders. I've seen this type of finish in very old quilts and it is interesting so if that is the look that appeals to your aesthetic why not consider it? Alternatively you could omit the top and bottom and add side borders. A third option is to use wider borders on the top and bottom and narrower borders on the sides (or vice versa). How about using to different but complementary fabrics for the borders, one for the top and bottom and the other for the sides? Use your imagination to make your Value Proposition quilt uniquely yours! Borders will go a long way to change the look and feel of your quilt.
I am considering appliqueing my quilt top to this fabric. It is from Andover's Winterthur Museum line. I've had it in my stash just waiting for the right quilt and Value Proposition might be it!

This is the look it would create.

I wrote a tutorial that explains how to applique a hexagon top to a border. The zigzag edge of the hexagons is not trimmed; I applique the hexagons to a strip of border fabric in order to create a straight outer edge. From there you could add additional borders or just bind the quilt. You will find my tutorial here. I also provide instructions for creating a mitered corner. I think my method is pretty simple and straight forward so do read it over before you make your decision.
I wrote a tutorial that explains how to applique a hexagon top to a border. The zigzag edge of the hexagons is not trimmed; I applique the hexagons to a strip of border fabric in order to create a straight outer edge. From there you could add additional borders or just bind the quilt. You will find my tutorial here. I also provide instructions for creating a mitered corner. I think my method is pretty simple and straight forward so do read it over before you make your decision.
Good Golly Miss Mollie by Karen H 2014
If you prefer to eliminate the zigzag edge of the hexagons so that the quilt top is straight edges all the way around there is a wonderful tutorial on Jo Morton's blog. You will find it here. I would like to thank Jo for allowing me to use a picture from her blog. To do this you remove the papers from the outer edge, press the quilt, trim the excess fabric (in the picture below it is the white hexagons that were trimmed down) and then add your border fabric. Don't forget to measure your quilt top and cut the border fabric to fit the top. Never just cut a strip of border fabric and sew it to the quilt top because they will not lay flat!

Image courtesy of Jo Morton of Jo Morton Quilts
How about finishing the quilt without a border?
What if you don't want to add borders or straighten the edges? This is an interesting option that allows you to maintain the zigzag edge of the hexagon quilt top exactly as it is without trimming. There is a great tutorial by Amy of Badskirt blog and I would like to thank her for allowing me to share a picture from her blog. Amy demonstrates how you would use hexagons to finish the edges of your quilt. You will find the tutorial here.
What if you don't want to add borders or straighten the edges? This is an interesting option that allows you to maintain the zigzag edge of the hexagon quilt top exactly as it is without trimming. There is a great tutorial by Amy of Badskirt blog and I would like to thank her for allowing me to share a picture from her blog. Amy demonstrates how you would use hexagons to finish the edges of your quilt. You will find the tutorial here.

Image courtesy of Amy Gunson of Badskirt
There you have it - options for finishing your Value Proposition Quilt. I hope I've given you lots of food for thought! If you're working on Value Proposition please be sure to post pictures of your progress on the Value Proposition QAL page on Flickr. I hope that you'll post pictures of your completed quilt tops too! If you have a blog and post pictures on your blog let me know so I can visit your blog and send others over to see your masterpiece!
If after reading along you are tempted to get started on my Value Proposition Hexagon Quilt links to all of the patterns and instructions are under the tab Quilt Alongs by Karen H just under the banner at the top of this page.
Thanks so much to those of you who sewed along with me and also to those of you who read along! I appreciate each and every comment and email message that you sent to me. I replied to each one so if you didn't hear back from me it would mean that you are a no reply blogger and I have no way to contact you unless you leave your email in the comment. The safest way to do this is to replace the "@" in your address with "at" and you could replace the "." with "dot"!
I'm linking up with The Needle and Thread Network - a great place for Canadian bloggers to share their work with others!
Phew! I'm done! I hope you enjoyed this QAL! I'm thinking about another QAL for 2015 so if you are interested stay tuned! Until I post again, happy sewing!
Karen H
I love the subtle path, Karen -- really sets off the rosettes! Wish I was ready for this step, but after Christmas, I'll be back at my blocks!
ReplyDeleteAckckck...too many options. Teehee! I'll decide on borders when I get all my blocks together. I'm using a triple path with 2 shades of blue-gray that play nice with the dark turquoise fabrics I used to pull all my blocks together. I'll use more turquoise in my border somehow. Nothing in my stash at the time but I can have my arm twisted to maybe, possibly go shopping when I get to that point :-)
ReplyDeleteI am still sewing blocks! (Just chosen the fabrics for #16). I've been very very busy with making things for Christmas and studying for my uni course but I will finish the quilt eventually. It has been great fun and a completely new technique for me. Just don't start another QAL too soon!!!!
ReplyDelete(sorry, I STILL haven't worked out how to make myself a "reply blogger")
That's too bad! Hope you are able to figure out the no reply thingy! As far as the quilt goes, I'm so glad you are enjoying it. It will be a while before I can start another QAL - maybe in the Spring or very late winter!
DeleteWow so many great ideas! I was planning on the triple path but now may reconsider and appliqué to a background. Decisions, decisions!
ReplyDeleteThanks so much for the great diagrams. I have a few more paths to add to my blocks and will get that done while I am away at daughters cottage. My girls said bring crafts to do LOL. Should be fun. I can't wait to geth the whole quilt together. You are a great teacher.
ReplyDeleteHugs and have a Merry Christmas.Bunny
I love Amy's hexi edging but I also like the fabric edging that tones so beautifully with this quilt you've designed.
ReplyDeleteHave you seen the plan for the 2015 Miliefiori Quilt?
It looks super and theres lots of fussy cutting needed
http://hexagonalley.blogspot.co.uk/
Like I know you wont have anything else to be doing lol : )
Beautiful.
ReplyDeleteNo idea if you still see any comments on this - but I finally finished my Value Proposition Quilt today LOL. And yes, I did start it in 2014! In the end I cheated and appliqued my rosettes to a plain backing rather than doing the path - I was never going to finish it otherwise.
ReplyDeleteThanks so much for all the info. I've just finished a large hexagon quilt which also happens to be my first quilt so I'm delighted to have found guidance on finishing it here. tanjawilmot(at)gmail(dot)com
ReplyDelete